Java多线程

1、多线程的创建

1.1 继承于Thread类

  • 创建一个继承于Thread类的子类。
  • 重写Thread类的run()。
  • 创建Thread类的子类的对象。
  • 通过此对象调用start()。

例子:

1
2
3
4
5
6
7
8
9
10
11
12
13
14
15
16
17
18
19
20
21
22
//1. 创建一个继承于Thread类的子类
class MyThread extends Thread {
//2. 重写Thread类的run()
@Override
public void run() {
for (int i = 0; i < 100; i++) {
if(i % 2 == 0){
System.out.println(Thread.currentThread().getName() + ":" + i);
}
}
}
}

public class ThreadTest {
public static void main(String[] args) {
//3. 创建Thread类的子类的对象
MyThread t1 = new MyThread();

//4.通过此对象调用start():①启动当前线程 ② 调用当前线程的run()
t1.start();
}
}
  • 不可以还让已经start()的线程去执行。会报IllegalThreadStateException。
  • 如果自己手动调用run()方法,那么就只是普通方法,没有启动多线程模式。

1.1.1 Thread类中的常用方法

  • start():启动当前线程;调用当前线程的run()。
  • run(): 通常需要重写Thread类中的此方法,将创建的线程要执行的操作声明在此方法中。
  • currentThread():静态方法,返回执行当前代码的线程。
  • getName():获取当前线程的名字。
  • setName():设置当前线程的名字。
  • yield():释放当前cpu的执行权。
  • join():在线程a中调用线程b的join(),此时线程a就进入阻塞状态,直到线程b完全执行完以后,线程a才结束阻塞状态。
  • stop():已过时。当执行此方法时,强制结束当前线程。
  • sleep(long millitime):让当前线程“睡眠”指定的millitime毫秒。在指定的millitime毫秒时间内,当前线程是阻塞状态。
  • isAlive():判断当前线程是否存活。
  • getPriority():获取线程的优先级。
    • MAX_PRIORITY:10
    • MIN _PRIORITY:1
    • NORM_PRIORITY:5 –>默认优先级
  • setPriority(int p):设置线程的优先级。(说明:高优先级的线程要抢占低优先级线程cpu的执行权。但是只是从概率上讲,高优先级的线程高概率的情况下被执行。并不意味着只有当高优先级的线程执行完以后,低优先级的线程才执行。)

例子:

1
2
3
4
5
6
7
8
9
10
11
12
13
14
15
16
17
18
19
20
21
22
23
24
25
26
27
28
29
30
31
32
33
34
35
36
37
38
39
40
41
42
43
44
45
46
47
48
49
50
51
52
53
54
class HelloThread extends Thread{
@Override
public void run() {
for (int i = 0; i < 100; i++) {
if(i % 2 == 0){
try {
sleep(10);
} catch (InterruptedException e) {
e.printStackTrace();
}
System.out.println(Thread.currentThread().getName() + ":" + Thread.currentThread().getPriority() + ":" + i);
}
if(i % 20 == 0){
yield();
}
}

}
//通过构造器给线程命名
public HelloThread(String name){
super(name);
}
}


public class ThreadMethodTest {
public static void main(String[] args) {

HelloThread h1 = new HelloThread("Thread:1");

//h1.setName("线程一");
//设置分线程的优先级
h1.setPriority(Thread.MAX_PRIORITY);
h1.start();

//给主线程命名
Thread.currentThread().setName("主线程");
Thread.currentThread().setPriority(Thread.MIN_PRIORITY);

for (int i = 0; i < 100; i++) {
if(i % 2 == 0){
System.out.println(Thread.currentThread().getName() + ":" + Thread.currentThread().getPriority() + ":" + i);
}
if(i == 20){
try {
h1.join();
} catch (InterruptedException e) {
e.printStackTrace();
}
}
}
System.out.println(h1.isAlive());//false
}
}

1.2 实现Runnable接口

  • 创建一个实现了Runnable接口的类。
  • 实现类去实现Runnable中的抽象方法:run()。
  • 创建实现类的对象。
  • 将此对象作为参数传递到Thread类的构造器中,创建Thread类的对象。
  • 通过Thread类的对象调用start()。

例子:

1
2
3
4
5
6
7
8
9
10
11
12
13
14
15
16
17
18
19
20
21
22
23
24
25
26
27
28
29
30
31
32
//1. 创建一个实现了Runnable接口的类
class MThread implements Runnable{

//2. 实现类去实现Runnable中的抽象方法:run()
@Override
public void run() {
for (int i = 0; i < 100; i++) {
if(i % 2 == 0){
System.out.println(Thread.currentThread().getName() + ":" + i);
}

}
}
}


public class ThreadTest1 {
public static void main(String[] args) {
//3. 创建实现类的对象
MThread mThread = new MThread();
//4. 将此对象作为参数传递到Thread类的构造器中,创建Thread类的对象
Thread t1 = new Thread(mThread);
t1.setName("线程1");
//5. 通过Thread类的对象调用start():① 启动线程 ②调用当前线程的run()-->调用了Runnable类型的target的run()
t1.start();

//再启动一个线程,遍历100以内的偶数
Thread t2 = new Thread(mThread);
t2.setName("线程2");
t2.start();
}
}

1.3 实现Callable接口

  • 与使用Runnable相比, Callable功能更强大些。
    • 相比run()方法,可以有返回值。
    • 方法可以抛出异常。
    • 支持泛型的返回值。
    • 需要借助FutureTask类,比如获取返回结果。
1
2
3
4
5
6
7
8
9
10
11
12
13
14
15
16
17
18
19
20
21
22
23
24
25
26
27
28
29
30
31
32
33
34
35
36
37
38
//1.创建一个实现Callable的实现类
class NumThread implements Callable{
//2.实现call方法,将此线程需要执行的操作声明在call()中
@Override
public Object call() throws Exception {
int sum = 0;
for (int i = 1; i <= 100; i++) {
if(i % 2 == 0){
System.out.println(i);
sum += i;
}
}
return sum;
}
}


public class ThreadNew {
public static void main(String[] args) {
//3.创建Callable接口实现类的对象
NumThread numThread = new NumThread();
//4.将此Callable接口实现类的对象作为传递到FutureTask构造器中,创建FutureTask的对象
FutureTask futureTask = new FutureTask(numThread);
//5.将FutureTask的对象作为参数传递到Thread类的构造器中,创建Thread对象,并调用start()
new Thread(futureTask).start();

try {
//6.获取Callable中call方法的返回值
//get()返回值即为FutureTask构造器参数Callable实现类重写的call()的返回值。
Object sum = futureTask.get();
System.out.println("总和为:" + sum);
} catch (InterruptedException e) {
e.printStackTrace();
} catch (ExecutionException e) {
e.printStackTrace();
}
}
}

1.4 使用线程池

  • 提前创建好多个线程,放入线程池中,使用时直接获取,使用完放回池中。可以避免频繁创建销毁、实现重复利用。类似生活中的公共交通工具。
  • JDK 5.0起提供了线程池相关API:ExecutorService 和 Executors:
    • ExecutorService:真正的线程池接口。常见子类ThreadPoolExecutor。
      • void execute(Runnable command) :执行任务/命令,没有返回值,一般用来执行Runnable。
      • Future submit(Callable task):执行任务,有返回值,一般又来执行Callable。
      • void shutdown() :关闭连接池。
    • Executors:工具类、线程池的工厂类,用于创建并返回不同类型的线程池。
      • Executors.newCachedThreadPool():创建一个可根据需要创建新线程的线程池。
      • Executors.newFixedThreadPool(n); 创建一个可重用固定线程数的线程池。
      • Executors.newSingleThreadExecutor() :创建一个只有一个线程的线程池。
      • Executors.newScheduledThreadPool(n):创建一个线程池,它可安排在给定延迟后运行命令或者定期地执行。
  • 好处:
    • 提高响应速度(减少了创建新线程的时间)。
    • 降低资源消耗(重复利用线程池中线程,不需要每次都创建)。
    • 便于线程管理
      • corePoolSize:核心池的大小。
      • maximumPoolSize:最大线程数。
      • keepAliveTime:线程没有任务时最多保持多长时间后会终止。
1
2
3
4
5
6
7
8
9
10
11
12
13
14
15
16
17
18
19
20
21
22
23
24
25
26
27
28
29
30
31
32
33
34
35
36
37
38
39
40
41
42
43
44
class NumberThread implements Runnable{
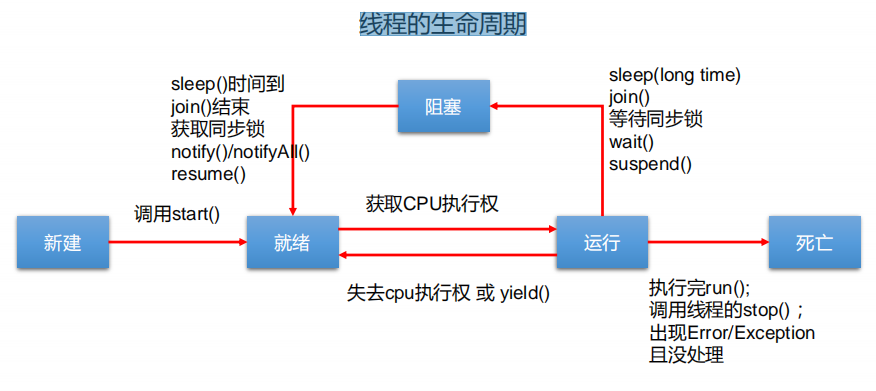
@Override
public void run() {
for(int i = 0;i <= 100;i++){
if(i % 2 == 0){
System.out.println(Thread.currentThread().getName() + ": " + i);
}
}
}
}

class NumberThread1 implements Runnable{

@Override
public void run() {
for(int i = 0;i <= 100;i++){
if(i % 2 != 0){
System.out.println(Thread.currentThread().getName() + ": " + i);
}
}
}
}

public class ThreadPool {

public static void main(String[] args) {
//1. 提供指定线程数量的线程池
ExecutorService service = Executors.newFixedThreadPool(10);
ThreadPoolExecutor service1 = (ThreadPoolExecutor) service;
//设置线程池的属性
//System.out.println(service.getClass());//class java.util.concurrent.ThreadPoolExecutor
// service1.setCorePoolSize(15);
// service1.setKeepAliveTime();

//2.执行指定的线程的操作。需要提供实现Runnable接口或Callable接口实现类的对象
service.execute(new NumberThread());//适合适用于Runnable
service.execute(new NumberThread1());//适合适用于Runnable

// service.submit(Callable callable);//适合使用于Callable
//3.关闭连接池
service.shutdown();
}
}

2、线程的生命周期

3、线程安全问题

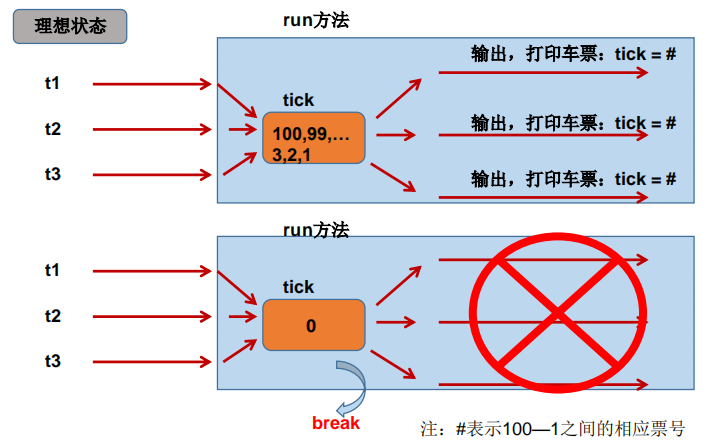
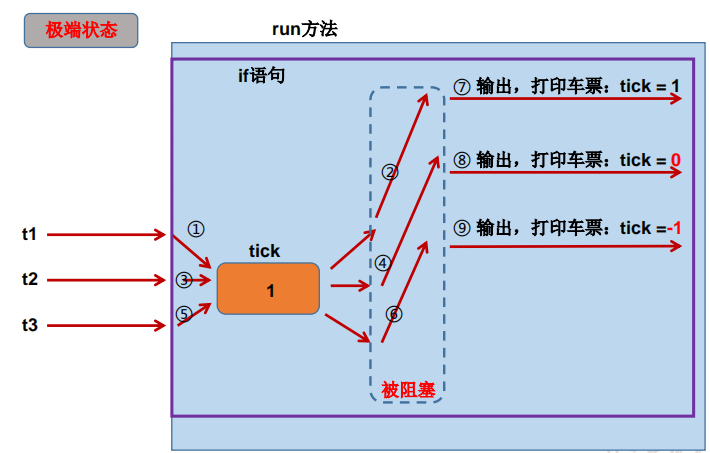
  • 例子:创建三个窗口卖票,总票数为100张。
    • 问题:卖票过程中,出现了重票、错票 –>出现了线程的安全问题。
    • 问题出现的原因:当某个线程操作车票的过程中,尚未操作完成时,其他线程参与进来,也操作车票。
    • 如何解决:当一个线程a在操作ticket的时候,其他线程不能参与进来。直到线程a操作完ticket时,其他线程才可以开始操作ticket。这种情况即使线程a出现了阻塞,也不能被改变。

3.1 同步代码块解决实现Runnable接口线程安全问题

1
2
3
synchronized(同步监视器){
//需要被同步的代码
}
  • 操作共享数据的代码,即为需要被同步的代码。
  • 共享数据:多个线程共同操作的变量。比如:ticket就是共享数据。
  • 同步监视器,俗称:锁。任何一个类的对象,都可以充当锁。要求多个线程必须要共用同一把锁。
  • 在实现Runnable接口创建多线程的方式中,我们可以考虑使用this充当同步监视器。
1
2
3
4
5
6
7
8
9
10
11
12
13
14
15
16
17
18
19
20
21
22
23
24
25
26
27
28
29
30
31
32
33
34
35
36
37
38
39
40
41
42
43
44
45
46
47
class Window1 implements Runnable{

private int ticket = 100;
// Object obj = new Object();
// Dog dog = new Dog();
@Override
public void run() {
while(true){
synchronized (this){//此时的this:唯一的Window1的对象 //方式二:synchronized (dog) {
if (ticket > 0) {
try {
Thread.sleep(100);
} catch (InterruptedException e) {
e.printStackTrace();
}
System.out.println(Thread.currentThread().getName() + ":卖票,票号为:" + ticket);
ticket--;
} else {
break;
}
}
}
}
}


public class WindowTest1 {
public static void main(String[] args) {
Window1 w = new Window1();

Thread t1 = new Thread(w);
Thread t2 = new Thread(w);
Thread t3 = new Thread(w);

t1.setName("窗口1");
t2.setName("窗口2");
t3.setName("窗口3");

t1.start();
t2.start();
t3.start();
}
}

class Dog{

}

3.2 同步代码块解决继承实现Thread类线程安全问题

  • 在继承Thread类创建多线程的方式中,慎用this充当同步监视器,考虑使用当前类充当同步监视器。
1
2
3
4
5
6
7
8
9
10
11
12
13
14
15
16
17
18
19
20
21
22
23
24
25
26
27
28
29
30
31
32
33
34
35
36
37
38
39
40
41
42
43
44
45
46
47
48
49
class Window2 extends Thread{


private static int ticket = 100;

private static Object obj = new Object();

@Override
public void run() {
while(true){
//正确的
// synchronized (obj){
synchronized (Window2.class){//Class clazz = Window2.class,Window2.class只会加载一次
//错误的方式:this代表着t1,t2,t3三个对象
// synchronized (this){
if(ticket > 0){
try {
Thread.sleep(100);
} catch (InterruptedException e) {
e.printStackTrace();
}
System.out.println(getName() + ":卖票,票号为:" + ticket);
ticket--;
}else{
break;
}
}

}

}
}

public class WindowTest2 {
public static void main(String[] args) {
Window2 t1 = new Window2();
Window2 t2 = new Window2();
Window2 t3 = new Window2();

t1.setName("窗口1");
t2.setName("窗口2");
t3.setName("窗口3");

t1.start();
t2.start();
t3.start();

}
}

3.3 同步方法解决实现Runnable接口线程安全问题

  • 同步方法仍然涉及到同步监视器,只是不需要我们显式的声明。
    • 非静态的同步方法,同步监视器是:this。
    • 静态的同步方法,同步监视器是:当前类本身。
1
2
3
4
5
6
7
8
9
10
11
12
13
14
15
16
17
18
19
20
21
22
23
24
25
26
27
28
29
30
31
32
33
34
35
36
37
38
39
40
41
42
43
44
class Window3 implements Runnable {

private int ticket = 100;

@Override
public void run() {
while (true) {
show();
}
}

private synchronized void show(){//同步监视器:this
//synchronized (this){
if (ticket > 0) {
try {
Thread.sleep(100);
} catch (InterruptedException e) {
e.printStackTrace();
}
System.out.println(Thread.currentThread().getName() + ":卖票,票号为:" + ticket);
ticket--;
}
//}
}
}


public class WindowTest3 {
public static void main(String[] args) {
Window3 w = new Window3();

Thread t1 = new Thread(w);
Thread t2 = new Thread(w);
Thread t3 = new Thread(w);

t1.setName("窗口1");
t2.setName("窗口2");
t3.setName("窗口3");

t1.start();
t2.start();
t3.start();
}
}

3.4 同步方法解决继承实现Thread类线程安全问题

1
2
3
4
5
6
7
8
9
10
11
12
13
14
15
16
17
18
19
20
21
22
23
24
25
26
27
28
29
30
31
32
33
34
35
36
37
38
39
40
class Window4 extends Thread {
private static int ticket = 100;

@Override
public void run() {
while (true) {
show();
}
}

private static synchronized void show(){//同步监视器:Window4.class
//private synchronized void show(){ //同步监视器:t1,t2,t3。此种解决方式是错误的
if (ticket > 0) {
try {
Thread.sleep(100);
} catch (InterruptedException e) {
e.printStackTrace();
}

System.out.println(Thread.currentThread().getName() + ":卖票,票号为:" + ticket);
ticket--;
}
}
}

public class WindowTest4 {
public static void main(String[] args) {
Window4 t1 = new Window4();
Window4 t2 = new Window4();
Window4 t3 = new Window4();

t1.setName("窗口1");
t2.setName("窗口2");
t3.setName("窗口3");

t1.start();
t2.start();
t3.start();
}
}

3.5 Lock锁解决线程安全问题

  • 从JDK 5.0开始,Java提供了更强大的线程同步机制——通过显式定义同步锁对象来实现同步。同步锁使用Lock对象充当。
  • java.util.concurrent.locks.Lock接口是控制多个线程对共享资源进行访问的工具。锁提供了对共享资源的独占访问,每次只能有一个线程对Lock对象加锁,线程开始访问共享资源之前应先获得Lock对象。
  • ReentrantLock 类实现了 Lock ,它拥有与 synchronized 相同的并发性和内存语义,在实现线程安全的控制中,比较常用的是ReentrantLock,可以显式加锁、释放锁。
1
2
3
4
5
6
7
8
9
10
11
12
13
14
15
16
17
18
19
20
21
22
23
24
25
26
27
28
29
30
31
32
33
34
35
36
37
38
39
40
41
42
43
44
45
46
47
48
49
50
51
52
class Window implements Runnable{

private int ticket = 100;
//1.实例化ReentrantLock
private ReentrantLock lock = new ReentrantLock();

@Override
public void run() {
while(true){
try{
//2.调用锁定方法lock()
lock.lock();

if(ticket > 0){

try {
Thread.sleep(100);
} catch (InterruptedException e) {
e.printStackTrace();
}

System.out.println(Thread.currentThread().getName() + ":售票,票号为:" + ticket);
ticket--;
}else{
break;
}
}finally {
//3.调用解锁方法:unlock()
lock.unlock();
}

}
}
}

public class LockTest {
public static void main(String[] args) {
Window w = new Window();

Thread t1 = new Thread(w);
Thread t2 = new Thread(w);
Thread t3 = new Thread(w);

t1.setName("窗口1");
t2.setName("窗口2");
t3.setName("窗口3");

t1.start();
t2.start();
t3.start();
}
}

4、死锁

  • 不同的线程分别占用对方需要的同步资源不放弃,都在等待对方放弃自己需要的同步资源,就形成了线程的死锁。
  • 出现死锁后,不会出现异常,不会出现提示,只是所有的线程都处于阻塞状态,无法继续。
1
2
3
4
5
6
7
8
9
10
11
12
13
14
15
16
17
18
19
20
21
22
23
24
25
26
27
28
29
30
31
32
33
34
35
36
37
38
39
40
41
42
43
44
45
46
47
48
49
50
51
52
53
54
55
56
public class ThreadTest {

public static void main(String[] args) {

StringBuffer s1 = new StringBuffer();
StringBuffer s2 = new StringBuffer();

new Thread(){
@Override
public void run() {
synchronized (s1){
s1.append("a");
s2.append("1");

try {
Thread.sleep(100);
} catch (InterruptedException e) {
e.printStackTrace();
}

synchronized (s2){
s1.append("b");
s2.append("2");

System.out.println(s1);
System.out.println(s2);
}
}
}
}.start();


new Thread(new Runnable() {
@Override
public void run() {
synchronized (s2){
s1.append("c");
s2.append("3");
try {
Thread.sleep(100);
} catch (InterruptedException e) {
e.printStackTrace();
}

synchronized (s1){
s1.append("d");
s2.append("4");

System.out.println(s1);
System.out.println(s2);
}
}
}
}).start();
}
}

5、线程的通信

  • 使用两个线程打印 1-100。线程1, 线程2 交替打印。
    • wait():一旦执行此方法,当前线程就进入阻塞状态,并释放同步监视器。
    • notify():一旦执行此方法,就会唤醒被wait的一个线程。如果有多个线程被wait,就唤醒优先级高的那个。
    • notifyAll():一旦执行此方法,就会唤醒所有被wait的线程。
1
2
3
4
5
6
7
8
9
10
11
12
13
14
15
16
17
18
19
20
21
22
23
24
25
26
27
28
29
30
31
32
33
34
35
36
37
38
39
40
41
42
43
44
45
46
47
48
49
50
class Number implements Runnable{
private int number = 1;
private Object obj = new Object();
@Override
public void run() {

while(true){

synchronized (obj) {
obj.notify();

if(number <= 100){
try {
Thread.sleep(10);
} catch (InterruptedException e) {
e.printStackTrace();
}
System.out.println(Thread.currentThread().getName() + ":" + number);
number++;

try {
//使得调用如下wait()方法的线程进入阻塞状态
obj.wait();
} catch (InterruptedException e) {
e.printStackTrace();
}

}else{
break;
}
}

}

}
}

public class CommunicationTest {
public static void main(String[] args) {
Number number = new Number();
Thread t1 = new Thread(number);
Thread t2 = new Thread(number);

t1.setName("线程1");
t2.setName("线程2");

t1.start();
t2.start();
}
}
  • wait(),notify(),notifyAll()三个方法必须使用在同步代码块或同步方法中。
  • wait(),notify(),notifyAll()三个方法的调用者必须是同步代码块或同步方法中的同步监视器。否则,会出现IllegalMonitorStateException异常。
  • wait(),notify(),notifyAll()三个方法是定义在java.lang.Object类中。
  • sleep() 和 wait()的异同:
    • 相同点:一旦执行方法,都可以使得当前的线程进入阻塞状态。
    • 不同点:
      • 两个方法声明的位置不同:Thread类中声明sleep() , Object类中声明wait()。
      • 调用的要求不同:sleep()可以在任何需要的场景下调用。 wait()必须使用在同步代码块或同步方法中。
      • 关于是否释放同步监视器:如果两个方法都使用在同步代码块或同步方法中,sleep()不会释放锁,wait()会释放锁。