消息中间件RabbitMQ
1、RabbitMQ角色分类
| 角色 | 特点 |
|---|---|
| none | 不能访问management plugin |
| management | ①列出自己可以通过AMQP登入的虚拟机 ②查看自己的虚拟机节点virtual hosts的queues,exchanges和bindings信息 ③查看和关闭自己的channels和connections ④查看有关自己的虚拟机节点virtual hosts的统计信息,包括其他用户在这个节点virtual hosts中的活动信息 |
| Policymaker | ①包含management所有权限 ②查看和创建和删除自己的virtual hosts所属的policies和parameters信息 |
| Monitoring | ①包含management所有权限 ②罗列出所有的virtual hosts,包括不能登录的virtual hosts。 ③查看其他用户的connections和channels信息 ④查看节点级别的数据如clustering和memory使用情况 ⑤查看所有的virtual hosts的全局统计信息 |
| Administrator | ①最高权限 ②可以创建和删除virtual hosts ③可以查看,创建和删除users ④查看创建permisssions ⑤关闭所有用户的connections |
2、RabbitMQ组成部分
RabbitMQ核心组成如图:
![]()
- Server:又称Broker,接受客户端的连接,实现AMQP实体服务。
- Connection:连接,应用程序与Broker的网络连接TCP/IP/三次握手和四次挥手。
- Channel:网络信道,几乎所有的操作都在Channel中进行,Channel是进行消息读写的通道,客户端可以建立各个Channel,每个Channel代表一个会话任务。
- Message:消息,服务与应用程序之间传送的数据,由Properties和body组成,Properties可是对消息进行修饰,比如消息的优先级,延迟等高级特性,Body则就是消息体的内容。
- Virtual Host:虚拟地址,用于进行逻辑隔离,最上层的消息路由,一个虚拟主机理由可以有若干个Exhange和Queueu,同一个虚拟主机里面不能有相同名字的Exchange。
- Exchange:交换机,接受消息,根据路由键发送消息到绑定的队列,其不具备消息存储的能力。
- Bindings:Exchange和Queue之间的虚拟连接,binding中可以保护多个routing key。
- Routing key:是一个路由规则,虚拟机可以用它来确定如何路由一个特定消息。
- Queue:队列,也成为Message Queue,消息队列,保存消息并将它们转发给消费者。
运行流程图:
![]()
RabbitMQ为什么需要信道而不是TCP直接通信?
- TCP的创建加销毁,开销大,创醒要三次握手,销毁要4次挥手。
- 如果不用信道,那应用程序就会TCP连接到Rabbit服务器,高峰时每秒成千上万连接就会造成资源的巨大浪费,而且底层操作系统每秒处理tcp连接数也是有限制的,必定造成性能瓶颈。
- 信道的原理是一条线程一条信道,多条线程多条信道同用一条TCP连接,一条TCP连接可以容纳无限的信道,即使每秒成千上万的请求也不会成为性能瓶颁。


3、RabbitMQ消息模式
3.1 简单模式(simple)
使用的是默认交换机。
生产者负责生产消息,将消息发送到队列中,消费者监听队列,队列有消息就进行消费。
![1621079856219]()
图形界面演示:
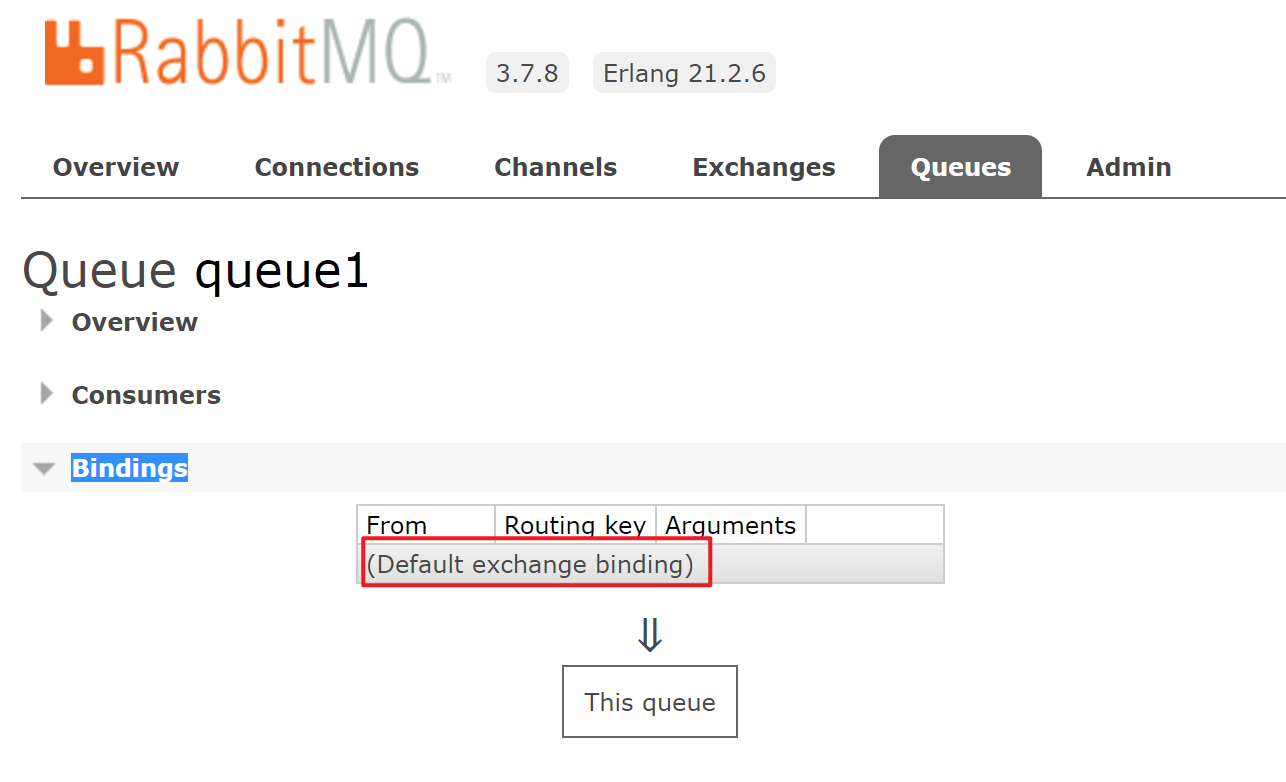
①创建一个队列,虽然没有指定交换机,但是默认会绑定一个默认交换机。
![]()
![]()
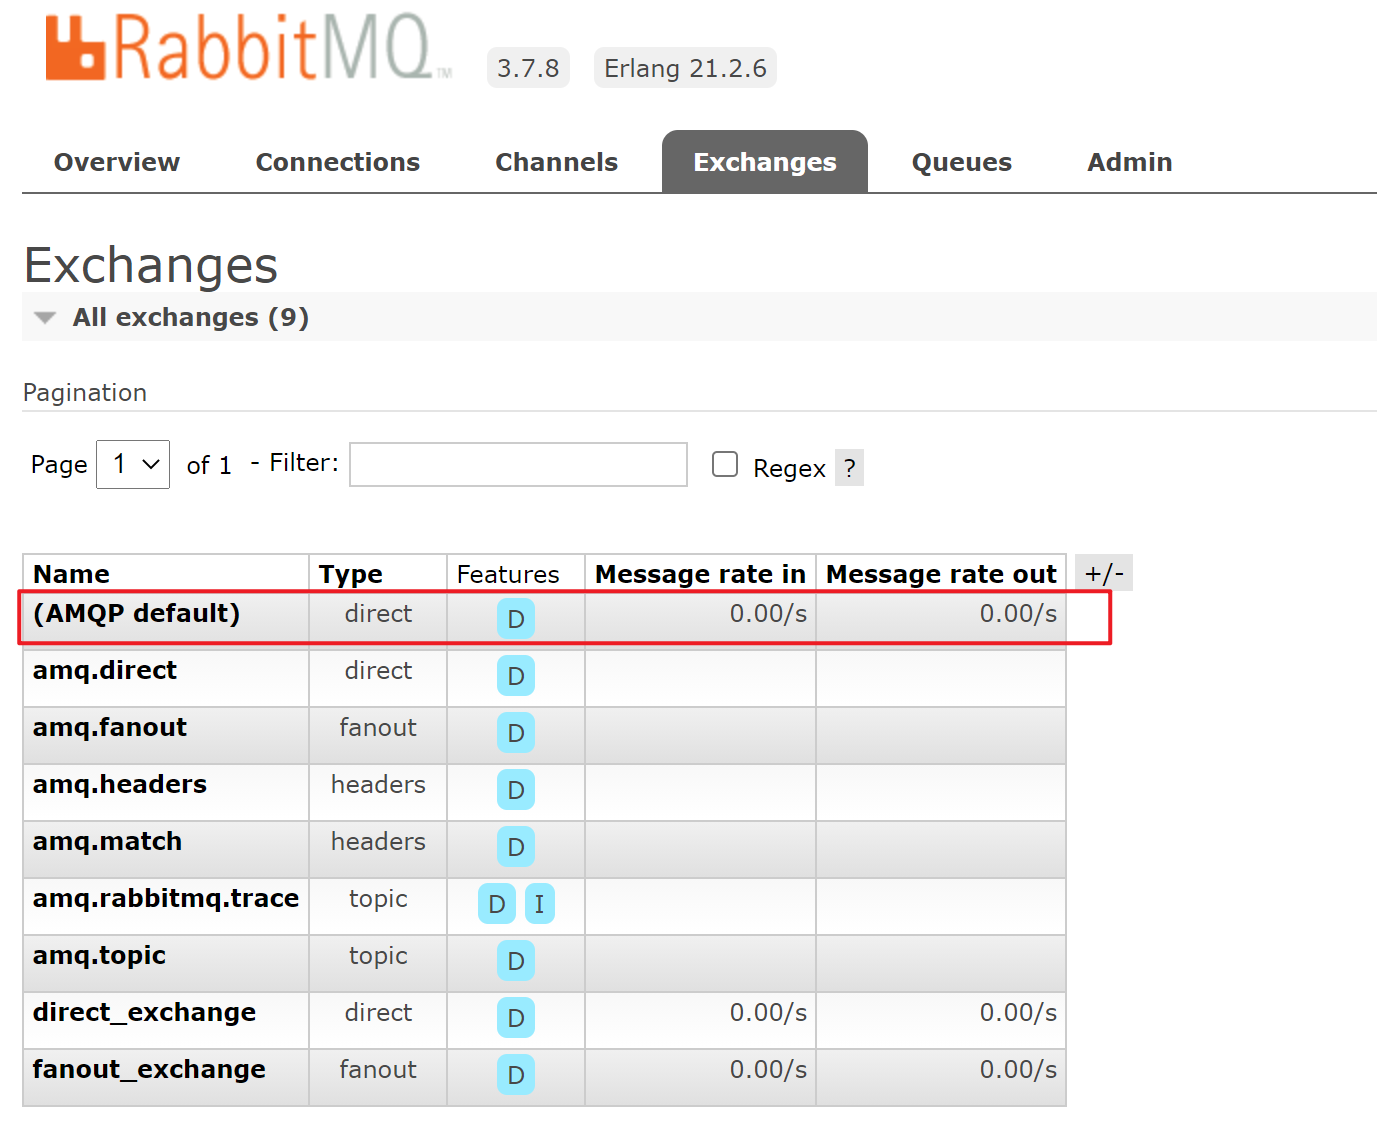
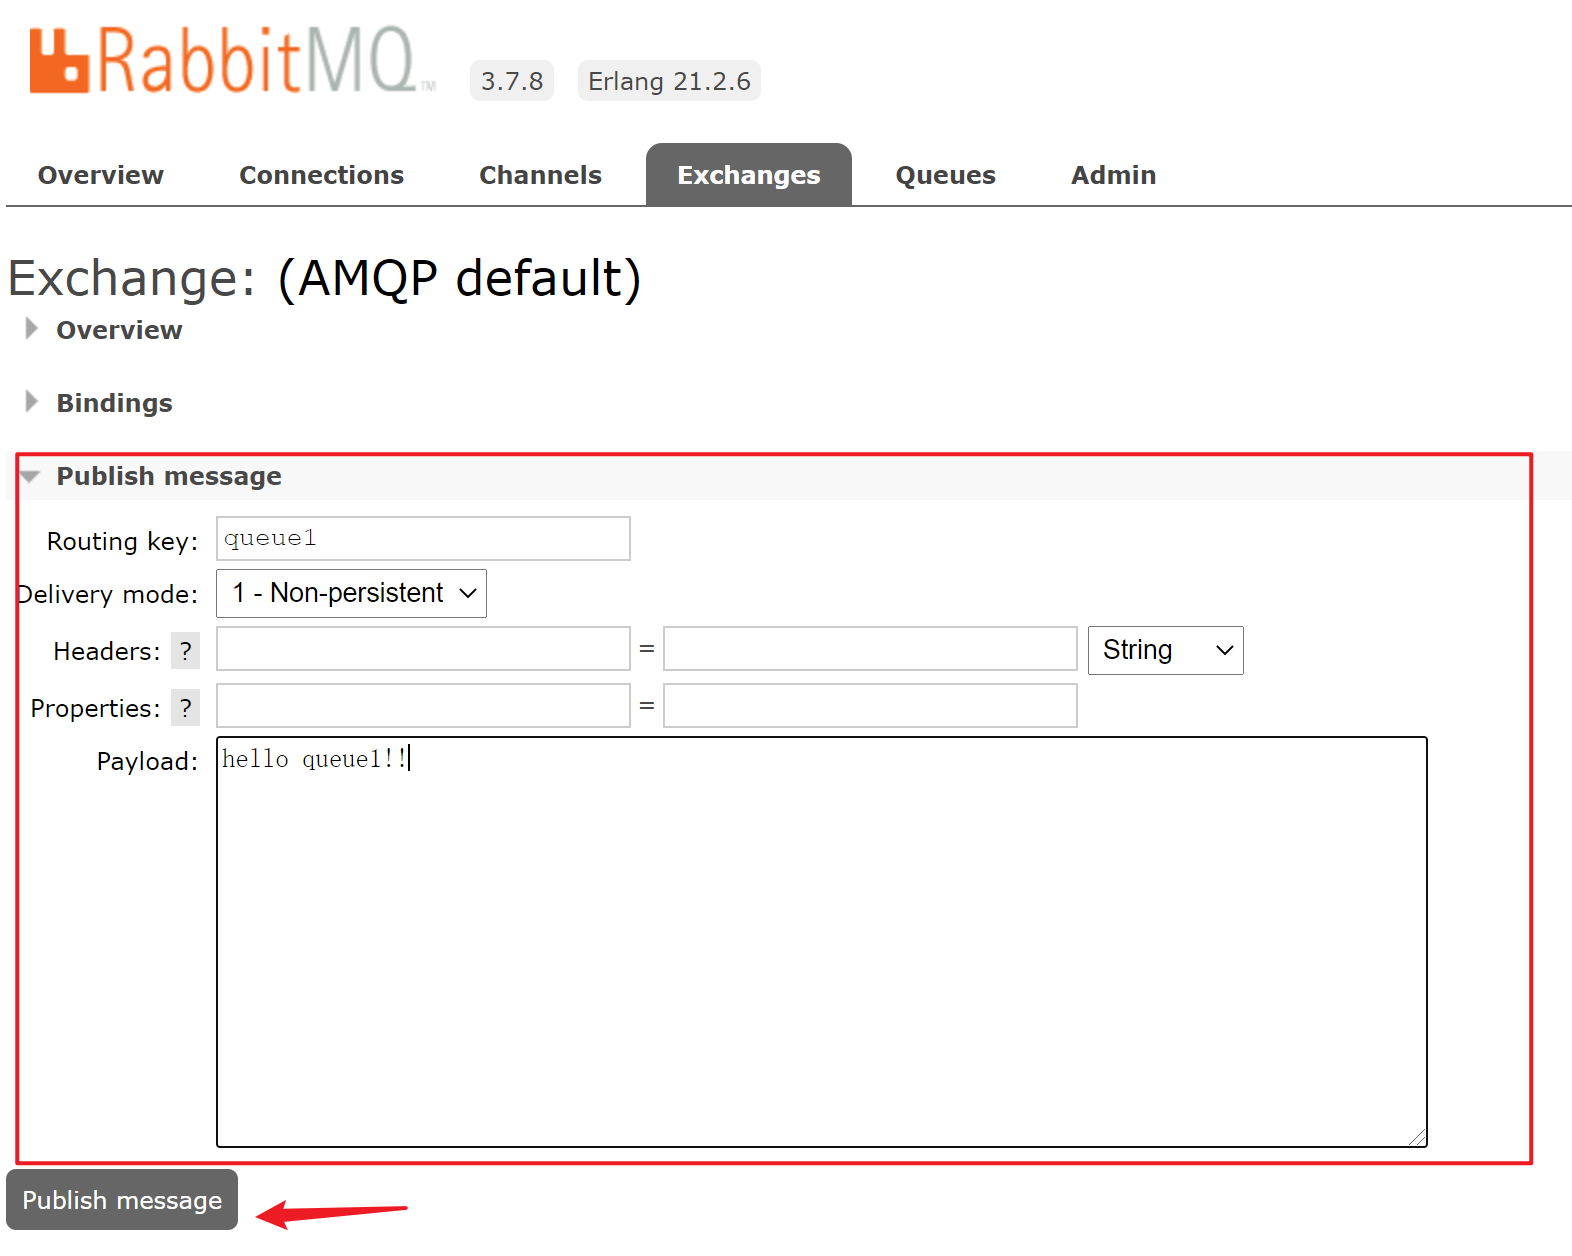
②往默认交换机(direct类型)里发送消息。
![]()
![]()
③queue1通过默认交换机获取到消息。
![]()
Java代码演示如下:
生产者:
1
2
3
4
5
6
7
8
9
10
11
12
13
14
15
16
17
18
19
20
21
22
23
24
25
26
27
28
29
30
31
32
33
34
35
36
37
38
39
40
41
42
43
44
45
46
47
48
49
50
51
52
public class Producer {
public static void main(String[] args) throws IOException, TimeoutException {
String queueName = "queue1";
Connection connection = null;
Channel channel = null;
try {
//1:新建连接工程
ConnectionFactory factory = new ConnectionFactory();
factory.setHost("localhost");
factory.setPort(5672);
factory.setUsername("admin");
factory.setPassword("admin");
factory.setVirtualHost("/");
//2:创建连接
connection = factory.newConnection();
//3:通过连接创建通道Channel,一个连接可以创建多个Channel
channel = connection.createChannel();
/**
* 4:声明队列,如果Rabbit中没有此队列将自动创建
* param1:队列名称
* param2:队列是否持久化
* param3:队列是否独占此连接
* param4:队列不再使用时是否自动删除此队列
* param5:队列参数
*/
channel.queueDeclare(queueName, true, false, false, null);
//5:准备消息内容
String message = "hello rabbitmq" + System.currentTimeMillis();
/**
* 6:发送消息给队列queue1
* param1:Exchange的名称,如果没有指定,则使用Default Exchange
* param2:routingKey,消息的路由Key,是用于Exchange(交换机)将消息转发到指定的消息队列
* param3:消息包含的属性
* param4:消息体
*/
//这里没有指定交换机,消息将发送给默认交换机,每个队列也会绑定一个默认交换机,但是不能显示绑定或解除绑定
channel.basicPublish("", queueName, null, message.getBytes());
System.out.println("消息发送成功");
} catch (Exception ex) {
ex.printStackTrace();
} finally {
//7:关闭通道
if (channel != null) {
channel.close();
}
//8:关闭连接
if (connection != null) {
connection.close();
}
}
}
}消费者:
1
2
3
4
5
6
7
8
9
10
11
12
13
14
15
16
17
18
19
20
21
22
23
24
25
26
27
28
29
30
31
32
33
34
35
36
37
38
39
40
41
42
43
44
45
46
47
48
49
50
51
52
53
54
55
56
57
58
59
60
61
62
63
64
public class Customer {
public static void main(String[] args) throws IOException, TimeoutException {
String queueName = "queue1";
Connection connection = null;
Channel channel = null;
try {
//1:新建连接工程
ConnectionFactory factory = new ConnectionFactory();
factory.setHost("localhost");
factory.setPort(5672);
factory.setUsername("admin");
factory.setPassword("admin");
factory.setVirtualHost("/");
//2:创建连接
connection = factory.newConnection();
//3:通过连接创建通道Channel,一个连接可以创建多个Channel
channel = connection.createChannel();
//4:声明队列
channel.queueDeclare(queueName, true, false, false, null);
//5:定义消费方法
DefaultConsumer consumer = new DefaultConsumer(channel) {
/**
* 消费者接收消息调用此方法
* @param consumerTag 消费者的标签,在channel.basicConsume()去指定
* @param envelope 消息包的内容,可从中获取消息id,消息routingKey,交换机,消息和重传标志(收到消息失败后是否需要重新发送)
* @param properties
* @param body
* @throws IOException
*/
public void handleDelivery(String consumerTag, Envelope envelope, AMQP.BasicProperties properties, byte[] body)
throws IOException {
//交换机
String exchange = envelope.getExchange();
//路由key
String routingKey = envelope.getRoutingKey();
//消息id
long deliveryTag = envelope.getDeliveryTag();
//消息内容
String msg = new String(body, StandardCharsets.UTF_8);
System.out.println("收到消息为:" + msg);
}
};
/**
* 6:监听队列
* @param1: 队列名称
* @param2: 是否自动回复,设置为true为表示消息接收到自动向mq回复接收到了,mq接收到回复会删除消息,设置为false则需要手动回复
* @param3: 消费消息的方法,消费者接收到消息后调用此方法
*/
channel.basicConsume(queueName, true, consumer);
} catch (Exception ex) {
ex.printStackTrace();
} finally {
//7:关闭通道
if (channel != null) {
channel.close();
}
//8:关闭连接
if (connection != null) {
connection.close();
}
}
}
}


3.2 工作队列模式(Work Queues)
一个生产者,多个消费者,每个消费者获取到的消息唯一,多个消费者只有一个队列, 且一条消息只会被一个消费者接收。
对于任务过重或任务较多情况使用工作队列可以提高任务处理的速度。
![]()
当有多个消费者时,主要有两种模式:
**轮询模式(Round-Robin)**的分发:一个消费者一条,按均分配。
该模式接收消息是当有多个消费者接入时,消息的分配模式是一个消费者分配一条,直至消息消费完成。
生产者:
1
2
3
4
5
6
7
8
9
10
11
12
13
14
15
16
17
18
19
20
21
22
23
24
25
26
27
28
29
30
31
32
33
34
35
36
37
38
39
40
41
42
43
44
45
46
47
48
49
50
51
52
53
public class Producer {
public static void main(String[] args) throws IOException, TimeoutException {
String queueName = "queue1";
Connection connection = null;
Channel channel = null;
try {
//1:新建连接工程
ConnectionFactory factory = new ConnectionFactory();
factory.setHost("localhost");
factory.setPort(5672);
factory.setUsername("admin");
factory.setPassword("admin");
factory.setVirtualHost("/");
//2:创建连接
connection = factory.newConnection();
//3:通过连接创建通道Channel,一个连接可以创建多个Channel
channel = connection.createChannel();
/**
* 4:声明队列,如果Rabbit中没有此队列将自动创建
* param1:队列名称
* param2:队列是否持久化
* param3:队列是否独占此连接
* param4:队列不再使用时是否自动删除此队列
* param5:队列参数
*/
channel.queueDeclare(queueName, true, false, false, null);
/**
* 5:发送消息给队列queue1
* param1:Exchange的名称,如果没有指定,则使用Default Exchange
* param2:routingKey,消息的路由Key,是用于Exchange(交换机)将消息转发到指定的消息队列
* param3:消息包含的属性
* param4:消息体
*/
for (int i = 1; i <= 20; i++) {
String message = "hello rabbitmq:" + i;
//这里没有指定交换机,消息将发送给默认交换机,每个队列也会绑定一个默认交换机,但是不能显示绑定或解除绑定
channel.basicPublish("", queueName, null, message.getBytes());
Thread.sleep(1000);
}
} catch (Exception ex) {
ex.printStackTrace();
} finally {
//6:关闭通道
if (channel != null) {
channel.close();
}
//7:关闭连接
if (connection != null) {
connection.close();
}
}
}
}消费者1,2:
1
2
3
4
5
6
7
8
9
10
11
12
13
14
15
16
17
18
19
20
21
22
23
24
25
26
27
28
29
30
31
32
33
34
35
36
37
38
39
40
41
42
43
44
45
46
47
48
49
50
51
52
53
54
55
56
57
58
59
60
public class Worker1 {
public static void main(String[] args) throws IOException, TimeoutException {
String queueName = "queue1";
Connection connection = null;
Channel channel = null;
try {
//1:新建连接工程
ConnectionFactory factory = new ConnectionFactory();
factory.setHost("localhost");
factory.setPort(5672);
factory.setUsername("admin");
factory.setPassword("admin");
factory.setVirtualHost("/");
//2:创建连接
connection = factory.newConnection();
//3:通过连接创建通道Channel,一个连接可以创建多个Channel
channel = connection.createChannel();
//4:声明队列
channel.queueDeclare(queueName, true, false, false, null);
//5:定义消费方法
DefaultConsumer consumer = new DefaultConsumer(channel) {
/**
* 消费者接收消息调用此方法
* @param consumerTag 消费者的标签,在channel.basicConsume()去指定
* @param envelope 消息包的内容,可从中获取消息id,消息routingKey,交换机,消息和重传标志(收到消息失败后是否需要重新发送)
* @param properties
* @param body
* @throws IOException
*/
public void handleDelivery(String consumerTag, Envelope envelope, AMQP.BasicProperties properties, byte[] body)
throws IOException {
//消息内容
String msg = new String(body, StandardCharsets.UTF_8);
System.out.println("收到消息为:" + msg);
}
};
/**
* 6:监听队列
* @param1: 队列名称
* @param2: 是否自动回复,设置为true为表示消息接收到自动向mq回复接收到了,mq接收到回复会删除消息,设置为false则需要手动回复
* @param3: 消费消息的方法,消费者接收到消息后调用此方法
*/
channel.basicConsume(queueName, true, consumer);
System.out.println("work1开始接收消息");//消费者2改成System.out.println("work2开始接收消息"),其余代码不变
System.in.read();
} catch (Exception ex) {
ex.printStackTrace();
} finally {
//7:关闭通道
if (channel != null) {
channel.close();
}
//8:关闭连接
if (connection != null) {
connection.close();
}
}
}
}执行结果是消费者1和消费者2平均消费生产者生产的20条消息,如图:


公平分发:根据消费者的消费能力进行公平分发,处理快的处理的多,处理慢的处理的少,即按劳分配。
生产者:
1
2
3
4
5
6
7
8
9
10
11
12
13
14
15
16
17
18
19
20
21
22
23
24
25
26
27
28
29
30
31
32
33
34
35
36
37
38
39
40
41
42
43
44
45
46
47
48
49
50
51
52
53
public class Producer {
public static void main(String[] args) throws IOException, TimeoutException {
String queueName = "queue1";
Connection connection = null;
Channel channel = null;
try {
//1:新建连接工程
ConnectionFactory factory = new ConnectionFactory();
factory.setHost("localhost");
factory.setPort(5672);
factory.setUsername("admin");
factory.setPassword("admin");
factory.setVirtualHost("/");
//2:创建连接
connection = factory.newConnection();
//3:通过连接创建通道Channel,一个连接可以创建多个Channel
channel = connection.createChannel();
/**
* 4:声明队列,如果Rabbit中没有此队列将自动创建
* param1:队列名称
* param2:队列是否持久化
* param3:队列是否独占此连接
* param4:队列不再使用时是否自动删除此队列
* param5:队列参数
*/
channel.queueDeclare(queueName, true, false, false, null);
/**
* 5:发送消息给队列queue1
* param1:Exchange的名称,如果没有指定,则使用Default Exchange
* param2:routingKey,消息的路由Key,是用于Exchange(交换机)将消息转发到指定的消息队列
* param3:消息包含的属性
* param4:消息体
*/
for (int i = 1; i <= 20; i++) {
String message = "hello rabbitmq:" + i;
//这里没有指定交换机,消息将发送给默认交换机,每个队列也会绑定一个默认交换机,但是不能显示绑定或解除绑定
channel.basicPublish("", queueName, null, message.getBytes());
// Thread.sleep(1000);
}
} catch (Exception ex) {
ex.printStackTrace();
} finally {
//6:关闭通道
if (channel != null) {
channel.close();
}
//7:关闭连接
if (connection != null) {
connection.close();
}
}
}
}消费者(设置成手动应答):
1
2
3
4
5
6
7
8
9
10
11
12
13
14
15
16
17
18
19
20
21
22
23
24
25
26
27
28
29
30
31
32
33
34
35
36
37
38
39
40
41
42
43
44
45
46
47
48
49
50
51
52
53
54
55
56
57
58
59
60
61
62
63
64
65
66
67
68
69
public class Worker1 {
public static void main(String[] args) throws IOException, TimeoutException {
String queueName = "queue1";
Connection connection = null;
Channel channel = null;
try {
//1:新建连接工程
ConnectionFactory factory = new ConnectionFactory();
factory.setHost("localhost");
factory.setPort(5672);
factory.setUsername("admin");
factory.setPassword("admin");
factory.setVirtualHost("/");
//2:创建连接
connection = factory.newConnection();
//3:通过连接创建通道Channel,一个连接可以创建多个Channel
channel = connection.createChannel();
//4:声明队列
channel.queueDeclare(queueName, true, false, false, null);
//5:定义消费方法
Channel finalChannel = channel;
//指消费者每次从队列拿出多少消息出来消费
finalChannel.basicQos(1);
DefaultConsumer consumer = new DefaultConsumer(finalChannel) {
/**
* 消费者接收消息调用此方法
* @param consumerTag 消费者的标签,在channel.basicConsume()去指定
* @param envelope 消息包的内容,可从中获取消息id,消息routingKey,交换机,消息和重传标志(收到消息失败后是否需要重新发送)
* @param properties
* @param body
* @throws IOException
*/
public void handleDelivery(String consumerTag, Envelope envelope, AMQP.BasicProperties properties, byte[] body)
throws IOException {
//消息内容
String msg = new String(body, StandardCharsets.UTF_8);
System.out.println("收到消息为:" + msg);
try {
Thread.sleep(100);
} catch (InterruptedException e) {
e.printStackTrace();
}
finalChannel.basicAck(envelope.getDeliveryTag(), false);
}
};
/**
* 6:监听队列
* @param1: 队列名称
* @param2: 是否自动回复,设置为true为表示消息接收到自动向mq回复接收到了,mq接收到回复会删除消息,设置为false则需要手动回复
* @param3: 消费消息的方法,消费者接收到消息后调用此方法
*/
channel.basicConsume(queueName, false, consumer);
System.out.println("work1开始接收消息");//消费者2改成System.out.println("work2开始接收消息"),其余代码不变
System.in.read();
} catch (Exception ex) {
ex.printStackTrace();
} finally {
//7:关闭通道
if (channel != null) {
channel.close();
}
//8:关闭连接
if (connection != null) {
connection.close();
}
}
}
}执行结果是由于消费者1处理消息的速度较快,因而比消费者2消费更多消息:


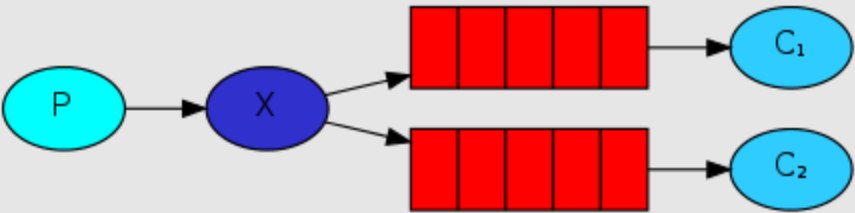
3.3 发布/订阅模式(Publish/Subscribe)
使用fanout类型的交换机。
生产者将消息发给broker,由交换机将消息转发到绑定此交换机的每个队列,每个绑定交换机的队列都将接收到消息。
每个消费者监听自己的队列并消费消息。
交换机不能存储消息,消息存储在队列中。
是一种广播机制,它是没有路由key的模式。
![]()
图形界面演示:
①创建fanout类型的交换机。
![]()
②创建三个队列。
![]()
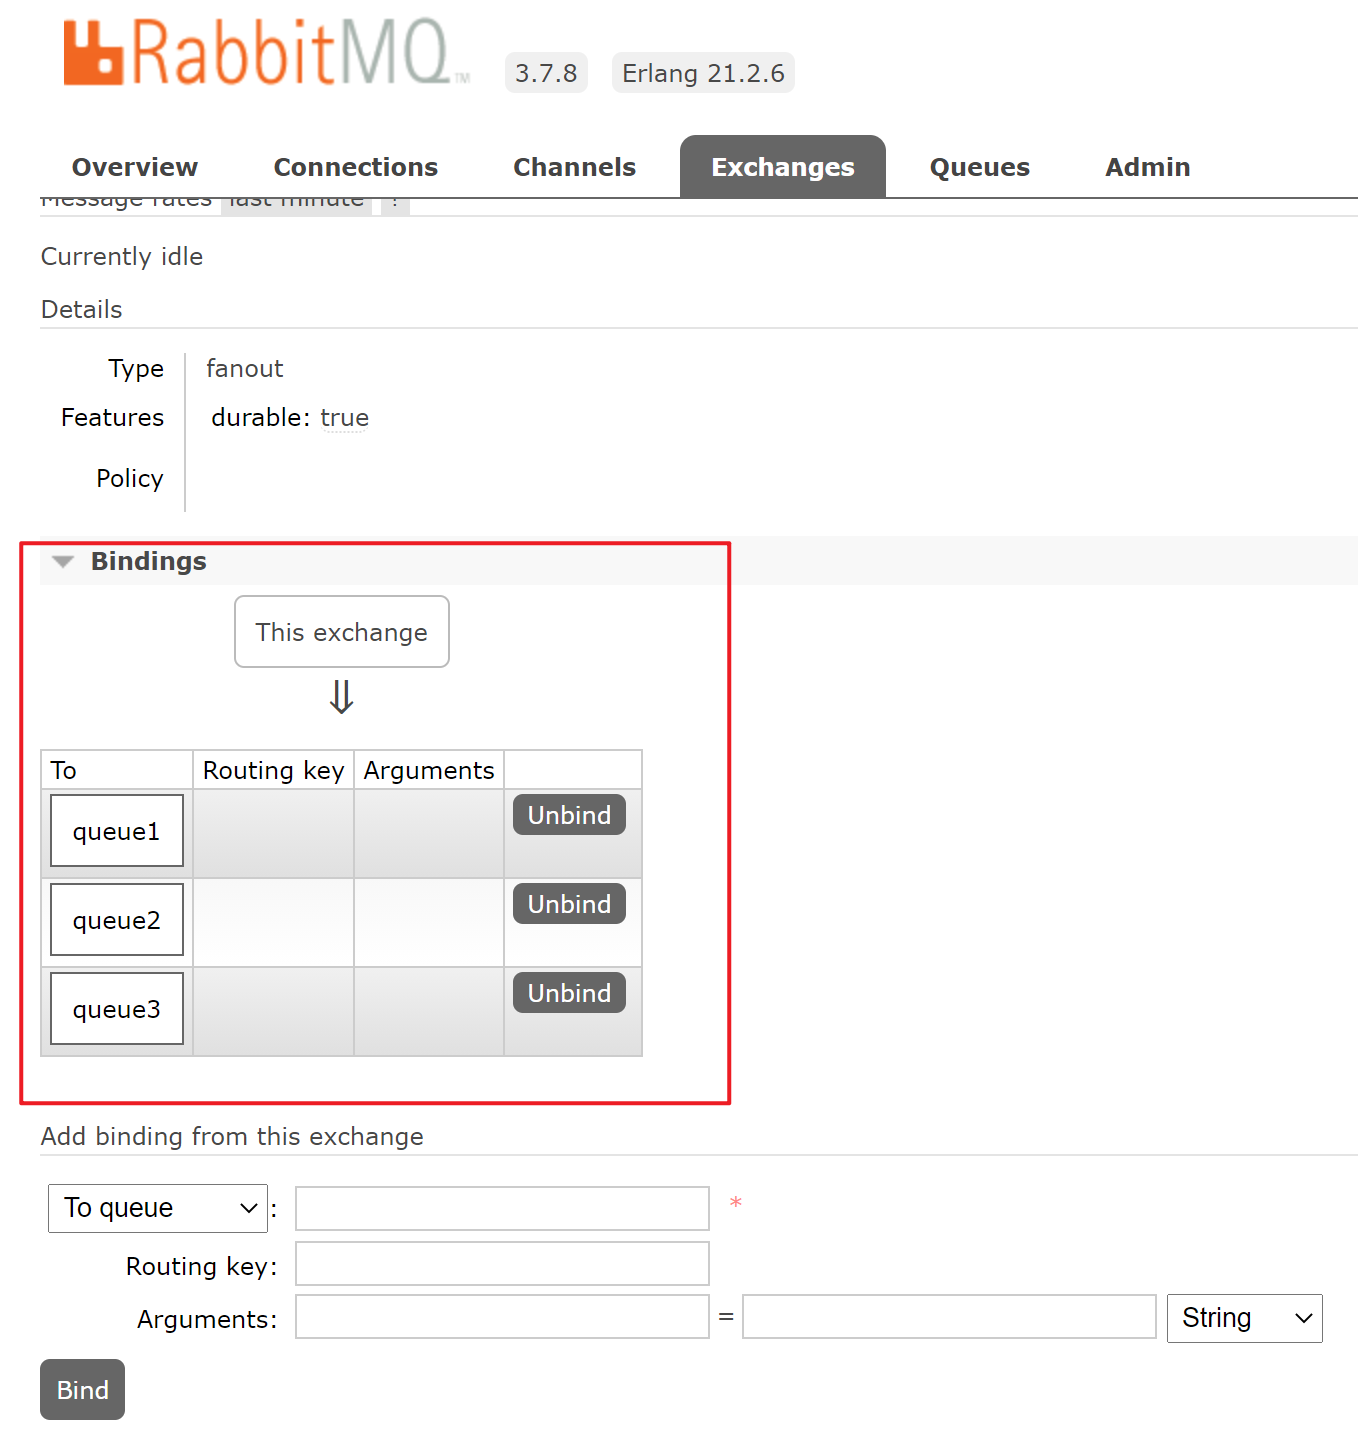
③三个队列分别绑定交换机(无需指定routingKey)。
![]()
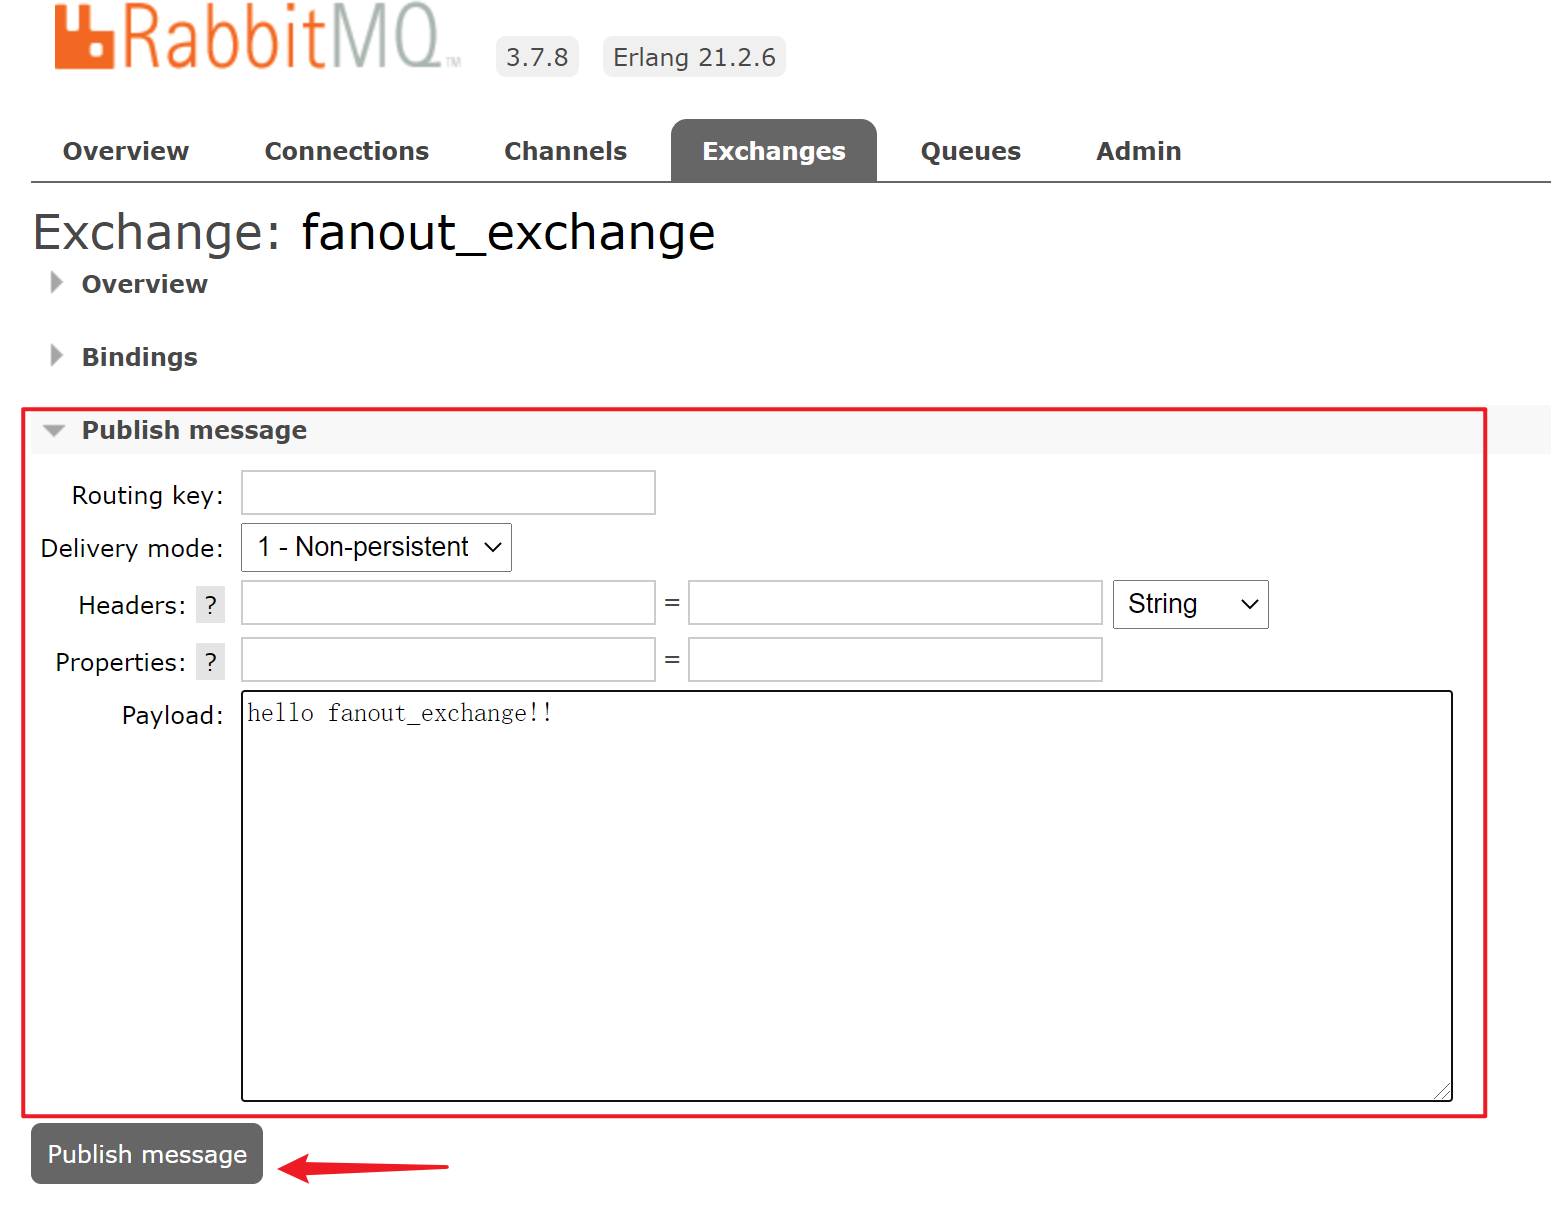
④往交换机里发布消息。
![]()
⑤三个队列都收到消息。
![]()
Java代码演示如下:
生产者(声明两个队列并且绑定到此交换机,绑定时不需要指定routingKey,且最后将消息发送给fanout交换机时不需要绑定routingKey):
1
2
3
4
5
6
7
8
9
10
11
12
13
14
15
16
17
18
19
20
21
22
23
24
25
26
27
28
29
30
31
32
33
34
35
36
37
38
39
40
41
42
43
44
45
46
47
48
49
50
51
52
53
54
55
56
57
58
59
60
61
62
63
64
65
66
67
public class Producer {
public static void main(String[] args) throws IOException, TimeoutException {
String queueEmail = "queue_email";
String queueSMS = "queue_SMS";
String exchangeName = "fanout_exchange";
Connection connection = null;
Channel channel = null;
try {
//1:新建连接工程
ConnectionFactory factory = new ConnectionFactory();
factory.setHost("localhost");
factory.setPort(5672);
factory.setUsername("admin");
factory.setPassword("admin");
factory.setVirtualHost("/");
//2:创建连接
connection = factory.newConnection();
//3:通过连接创建通道Channel,一个连接可以创建多个Channel
channel = connection.createChannel();
/**
* 4:声明交换机,如果Rabbit中没有此交换机将自动创建
* param1:交换机名称
* param2:交换机类型,fanout、topic、direct、headers
* param3:交换机是否持久化
*/
channel.exchangeDeclare(exchangeName, BuiltinExchangeType.FANOUT,true);
/**
* 5:声明队列,如果Rabbit中没有此队列将自动创建
* param1:队列名称
* param2:队列是否持久化
* param3:队列是否独占此连接
* param4:队列不再使用时是否自动删除此队列
* param5:队列参数
*/
channel.queueDeclare(queueEmail, true, false, false, null);
channel.queueDeclare(queueSMS, true, false, false, null);
/**
* 6:交换机和队列绑定
* param1:队列名称
* param2:交换机名称
* param3:路由key
*/
channel.queueBind(queueEmail, exchangeName, "");
channel.queueBind(queueSMS, exchangeName, "");
//7:向交换机发送消息
String message = "send inform to exchange";
/**
* param1:交换机名称,不指令使用默认交换机名称 Default Exchange
* param2:routingKey(路由key),根据key名称将消息转发到具体的队列,这里填写队列名称表示消息将发到此队列
* param3:消息属性
* param4:消息内容
*/
channel.basicPublish(exchangeName, "", null, message.getBytes());
} catch (Exception ex) {
ex.printStackTrace();
} finally {
//8:关闭通道
if (channel != null) {
channel.close();
}
//9:关闭连接
if (connection != null) {
connection.close();
}
}
}
}消费者:
1
2
3
4
5
6
7
8
9
10
11
12
13
14
15
16
17
18
19
20
21
22
23
24
25
26
27
28
29
30
31
32
33
34
35
36
37
38
39
40
41
42
43
44
45
46
47
48
49
50
51
52
53
54
55
56
57
58
59
60
61
62
63
64
65
66
public class Customer {
public static void main(String[] args) throws IOException, TimeoutException {
String queueEmail = "queue_email";
String queueSMS = "queue_SMS";
String exchangeName = "fanout_exchange";
Connection connection = null;
Channel channel = null;
try {
//1:新建连接工程
ConnectionFactory factory = new ConnectionFactory();
factory.setHost("localhost");
factory.setPort(5672);
factory.setUsername("admin");
factory.setPassword("admin");
factory.setVirtualHost("/");
//2:创建连接
connection = factory.newConnection();
//3:通过连接创建通道Channel,一个连接可以创建多个Channel
channel = connection.createChannel();
/**
* 4:声明交换机,如果Rabbit中没有此交换机将自动创建
* param1:交换机名称
* param2:交换机类型,fanout、topic、direct、headers
* param3:交换机是否持久化
*/
channel.exchangeDeclare(exchangeName, BuiltinExchangeType.FANOUT,true);
//5:定义消费方法
DefaultConsumer consumer = new DefaultConsumer(channel) {
/**
* 消费者接收消息调用此方法
* @param consumerTag 消费者的标签,在channel.basicConsume()去指定
* @param envelope 消息包的内容,可从中获取消息id,消息routingKey,交换机,消息和重传标志(收到消息失败后是否需要重新发送)
* @param properties
* @param body
* @throws IOException
*/
public void handleDelivery(String consumerTag, Envelope envelope, AMQP.BasicProperties properties, byte[] body)
throws IOException {
//消息内容
String msg = new String(body, StandardCharsets.UTF_8);
System.out.println("收到消息为:" + msg);
}
};
/**
* 6:监听队列
* @param1: 队列名称
* @param2: 是否自动回复,设置为true为表示消息接收到自动向mq回复接收到了,mq接收到回复会删除消息,设置为false则需要手动回复
* @param3: 消费消息的方法,消费者接收到消息后调用此方法
*/
channel.basicConsume(queueEmail, true, consumer);
channel.basicConsume(queueSMS, true, consumer);
} catch (Exception ex) {
ex.printStackTrace();
} finally {
//7:关闭通道
if (channel != null) {
channel.close();
}
//8:关闭连接
if (connection != null) {
connection.close();
}
}
}
}


3.4 路由模式(Routing)
使用direct类型的交换机。
每个消费者监听自己的队列,并且设置routingKey。
生产者将消息发给交换机,由交换机根据routingKey来转发消息到指定的队列。
![]()
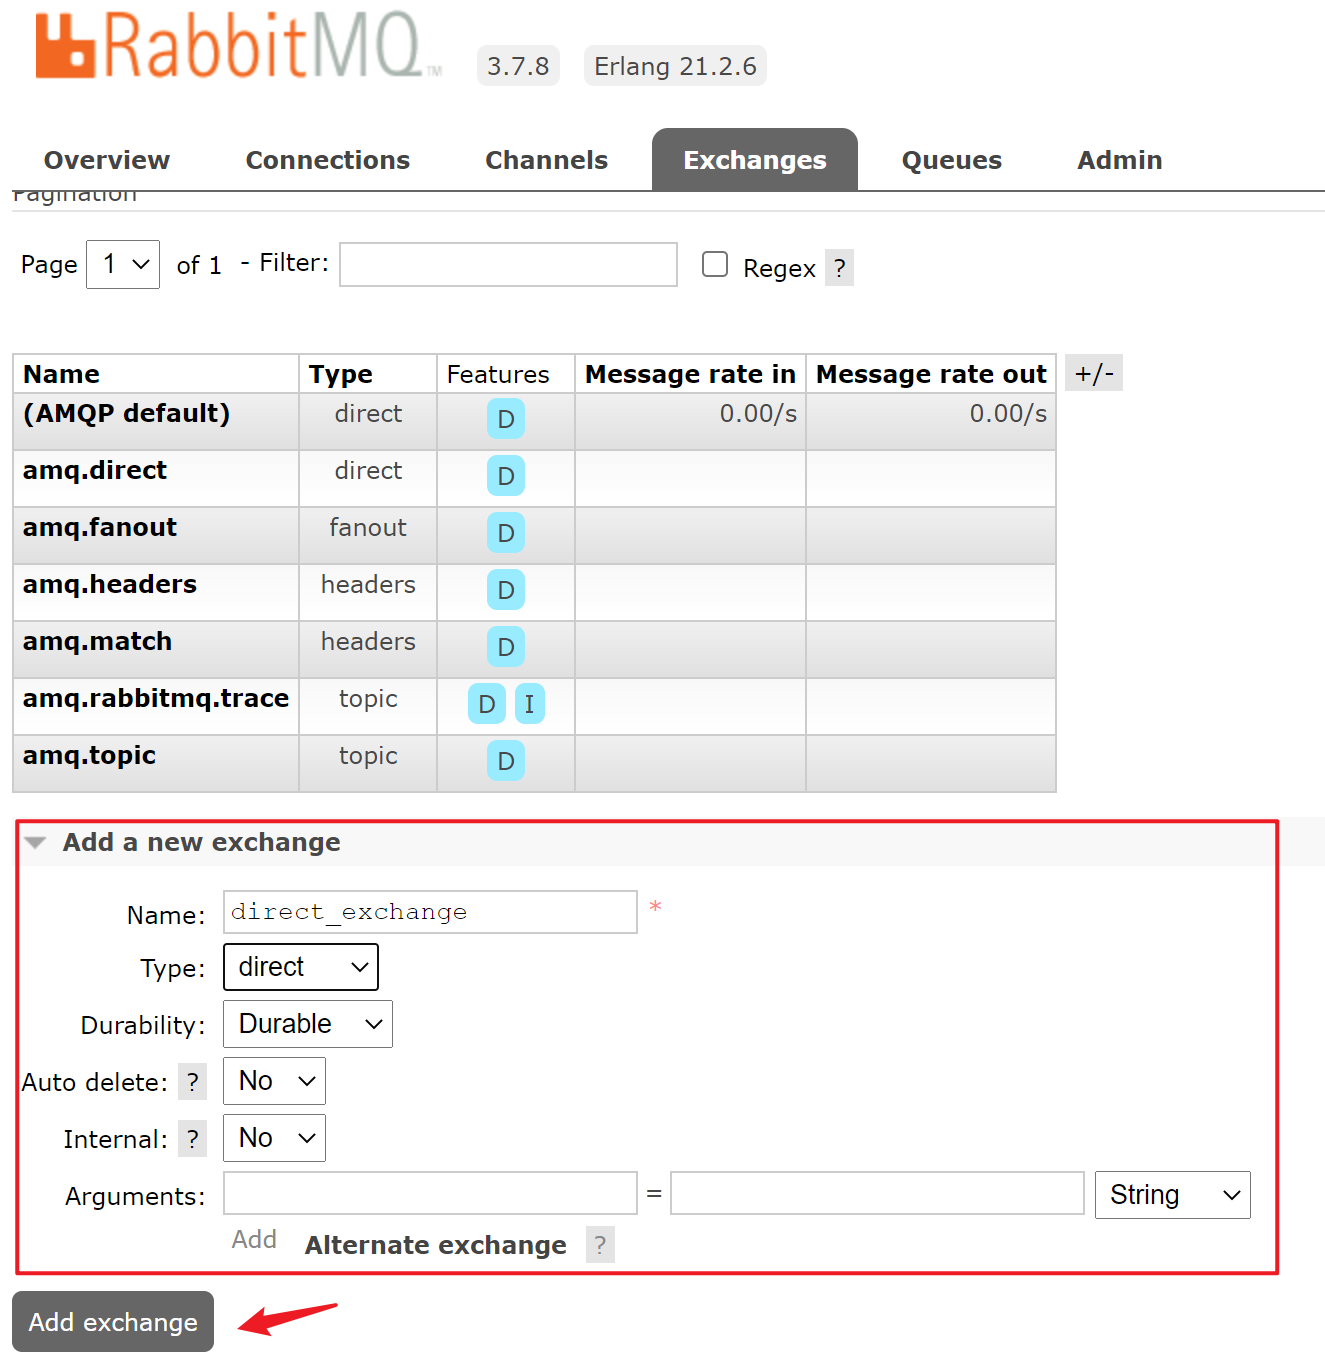
图形界面演示:
①创建direct类型的交换机。
![]()
②创建队列。
![]()
③交换机通过routingKey绑定队列。
![]()
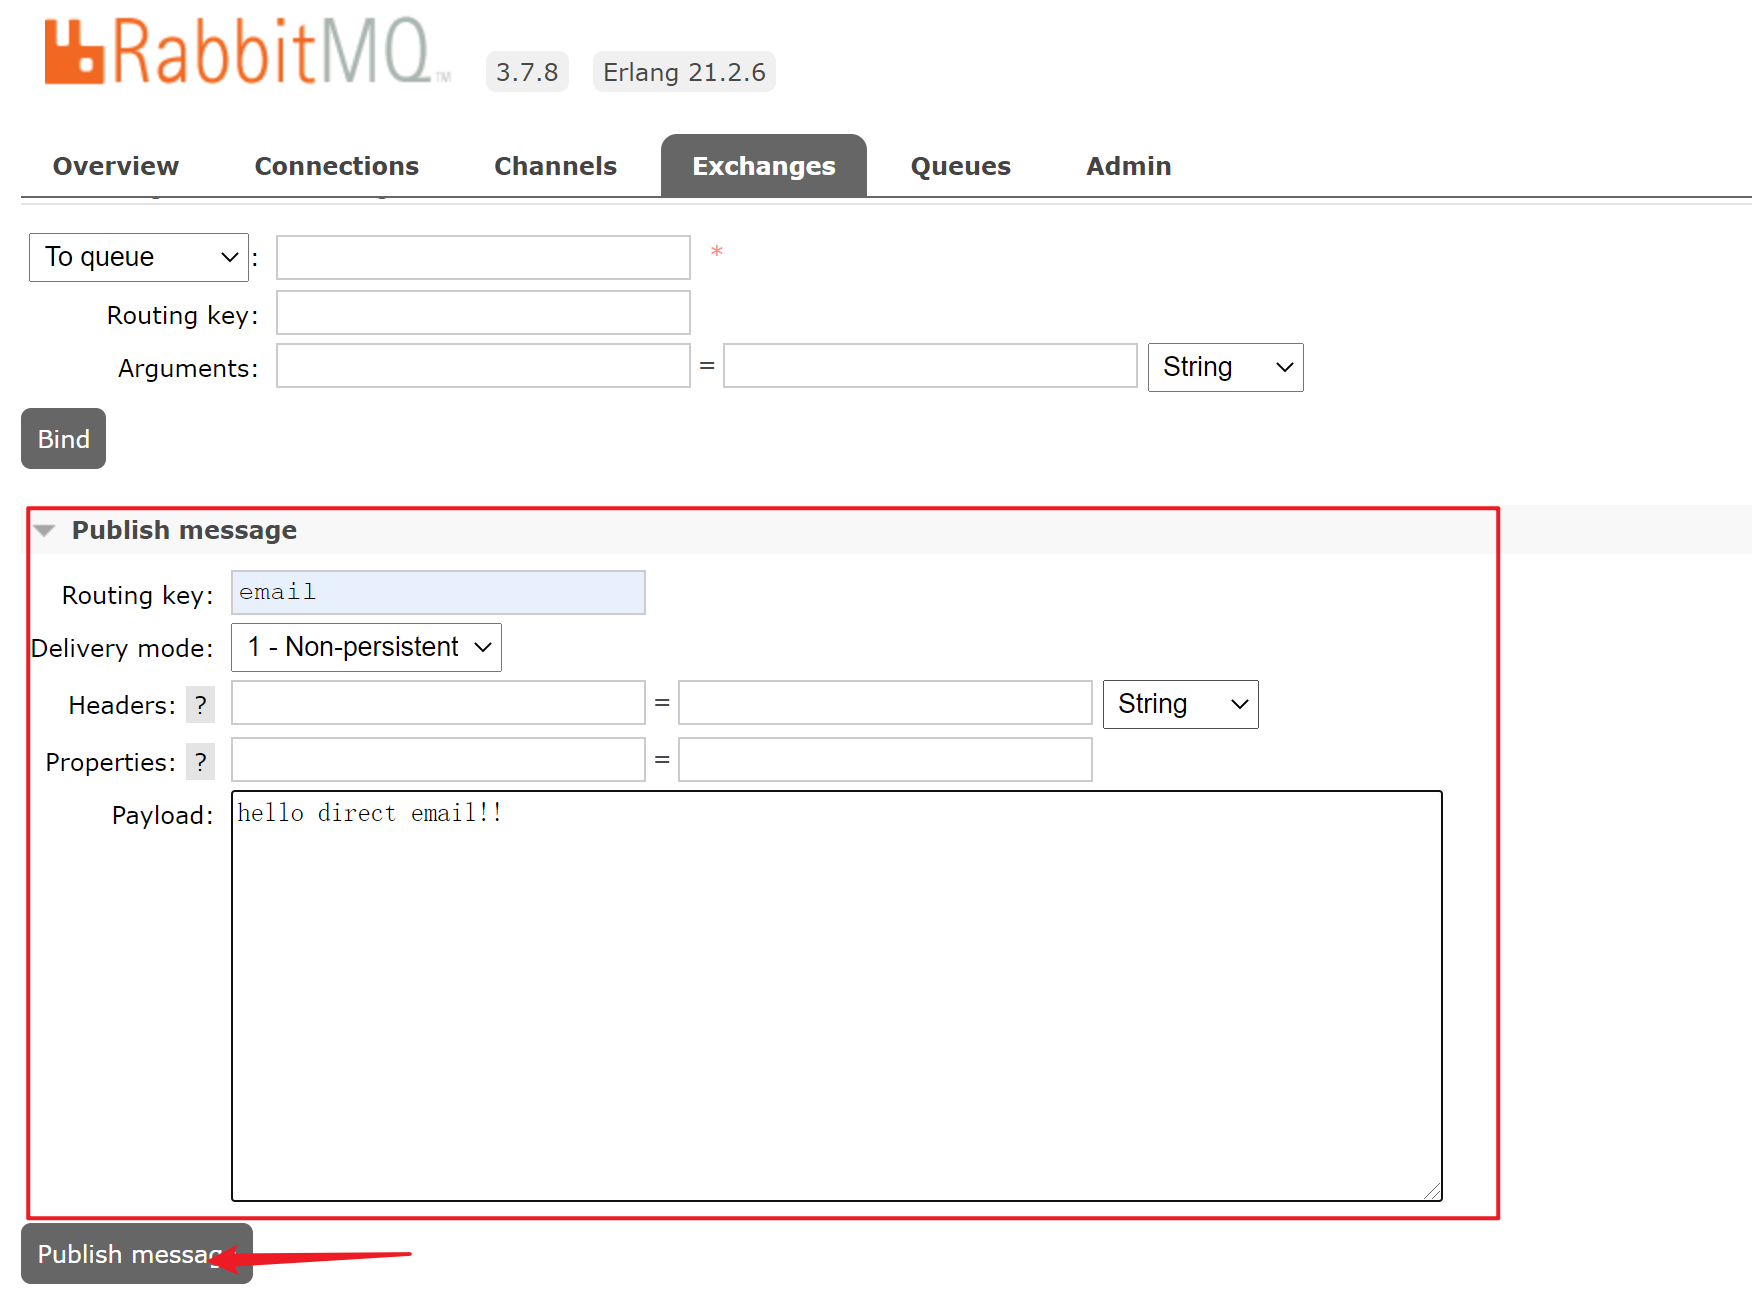
④通过指定routingKey往交换机中发送消息。
![]()
⑤routingKey为email的队列queue1接收到消息。
![]()
Java代码演示如下:
生产者(声明两个队列并且绑定到此交换机,绑定时需要指定routingKey,且发送消息时需要指定routingKey):
1
2
3
4
5
6
7
8
9
10
11
12
13
14
15
16
17
18
19
20
21
22
23
24
25
26
27
28
29
30
31
32
33
34
35
36
37
38
39
40
41
42
43
44
45
46
47
48
49
50
51
52
53
54
55
56
57
58
59
60
61
62
63
64
65
66
67
68
69
public class Producer {
public static void main(String[] args) throws IOException, TimeoutException {
String queueEmail = "queue_email";
String queueSMS = "queue_SMS";
String exchangeName = "direct_exchange";
Connection connection = null;
Channel channel = null;
try {
//1:新建连接工程
ConnectionFactory factory = new ConnectionFactory();
factory.setHost("localhost");
factory.setPort(5672);
factory.setUsername("admin");
factory.setPassword("admin");
factory.setVirtualHost("/");
//2:创建连接
connection = factory.newConnection();
//3:通过连接创建通道Channel,一个连接可以创建多个Channel
channel = connection.createChannel();
/**
* 4:声明交换机,如果Rabbit中没有此交换机将自动创建
* param1:交换机名称
* param2:交换机类型,fanout、topic、direct、headers
* param3:交换机是否持久化
*/
channel.exchangeDeclare(exchangeName, BuiltinExchangeType.DIRECT, true);
/**
* 5:声明队列,如果Rabbit中没有此队列将自动创建
* param1:队列名称
* param2:队列是否持久化
* param3:队列是否独占此连接
* param4:队列不再使用时是否自动删除此队列
* param5:队列参数
*/
channel.queueDeclare(queueEmail, true, false, false, null);
channel.queueDeclare(queueSMS, true, false, false, null);
/**
* 6:交换机和队列绑定
* param1:队列名称
* param2:交换机名称
* param3:路由key
*/
channel.queueBind(queueEmail, exchangeName, queueEmail);
channel.queueBind(queueSMS, exchangeName, queueSMS);
//7:向交换机发送消息
String emailMessage = "send inform to email_queue";
String smsMessage = "send inform to sms_queue";
/**
* param1:交换机名称,不指令使用默认交换机名称 Default Exchange
* param2:routingKey(路由key),根据key名称将消息转发到具体的队列,这里填写队列名称表示消息将发到此队列
* param3:消息属性
* param4:消息内容
*/
channel.basicPublish(exchangeName, queueEmail, null, emailMessage.getBytes());
channel.basicPublish(exchangeName, queueSMS, null, smsMessage.getBytes());
} catch (Exception ex) {
ex.printStackTrace();
} finally {
//8:关闭通道
if (channel != null) {
channel.close();
}
//9:关闭连接
if (connection != null) {
connection.close();
}
}
}
}消费者:
1
2
3
4
5
6
7
8
9
10
11
12
13
14
15
16
17
18
19
20
21
22
23
24
25
26
27
28
29
30
31
32
33
34
35
36
37
38
39
40
41
42
43
44
45
46
47
48
49
50
51
52
53
54
55
56
57
58
59
60
61
62
63
64
65
66
public class Customer {
public static void main(String[] args) throws IOException, TimeoutException {
String queueEmail = "queue_email";
String queueSMS = "queue_SMS";
String exchangeName = "direct_exchange";
Connection connection = null;
Channel channel = null;
try {
//1:新建连接工程
ConnectionFactory factory = new ConnectionFactory();
factory.setHost("localhost");
factory.setPort(5672);
factory.setUsername("admin");
factory.setPassword("admin");
factory.setVirtualHost("/");
//2:创建连接
connection = factory.newConnection();
//3:通过连接创建通道Channel,一个连接可以创建多个Channel
channel = connection.createChannel();
/**
* 4:声明交换机,如果Rabbit中没有此交换机将自动创建
* param1:交换机名称
* param2:交换机类型,fanout、topic、direct、headers
* param3:交换机是否持久化
*/
channel.exchangeDeclare(exchangeName, BuiltinExchangeType.DIRECT,true);
//5:定义消费方法
DefaultConsumer consumer = new DefaultConsumer(channel) {
/**
* 消费者接收消息调用此方法
* @param consumerTag 消费者的标签,在channel.basicConsume()去指定
* @param envelope 消息包的内容,可从中获取消息id,消息routingKey,交换机,消息和重传标志(收到消息失败后是否需要重新发送)
* @param properties
* @param body
* @throws IOException
*/
public void handleDelivery(String consumerTag, Envelope envelope, AMQP.BasicProperties properties, byte[] body)
throws IOException {
//消息内容
String msg = new String(body, StandardCharsets.UTF_8);
System.out.println("收到消息为:" + msg);
}
};
/**
* 6:监听队列
* @param1: 队列名称
* @param2: 是否自动回复,设置为true为表示消息接收到自动向mq回复接收到了,mq接收到回复会删除消息,设置为false则需要手动回复
* @param3: 消费消息的方法,消费者接收到消息后调用此方法
*/
channel.basicConsume(queueEmail, true, consumer);
channel.basicConsume(queueSMS, true, consumer);
} catch (Exception ex) {
ex.printStackTrace();
} finally {
//7:关闭通道
if (channel != null) {
channel.close();
}
//8:关闭连接
if (connection != null) {
connection.close();
}
}
}
}


3.5 主题模式(Topics)
使用topic类型的交换机。
每个消费者监听自己的队列,并且设置带统配符的routingkey。
生产者将消息发给broker,由交换机根据routingKey来转发消息到指定的队列。
![]()
图形界面演示:
①创建topic类型的交换机。
![]()
②创建两个队列。
![]()
③交换机通过模糊的routingKey绑定队列(“#”表示0或多个,”*”表示只能1个)。
![]()
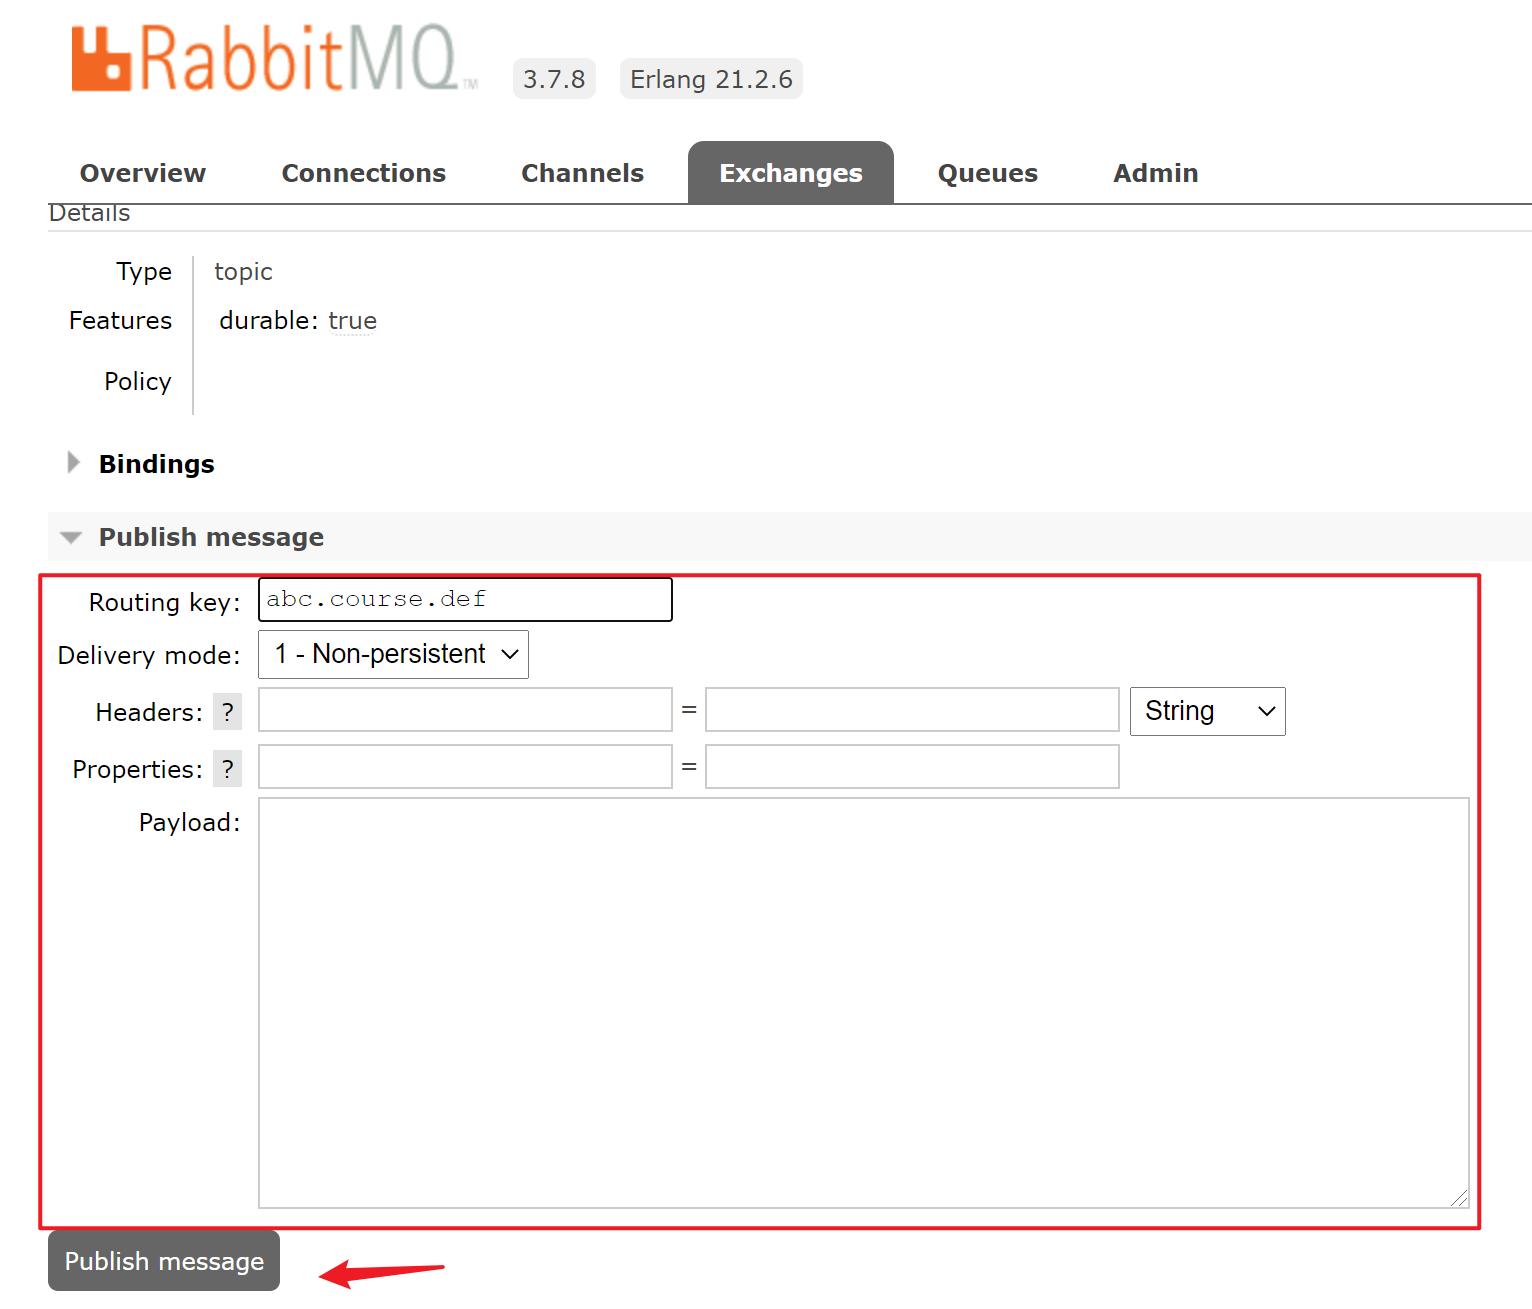
④往交换机里发布信息。
![]()
![]()
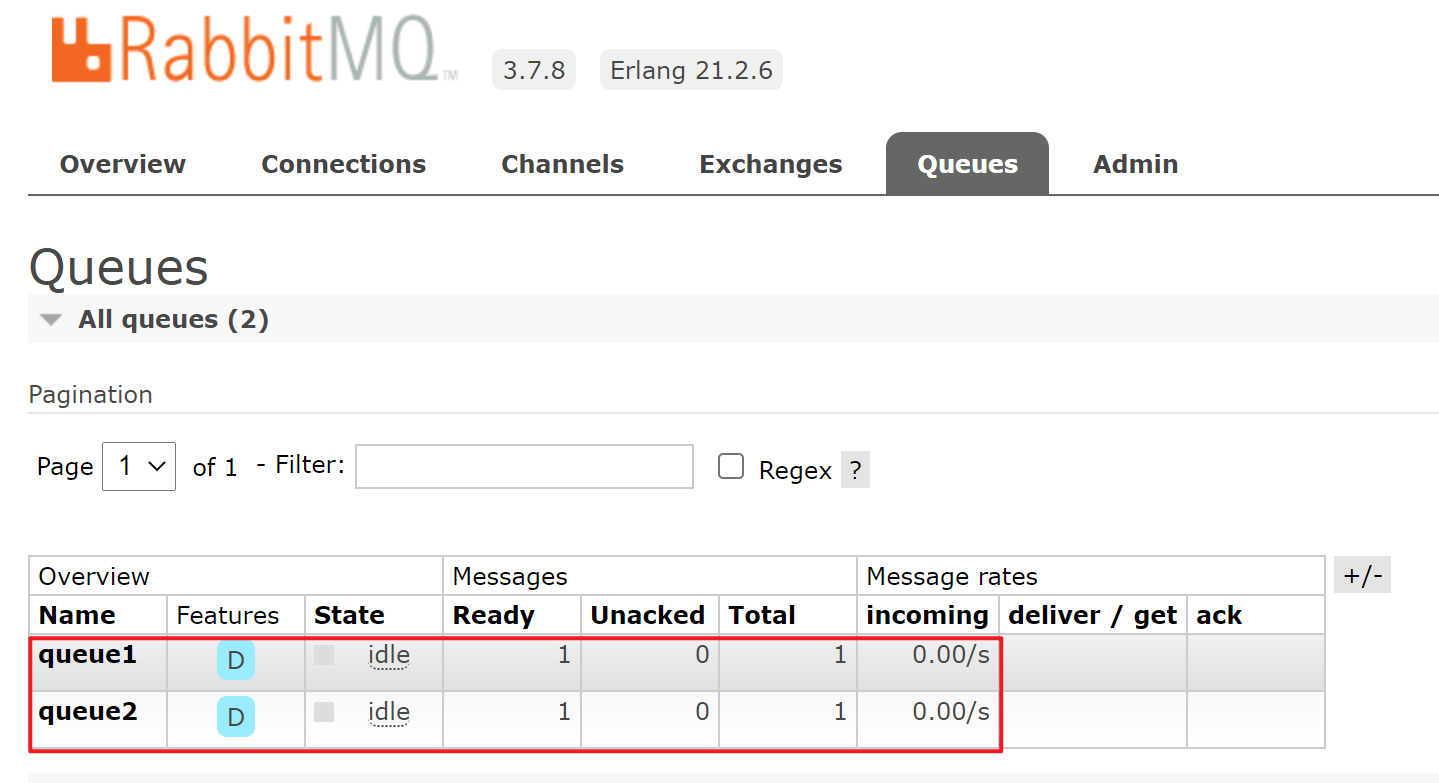
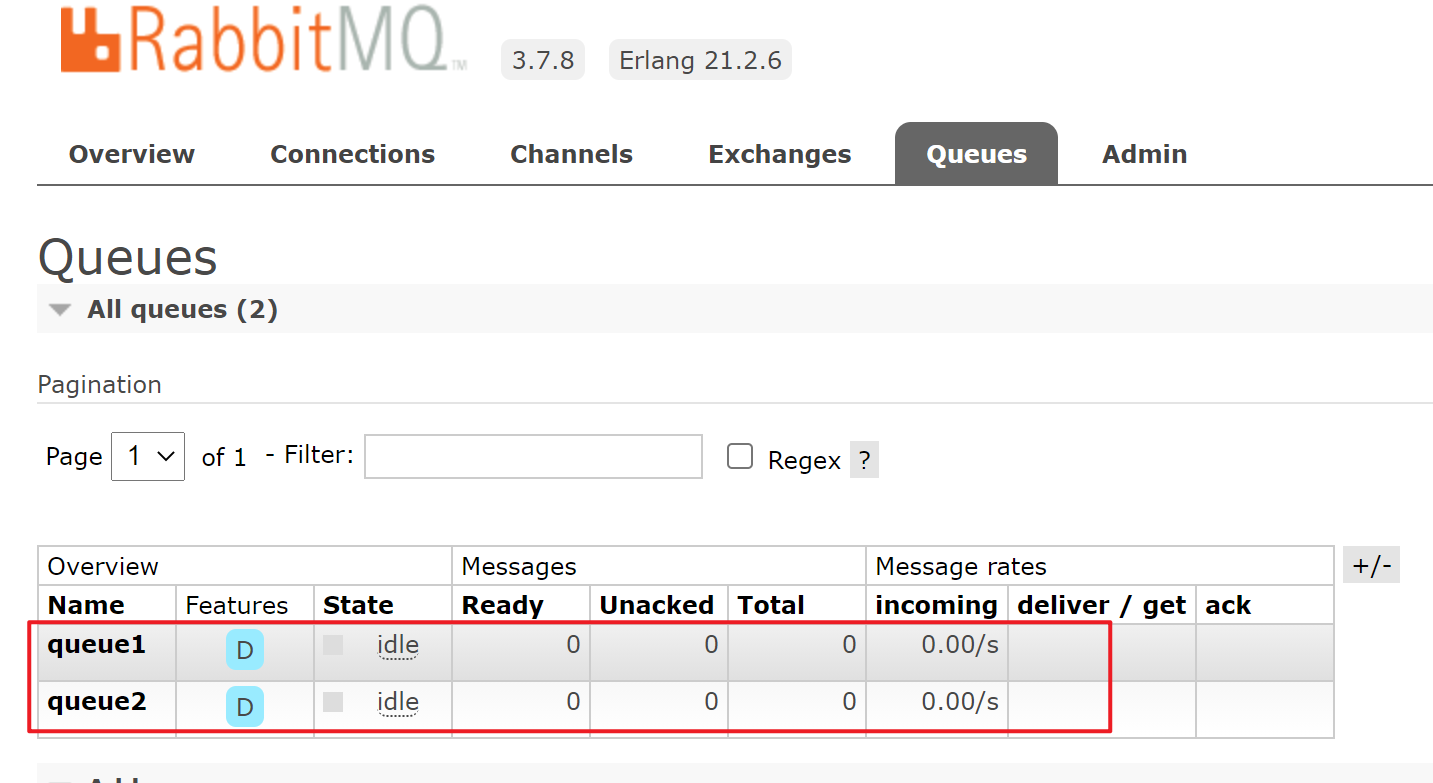
⑤队列queue1和queue2分别接收到消息。
![]()
Java代码演示如下:
生产者:
1
2
3
4
5
6
7
8
9
10
11
12
13
14
15
16
17
18
19
20
21
22
23
24
25
26
27
28
29
30
31
32
33
34
35
36
37
38
39
40
41
42
43
44
45
46
47
48
49
50
51
52
53
54
55
56
57
58
59
60
61
62
63
64
65
66
67
68
69
public class Producer {
public static void main(String[] args) throws IOException, TimeoutException {
String queueCom = "queue_com";
String queueCourse = "queue_course";
String exchangeName = "topic_exchange";
Connection connection = null;
Channel channel = null;
try {
//1:新建连接工程
ConnectionFactory factory = new ConnectionFactory();
factory.setHost("localhost");
factory.setPort(5672);
factory.setUsername("admin");
factory.setPassword("admin");
factory.setVirtualHost("/");
//2:创建连接
connection = factory.newConnection();
//3:通过连接创建通道Channel,一个连接可以创建多个Channel
channel = connection.createChannel();
/**
* 4:声明交换机,如果Rabbit中没有此交换机将自动创建
* param1:交换机名称
* param2:交换机类型,fanout、topic、direct、headers
* param3:交换机是否持久化
*/
channel.exchangeDeclare(exchangeName, BuiltinExchangeType.TOPIC, true);
/**
* 5:声明队列,如果Rabbit中没有此队列将自动创建
* param1:队列名称
* param2:队列是否持久化
* param3:队列是否独占此连接
* param4:队列不再使用时是否自动删除此队列
* param5:队列参数
*/
channel.queueDeclare(queueCom, true, false, false, null);
channel.queueDeclare(queueCourse, true, false, false, null);
/**
* 6:交换机和队列绑定
* param1:队列名称
* param2:交换机名称
* param3:路由key
*/
channel.queueBind(queueCom, exchangeName, "com.#");
channel.queueBind(queueCourse, exchangeName, "*.course.*");
//7:向交换机发送消息
String emailMessage = "send inform to com_queue";
String smsMessage = "send inform to course_queue";
/**
* param1:交换机名称,不指令使用默认交换机名称 Default Exchange
* param2:routingKey(路由key),根据key名称将消息转发到具体的队列,这里填写队列名称表示消息将发到此队列
* param3:消息属性
* param4:消息内容
*/
channel.basicPublish(exchangeName, "com.abc.def", null, emailMessage.getBytes());
channel.basicPublish(exchangeName, "abc.course.def", null, smsMessage.getBytes());
} catch (Exception ex) {
ex.printStackTrace();
} finally {
//8:关闭通道
if (channel != null) {
channel.close();
}
//9:关闭连接
if (connection != null) {
connection.close();
}
}
}
}消费者:
1
2
3
4
5
6
7
8
9
10
11
12
13
14
15
16
17
18
19
20
21
22
23
24
25
26
27
28
29
30
31
32
33
34
35
36
37
38
39
40
41
42
43
44
45
46
47
48
49
50
51
52
53
54
55
56
57
58
59
60
61
62
63
64
65
66
public class Customer {
public static void main(String[] args) throws IOException, TimeoutException {
String queueCom = "queue_com";
String queueCourse = "queue_course";
String exchangeName = "topic_exchange";
Connection connection = null;
Channel channel = null;
try {
//1:新建连接工程
ConnectionFactory factory = new ConnectionFactory();
factory.setHost("localhost");
factory.setPort(5672);
factory.setUsername("admin");
factory.setPassword("admin");
factory.setVirtualHost("/");
//2:创建连接
connection = factory.newConnection();
//3:通过连接创建通道Channel,一个连接可以创建多个Channel
channel = connection.createChannel();
/**
* 4:声明交换机,如果Rabbit中没有此交换机将自动创建
* param1:交换机名称
* param2:交换机类型,fanout、topic、direct、headers
* param3:交换机是否持久化
*/
channel.exchangeDeclare(exchangeName, BuiltinExchangeType.TOPIC,true);
//5:定义消费方法
DefaultConsumer consumer = new DefaultConsumer(channel) {
/**
* 消费者接收消息调用此方法
* @param consumerTag 消费者的标签,在channel.basicConsume()去指定
* @param envelope 消息包的内容,可从中获取消息id,消息routingKey,交换机,消息和重传标志(收到消息失败后是否需要重新发送)
* @param properties
* @param body
* @throws IOException
*/
public void handleDelivery(String consumerTag, Envelope envelope, AMQP.BasicProperties properties, byte[] body)
throws IOException {
//消息内容
String msg = new String(body, StandardCharsets.UTF_8);
System.out.println("收到消息为:" + msg);
}
};
/**
* 6:监听队列
* @param1: 队列名称
* @param2: 是否自动回复,设置为true为表示消息接收到自动向mq回复接收到了,mq接收到回复会删除消息,设置为false则需要手动回复
* @param3: 消费消息的方法,消费者接收到消息后调用此方法
*/
channel.basicConsume(queueCom, true, consumer);
channel.basicConsume(queueCourse, true, consumer);
} catch (Exception ex) {
ex.printStackTrace();
} finally {
//7:关闭通道
if (channel != null) {
channel.close();
}
//8:关闭连接
if (connection != null) {
connection.close();
}
}
}
}


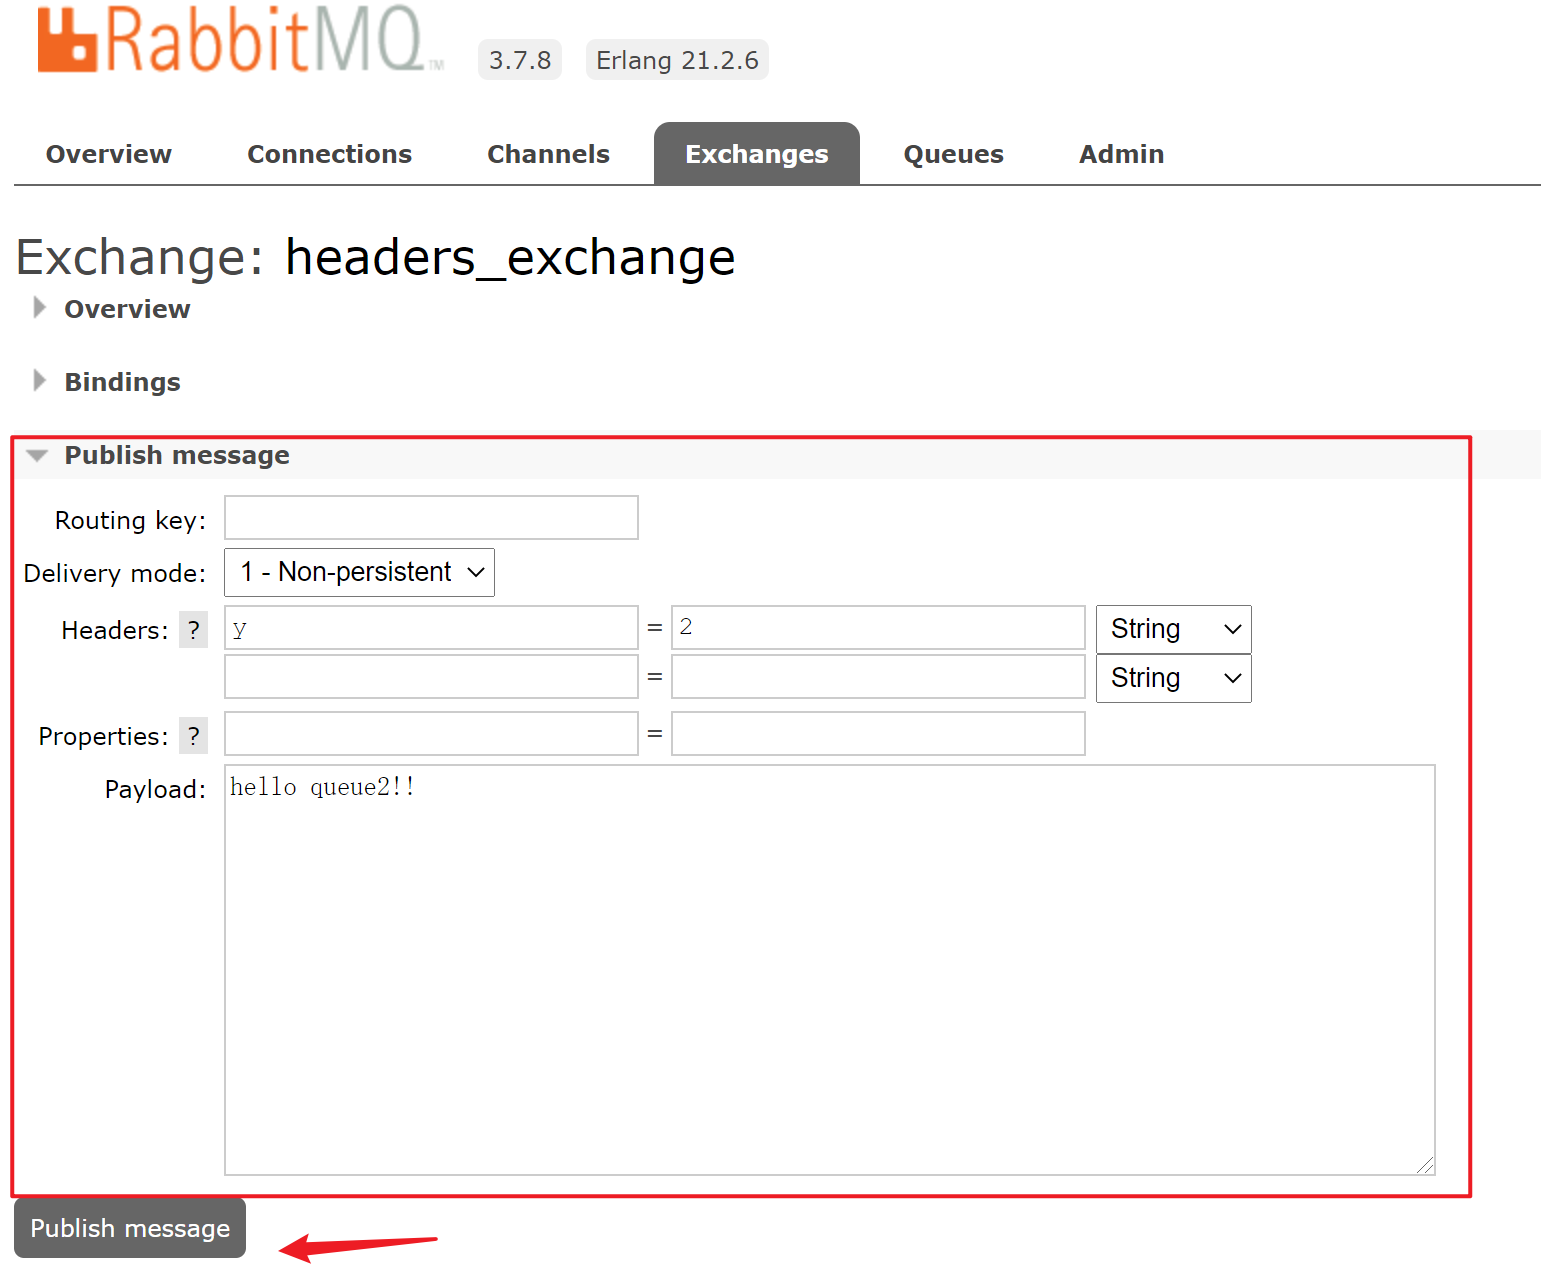
3.6 参数模式(Headers)
使用headers类型的交换机。
Headers模式与Routing不同的地方在于,headers模式取消routingKey,使用Headers中的key/value(键值对)匹配队列。
图形界面演示:
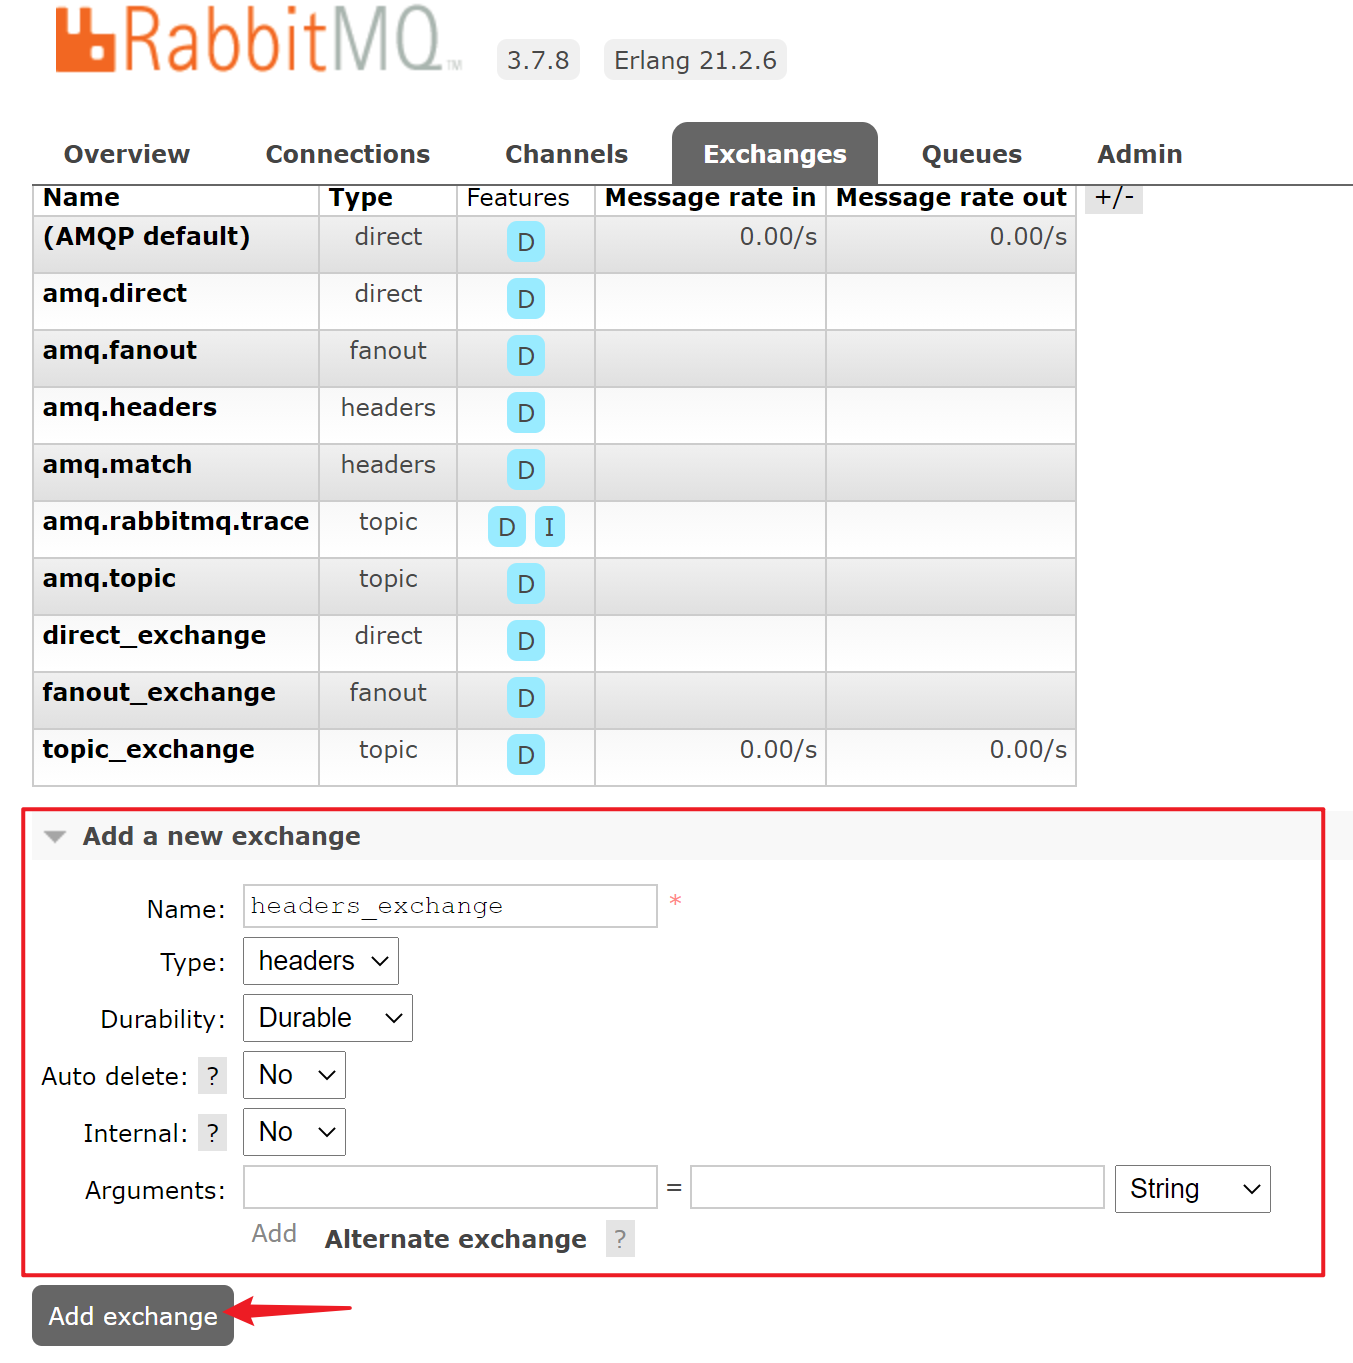
创建一个headers类型的交换机。
![]()
②创建两个队列。
![]()
③交换机通过键值对绑定队列。
![]()
④往交换机里发布信息。
![]()
![]()
⑤队列接收到消息。
![]()
Java代码演示如下:
生产者:
1
2
3
4
5
6
7
8
9
10
11
12
13
14
15
16
17
18
19
20
21
22
23
24
25
26
27
28
29
30
31
32
33
34
35
36
37
38
39
40
41
42
43
44
45
46
47
48
49
50
51
52
53
54
55
56
57
58
59
60
61
62
63
64
65
66
67
68
69
70
public class Producer {
public static void main(String[] args) throws IOException, TimeoutException {
String queueEmail = "queue_email";
String queueSMS = "queue_SMS";
String exchangeName = "headers_exchange";
Connection connection = null;
Channel channel = null;
try {
//1:新建连接工程
ConnectionFactory factory = new ConnectionFactory();
factory.setHost("localhost");
factory.setPort(5672);
factory.setUsername("admin");
factory.setPassword("admin");
factory.setVirtualHost("/");
//2:创建连接
connection = factory.newConnection();
//3:通过连接创建通道Channel,一个连接可以创建多个Channel
channel = connection.createChannel();
/**
* 4:声明交换机,如果Rabbit中没有此交换机将自动创建
* param1:交换机名称
* param2:交换机类型,fanout、topic、direct、headers
* param3:交换机是否持久化
*/
channel.exchangeDeclare(exchangeName, BuiltinExchangeType.HEADERS, true);
/**
* 5:声明队列,如果Rabbit中没有此队列将自动创建
* param1:队列名称
* param2:队列是否持久化
* param3:队列是否独占此连接
* param4:队列不再使用时是否自动删除此队列
* param5:队列参数
*/
channel.queueDeclare(queueEmail, true, false, false, null);
channel.queueDeclare(queueSMS, true, false, false, null);
/**
* 6:交换机和队列绑定
* param1:队列名称
* param2:交换机名称
* param3:路由key
* param4:参数
*/
Map<String, Object> headers_email = new HashMap<>();
headers_email.put("inform_type", "email");
Map<String, Object> headers_sms = new HashMap<>();
headers_sms.put("inform_type", "sms");
channel.queueBind(queueEmail, exchangeName, "", headers_email);
channel.queueBind(queueSMS, exchangeName, "", headers_sms);
//7:向交换机发送消息
String emailMessage = "send inform to email_queue";
Map<String, Object> headers = new HashMap<>();
headers.put("inform_type", "email");//匹配email通知消费者绑定的header
AMQP.BasicProperties.Builder properties = new AMQP.BasicProperties.Builder();
properties.headers(headers);
channel.basicPublish(exchangeName, "", properties.build(), emailMessage.getBytes());
} catch (Exception ex) {
ex.printStackTrace();
} finally {
//8:关闭通道
if (channel != null) {
channel.close();
}
//9:关闭连接
if (connection != null) {
connection.close();
}
}
}
}消费者:
1
2
3
4
5
6
7
8
9
10
11
12
13
14
15
16
17
18
19
20
21
22
23
24
25
26
27
28
29
30
31
32
33
34
35
36
37
38
39
40
41
42
43
44
45
46
47
48
49
50
51
52
53
54
55
56
57
58
59
60
61
62
63
64
65
public class Customer {
public static void main(String[] args) throws IOException, TimeoutException {
String queueEmail = "queue_email";
String queueSMS = "queue_SMS";
String exchangeName = "heads_exchange";
Connection connection = null;
Channel channel = null;
try {
//1:新建连接工程
ConnectionFactory factory = new ConnectionFactory();
factory.setHost("localhost");
factory.setPort(5672);
factory.setUsername("admin");
factory.setPassword("admin");
factory.setVirtualHost("/");
//2:创建连接
connection = factory.newConnection();
//3:通过连接创建通道Channel,一个连接可以创建多个Channel
channel = connection.createChannel();
/**
* 4:声明交换机,如果Rabbit中没有此交换机将自动创建
* param1:交换机名称
* param2:交换机类型,fanout、topic、direct、headers
* param3:交换机是否持久化
*/
channel.exchangeDeclare(exchangeName, BuiltinExchangeType.HEADERS,true);
//5:定义消费方法
DefaultConsumer consumer = new DefaultConsumer(channel) {
/**
* 消费者接收消息调用此方法
* @param consumerTag 消费者的标签,在channel.basicConsume()去指定
* @param envelope 消息包的内容,可从中获取消息id,消息routingKey,交换机,消息和重传标志(收到消息失败后是否需要重新发送)
* @param properties
* @param body
* @throws IOException
*/
public void handleDelivery(String consumerTag, Envelope envelope, AMQP.BasicProperties properties, byte[] body)
throws IOException {
//消息内容
String msg = new String(body, StandardCharsets.UTF_8);
System.out.println("收到消息为:" + msg);
}
};
/**
* 6:监听队列
* @param1: 队列名称
* @param2: 是否自动回复,设置为true为表示消息接收到自动向mq回复接收到了,mq接收到回复会删除消息,设置为false则需要手动回复
* @param3: 消费消息的方法,消费者接收到消息后调用此方法
*/
channel.basicConsume(queueEmail, true, consumer);
} catch (Exception ex) {
ex.printStackTrace();
} finally {
//7:关闭通道
if (channel != null) {
channel.close();
}
//8:关闭连接
if (connection != null) {
connection.close();
}
}
}
}


4、RabbitMQ使用场景
异步
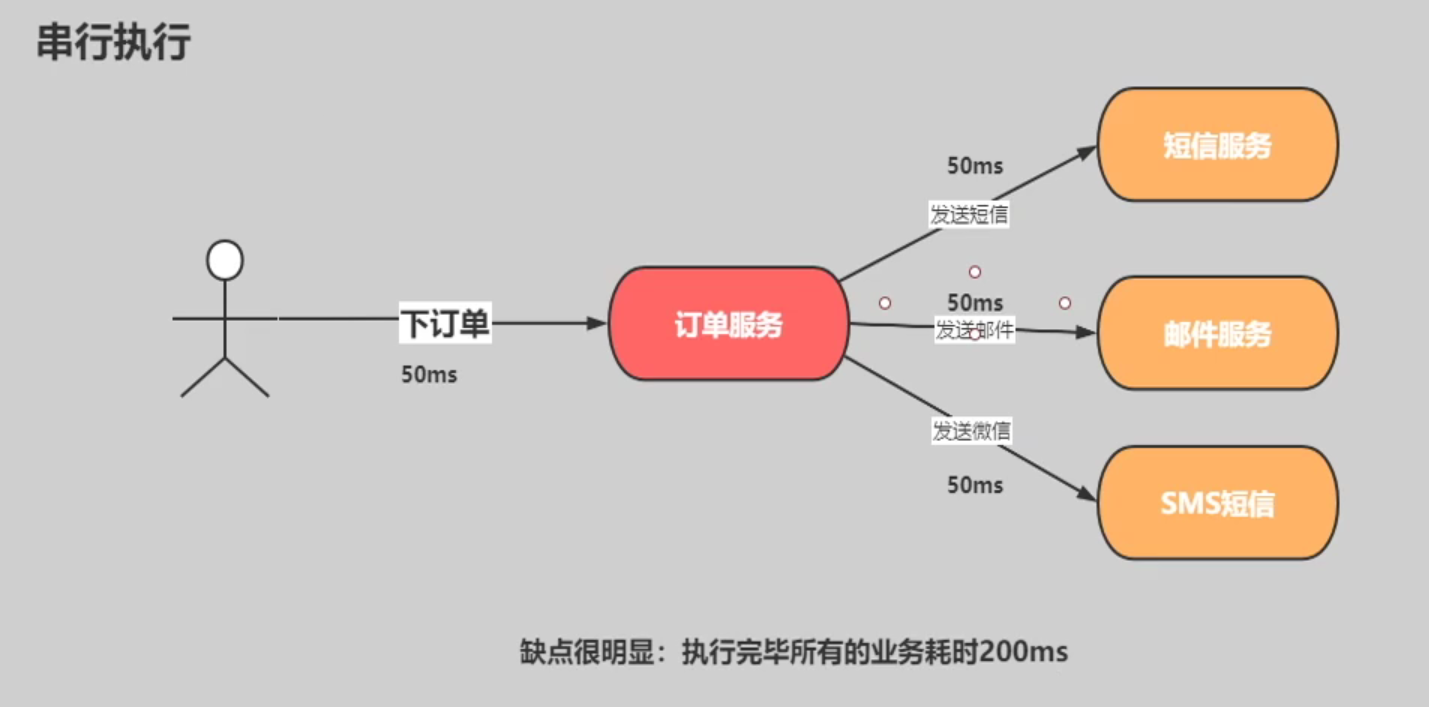
①同步异步的问题(串行)
串行方式:将订单信息写入数据库成功后,发送注册邮件,再发送注册短信。以上三个任务全部完成后,返回给客户端。
![image-20210516203234894]()
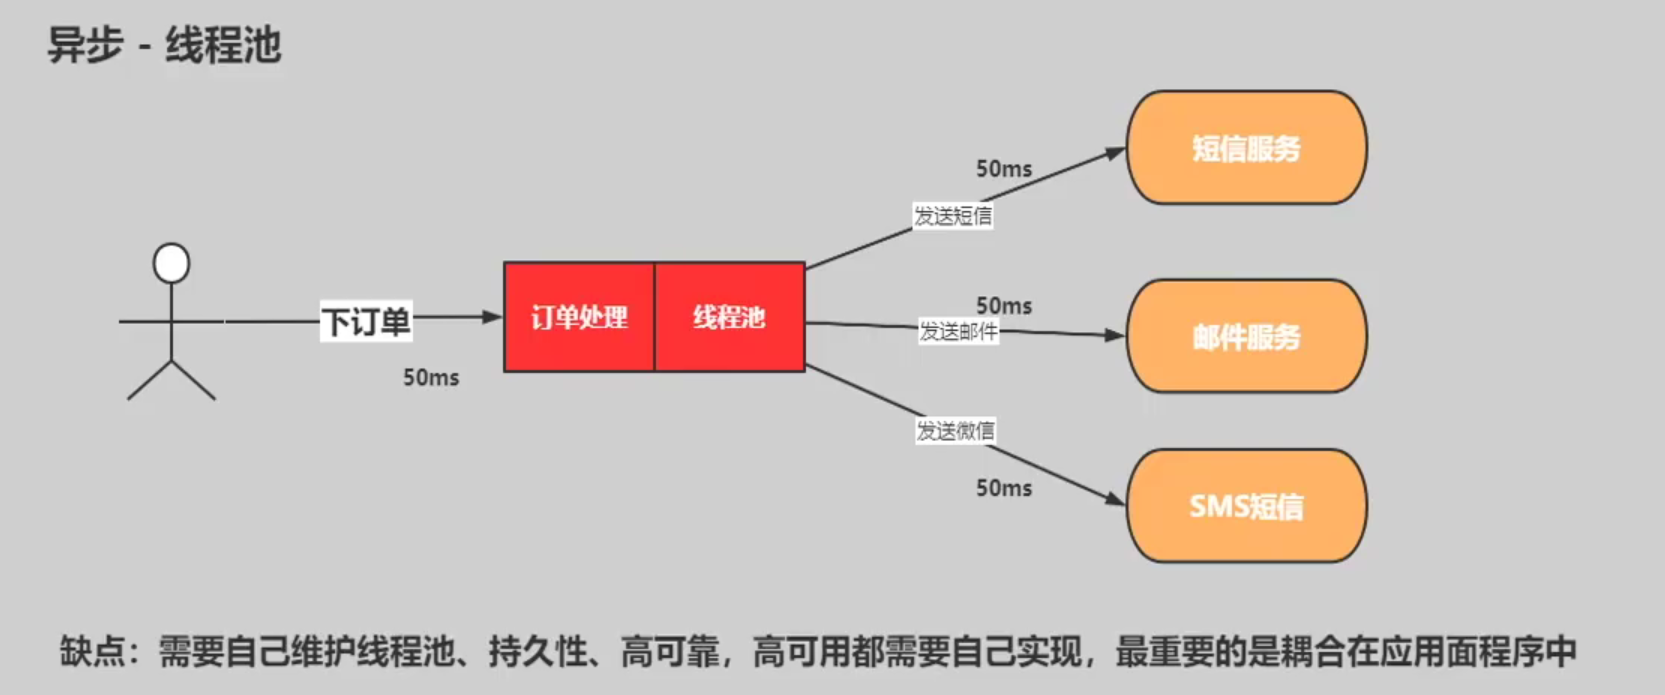
并行方式:使用异步线程池,将订单信息写入数据库成功后,发送注册邮件的同时,发送注册短信。以上三个任务完成后,返回给客户端。与串行的差别是,并行的方式可以提高处理的时间。
![image-20210516203650160]()
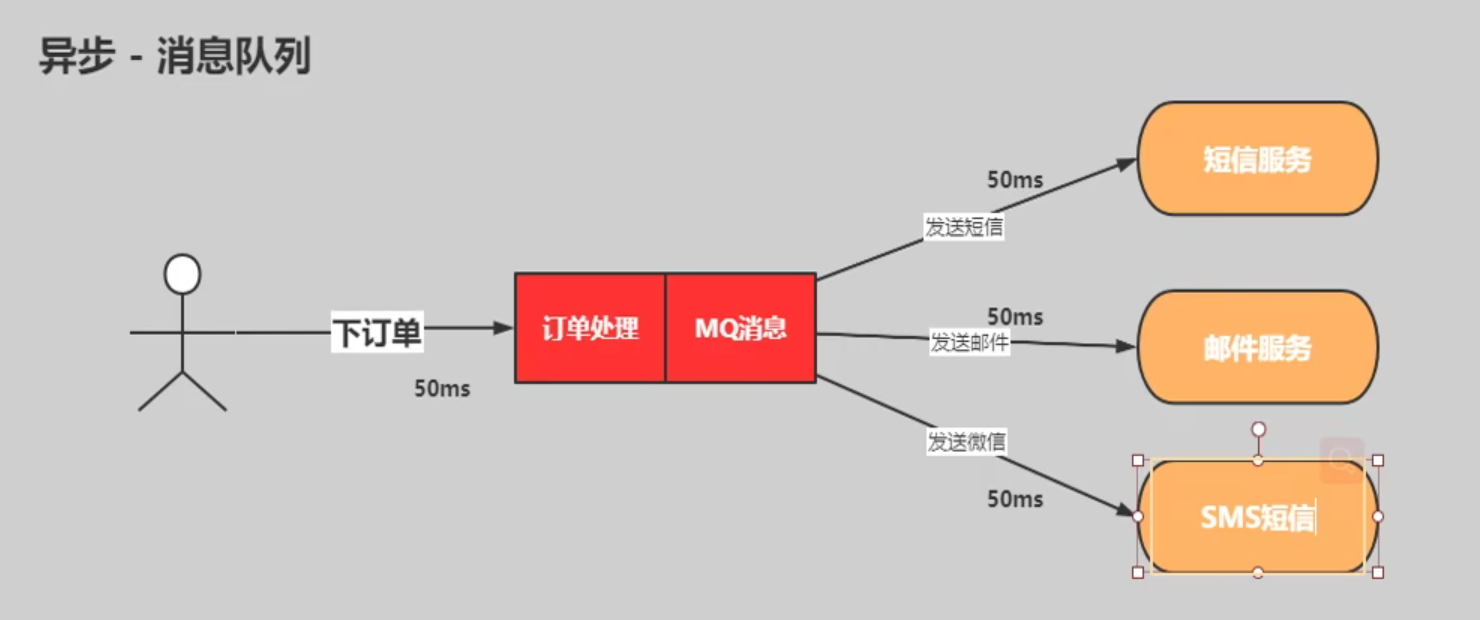
异步消息队列的方式:
- 好处:
- ①完全解耦,用MQ建立桥接。
- ②有独立的线程池和运行模型。
- ③MQ有持久化功能。
- ④保证了消息的可靠性。
- ⑤如果服务器承载不了,需要自己去写高可用,HA镜像模型高可用。按照以上约定,用户的响应时间相当于是订单信息写入数据库的时间,也就是50毫秒。注册邮件,发送短信写入消息队列后,直接返回,因此写入消息队列的速度很快,基本可以忽略,因此用户的响应时间可能是50毫秒。因此架构改变后,系统的吞吐量提高到每秒20QPS,比串行提高了3倍,比并行提高了两倍。
![image-20210516204057454]()
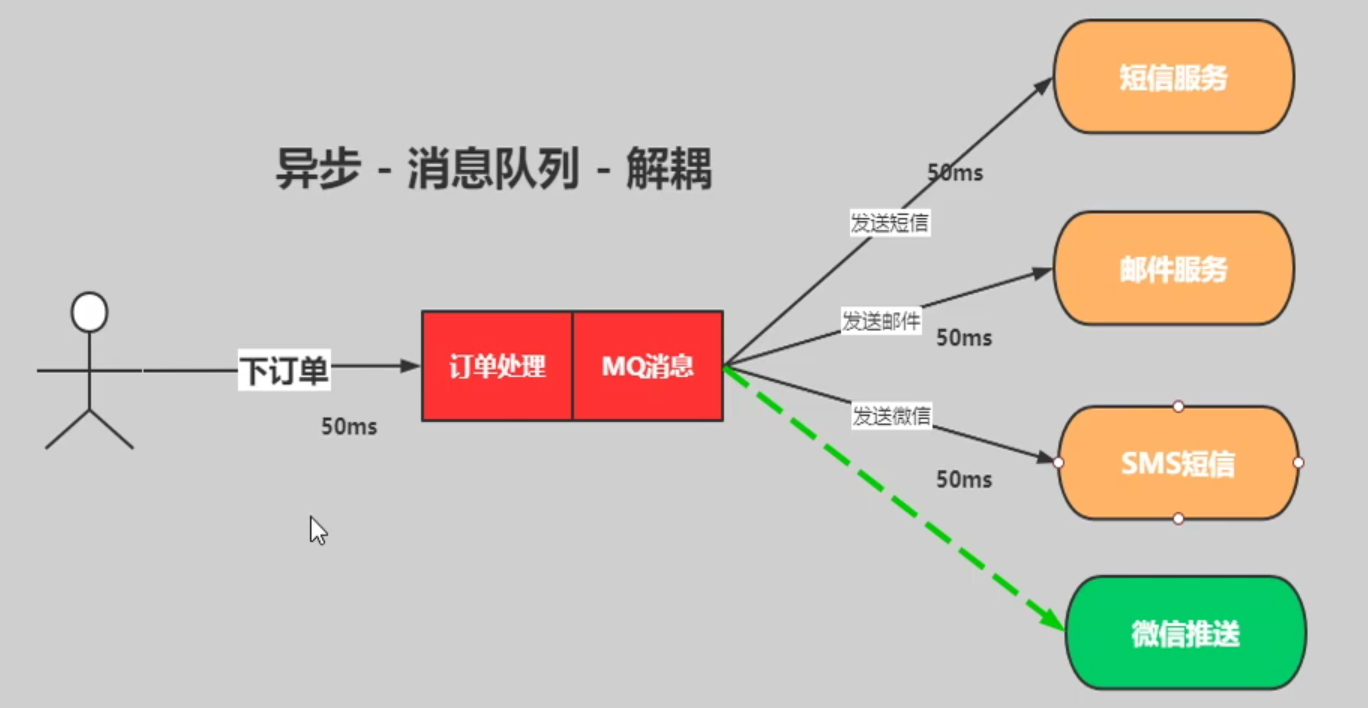
- 好处:
高内聚、低耦合
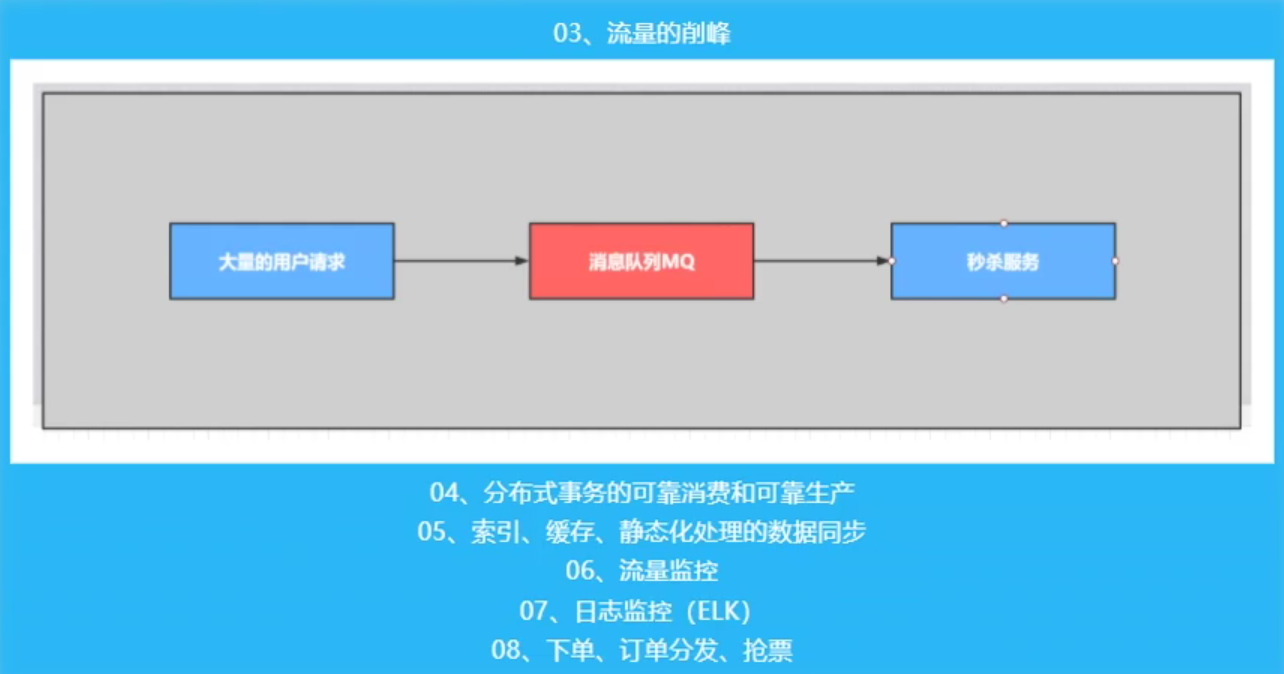
流量削峰
5、SpringBoot整合RabbitMQ
使用SpringBoot搭建以下场景:
![image-20210517193347542]()
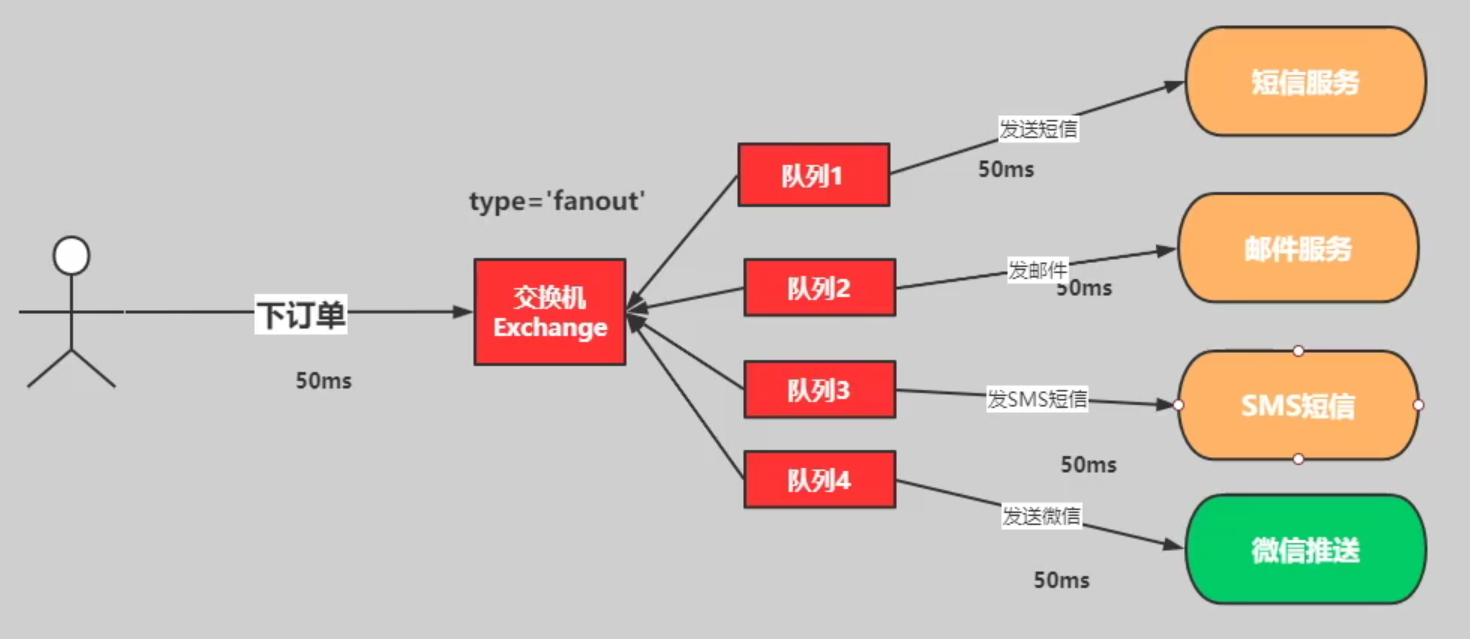
发布订阅模式
生产者:
①新建SpringBoot,导入相关依赖:
1
2
3
4
5
6
7
8
9
10
11
12
13
14
15
16
17
18
19
20
21
22
23
24
25
26
27<dependencies>
<dependency>
<groupId>org.springframework.boot</groupId>
<artifactId>spring-boot-starter-amqp</artifactId>
</dependency>
<dependency>
<groupId>org.springframework.boot</groupId>
<artifactId>spring-boot-starter-web</artifactId>
</dependency>
<dependency>
<groupId>org.springframework.boot</groupId>
<artifactId>spring-boot-starter-test</artifactId>
<scope>test</scope>
</dependency>
<dependency>
<groupId>org.springframework.amqp</groupId>
<artifactId>spring-rabbit-test</artifactId>
<scope>test</scope>
</dependency>
<dependency>
<groupId>org.projectlombok</groupId>
<artifactId>lombok</artifactId>
<version>1.18.16</version>
<scope>provided</scope>
</dependency>
</dependencies>②配置文件:
1
2
3
4
5
6
7
8
9
10
11
12
13
14
15
server:
port: 8080
spring:
# 项目名
application:
name: rabbitmq-producer
# 配置rabbitMq服务器
rabbitmq:
host: localhost
port: 5672
username: admin
password: admin
# 虚拟host
virtual-host: /③配置类:
1
2
3
4
5
6
7
8
9
10
11
12
13
14
15
16
17
18
19
20
21
22
23
24
25
26
27
28
29
30
31
32
33
34
35
36
37
38
39
40
public class RabbitMQConfig {
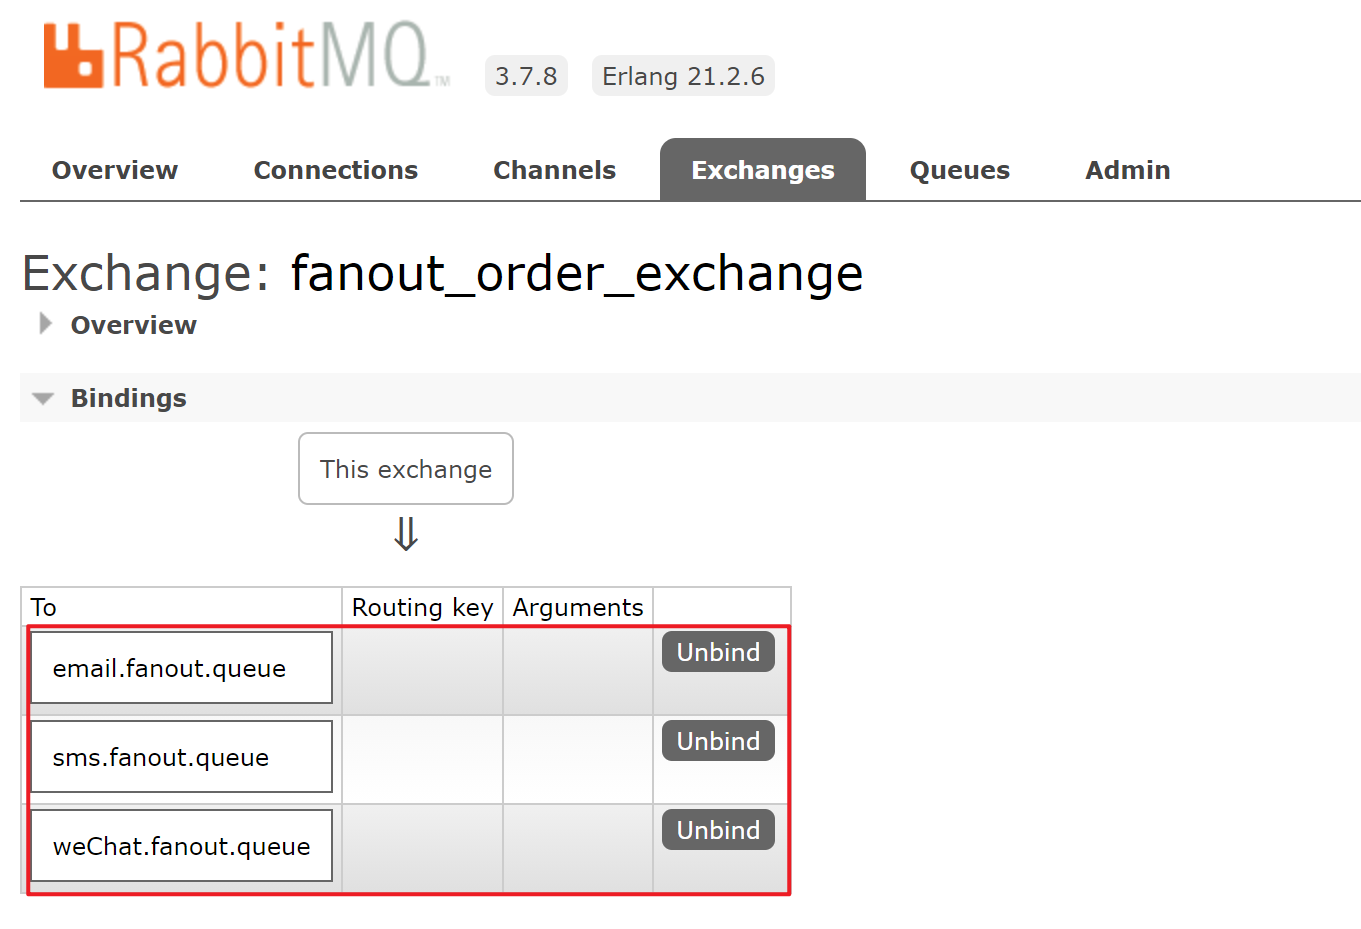
// 创建fanout类型、名为fanout_order_exchange、进行持久化且不自动删除的交换机
public FanoutExchange fanoutExchange() {
return new FanoutExchange("fanout_order_exchange", true, false);
}
// 创建三个持久化队列
public Queue smsQueue() {
return new Queue("sms.fanout.queue", true);
}
public Queue emailQueue() {
return new Queue("email.fanout.queue", true);
}
public Queue weChatQueue() {
return new Queue("weChat.fanout.queue", true);
}
// 交换机和队列绑定
public Binding smsBinding() {
return BindingBuilder.bind(smsQueue()).to(fanoutExchange());
}
public Binding emailBinding() {
return BindingBuilder.bind(emailQueue()).to(fanoutExchange());
}
public Binding weChatBinding() {
return BindingBuilder.bind(weChatQueue()).to(fanoutExchange());
}
}④生产订单服务类:
1
2
3
4
5
6
7
8
9
10
11
12
13
14
15
16
17
18
19
20
21
22
23
24
public class OrderService {
private RabbitTemplate rabbitTemplate;
/**
* 用户下单
*
* @param userId 用户id
* @param productId 下单产品id
* @param num 下单数量
*/
public void makeOrder(String userId, String productId, int num) {
// 生成订单
String orderId = UUID.randomUUID().toString() + "-" + userId + "-" + productId + "-" + num;
log.info("订单生成成功,订单号为:{}", orderId);
// 通过MQ完成消息分发
String exchangeName = "fanout_order_exchange";
String routingKey = "";
rabbitTemplate.convertAndSend(exchangeName, routingKey, orderId);
log.info("订单分发成功");
}
}⑤测试类:
1
2
3
4
5
6
7
8
9
10
class SpringbootOrderRabbitmqProducerApplicationTests {
OrderService orderService;
void contextLoads() {
orderService.makeOrder("1", "1", 10);
}
}
消费者:
①新建SpringBoot,导入相关依赖如同生产者。
②配置文件:
1
2
3
4
5
6
7
8
9
10
11
12
13
14
15
server:
port: 8081
spring:
# 项目名
application:
name: rabbitmq-consumer
# 配置rabbitMq服务器
rabbitmq:
host: localhost
port: 5672
username: admin
password: admin
# 虚拟host
virtual-host: /③消费订单服务类:
1
2
3
4
5
6
7
8
9
public class FanoutEmailConsumer {
public void receive(String message) {
log.info("email.fanout接收到订单信息:{}", message);
}
}1
2
3
4
5
6
7
8
9
public class FanoutSMSConsumer {
public void receive(String message) {
log.info("sms.fanout接收到订单信息:{}", message);
}
}1
2
3
4
5
6
7
8
9@RabbitListener(queues = {"weChat.fanout.queue"})
@Service
@Slf4j
public class FanoutWeChatConsumer {
@RabbitHandler
public void receive(String message) {
log.info("weChat.fanout接收到订单信息:{}", message);
}
}
测试,先运行生产者测试类,打印日志和RabbitMQ页面显示如下:

![image-20210517202920306]()
再运行消费者主启动类,日志打印如下:


路由模式
生产者:
1
2
3
4
5
6
7
8
9
10
11
12
13
14
15
16
17
18
19
20
21
22
23
24
25
26
27
28
29
30
31
32
33
34
35
36
37
38
39
40
public class DirectRabbitMQConfig {
// 创建direct类型、名为direct_order_exchange、进行持久化且不自动删除的交换机
public DirectExchange directExchange() {
return new DirectExchange("direct_order_exchange", true, false);
}
// 创建三个持久化队列
public Queue smsQueue() {
return new Queue("sms.direct.queue", true);
}
public Queue emailQueue() {
return new Queue("email.direct.queue", true);
}
public Queue weChatQueue() {
return new Queue("weChat.direct.queue", true);
}
// 交换机和队列绑定
public Binding smsBinding() {
return BindingBuilder.bind(smsQueue()).to(directExchange()).with("sms");
}
public Binding emailBinding() {
return BindingBuilder.bind(emailQueue()).to(directExchange()).with("email");
}
public Binding weChatBinding() {
return BindingBuilder.bind(weChatQueue()).to(directExchange()).with("WeChat");
}
}1
2
3
4
5
6
7
8
9
10
11
12
13
14
15
16
17
18
19
20
21
22
23
24
public class OrderService {
private RabbitTemplate rabbitTemplate;
/**
* 用户下单
*
* @param userId 用户id
* @param productId 下单产品id
* @param num 下单数量
*/
public void directMakeOrder(String userId, String productId, int num) {
// 生成订单
String orderId = UUID.randomUUID().toString() + "-" + userId + "-" + productId + "-" + num;
log.info("订单生成成功,订单号为:{}", orderId);
// 通过MQ完成消息分发
String exchangeName = "direct_order_exchange";
rabbitTemplate.convertAndSend(exchangeName, "sms", orderId);
rabbitTemplate.convertAndSend(exchangeName, "email", orderId);
rabbitTemplate.convertAndSend(exchangeName, "WeChat", orderId);
log.info("订单分发成功");
}
}1
2
3
4
5
6
7
8
9
10
class SpringbootOrderRabbitmqProducerApplicationTests {
OrderService orderService;
void contextLoads() {
orderService.directMakeOrder("1", "1", 10);
}
}消费者:
1
2
3
4
5
6
7
8
9
public class DirectEmailConsumer {
public void receive(String message) {
log.info("email.direct接收到订单信息:{}", message);
}
}1
2
3
4
5
6
7
8
9
public class DirectSMSConsumer {
public void receive(String message) {
log.info("sms.direct接收到订单信息:{}", message);
}
}1
2
3
4
5
6
7
8
9
public class DirectWeChatConsumer {
public void receive(String message) {
log.info("weChat.direct接收到订单信息:{}", message);
}
}测试,生产者:

消费者:


主题模式(这里使用注解模式)
生产者:
1
2
3
4
5
6
7
8
9
10
11
12
13
14
15
16
17
18
19
20
21
22
23
24
25
public class OrderService {
private RabbitTemplate rabbitTemplate;
/**
* 用户下单
*
* @param userId 用户id
* @param productId 下单产品id
* @param num 下单数量
*/
public void topicMakeOrder(String userId, String productId, int num) {
// 生成订单
String orderId = UUID.randomUUID().toString() + "-" + userId + "-" + productId + "-" + num;
log.info("订单生成成功,订单号为:{}", orderId);
// 通过MQ完成消息分发
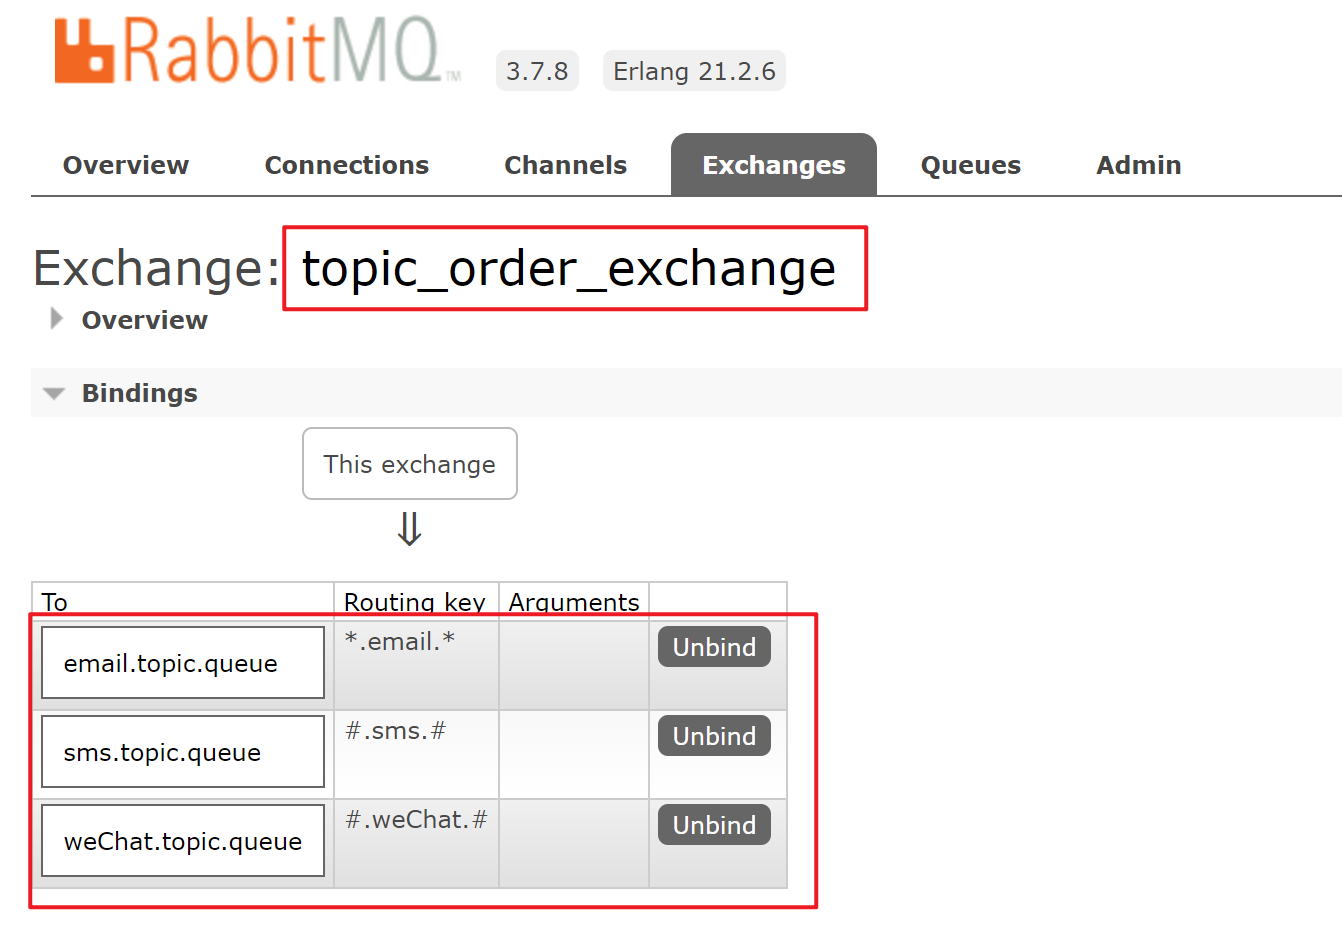
String exchangeName = "topic_order_exchange";
rabbitTemplate.convertAndSend(exchangeName, "sms.abc.def", orderId);
rabbitTemplate.convertAndSend(exchangeName, "abc.email.def", orderId);
rabbitTemplate.convertAndSend(exchangeName, "weChat", orderId);
log.info("订单分发成功");
}
}1
2
3
4
5
6
7
8
9
10
class SpringbootOrderRabbitmqProducerApplicationTests {
OrderService orderService;
void contextLoads() {
orderService.topicMakeOrder("1", "1", 10);
}
}消费者:
1
2
3
4
5
6
7
8
9
10
public class TopicEmailConsumer {
public void receive(String message) {
log.info("email.topic接收到订单信息:{}", message);
}
}1
2
3
4
5
6
7
8
9
10
public class TopicSMSConsumer {
public void receive(String message) {
log.info("sms.topic接收到订单信息:{}", message);
}
}1
2
3
4
5
6
7
8
9
10
public class TopicWeChatConsumer {
public void receive(String message) {
log.info("weChat.topic接收到订单信息:{}", message);
}
}测试,先启动消费者,RabbitMQ主界面如图:
![image-20210517210639428]()
再启动生产者:

此时消费者打印如下:


总结
- 声明交换机和队列以及它们之间的绑定关系的配置类推荐放在消费者端,因为消费者在启动时如果没有发现所监听的对应交换机或者队列的声明则会报错。
- 可以使用注解或者配置文件的方式声明交换机和队列以及它们之间的绑定关系。
6、RabbitMQ高级
6.1 过期时间TTL
过期时间TTL表示可以对消息设置预期的时间,在这个时间内都可以被消费者接收获取;过了之后消息将自动被删除。RabbitMQ可以对消息和队列设置TTL。目前有两种方法可以设置。
第一种方法是通过队列属性设置,队列中所有消息都有相同的过期时间。
使用路由模式测试队列TTL
生产者:
1
2
3
4
5
6
7
8
9
10
11
12
13
14
15
16
17
18
19
20
21
22
23
public class OrderService {
private RabbitTemplate rabbitTemplate;
/**
* 用户下单
*
* @param userId 用户id
* @param productId 下单产品id
* @param num 下单数量
*/
public void ttlMakeOrder(String userId, String productId, int num) {
// 生成订单
String orderId = UUID.randomUUID().toString() + "-" + userId + "-" + productId + "-" + num;
log.info("订单生成成功,订单号为:{}", orderId);
// 通过MQ完成消息分发
String exchangeName = "ttl_direct_exchange";
rabbitTemplate.convertAndSend(exchangeName, "ttl", orderId);
log.info("订单分发成功");
}
}1
2
3
4
5
6
7
8
9
10
class SpringbootOrderRabbitmqProducerApplicationTests {
OrderService orderService;
void contextLoads() {
orderService.ttlMakeOrder("1", "1", 10);
}
}消费者:
1
2
3
4
5
6
7
8
9
10
11
12
13
14
15
16
17
18
19
20
21
22
public class TTLRabbitMQConfig {
// 创建direct类型、名为ttl_direct_exchange、进行持久化且不自动删除的交换机
public DirectExchange ttlDirectExchange() {
return new DirectExchange("ttl_direct_exchange", true, false);
}
// 创建持久化队列并设置过期时间
public Queue ttlQueue() {
HashMap<String, Object> map = new HashMap<>();
map.put("x-message-ttl", 5000);
return new Queue("ttl.direct.queue", true, false, false, map);
}
// 交换机和队列绑定
public Binding ttlBinding() {
return BindingBuilder.bind(ttlQueue()).to(ttlDirectExchange()).with("ttl");
}
}测试,先启动消费者,可以在RabbitMQ主界面看到TTL队列的出现:

再启动生产者往该队列投递消息,会发现名为ttl.direct.queue的队列中多出一条待消费消息,但由于没有在消费者设置消费服务,并且给该队列设置了5秒的过期时间,于是在5秒过后该消息又会被丢弃。
第二种方法是对消息进行单独设置,每条消息TTL可以不同。
使用路由模式测试消息TTL
生产者:
1
2
3
4
5
6
7
8
9
10
11
12
13
14
15
16
17
18
19
20
21
22
23
24
25
26
27
28
29
30
31
32
public class OrderService {
private RabbitTemplate rabbitTemplate;
/**
* 用户下单
*
* @param userId 用户id
* @param productId 下单产品id
* @param num 下单数量
*/
public void ttlMessageMakeOrder(String userId, String productId, int num) {
// 生成订单
String orderId = UUID.randomUUID().toString() + "-" + userId + "-" + productId + "-" + num;
log.info("订单生成成功,订单号为:{}", orderId);
// 通过MQ完成消息分发
String exchangeName = "ttlMessage_direct_exchange";
String routingKey = "ttlMessage";
MessagePostProcessor messagePostProcessor = new MessagePostProcessor() {
public Message postProcessMessage(Message message) throws AmqpException {
message.getMessageProperties().setExpiration("5000");
message.getMessageProperties().setContentEncoding("UTF-8");
return message;
}
};
rabbitTemplate.convertAndSend(exchangeName, routingKey, orderId, messagePostProcessor);
log.info("订单分发成功");
}
}1
2
3
4
5
6
7
8
9
10
class SpringbootOrderRabbitmqProducerApplicationTests {
OrderService orderService;
void contextLoads() {
orderService.ttlMessageMakeOrder("1", "1", 10);
}
}消费者:
1
2
3
4
5
6
7
8
9
10
11
12
13
14
15
16
17
18
19
20
public class TTLMessageRabbitMQConfig {
// 创建direct类型、名为ttlMessage_direct_exchange、进行持久化且不自动删除的交换机
public DirectExchange ttlMessageDirectExchange() {
return new DirectExchange("ttlMessage_direct_exchange", true, false);
}
// 创建持久化队列并设置过期时间
public Queue ttlMessageQueue() {
return new Queue("ttlMessage.direct.queue", true);
}
// 交换机和队列绑定
public Binding ttlMessageBinding() {
return BindingBuilder.bind(ttlMessageQueue()).to(ttlMessageDirectExchange()).with("ttlMessage");
}
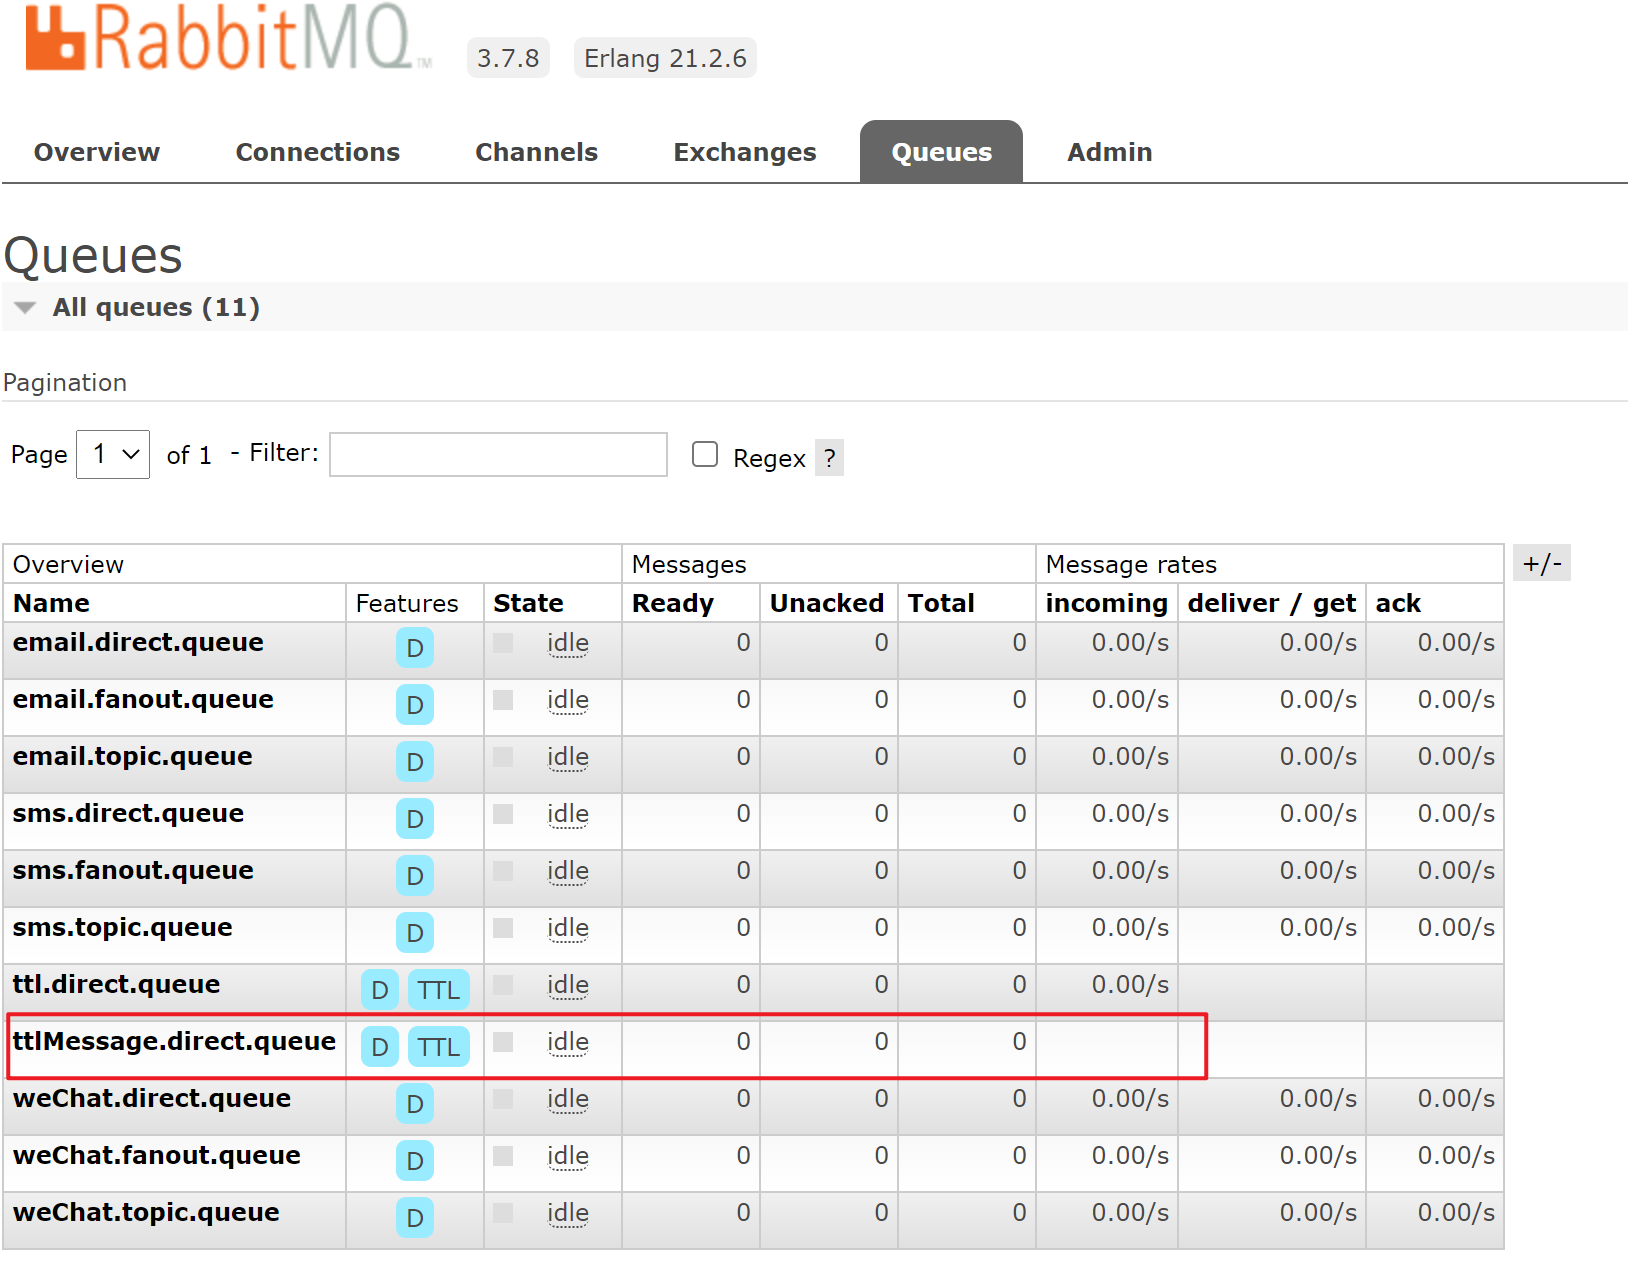
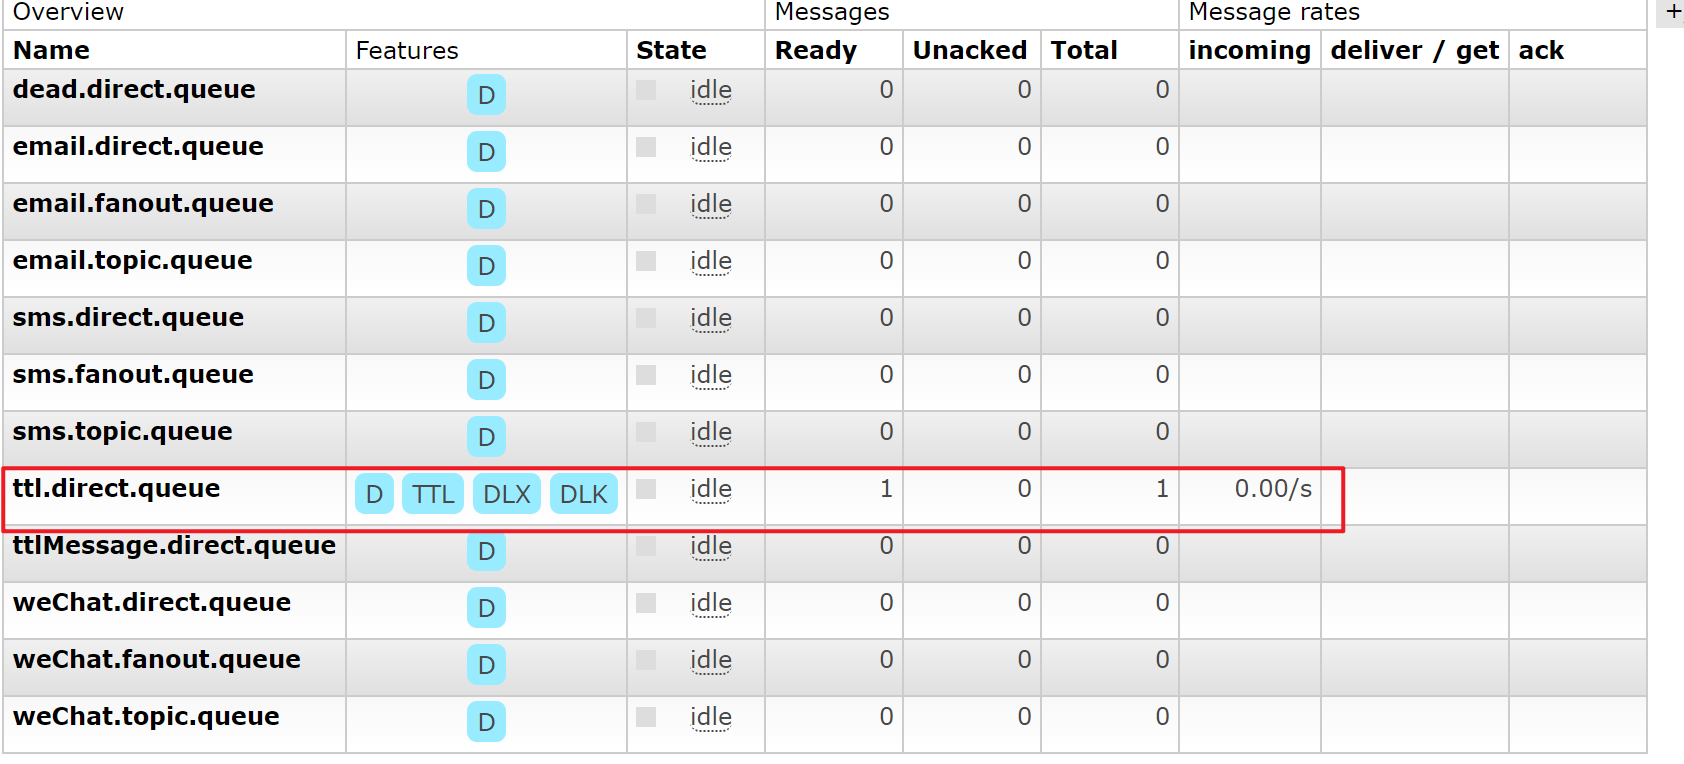
}测试,先启动消费者,可以在RabbitMQ主界面看到TTL队列的出现:
![image-20210517221031423]()
再启动生产者往该队列投递消息,会发现名为ttlMessage.direct.queue的队列中多出一条待消费消息,但由于没有在消费者设置消费服务,并且生产者给该消息设置了5秒的过期时间,于是在5秒过后该消息又会被丢弃。
如果上述两种方法同时使用,则消息的过期时间以两者之间TTL较小的那个数值为准。消息在队列的生存时间一旦超过设置的TTL值,就称为dead message被投递到死信队列,消费者将无法再收到该消息。

6.2 死信队列
DLX,全称为Dead-Letter-Exchange,可以称之为死信交换机,也有人称之为死信邮箱。当消息在一个队列中变成死信(dead message)之后,它能被重新发送到另一个交换机中,这个交换机就是DLX,绑定DLX的队列就称之为死信队列。消息变成死信,可能是由于以下的原因:
- 消息被拒绝。
- 消息过期。
- 队列达到最大长度。
流程如下:
![image-20210518145615624]()
DLX也是一个正常的交换机,和一般的交换机没有区别,它能在任何的队列上被指定,实际上就是设置某一个队列的属性。当这个队列中存在死信时,Rabbitmq就会自动地将这个消息重新发布到设置的DLX上去,进而被路由到另一个队列,即死信队列。
要想使用死信队列,只需要在定义队列的时候设置队列参数x-dead-letter-exchange指定交换机即可。
生产者:
1
2
3
4
5
6
7
8
9
10
11
12
13
14
15
16
17
18
19
20
21
22
23
public class OrderService {
private RabbitTemplate rabbitTemplate;
/**
* 用户下单
*
* @param userId 用户id
* @param productId 下单产品id
* @param num 下单数量
*/
public void ttlMakeOrder(String userId, String productId, int num) {
// 生成订单
String orderId = UUID.randomUUID().toString() + "-" + userId + "-" + productId + "-" + num;
log.info("订单生成成功,订单号为:{}", orderId);
// 通过MQ完成消息分发
String exchangeName = "ttl_direct_exchange";
rabbitTemplate.convertAndSend(exchangeName, "ttl", orderId);
log.info("订单分发成功");
}
}1
2
3
4
5
6
7
8
9
10
class SpringbootOrderRabbitmqProducerApplicationTests {
OrderService orderService;
void contextLoads() {
orderService.ttlMakeOrder("1", "1", 10);
}
}消费者:
1
2
3
4
5
6
7
8
9
10
11
12
13
14
15
16
17
18
19
20
21
22
23
24
25
26
27
public class TTLRabbitMQConfig {
// 创建direct类型、名为ttl_direct_exchange、进行持久化且不自动删除的交换机
public DirectExchange ttlDirectExchange() {
return new DirectExchange("ttl_direct_exchange", true, false);
}
// 创建持久化队列并设置过期时间
public Queue ttlQueue() {
HashMap<String, Object> map = new HashMap<>();
//设置队列内消息过期时间
map.put("x-message-ttl", 5000);
//设置死信交换机
map.put("x-dead-letter-exchange", "dead_direct_exchange");
//设置死信交换机绑定死信队列的routingKey,如果这里是发布订阅模式则不需要配置
map.put("x-dead-letter-routing-key","dead");
return new Queue("ttl.direct.queue", true, false, false, map);
}
// 交换机和队列绑定
public Binding ttlBinding() {
return BindingBuilder.bind(ttlQueue()).to(ttlDirectExchange()).with("ttl");
}
}1
2
3
4
5
6
7
8
9
10
11
12
13
14
15
16
17
18
19
public class DeadDirectRabbitMQConfig {
public DirectExchange deadDirectExchange() {
return new DirectExchange("dead_direct_exchange", true, false);
}
// 创建持久化队列并设置过期时间
public Queue deadQueue() {
return new Queue("dead.direct.queue", true);
}
// 交换机和队列绑定
public Binding deadBinding() {
return BindingBuilder.bind(deadQueue()).to(deadDirectExchange()).with("dead");
}
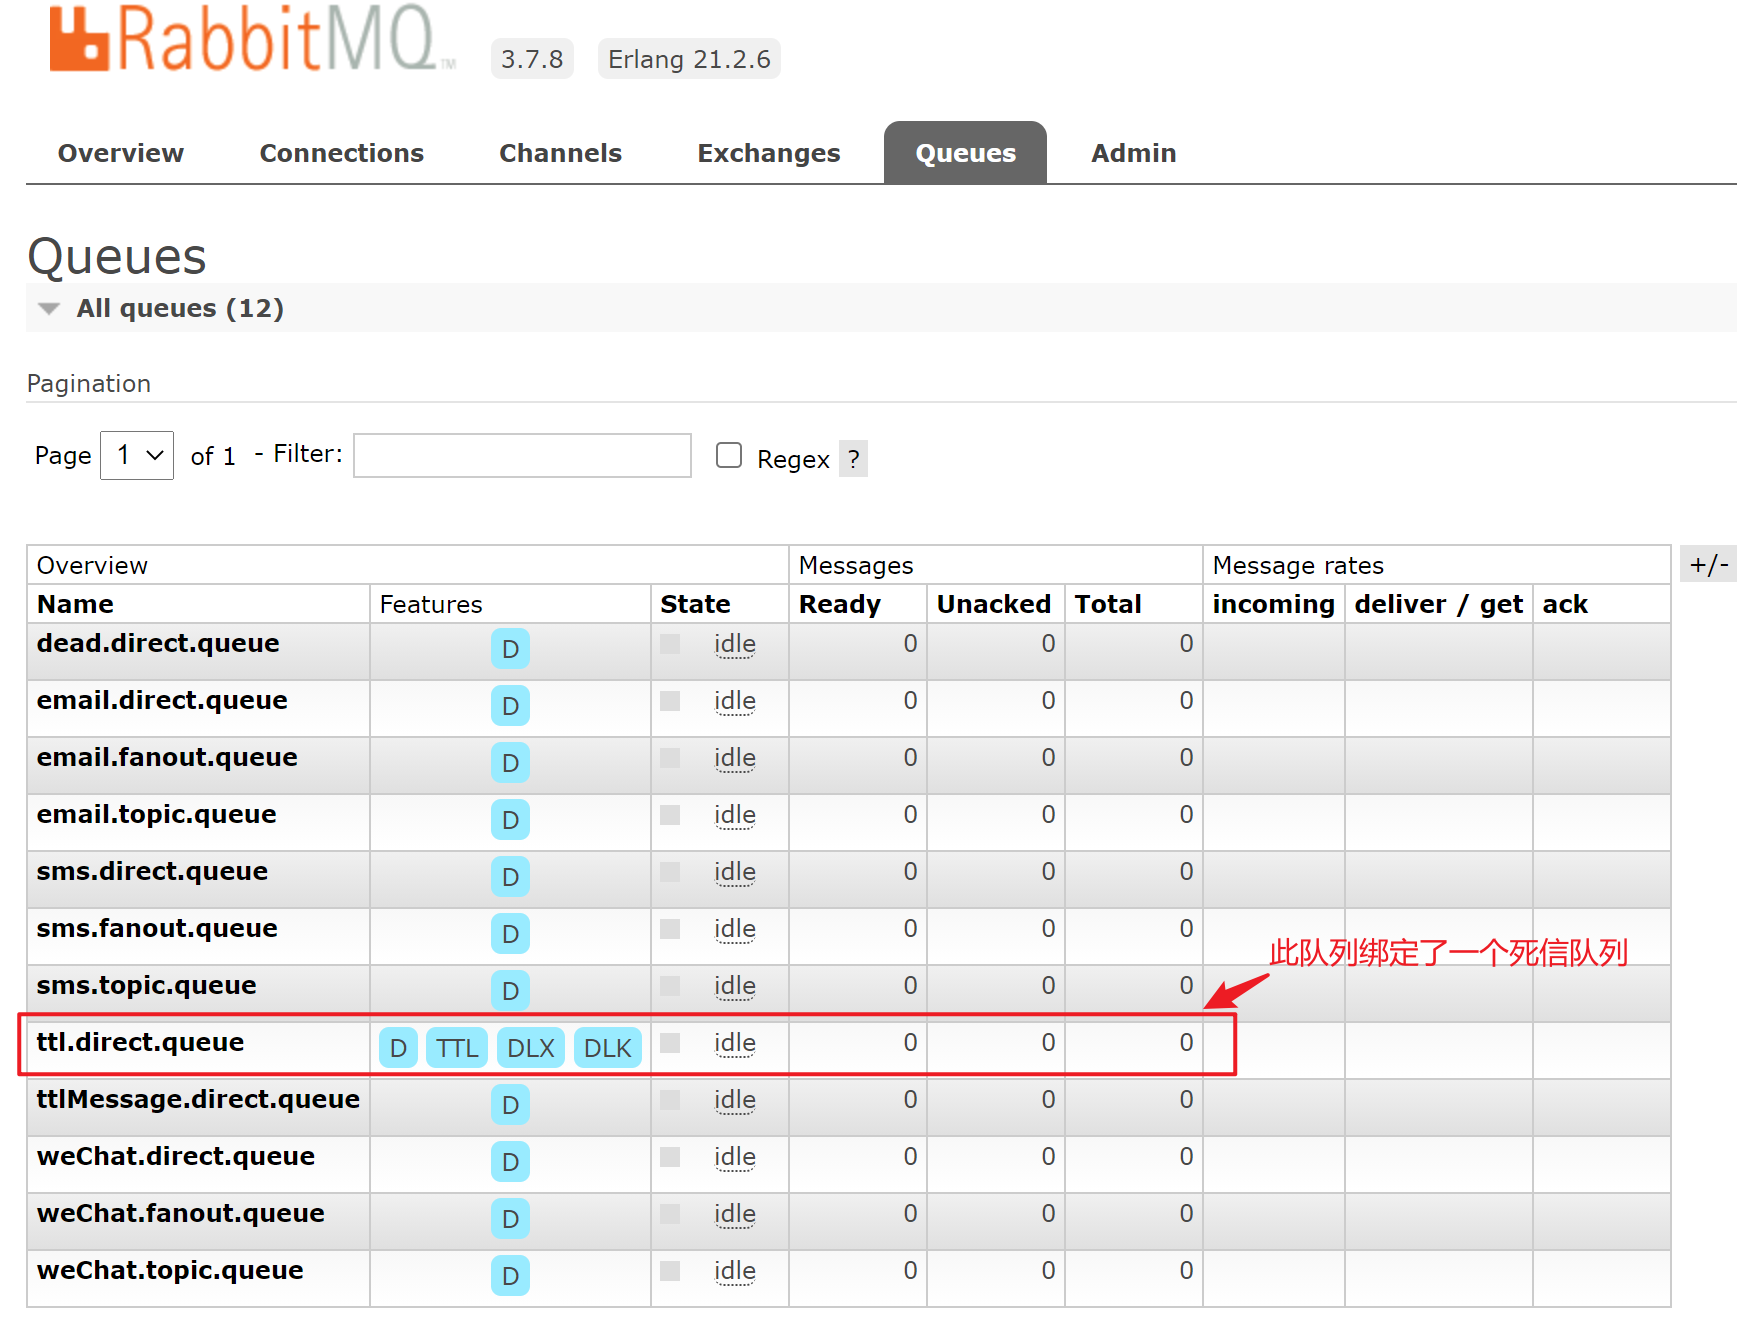
}先启动消费者,可以在RabbitMQ页面上看到创建的交换机和队列。
![image-20210518144708969]()
再启动生产者的测试方法,发现消息在投递到ttl.direct.queue队列后的5秒内由于没有被消费,于是又会被转移到dead.direct.queue中,如图:
![image-20210518145143831]()
![image-20210518145207389]()


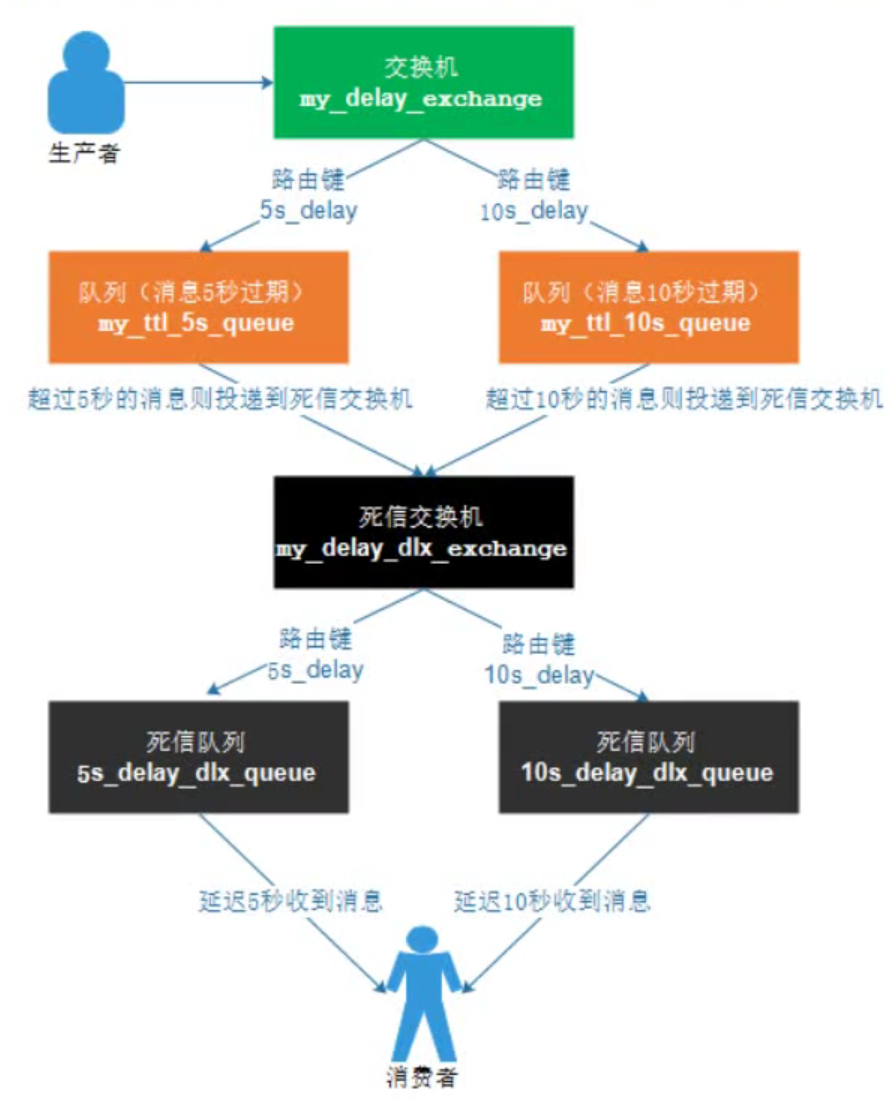
6.3 延迟队列
延迟队列存储的对象是对应的延迟消息;所谓“延迟消息”是指当消息被发送以后,并不想让消费者立刻拿到消息,而是等待特定时间后,消费者才能拿到这个消息进行消费。
在RabbitMQ中延迟队列可以通过过期时间+死信队列来实现,原因是TTL则刚好能让消息在延迟多久之后成为死信,另一方面,成为死信的消息都会被投递到死信队列里,这样只需要消费者一直消费死信队列里的消息就可以了,因为里面的消息都是希望被立即处理的消息。具体如下流程图所示:
![image-20210518201403297]()
6.4 消息确认机制
由于网络可能以不可预知的方式出现故障,且检测故障可能需要耗费一些时间,因此不能保证发送的消息能够到达对等方或由它成功地处理,为了确认生产者投递的消息成功发送到RabbitMQ中并且消费者能够成功消费从RabbitMQ中获取的信息,从而出现了消息确认机制,消息的ACK确认机制默认是打开的。
RabbitMQ 的消息确认机制如下:
![image-20210518203755060]()
- 生产者发送消息到RabbitMQ Server后,RabbitMQ Server需要对生产者进行消息Confirm确认。
- 消费者消费消息后需要对RabbitMQ Server进行消息ACK确认。
测试生产者确认机制:
①配置文件:
1
2
3
4
5
6
7
8
9
10
11
12
13
14
15
16
17
18
19server:
port: 8080
spring:
# 项目名
application:
name: rabbitmq-producer
# 配置rabbitMq服务器
rabbitmq:
host: localhost
port: 5672
username: admin
password: admin
# 虚拟host
virtual-host: /
# 设置消息只要被rabbitmq broker接收到就会触发confirmCallback回调
publisher-confirm-type: correlated
# 如果消息未能投递到目标queue里将触发回调returnCallback
publisher-returns: true②交换机和队列声明:
1
2
3
4
5
6
7
8
9
10
11
12
13
14
15
16
17
public class QueueConfig {
public DirectExchange confirmDirectExchange() {
return new DirectExchange("confirm_direct_exchange", true, false);
}
public Queue confirmDirectQueue() {
return new Queue("confirm_direct_queue", true);
}
public Binding confirmDirectBinding() {
return BindingBuilder.bind(confirmDirectQueue()).to(confirmDirectExchange()).with("directConfirm");
}
}③生产者服务类,绑定回调方法以及分发消息:
1
2
3
4
5
6
7
8
9
10
11
12
13
14
15
16
17
18
19
20
21
22
23
24
25
26
27
28
29
30
31
32
33
34
35
36
37
38
39
40
41
42
43
44
45
46
47
48
49
50
51
52
53
54
public class OrderService {
private RabbitTemplate rabbitTemplate;
public void callbackMakeOrder(String userId, String productId, int num) {
// 生成订单
String orderId = UUID.randomUUID().toString() + "-" + userId + "-" + productId + "-" + num;
log.info("订单生成成功,订单号为:{}", orderId);
// 通过MQ完成消息分发
String exchangeName = "confirm_direct_exchange";
//设置消息的confirm监听,监听消息是否到达exchange
rabbitTemplate.setConfirmCallback(new RabbitTemplate.ConfirmCallback() {
/**
*
* @param correlationData 对象内部只有一个 id 属性,用来表示当前消息的唯一性
* @param ack 息投递到broker 的状态,true表示成功
* @param cause 表示投递失败的原因
*/
public void confirm(CorrelationData correlationData, boolean ack, String cause) {
if (!ack) {
log.error("消息发送异常!");
} else {
log.info("收到确认,correlationData={} ,ack={}, cause={}", correlationData.getId(), ack, cause);
}
}
});
//设置消息的return监听,当消息无法路由到queue时候,会触发这个监听
rabbitTemplate.setReturnCallback(new RabbitTemplate.ReturnCallback() {
/**
*
* @param message 消息体
* @param replyCode 响应code
* @param replyText 响应内容
* @param exchange 交换机
* @param routingKey 路由key
*/
public void returnedMessage(Message message, int replyCode, String replyText, String exchange, String routingKey) {
log.info("returnedMessage ===> replyCode={} ,replyText={} ,exchange={} ,routingKey={}", replyCode, replyText, exchange, routingKey);
}
});
//correlationDataId相当于消息的唯一表示
UUID correlationDataId = UUID.randomUUID();
CorrelationData correlationData = new CorrelationData(correlationDataId.toString());
// 只能触发ConfirmCallback,因为消息能成功到达交换机和队列
rabbitTemplate.convertAndSend(exchangeName, "directConfirm", orderId, correlationData);
// 能同时触发ConfirmCallback和ReturnCallback,因为消息能成功到达交换机但不能路由到队列
rabbitTemplate.convertAndSend(exchangeName, "directConfirms", orderId, correlationData);
log.info("订单分发成功");
}
}④测试类:
1
2
3
4
5
6
7
8
9
10
class SpringbootOrderRabbitmqProducerApplicationTests {
OrderService orderService;
void contextLoads() {
orderService.callbackMakeOrder("1", "1", 10);
}
}⑤测试结果如下,路由key为directConfirm时:

路由key为directConfirms时:

测试消费者确认机制(比消息发送确认简单一点,因为只有一个消息回执ack的过程。使用@RabbitHandler注解标注的方法要增加channel、message两个参数):
消费消息有三种回执方法:
- basicAck:表示成功确认,使用此回执方法后,消息会被rabbitmq broker删除。
- basicNack:表示失败确认,一般在消费消息业务异常时用到此方法,可以将消息重新投递入队列。
- basicReject:拒绝消息,与basicNack区别在于不能进行批量操作,其他用法很相似。
①配置文件:
1
2
3
4
5
6
7
8
9
10
11
12
13
14
15
16
17
18
19server:
port: 8081
spring:
# 项目名
application:
name: rabbitmq-consumer
# 配置rabbitMq服务器
rabbitmq:
host: localhost
port: 5672
username: admin
password: admin
# 虚拟host
virtual-host: /
listener:
simple:
# 设置消费端手动 ack
acknowledge-mode: manual②消费者监听类:
- 使用@RabbitListener来监听队列。
- 从消息头里拿到消息的唯一表示deliveryTag。
- 使用channel.basicAck来确认消息已经消费。
- 如果有异常,并且如果该消息被重复消费则直接丢弃,否则使用channel.basicNack把消费失败的消息重新放入到队列中去。
1
2
3
4
5
6
7
8
9
10
11
12
13
14
15
16
17
18
19
20
21
22
23
24
25
26
27
28
29
30
31
32
33
34
35
36
37
public class ReceiverMessage {
public void processHandler(String msg, Channel channel, Message message) throws IOException {
try {
log.info("收到消息:{}", msg);
/**
* void basicAck(long deliveryTag, boolean multiple) throws IOException;
* @param1: 表示消息投递序号,每次消费消息或者消息重新投递后,deliveryTag都会增加。
* 手动消息确认模式下,我们可以对指定deliveryTag的消息进行ack、nack、reject等操作。
* @param2: 是否批量确认,值为true则会一次性ack所有小于当前消息deliveryTag的消息。
*/
channel.basicAck(message.getMessageProperties().getDeliveryTag(), false);
} catch (Exception e) {
if (message.getMessageProperties().getRedelivered()) {
log.error("消息已重复处理失败,拒绝再次接收...");
/**
* void basicReject(long deliveryTag, boolean requeue) throws IOException;
* @param1: 表示消息投递序号
* @param2: 值为true消息将重新入队列
*/
channel.basicReject(message.getMessageProperties().getDeliveryTag(), false); // 拒绝消息
} else {
log.error("消息即将再次返回队列处理...");
/**
* void basicNack(long deliveryTag, boolean multiple, boolean requeue) throws IOException;
* @param1: 表示消息投递序号
* @param2: 是否批量确认
* @param3: 值为true消息将重新入队列,如果为false则会把消息放进死信队列
*/
channel.basicNack(message.getMessageProperties().getDeliveryTag(), false, true);
}
}
}
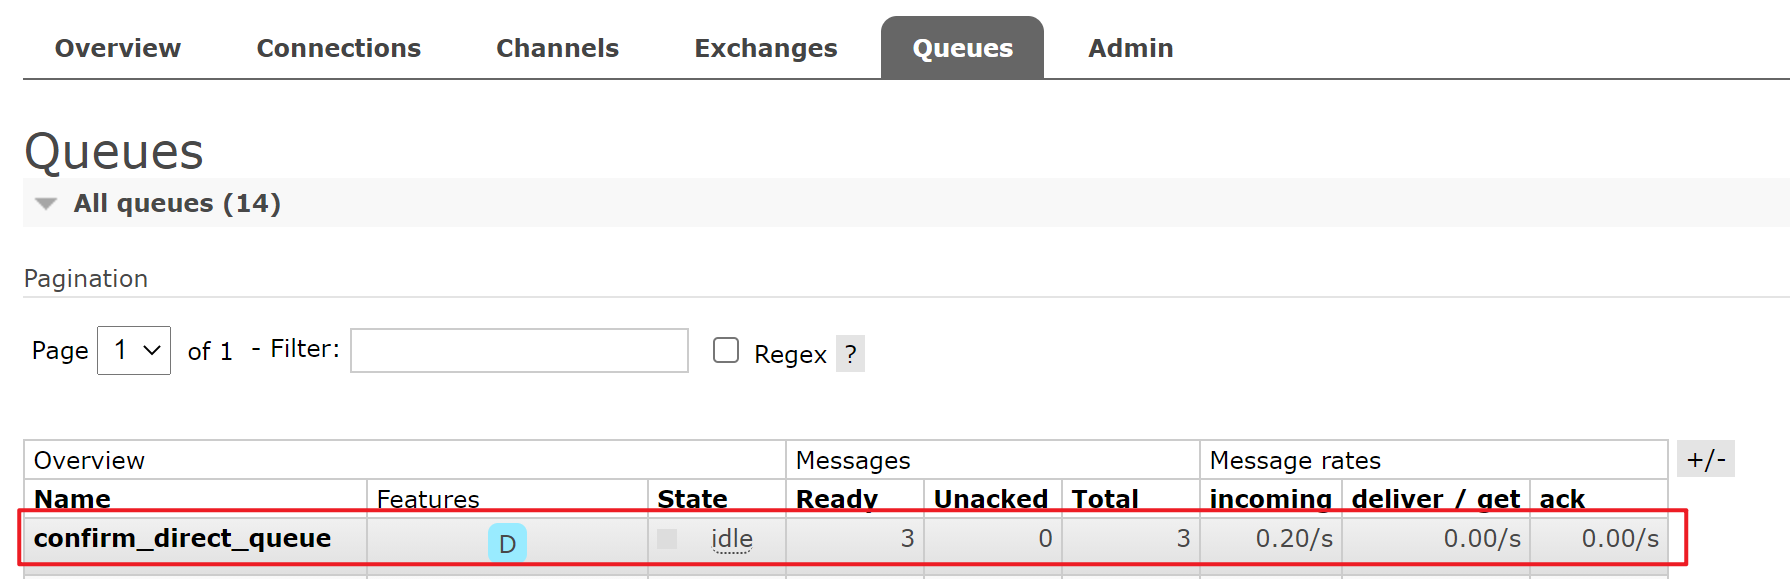
}③查看当前confirm_direct_queue队列中有3条待消费信息:
![image-20210518221216341]()
启动消费者主启动类后成功消费3条信息,控制台打印如下:

注意:
①默认是acknowledge-mode: auto,即消息自动确认,如果消息处理时出现异常,会出现死循环,并且消息在出现异常后不会被丢失,如下代码:
1
2
3
4
5
6
7
8
9
10
11
12
13
14
15
16
17
18
19
20server:
port: 8081
spring:
# 项目名
application:
name: rabbitmq-consumer
# 配置rabbitMq服务器
rabbitmq:
host: localhost
port: 5672
username: admin
password: admin
# 虚拟host
virtual-host: /
listener:
simple:
# 如果设置为manual则消息在出现异常后也不会被丢失,因为需要手动确认,而这里没有手动应答的逻辑
# 如果设置为none则消息在出现异常后会被丢失,因为不需要确认
acknowledge-mode: auto1
2
3
4
5
6
7
8
9
10
public class ReceiverMessage {
public void processHandler(String msg, Channel channel, Message message) throws IOException {
log.info("收到消息:{}", msg);
int i = 1 / 0;
}
}解决办法是可以在配置文件设置重复次数,但是无法根本解决问题:
1
2
3
4
5
6
7
8
9
10
11
12
13
14
15
16
17
18
19
20
21
22
23
24
25server:
port: 8081
spring:
# 项目名
application:
name: rabbitmq-consumer
# 配置rabbitMq服务器
rabbitmq:
host: localhost
port: 5672
username: admin
password: admin
# 虚拟host
virtual-host: /
listener:
simple:
retry:
# 是否支持重试
enabled: true
# 最大重试次数
max-attempts: 5
# 重试时间间隔
initial-interval: 2000
acknowledge-mode: auto②使用acknowledge-mode=manual开启消费者手动应答时,要使用channel.basicAck来确认消息已经消费(会把消息移除队列),否则消息会一直存在,导致重复消费。
1
2
3
4
5
6
7
8
9
10
11
12
13
14
15
16
17
18server:
port: 8081
spring:
# 项目名
application:
name: rabbitmq-consumer
# 配置rabbitMq服务器
rabbitmq:
host: localhost
port: 5672
username: admin
password: admin
# 虚拟host
virtual-host: /
listener:
simple:
acknowledge-mode: manual1
2
3
4
5
6
7
8
9
public class ReceiverMessage {
public void processHandler(String msg, Channel channel, Message message) throws IOException {
log.info("收到消息:{}", msg);
}
}
③如果消费者处理过程中出现异常并且使用的是try catch+手动应答的方式,会出现死循环,即消息会一直重复入队被消费,并且控制重复次数的配置会失效(因为到达重复次数后会抛出异常,而该异常又会被捕获而无法被系统处理,相当于被屏蔽了),如下面的代码:
1
2
3
4
5
6
7
8
9
10
11
12
13
14
15
16
17
18server:
port: 8081
spring:
# 项目名
application:
name: rabbitmq-consumer
# 配置rabbitMq服务器
rabbitmq:
host: localhost
port: 5672
username: admin
password: admin
# 虚拟host
virtual-host: /
listener:
simple:
acknowledge-mode: manual1
2
3
4
5
6
7
8
9
10
11
12
13
14
15
16
17
18
19
20
21
22
23
24
25
26
27
28
public class ReceiverMessage {
public void processHandler(String msg, Channel channel, Message message) throws IOException {
try {
log.info("收到消息:{}", msg);
/**
* void basicAck(long deliveryTag, boolean multiple) throws IOException;
* @param1: 表示消息投递序号,每次消费消息或者消息重新投递后,deliveryTag都会增加。
* 手动消息确认模式下,我们可以对指定deliveryTag的消息进行ack、nack、reject等操作。
* @param2: 是否批量确认,值为true则会一次性ack所有小于当前消息deliveryTag的消息。
*/
int i = 1 / 0;
channel.basicAck(message.getMessageProperties().getDeliveryTag(), false);
} catch (Exception e) {
log.error("消息即将再次返回队列处理...");
/**
* void basicNack(long deliveryTag, boolean multiple, boolean requeue) throws IOException;
* @param1: 表示消息投递序号
* @param2: 是否批量确认
* @param3: 值为true消息将重新入队列,如果为false则会把消息放进死信队列
*/
channel.basicNack(message.getMessageProperties().getDeliveryTag(), false, true);
}
}
}