Kubernetes之集群安装
1、准备三台主机
1.1 配置静态IP
①运行以下命令修改网卡配置文件。
1
vim /etc/sysconfig/network-scripts/ifcfg-ens33
修改内容为:
1
2
3
4
5
6
7
8
9
10
11
12
13
14
15
16
17
18
19
20
TYPE=Ethernet
PROXY_METHOD=none
BROWSER_ONLY=no
BOOTPROTO=static # 使用静态分配ip
DEFROUTE=yes
IPV4_FAILURE_FATAL=no
IPV6INIT=yes
IPV6_AUTOCONF=yes
IPV6_DEFROUTE=yes
IPV6_FAILURE_FATAL=no
IPV6_ADDR_GEN_MODE=stable-privacy
NAME=ens33
UUID=75edc1c5-bdcb-41f8-8915-c9aa1f6b4011
DEVICE=ens33
ONBOOT=yes # 系统启动时检查网路接口是否有效
IPADDR=192.168.200.20 # IP地址
NETMASK=255.255.255.0 # 子网掩码
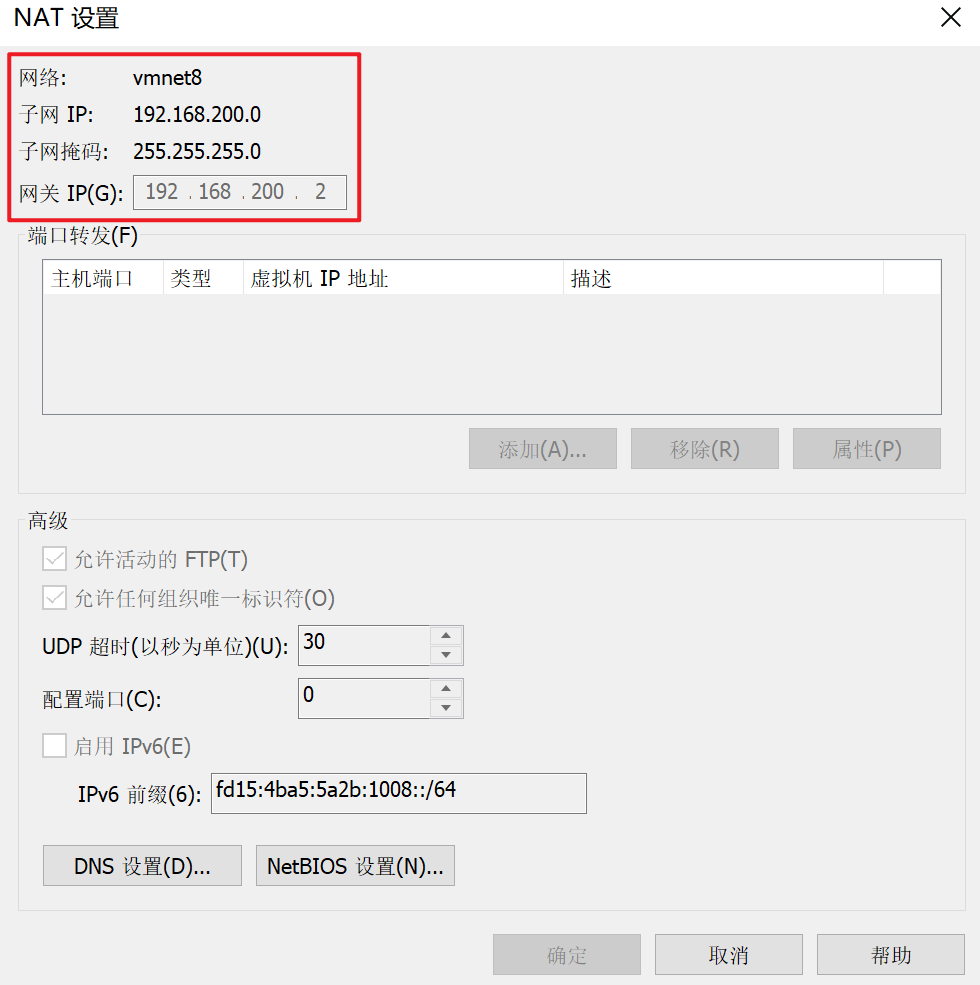
GATEWAY=192.168.200.2 # 网关
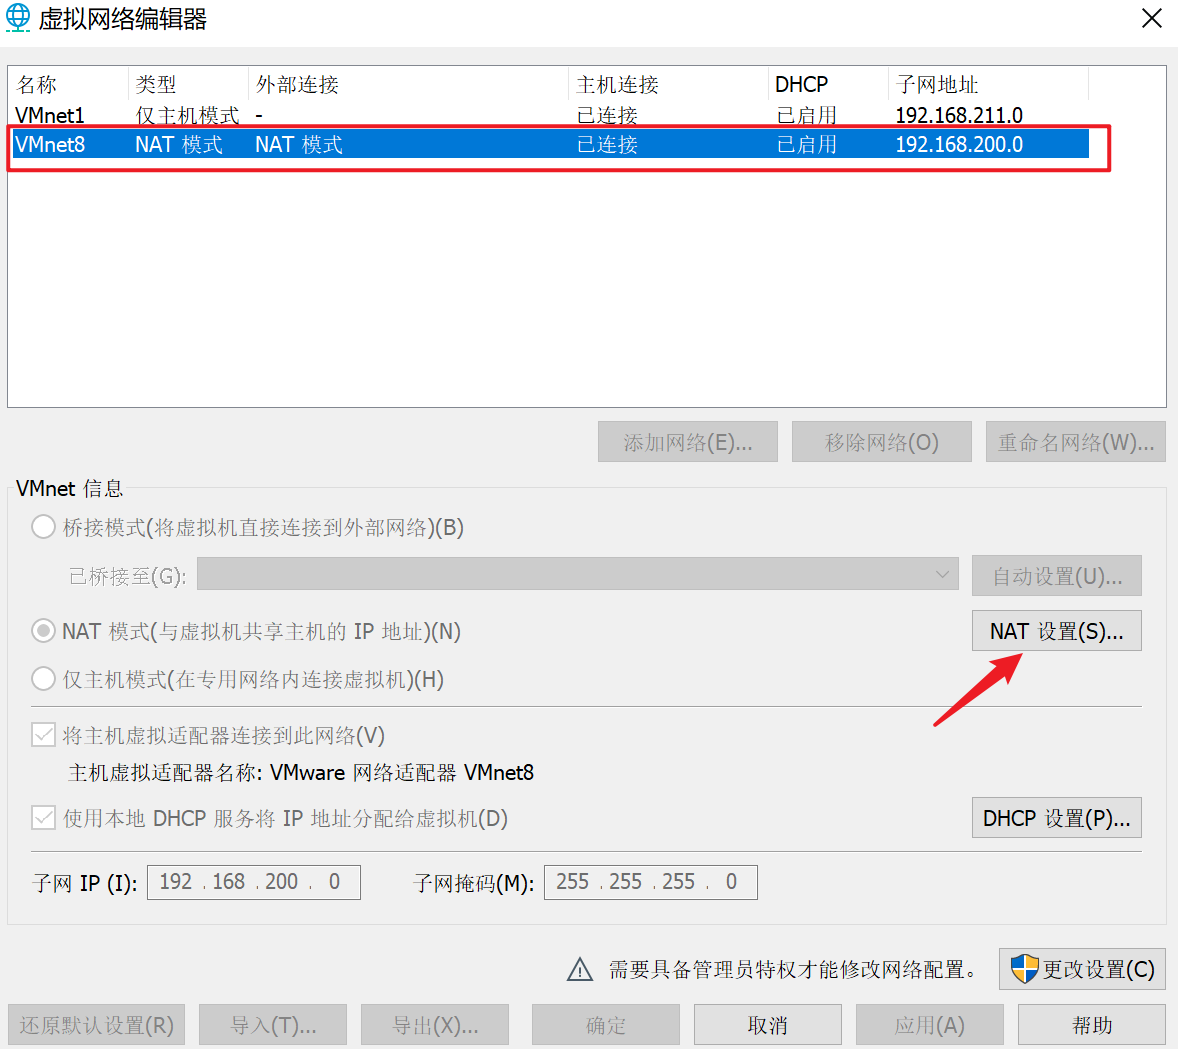
DNS1=192.168.200.2 # 域名解析器其中IP的设置可参照VMware的虚拟网络编辑器:
![1633423684712]()
![1633423711418]()
②重启网络服务。
1
service network restart
1.2 修改yum源
①备份yum配置文件。
1
mv /etc/yum.repos.d/CentOS-Base.repo /etc/yum.repos.d/CentOS-Base.repo.backup
②获取阿里yum源配置文件。
1
wget -O /etc/yum.repos.d/CentOS-Base.repo http://mirrors.aliyun.com/repo/Centos-7.repo
③执行yum源的更新命令。
1
2
3
yum clean all
yum makecache
yum update
1.3 克隆虚拟机
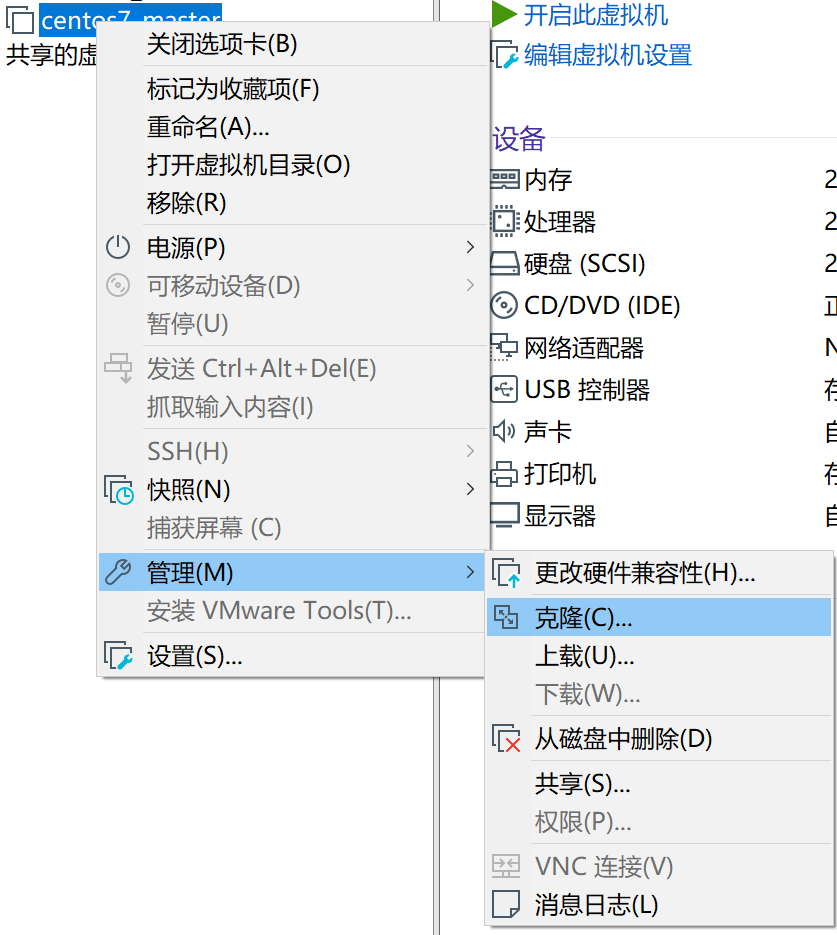
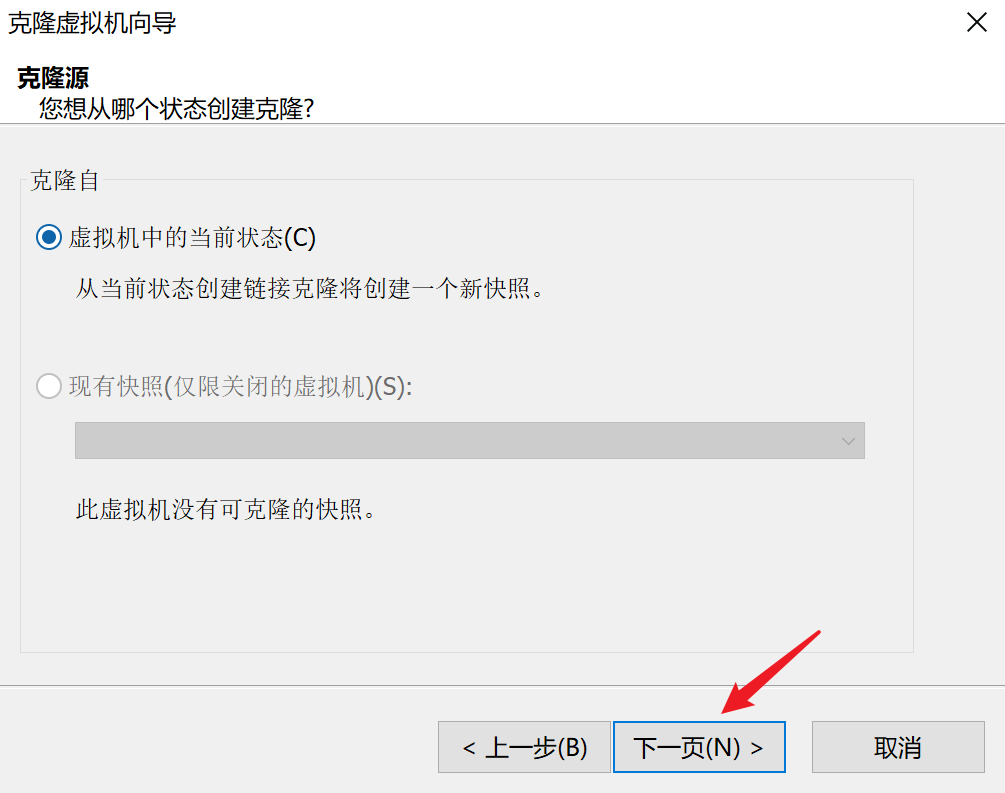
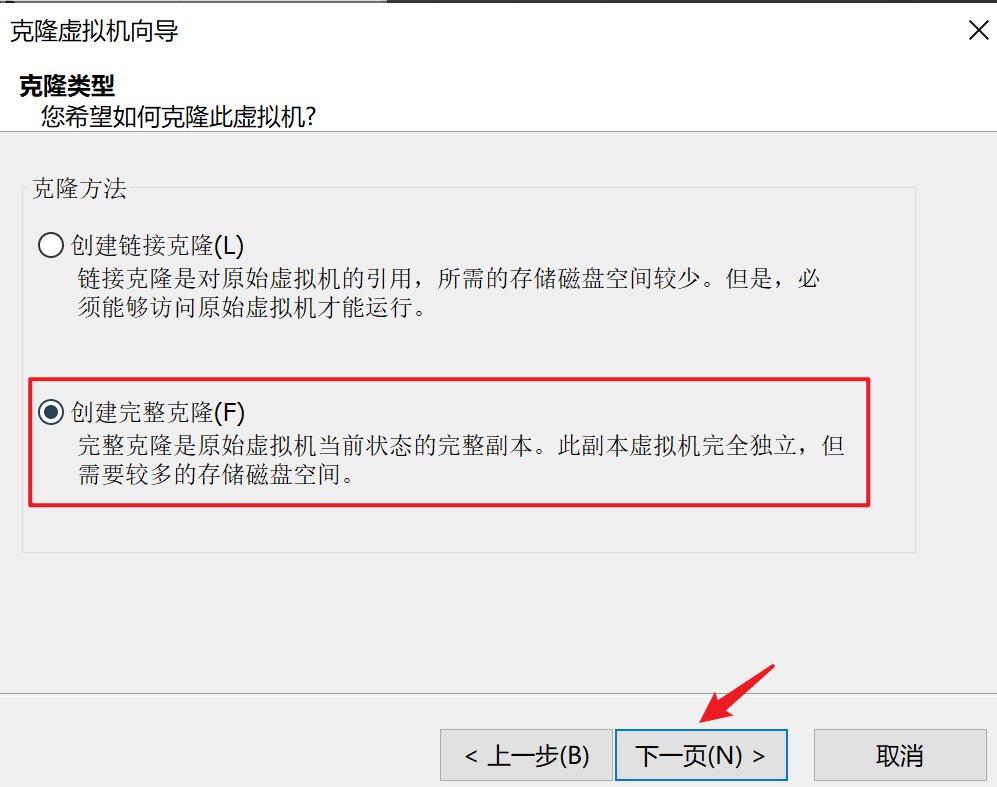
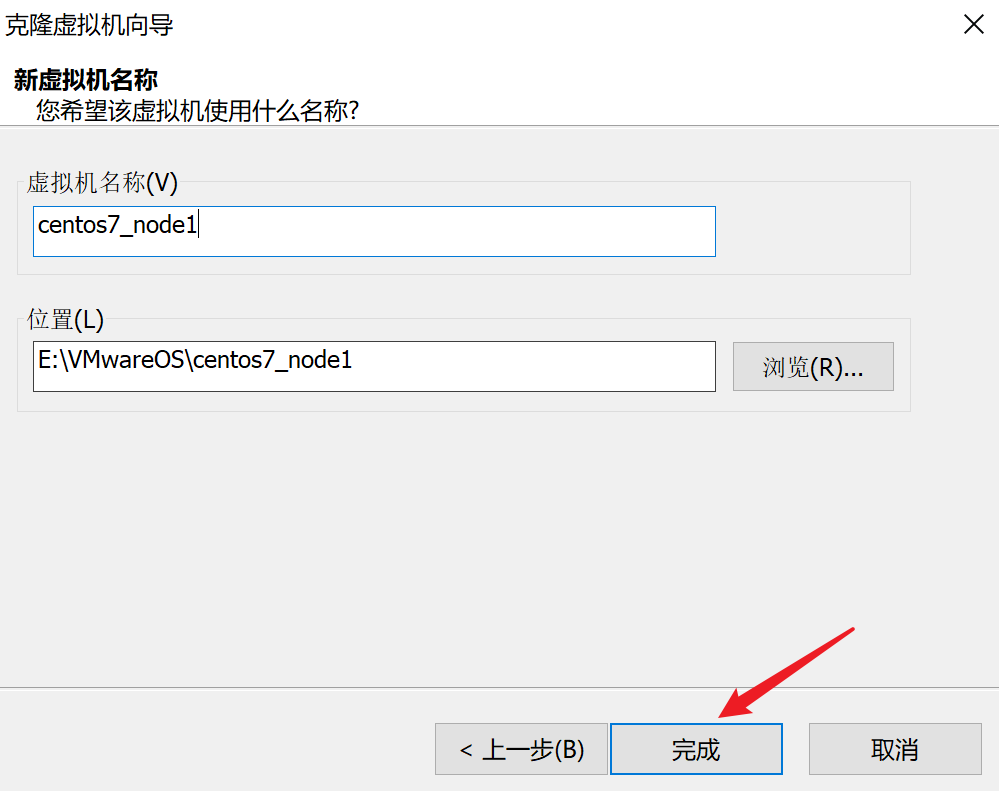
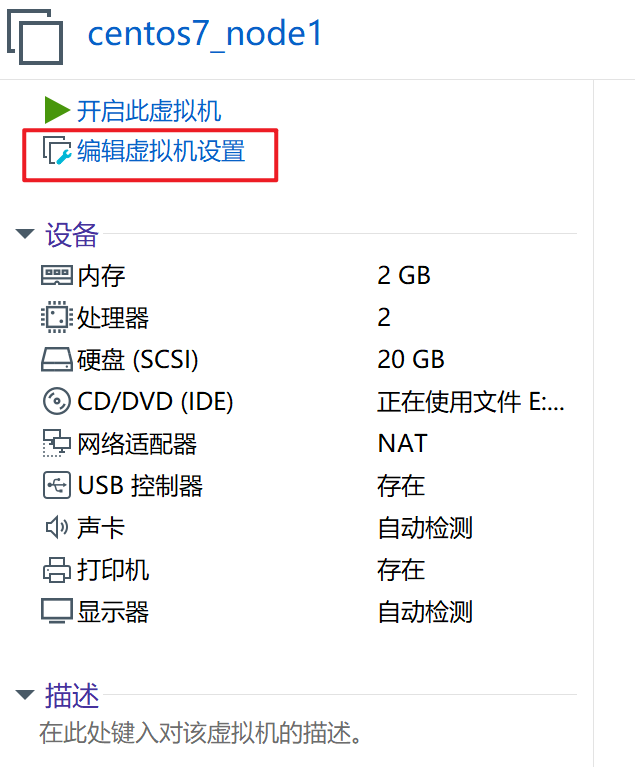
①操作前关闭刚创建的虚拟机,并按照以下步骤克隆出另外两台虚拟机作为node1和node2节点。
![1633425211388]()
![1633425110698]()
![1633425275676]()
![1633425300358]()
![1633425370759]()
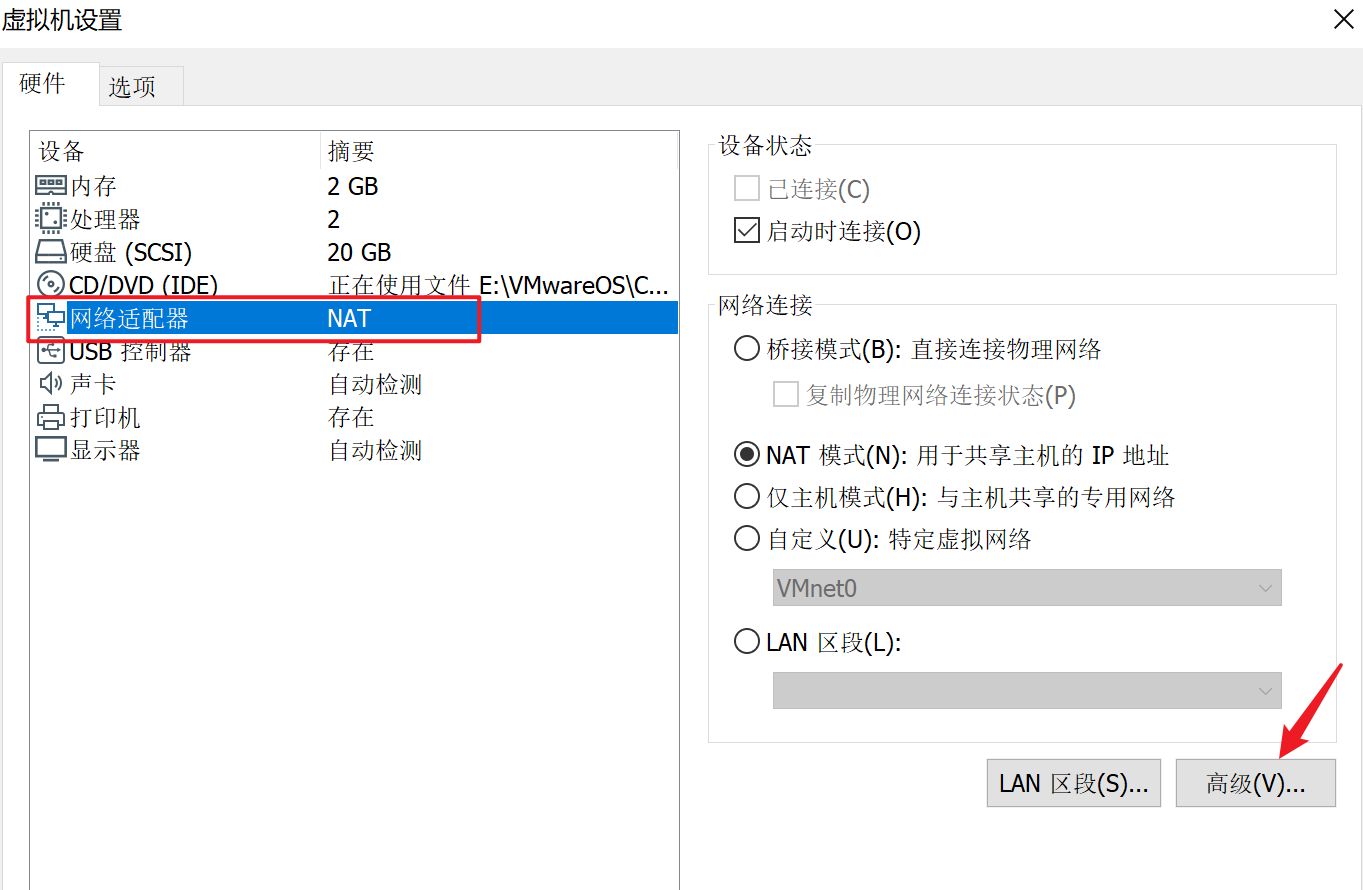
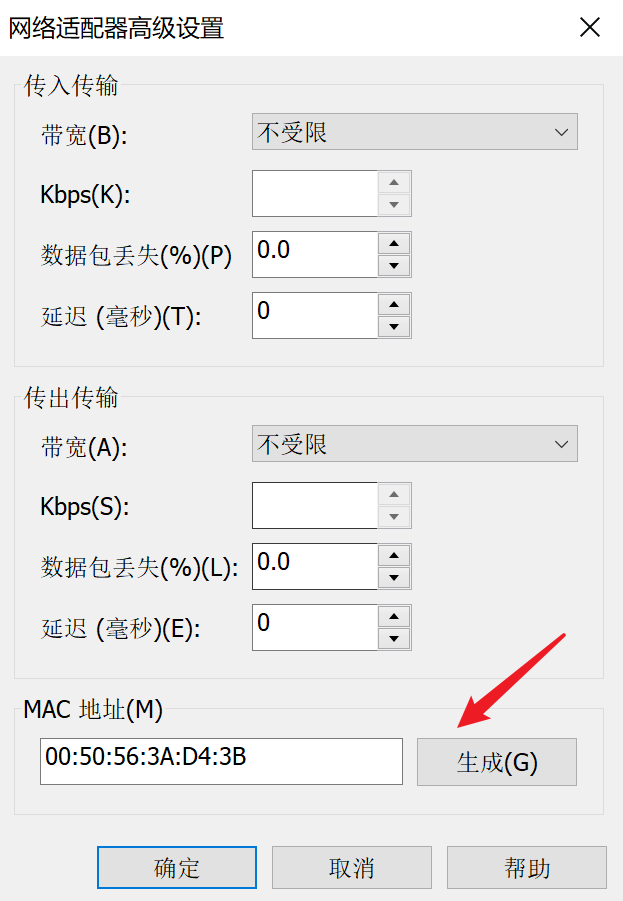
②修改node1和node2的MAC地址。
![1633425631753]()
![1633425701222]()
![1633425764469]()
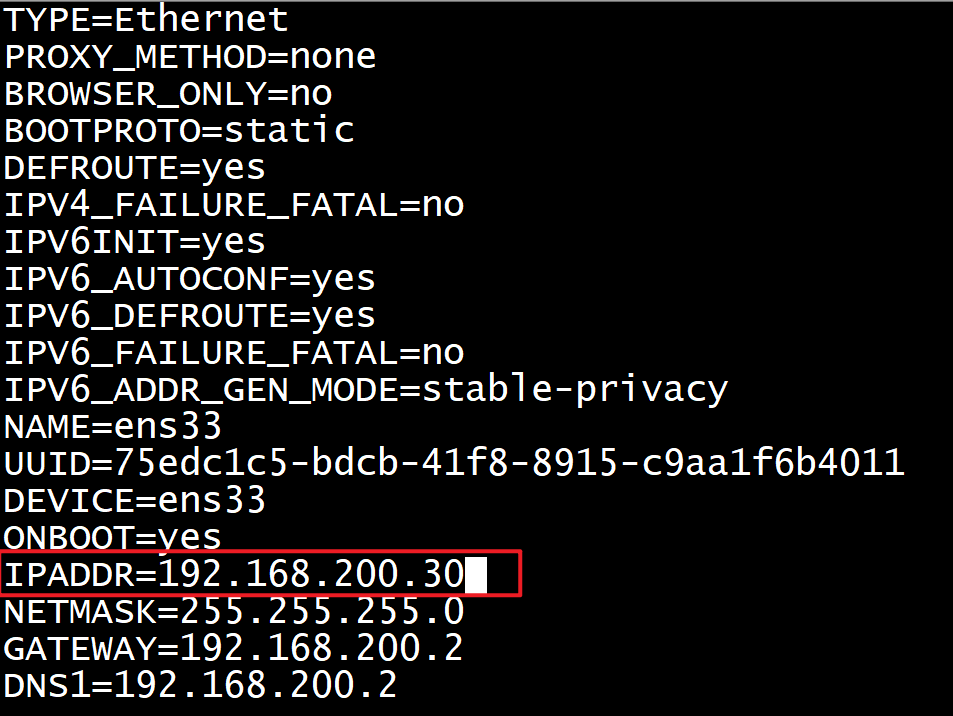
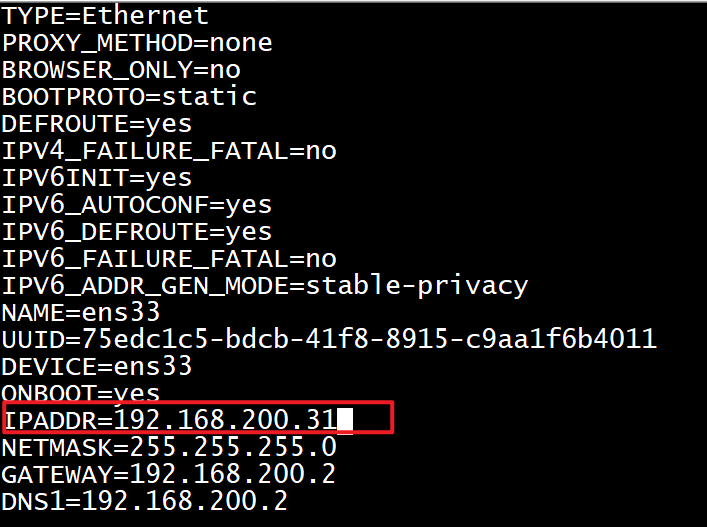
③修改node1和node2的IP地址,即分别启动node1和node2虚拟机,然后将ifcfg-ens33文件中的IPADDR属性修改成不重复的即可。
![1633426009522]()
![1633426174130]()
至此,master主机ip为192.168.200.20,node1和node2主机ip分别为192.168.200.30和192.168.200.31。
1.4 设置主机名和hosts映射
①分别启动三台主机名运行以下命令进行永久修改即可。
1
2
3
hostnamectl set-hostname master # 在master主机运行
hostnamectl set-hostname node1 # 在node1主机运行
hostnamectl set-hostname node2 # 在node2主机运行②分别在三台主机的hosts文件中添加如下内容。
1
vim /etc/hosts
1
2
3
192.168.200.20 master
192.168.200.30 node1
192.168.200.31 node2
1.5 SSH免密互登设置
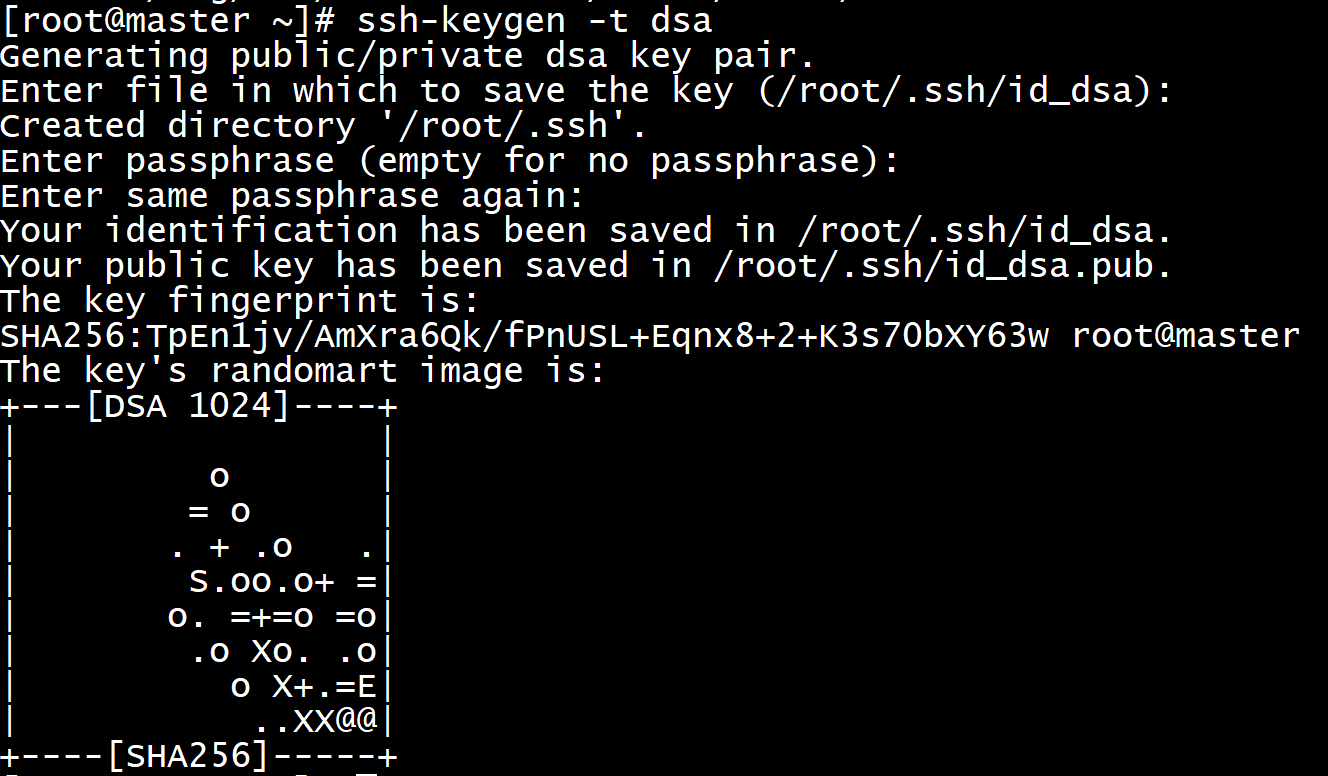
①分别在三台主机执行以下命令在/root/.ssh文件夹下生成id_dsa(私钥)和id_dsa.pub(公钥)文件(在命令执行过程中敲击两遍回车)。
1
ssh-keygen -t dsa
![]()
![]()
②运行以下命令向本机复制公钥。
1
cat ~/.ssh/id_rsa.pub >> ~/.ssh/authorized_keys
![]()
③把公钥复制到另外两台虚拟机(途中输入密码)。
1
2
3
4
5
6
7
8
9
10
11
12
13
14
15
16
17
18
19
20
21
22
23
24
25
26
27
28
29
[root@master ~]# ssh-copy-id -i node1
/usr/bin/ssh-copy-id: INFO: Source of key(s) to be installed: "/root/.ssh/id_rsa.pub"
The authenticity of host 'node1 (192.168.200.30)' can't be established.
ECDSA key fingerprint is SHA256:HKUwab7yhyDZspzpMEq/EIDl9naz24hwE6XmhhlmxsY.
ECDSA key fingerprint is MD5:52:36:22:9c:89:c0:77:a1:31:dd:f3:1b:2b:3c:3b:cd.
Are you sure you want to continue connecting (yes/no)? yes
/usr/bin/ssh-copy-id: INFO: attempting to log in with the new key(s), to filter out any that are already installed
/usr/bin/ssh-copy-id: INFO: 1 key(s) remain to be installed -- if you are prompted now it is to install the new keys
root@node1's password:
Number of key(s) added: 1
Now try logging into the machine, with: "ssh 'node1'"
and check to make sure that only the key(s) you wanted were added.
[root@master ~]# ssh-copy-id -i node2
/usr/bin/ssh-copy-id: INFO: Source of key(s) to be installed: "/root/.ssh/id_rsa.pub"
The authenticity of host 'node2 (192.168.200.31)' can't be established.
ECDSA key fingerprint is SHA256:HKUwab7yhyDZspzpMEq/EIDl9naz24hwE6XmhhlmxsY.
ECDSA key fingerprint is MD5:52:36:22:9c:89:c0:77:a1:31:dd:f3:1b:2b:3c:3b:cd.
Are you sure you want to continue connecting (yes/no)? yes
/usr/bin/ssh-copy-id: INFO: attempting to log in with the new key(s), to filter out any that are already installed
/usr/bin/ssh-copy-id: INFO: 1 key(s) remain to be installed -- if you are prompted now it is to install the new keys
root@node2's password:
Number of key(s) added: 1
Now try logging into the machine, with: "ssh 'node2'"
and check to make sure that only the key(s) you wanted were added.④测试相互是否可以进行免密登录。
1
2
3
4
5
6
7
8
9
10
11
12
13
14
15
16
17
18
19
20
[root@master ~]# ssh master
The authenticity of host 'master (192.168.200.20)' can't be established.
ECDSA key fingerprint is SHA256:HKUwab7yhyDZspzpMEq/EIDl9naz24hwE6XmhhlmxsY.
ECDSA key fingerprint is MD5:52:36:22:9c:89:c0:77:a1:31:dd:f3:1b:2b:3c:3b:cd.
Are you sure you want to continue connecting (yes/no)? yes
Warning: Permanently added 'master,192.168.200.20' (ECDSA) to the list of known hosts.
Last login: Tue Oct 5 18:22:50 2021 from node1
[root@master ~]# exit
登出
Connection to master closed.
[root@master ~]# ssh node1
Last login: Tue Oct 5 18:22:25 2021 from node1
[root@node1 ~]# exit
登出
Connection to node1 closed.
[root@master ~]# ssh node2
Last login: Tue Oct 5 18:22:45 2021 from node1
[root@node2 ~]# exit
登出
Connection to node2 closed
1.6 系统配置
在三台主机都执行以下操作。
(1)安装相关依赖包。
1
yum install -y conntrack ntpdate ntp ipvsadm ipset jq iptables curl sysstat libseccomp wget vim net-tools git
(2)关闭防火墙。
1
systemctl stop firewalld && systemctl disable firewalld
(3)设置防火墙为Iptables并设置空规则。
1
yum -y install iptables-services && systemctl start iptables && systemctl enable iptables && iptables -F && service iptables save
(4)关闭SWAP,即关闭虚拟内存,防止出现容器运行在虚拟内存的情况。
1
swapoff -a && sed -i '/ swap / s/^\(.*\)$/#\1/g' /etc/fstab
(5)关闭SELINUX。
1
setenforce 0 && sed -i 's/^SELINUX=.*/SELINUX=disabled/' /etc/selinux/config
(6)调整内核参数,对于K8S。
1
2
3
4
5
6
7
8
9
10
11
12
13
14
15
cat > kubernetes.conf <<EOF
net.bridge.bridge-nf-call-iptables=1
net.bridge.bridge-nf-call-ip6tables=1
net.ipv4.ip_forward=1
net.ipv4.tcp_tw_recycle=0
vm.swappiness=0 # 禁止使用 swap 空间,只有当系统 OOM 时才允许使用它
vm.overcommit_memory=1 # 不检查物理内存是否够用
vm.panic_on_oom=0 # 开启 OOM
fs.inotify.max_user_instances=8192
fs.inotify.max_user_watches=1048576
fs.file-max=52706963
fs.nr_open=52706963
net.ipv6.conf.all.disable_ipv6=1
net.netfilter.nf_conntrack_max=2310720
EOF1
cp kubernetes.conf /etc/sysctl.d/kubernetes.conf
1
sysctl -p /etc/sysctl.d/kubernetes.conf
(7)调整系统时区。
1
timedatectl set-timezone Asia/Shanghai # 设置系统时区为 中国/上海
1
timedatectl set-local-rtc 0 # 将当前的 UTC 时间写入硬件时钟
1
2
3
# 重启依赖于系统时间的服务
systemctl restart rsyslog
systemctl restart crond(8)关闭系统不需要的服务,,从而尽可能降低系统占用的资源。
1
systemctl stop postfix && systemctl disable postfix
(9)设置rsyslogd和systemd journald。
1
2
3
4
5
6
7
8
9
10
11
12
13
14
15
16
17
18
19
20
21
22
23
24
25
26
27
28
29
30
31
# 持久化保存日志的目录
[root@master ~]# mkdir /var/log/journal
[root@master ~]# mkdir /etc/systemd/journald.conf.d
[root@master ~]# cat > /etc/systemd/journald.conf.d/99-prophet.conf <<EOF
[Journal]
# 持久化保存到磁盘
Storage=persistent
# 压缩历史日志
Compress=yes
SyncIntervalSec=5m
RateLimitInterval=30s
RateLimitBurst=1000
# 最大占用空间 10G
SystemMaxUse=10G
# 单日志文件最大 200M
SystemMaxFileSize=200M
# 日志保存时间 2 周
MaxRetentionSec=2week
# 不将日志转发到 syslog
ForwardToSyslog=no
EOF
[root@master ~]# systemctl restart systemd-journald(10)升级系统内核为4.4+, 因为CentOS 7.x系统自带的3.10.x内核存在一些Bugs,导致运行的 Docker、Kubernetes不稳定。
1
rpm -Uvh http://www.elrepo.org/elrepo-release-7.0-3.el7.elrepo.noarch.rpm
1
2
# 安装完成后检查 /boot/grub2/grub.cfg 中对应内核 menuentry 中是否包含 initrd16 配置,如果没有,再安装一次!
yum --enablerepo=elrepo-kernel install -y kernel-lt1
2# 设置开机从新内核启动
grub2-set-default 'CentOS Linux (4.4.189-1.el7.elrepo.x86_64) 7 (Core)' && reboot
2、使用Kubeadm安装k8s
①在三台主机都执行以下操作。
(1)kube-proxy(主要解决SVC与pod的调度关系)开启ipvs的前置条件, 可以增加访问效率。
1
modprobe br_netfilter
1
2
3
4
5
6
7
8cat > /etc/sysconfig/modules/ipvs.modules <<EOF
#!/bin/bash
modprobe -- ip_vs
modprobe -- ip_vs_rr
modprobe -- ip_vs_wrr
modprobe -- ip_vs_sh
modprobe -- nf_conntrack_ipv4
EOF1
2
3chmod 755 /etc/sysconfig/modules/ipvs.modules && bash /etc/sysconfig/modules/ipvs.modules && lsmod | grep -e ip_vs -e nf_conntrack_ipv4
# 这里如果显示……ipv4 not found没关系,后面无影响(2)安装Docker软件。
1
2
3
4
5
6
7
8
9
10
11
12
13
14
15
16
17
18
19
20
21
22
23
24
25[root@master ~]# yum install -y yum-utils device-mapper-persistent-data lvm2
[root@master ~]# yum-config-manager --add-repo http://mirrors.aliyun.com/docker-ce/linux/centos/docker-ce.repo
[root@master ~]# yum update -y && yum install -y docker-ce
[root@master ~]# systemctl start docker
[root@master ~]# systemctl enable docker
[root@master ~]# mkdir /etc/docker
[root@master ~]# cat > /etc/docker/daemon.json <<EOF
{
"exec-opts": ["native.cgroupdriver=systemd"],
"log-driver": "json-file",
"log-opts": {
"max-size": "100m"
}
}
EOF
[root@master ~]# mkdir -p /etc/systemd/system/docker.service.d
[root@master ~]# systemctl daemon-reload && systemctl restart docker && systemctl enable docker(3)安装Kubeadm(主从配置)。
1
2
3
4
5
6
7
8
9
10
11
12
13
14[root@master ~]# cat <<EOF > /etc/yum.repos.d/kubernetes.repo
[kubernetes]
name=Kubernetes
baseurl=http://mirrors.aliyun.com/kubernetes/yum/repos/kubernetes-el7-x86_64
enabled=1
gpgcheck=0
repo_gpgcheck=0
gpgkey=http://mirrors.aliyun.com/kubernetes/yum/doc/yum-key.gpg
http://mirrors.aliyun.com/kubernetes/yum/doc/rpm-package-key.gpg
EOF
[root@master ~]# yum -y install kubeadm-1.15.1 kubectl-1.15.1 kubelet-1.15.1
[root@master ~]# systemctl enable kubelet.service(4)导入离线镜像。
1
2
3
4
5
6
7
8
9
10
11
12
13
14
15
16[root@master ~]# wget https://linuxli.oss-cn-beijing.aliyuncs.com/Kubernetes/%E4%B8%8B%E8%BD%BD%E6%96%87%E4%BB%B6/kubeadm-basic.images.tar.gz
[root@master ~]# tar -zxvf kubeadm-basic.images.tar.gz
[root@master ~]# vim image-load.sh
#!/bin/bash
ls /root/kubeadm-basic.images/ >/tmp/image-list.txt
cd /root/kubeadm-basic.images/
for i in $(cat /tmp/image-list.txt)
do
docker load -i $i
done
rm -rf /tmp/image-list.txt
[root@master ~]# chmod a+x image-load.sh && ./image-load.sh
②初始化master主节点。
1
2
3
4
5
6
7
8
9
10
11
12
13
14
15
16
17
18
19
20
21
22
23
24
25
26
27
28
29
30
31
32
33
34
35
36
37
38
39
40
41
42
43
44
45
46
47
48
49
50
51
52
53
54
55
56
57
58
59
60
61
62
63
64
65
66
67
68
69
70
71
72
73
74
75
76
77
78
79
80
81
82
83
84
85
86
87
88
89
90
91
92
93
94
95
96
97
98
99
100
101
102
103
104
105
106
107
108
109
110
111
112
113
114
115
116
117
118
119
120
121
122
123
124
125
126[root@master ~]# kubeadm config print init-defaults > kubeadm-config.yaml
[root@master ~]# vim kubeadm-config.yaml
apiVersion: kubeadm.k8s.io/v1beta2
bootstrapTokens:
- groups:
- system:bootstrappers:kubeadm:default-node-token
token: abcdef.0123456789abcdef
ttl: 24h0m0s
usages:
- signing
- authentication
kind: InitConfiguration
localAPIEndpoint:
advertiseAddress: 192.168.200.20
bindPort: 6443
nodeRegistration:
criSocket: /var/run/dockershim.sock
name: master
taints:
- effect: NoSchedule
key: node-role.kubernetes.io/master
---
apiServer:
timeoutForControlPlane: 4m0s
apiVersion: kubeadm.k8s.io/v1beta2
certificatesDir: /etc/kubernetes/pki
clusterName: kubernetes
controllerManager: {}
dns:
type: CoreDNS
etcd:
local:
dataDir: /var/lib/etcd
imageRepository: k8s.gcr.io
kind: ClusterConfiguration
kubernetesVersion: v1.15.1
networking:
dnsDomain: cluster.local
podSubnet: "10.244.0.0/16"
serviceSubnet: 10.96.0.0/12
scheduler: {}
---
apiVersion: kubeproxy.config.k8s.io/v1alpha1
kind: KubeProxyConfiguration
featureGates:
SupportIPVSProxyMode: true
mode: ipvs
[root@master ~]# kubeadm init --config=kubeadm-config.yaml --experimental-upload-certs | tee kubeadm-init.log
Flag --experimental-upload-certs has been deprecated, use --upload-certs instead
[init] Using Kubernetes version: v1.15.1
[preflight] Running pre-flight checks
[WARNING SystemVerification]: this Docker version is not on the list of validated versions: 20.10.9. Latest validated version: 18.09
[preflight] Pulling images required for setting up a Kubernetes cluster
[preflight] This might take a minute or two, depending on the speed of your internet connection
[preflight] You can also perform this action in beforehand using 'kubeadm config images pull'
[kubelet-start] Writing kubelet environment file with flags to file "/var/lib/kubelet/kubeadm-flags.env"
[kubelet-start] Writing kubelet configuration to file "/var/lib/kubelet/config.yaml"
[kubelet-start] Activating the kubelet service
[certs] Using certificateDir folder "/etc/kubernetes/pki"
[certs] Generating "front-proxy-ca" certificate and key
[certs] Generating "front-proxy-client" certificate and key
[certs] Generating "etcd/ca" certificate and key
[certs] Generating "etcd/server" certificate and key
[certs] etcd/server serving cert is signed for DNS names [master localhost] and IPs [192.168.200.20 127.0.0.1 ::1]
[certs] Generating "apiserver-etcd-client" certificate and key
[certs] Generating "etcd/peer" certificate and key
[certs] etcd/peer serving cert is signed for DNS names [master localhost] and IPs [192.168.200.20 127.0.0.1 ::1]
[certs] Generating "etcd/healthcheck-client" certificate and key
[certs] Generating "ca" certificate and key
[certs] Generating "apiserver" certificate and key
[certs] apiserver serving cert is signed for DNS names [master kubernetes kubernetes.default kubernetes.default.svc kubernetes.default.svc.cluster.local] and IPs [10.96.0.1 192.168.200.20]
[certs] Generating "apiserver-kubelet-client" certificate and key
[certs] Generating "sa" key and public key
[kubeconfig] Using kubeconfig folder "/etc/kubernetes"
[kubeconfig] Writing "admin.conf" kubeconfig file
[kubeconfig] Writing "kubelet.conf" kubeconfig file
[kubeconfig] Writing "controller-manager.conf" kubeconfig file
[kubeconfig] Writing "scheduler.conf" kubeconfig file
[control-plane] Using manifest folder "/etc/kubernetes/manifests"
[control-plane] Creating static Pod manifest for "kube-apiserver"
[control-plane] Creating static Pod manifest for "kube-controller-manager"
[control-plane] Creating static Pod manifest for "kube-scheduler"
[etcd] Creating static Pod manifest for local etcd in "/etc/kubernetes/manifests"
[wait-control-plane] Waiting for the kubelet to boot up the control plane as static Pods from directory "/etc/kubernetes/manifests". This can take up to 4m0s
[apiclient] All control plane components are healthy after 19.002229 seconds
[upload-config] Storing the configuration used in ConfigMap "kubeadm-config" in the "kube-system" Namespace
[kubelet] Creating a ConfigMap "kubelet-config-1.15" in namespace kube-system with the configuration for the kubelets in the cluster
[upload-certs] Storing the certificates in Secret "kubeadm-certs" in the "kube-system" Namespace
[upload-certs] Using certificate key:
d220ee15e98d429ba0b9562fe2bf17a4d79e576d830d22de16d61c3f3804262e
[mark-control-plane] Marking the node master as control-plane by adding the label "node-role.kubernetes.io/master=''"
[mark-control-plane] Marking the node master as control-plane by adding the taints [node-role.kubernetes.io/master:NoSchedule]
[bootstrap-token] Using token: abcdef.0123456789abcdef
[bootstrap-token] Configuring bootstrap tokens, cluster-info ConfigMap, RBAC Roles
[bootstrap-token] configured RBAC rules to allow Node Bootstrap tokens to post CSRs in order for nodes to get long term certificate credentials
[bootstrap-token] configured RBAC rules to allow the csrapprover controller automatically approve CSRs from a Node Bootstrap Token
[bootstrap-token] configured RBAC rules to allow certificate rotation for all node client certificates in the cluster
[bootstrap-token] Creating the "cluster-info" ConfigMap in the "kube-public" namespace
[addons] Applied essential addon: CoreDNS
[addons] Applied essential addon: kube-proxy
Your Kubernetes control-plane has initialized successfully!
To start using your cluster, you need to run the following as a regular user:
mkdir -p $HOME/.kube
sudo cp -i /etc/kubernetes/admin.conf $HOME/.kube/config
sudo chown $(id -u):$(id -g) $HOME/.kube/config
You should now deploy a pod network to the cluster.
Run "kubectl apply -f [podnetwork].yaml" with one of the options listed at:
https://kubernetes.io/docs/concepts/cluster-administration/addons/
Then you can join any number of worker nodes by running the following on each as root:
kubeadm join 192.168.200.20:6443 --token abcdef.0123456789abcdef \
--discovery-token-ca-cert-hash sha256:c2c536ae4fe2f6b3e8297e99b5327ae1ef9c97723f73c5bb3426011902373e9c
[root@master ~]# mkdir -p $HOME/.kube
[root@master ~]# sudo cp -i /etc/kubernetes/admin.conf $HOME/.kube/config
[root@master ~]# sudo chown $(id -u):$(id -g) $HOME/.kube/config
[root@master ~]# kubectl get node # 当前节点状态为未就绪状态,由于未构建flannel网络
NAME STATUS ROLES AGE VERSION
master NotReady master 6m10s v1.15.1③在master节点部署flannel网络。
1
2
3
4
5
6
7
8
9
10
11
12
13
14
15
16
17
18
19
20
21
22
23
24
25
26
27
28
29
30[root@master ~]# mkdir install-k8s
[root@master ~]# mv kubeadm-config.yaml kubeadm-init.log kubernetes.conf install-k8s/
[root@master ~]# cd install-k8s/
[root@master install-k8s]# mkdir core && mv * core/
[root@master install-k8s]# mkdir plugin && cd plugin
[root@master plugin]# mkdir flannel && cd flannel/
# 解析下载flannel网址域名
[root@master flannel]# vim /etc/hosts
151.101.0.133 raw.githubusercontent.com
# 下载flannel所需的配置文件
[root@master flannel]# wget https://raw.githubusercontent.com/coreos/flannel/master/Documentation/kube-flannel.yml
[root@master flannel]# kubectl create -f kube-flannel.yml
# 如果启动后提示Init:ImagePullBackOff,则可参考https://www.freesion.com/article/51661053100/解决
[root@master flannel]# kubectl get pod -n kube-system
NAME READY STATUS RESTARTS AGE
coredns-5c98db65d4-57sg8 1/1 Running 0 59m
coredns-5c98db65d4-77rjv 1/1 Running 0 59m
etcd-master 1/1 Running 0 58m
kube-apiserver-master 1/1 Running 0 58m
kube-controller-manager-master 1/1 Running 0 58m
kube-flannel-ds-amd64-8sn89 1/1 Running 0 22m
kube-proxy-q7grf 1/1 Running 0 59m
kube-scheduler-master 1/1 Running 0 58m
[root@master flannel]# kubectl get node
NAME STATUS ROLES AGE VERSION
master Ready master 59m v1.15.1④在node1和node2节点上进行以下操作加入主节点。
1
2
3
4
5
6
7
8
9
10
11
12
13
14
15
16
17
18
19
20
21
22
23
24
25
26# 该命令可在刚才的日志文件kubeadm-init.log中查看到
[root@node1 ~]# kubeadm join 192.168.200.20:6443 --token abcdef.0123456789abcdef \
> --discovery-token-ca-cert-hash sha256:c2c536ae4fe2f6b3e8297e99b5327ae1ef9c97723f73c5bb3426011902373e9c
[root@node2 ~]# kubeadm join 192.168.200.20:6443 --token abcdef.0123456789abcdef \
> --discovery-token-ca-cert-hash sha256:c2c536ae4fe2f6b3e8297e99b5327ae1ef9c97723f73c5bb3426011902373e9c
[root@master flannel]# kubectl get pod -n kube-system
NAME READY STATUS RESTARTS AGE
coredns-5c98db65d4-57sg8 1/1 Running 0 67m
coredns-5c98db65d4-77rjv 1/1 Running 0 67m
etcd-master 1/1 Running 0 66m
kube-apiserver-master 1/1 Running 0 66m
kube-controller-manager-master 1/1 Running 0 66m
kube-flannel-ds-amd64-8sn89 1/1 Running 0 30m
kube-flannel-ds-amd64-fr9dj 1/1 Running 0 3m12s
kube-flannel-ds-amd64-gvspv 1/1 Running 0 3m17s
kube-proxy-q7grf 1/1 Running 0 67m
kube-proxy-wk2pj 1/1 Running 0 3m12s
kube-proxy-zs5q2 1/1 Running 0 3m17s
kube-scheduler-master 1/1 Running 0 66m
[root@master flannel]# kubectl get node
NAME STATUS ROLES AGE VERSION
master Ready master 68m v1.15.1
node1 Ready <none> 3m41s v1.15.1
node2 Ready <none> 3m36s v1.15.
3、利用harbor创建私有仓库
①准备另一台虚拟机并安装docker。
②修改目前四台主机docker的配置文件并重启docker。
1
2
3
4
5
6
7
8
9
10
11[root@centos7-01 ~]# cat > /etc/docker/daemon.json <<EOF
> {
> "exec-opts": ["native.cgroupdriver=systemd"],
> "log-driver": "json-file",
> "log-opts": {
> "max-size": "100m"
> },
> "insecure-registries": ["https://hub.hc.com"]
> }
> EOF
[root@centos7-01 ~]# systemctl restart docker③在新建的虚拟机上安装docker-compose。
1
2
3
4
5# 下载docker compose
[root@centos7-01 ~]# curl -L "https://github.com/docker/compose/releases/download/1.25.0/docker-compose-$(uname -s)-$(uname -m)" -o /usr/local/bin/docker-compose
# 添加可执行权限
[root@centos7-01 ~]# chmod +x /usr/local/bin/docker-compose④安装harbor。
1
2
3
4
5
6
7
8
9
10
11
12
13
14
15
16
17
18
19
20
21
22
23
24
25
26
27
28
29
30
31
32
33
34
35
36
37
38
39
40
41
42
43
44
45
46
47[root@centos7-01 ~]# wget https://github.com/goharbor/harbor/releases/download/v1.2.0/harbor-offline-installer-v1.2.0.tgz
[root@centos7-01 ~]# tar -zxvf harbor-offline-installer-v1.2.0.tgz
[root@centos7-01 ~]# mv harbor /usr/local/ && cd /usr/local/harbor
[root@centos7-01 harbor]# vim harbor.cfg
…………
hostname = hub.hc.com
ui_url_protocol = https
…………
[root@centos7-01 harbor]# mkdir -p /data/cert/ && cd /data/cert
[root@centos7-01 cert]# openssl genrsa -des3 -out server.key 2048
Generating RSA private key, 2048 bit long modulus
..........................................................................................................................+++
.......................+++
e is 65537 (0x10001)
Enter pass phrase for server.key:
Verifying - Enter pass phrase for server.key:
[root@centos7-01 cert]# openssl req -new -key server.key -out server.csr
Enter pass phrase for server.key:
You are about to be asked to enter information that will be incorporated
into your certificate request.
What you are about to enter is what is called a Distinguished Name or a DN.
There are quite a few fields but you can leave some blank
For some fields there will be a default value,
If you enter '.', the field will be left blank.
-----
Country Name (2 letter code) [XX]:CN
State or Province Name (full name) []:GD
Locality Name (eg, city) [Default City]:ST
Organization Name (eg, company) [Default Company Ltd]:ZHU
Organizational Unit Name (eg, section) []:ZHU
Common Name (eg, your name or your server's hostname) []:hub.hc.com
Email Address []:<你的邮箱>
Please enter the following 'extra' attributes
to be sent with your certificate request
A challenge password []:
An optional company name []:
[root@centos7-01 cert]# cp server.key server.key.org
[root@centos7-01 cert]# openssl rsa -in server.key.org -out server.key
Enter pass phrase for server.key.org:
writing RSA key
[root@centos7-01 cert]# openssl x509 -req -days 365 -in server.csr -signkey server.key -out server.crt
Signature ok
subject=/C=CN/ST=GD/L=ST/O=ZHU/OU=ZHU/CN=hub.hc.com/[email protected]
Getting Private key
[root@centos7-01 cert]# chmod a+x *
[root@centos7-01 cert]# cd /usr/local/harbor && ./install.sh⑤在其它三台主机以及本机上添加harbor的主机映射关系。
1
2
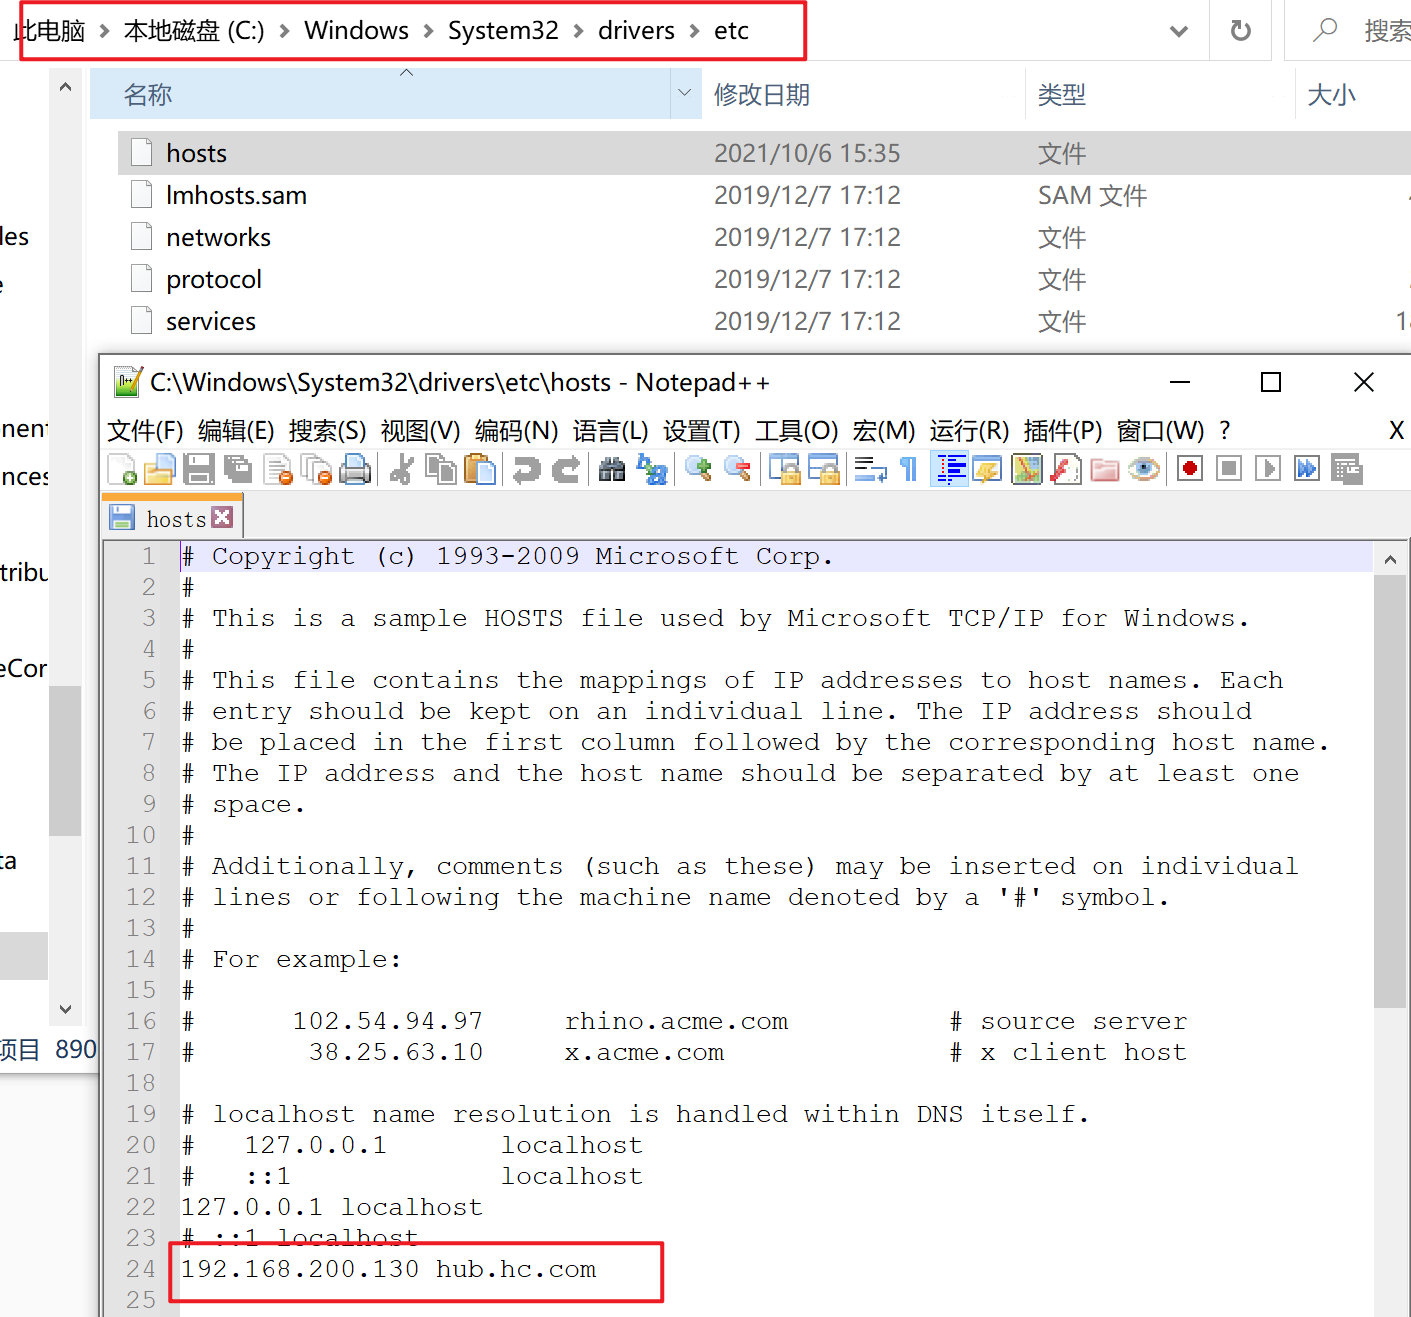
3[root@master ~]# echo "192.168.200.130 hub.hc.com" >> /etc/hosts
[root@node1 ~]# echo "192.168.200.130 hub.hc.com" >> /etc/hosts
[root@node2 ~]# echo "192.168.200.130 hub.hc.com" >> /etc/hosts![1633505815069]()
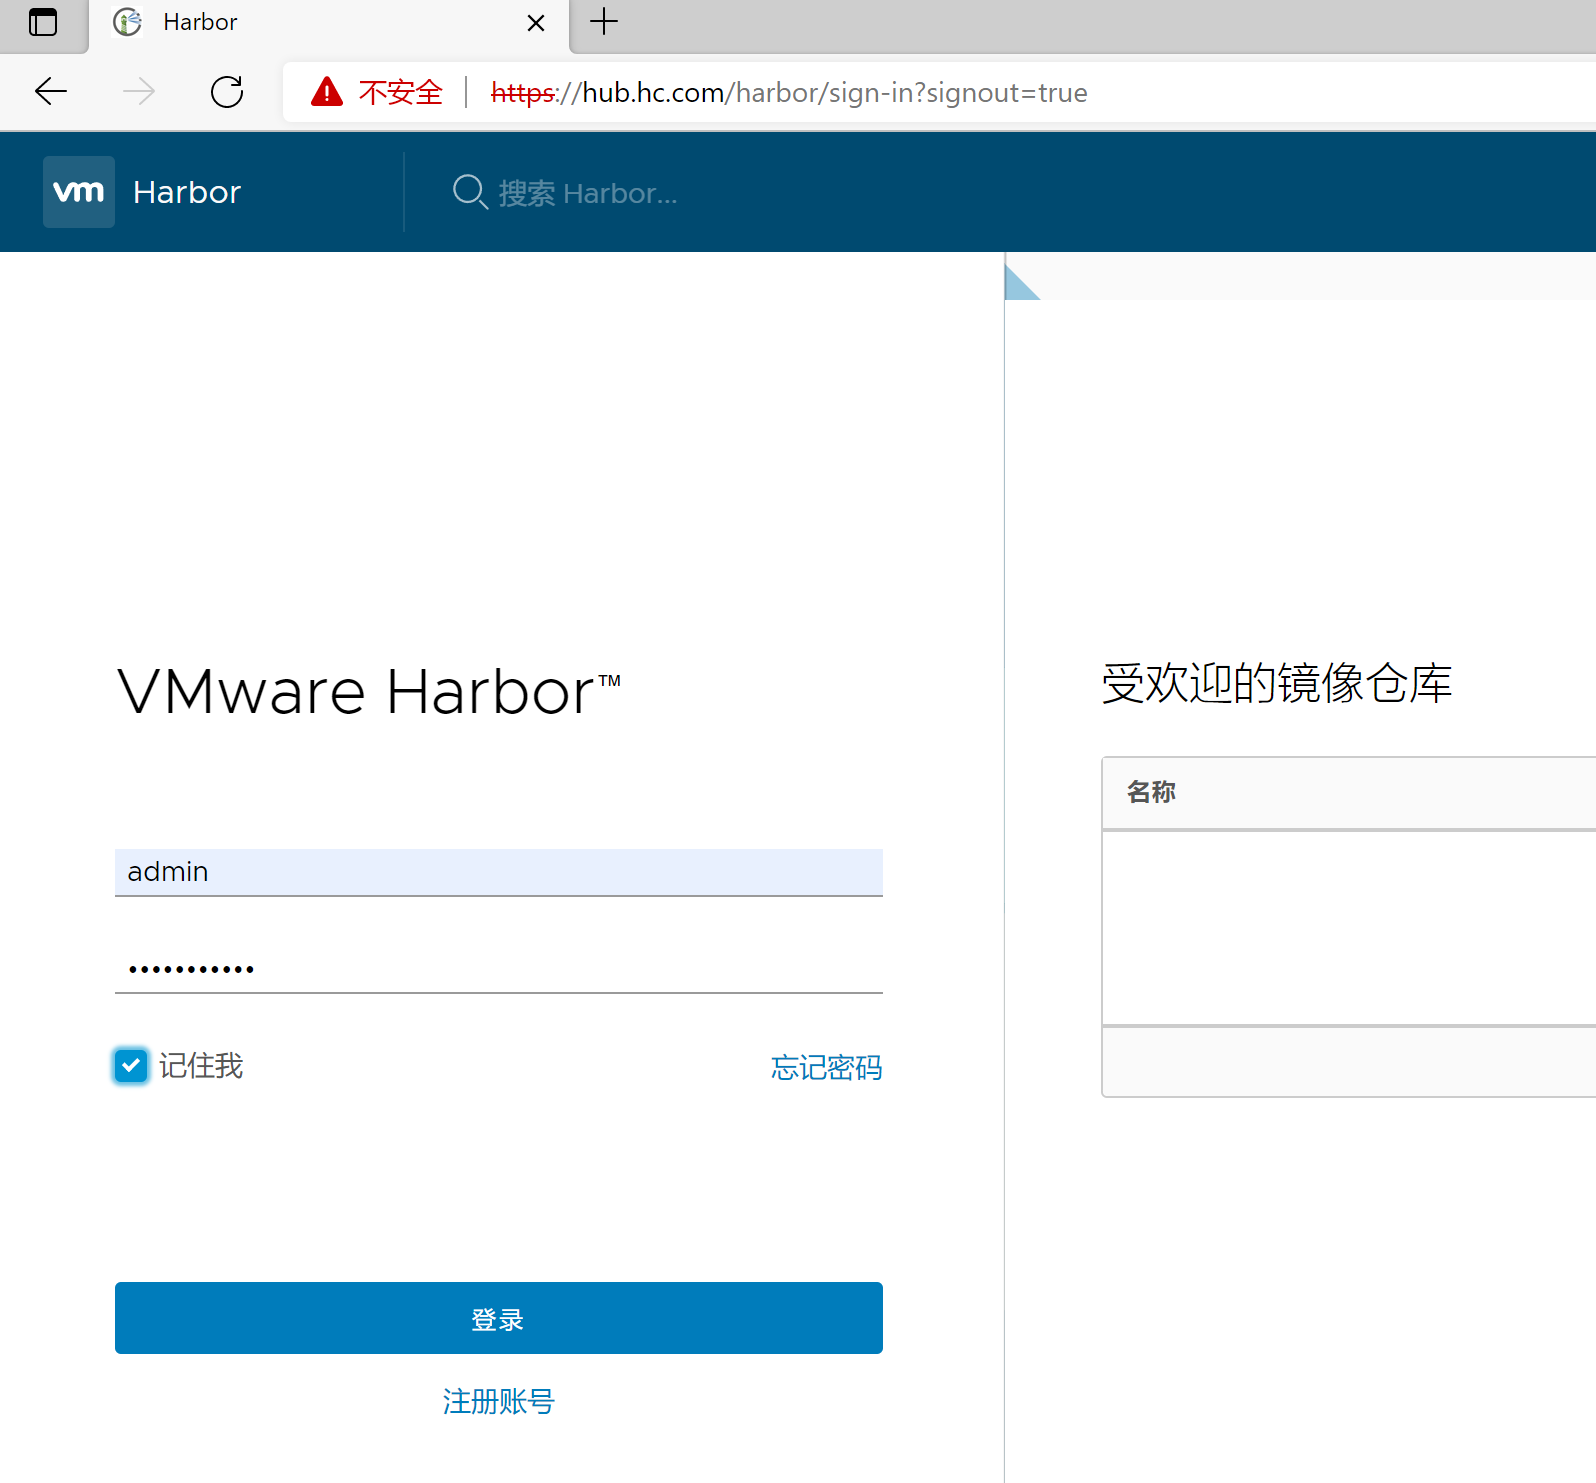
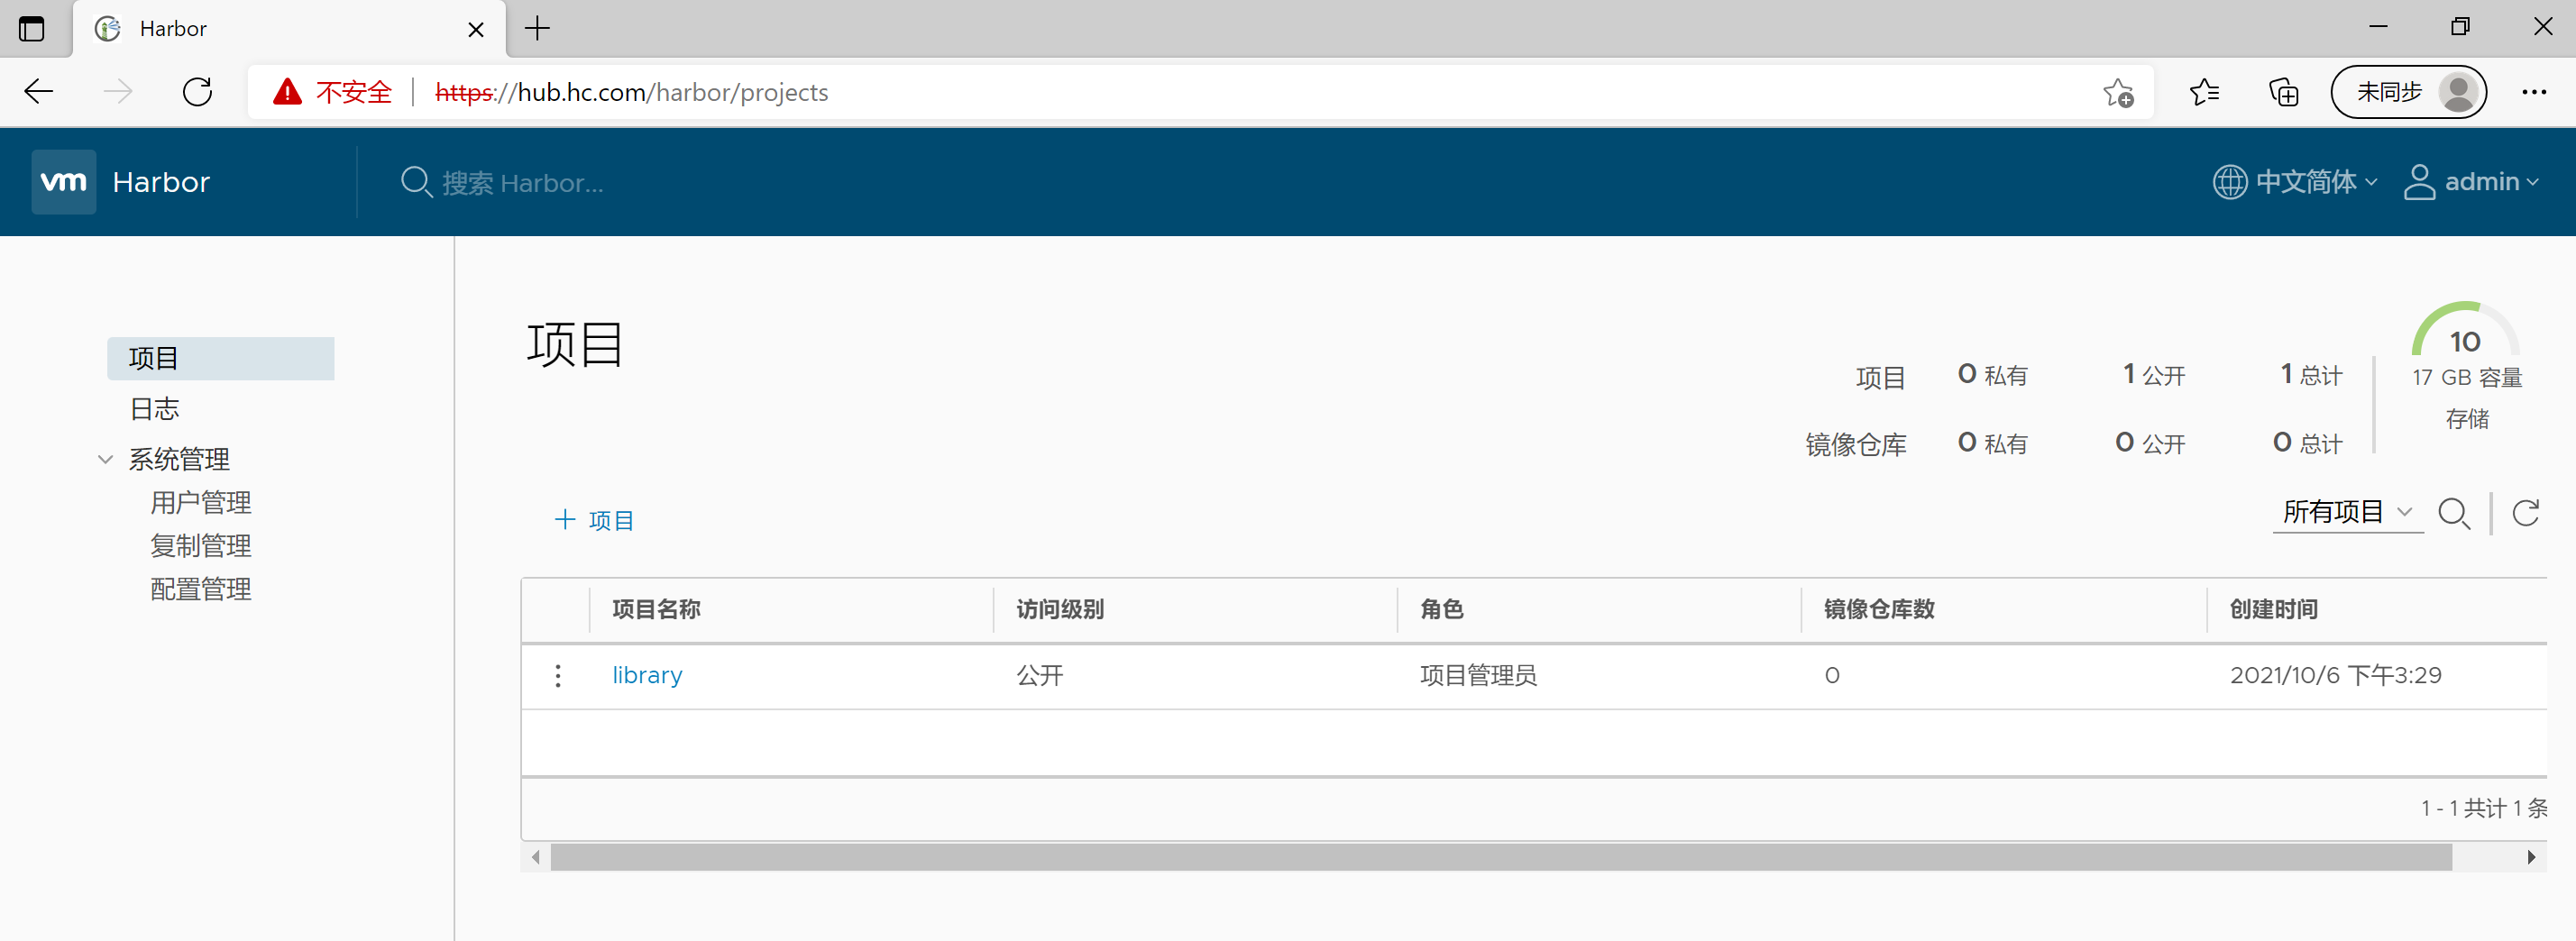
⑥浏览器访问https://hub.hc.com/harbor/sign-in,输入用户名admin和密码Harbor12345登录即可。
![1633505988695]()
![1633505998960]()
⑦在node1节点上进行测试。
1
2
3
4
5
6
7
8
9
10
11
12
13
14
15
16
17
18
19
20
21
22
23
24
25
26
27
28
29
30
31
32
33
34
35
36
37
38[root@node1 ~]# docker login https://hub.hc.com
Username: admin
Password:
WARNING! Your password will be stored unencrypted in /root/.docker/config.json.
Configure a credential helper to remove this warning. See
https://docs.docker.com/engine/reference/commandline/login/#credentials-store
Login Succeeded
[root@node1 ~]# docker pull nginx
Using default tag: latest
latest: Pulling from library/nginx
07aded7c29c6: Pull complete
bbe0b7acc89c: Pull complete
44ac32b0bba8: Pull complete
91d6e3e593db: Pull complete
8700267f2376: Pull complete
4ce73aa6e9b0: Pull complete
Digest: sha256:06e4235e95299b1d6d595c5ef4c41a9b12641f6683136c18394b858967cd1506
Status: Downloaded newer image for nginx:latest
docker.io/library/nginx:latest
[root@node1 ~]# docker tag nginx:latest hub.hc.com/library/mynginx:v1
[root@node1 ~]# docker push hub.hc.com/library/mynginx
Using default tag: latest
The push refers to repository [hub.hc.com/library/mynginx]
tag does not exist: hub.hc.com/library/mynginx:latest
[root@node1 ~]# docker push hub.hc.com/library/mynginx:v1
The push refers to repository [hub.hc.com/library/mynginx]
65e1ea1dc98c: Pushed
88891187bdd7: Pushed
6e109f6c2f99: Pushed
0772cb25d5ca: Pushed
525950111558: Pushed
476baebdfbf7: Pushed
v1: digest: sha256:39065444eb1acb2cfdea6373ca620c921e702b0f447641af5d0e0ea1e48e5e04 size: 1570⑧在master节点测试Kubernetes集群功能。
1
2
3
4
5
6
7
8
9
10
11
12
13
14
15
16
17
18
19
20
21
22
23
24
25
26
27
28
29
30
31
32
33
34
35
36
37
38
39
40
41
42
43
44
45
46
47
48
49
50
51
52
53
54
55
56
57
58
59
60
61
62
63
64
65
66
67
68
69
70
71
72
73
74
75
76
77
78
79
80
81
82
83
84
85
86
87
88
89
90
91
92
93
94
95
96
97
98
99
100
101
102
103
104
105
106
107
108
109
110
111
112
113
114
115
116
117
118
119
120
121
122
123
124
125
126
127
128
129
130
131
132
133
134
135
136
137
138
139
140
141
142
143
144
145
146
147[root@master ~]# kubectl run nginx-deployment --image=hub.hc.com/library/mynginx:v1 --port=80 --replicas=1
kubectl run --generator=deployment/apps.v1 is DEPRECATED and will be removed in a future version. Use kubectl run --generator=run-pod/v1 or kubectl create instead.
deployment.apps/nginx-deployment created
[root@master ~]# kubectl get deployment
NAME READY UP-TO-DATE AVAILABLE AGE
nginx-deployment 1/1 1 1 29s
[root@master ~]# kubectl get rs
NAME DESIRED CURRENT READY AGE
nginx-deployment-5d98ff5667 1 1 1 53s
[root@master ~]# kubectl get pod
NAME READY STATUS RESTARTS AGE
nginx-deployment-5d98ff5667-8chsc 1/1 Running 0 73s
[root@master ~]# kubectl get pod -o wide
NAME READY STATUS RESTARTS AGE IP NODE NOMINATED NODE READINESS GATES
nginx-deployment-5d98ff5667-8chsc 1/1 Running 0 100s 10.244.1.2 node1 <none> <none>
# 切换到node1
[root@node1 ~]# docker ps -a |grep nginx
75aadc2b1eb1 hub.hc.com/library/mynginx "/docker-entrypoint.…" 2 minutes ago Up 2 minutes k8s_nginx-deployment_nginx-deployment-5d98ff5667-8chsc_default_864ce51e-d62a-46f8-a41d-ff36af2a23d5_0
12541177a4e6 k8s.gcr.io/pause:3.1 "/pause" 2 minutes ago Up 2 minutes k8s_POD_nginx-deployment-5d98ff5667-8chsc_default_864ce51e-d62a-46f8-a41d-ff36af2a23d5_0
# 切换回master
[root@master ~]# curl 10.244.1.2
<!DOCTYPE html>
<html>
<head>
<title>Welcome to nginx!</title>
<style>
html { color-scheme: light dark; }
body { width: 35em; margin: 0 auto;
font-family: Tahoma, Verdana, Arial, sans-serif; }
</style>
</head>
<body>
<h1>Welcome to nginx!</h1>
<p>If you see this page, the nginx web server is successfully installed and
working. Further configuration is required.</p>
<p>For online documentation and support please refer to
<a href="http://nginx.org/">nginx.org</a>.<br/>
Commercial support is available at
<a href="http://nginx.com/">nginx.com</a>.</p>
<p><em>Thank you for using nginx.</em></p>
</body>
</html>
[root@master ~]# kubectl get pod
NAME READY STATUS RESTARTS AGE
nginx-deployment-5d98ff5667-8chsc 1/1 Running 0 6m12s
[root@master ~]# kubectl delete pod nginx-deployment-5d98ff5667-8chsc # 由于启动容器时指定副本数为1,所以这里即使删除了一个,又马上会重新运行一个
pod "nginx-deployment-5d98ff5667-8chsc" deleted
[root@master ~]# kubectl get pod
NAME READY STATUS RESTARTS AGE
nginx-deployment-5d98ff5667-kzpfj 1/1 Running 0 21s
[root@master ~]# kubectl scale --replicas=3 deployment/nginx-deployment # 动态修改副本数为3
deployment.extensions/nginx-deployment scaled
[root@master ~]# kubectl get pod
NAME READY STATUS RESTARTS AGE
nginx-deployment-5d98ff5667-45pz5 1/1 Running 0 9s
nginx-deployment-5d98ff5667-fpm5z 1/1 Running 0 9s
nginx-deployment-5d98ff5667-kzpfj 1/1 Running 0 2m57s
[root@master ~]# kubectl get pod -o wide
NAME READY STATUS RESTARTS AGE IP NODE NOMINATED NODE READINESS GATES
nginx-deployment-5d98ff5667-45pz5 1/1 Running 0 78s 10.244.2.3 node2 <none> <none>
nginx-deployment-5d98ff5667-fpm5z 1/1 Running 0 78s 10.244.1.3 node1 <none> <none>
nginx-deployment-5d98ff5667-kzpfj 1/1 Running 0 4m6s 10.244.2.2 node2 <none> <none>
# 测试通过svc实现负载均衡
[root@master ~]# kubectl expose --help
…………
# Create a service for an nginx deployment, which serves on port 80 and connects to the containers on port 8000.
kubectl expose deployment nginx --port=80 --target-port=8000
…………
[root@master ~]# kubectl get deployment
NAME READY UP-TO-DATE AVAILABLE AGE
nginx-deployment 3/3 3 3 27m
[root@master ~]# kubectl expose deployment nginx-deployment --port=30000 --target-port=80
service/nginx-deployment exposed
[root@master ~]# kubectl get svc
NAME TYPE CLUSTER-IP EXTERNAL-IP PORT(S) AGE
kubernetes ClusterIP 10.96.0.1 <none> 443/TCP 175m
nginx-deployment ClusterIP 10.110.122.239 <none> 30000/TCP 17s
[root@master ~]# curl 10.110.122.239:30000 # 多次访问是轮询的
<!DOCTYPE html>
<html>
<head>
<title>Welcome to nginx!</title>
<style>
html { color-scheme: light dark; }
body { width: 35em; margin: 0 auto;
font-family: Tahoma, Verdana, Arial, sans-serif; }
</style>
</head>
<body>
<h1>Welcome to nginx!</h1>
<p>If you see this page, the nginx web server is successfully installed and
working. Further configuration is required.</p>
<p>For online documentation and support please refer to
<a href="http://nginx.org/">nginx.org</a>.<br/>
Commercial support is available at
<a href="http://nginx.com/">nginx.com</a>.</p>
<p><em>Thank you for using nginx.</em></p>
</body>
</html>
[root@master ~]# ipvsadm -Ln
IP Virtual Server version 1.2.1 (size=4096)
Prot LocalAddress:Port Scheduler Flags
-> RemoteAddress:Port Forward Weight ActiveConn InActConn
TCP 10.96.0.1:443 rr
-> 192.168.200.20:6443 Masq 1 3 0
TCP 10.96.0.10:53 rr
-> 10.244.0.4:53 Masq 1 0 0
-> 10.244.0.5:53 Masq 1 0 0
TCP 10.96.0.10:9153 rr
-> 10.244.0.4:9153 Masq 1 0 0
-> 10.244.0.5:9153 Masq 1 0 0
TCP 10.110.122.239:30000 rr
-> 10.244.1.3:80 Masq 1 0 0
-> 10.244.2.2:80 Masq 1 0 0
-> 10.244.2.3:80 Masq 1 0 1
UDP 10.96.0.10:53 rr
-> 10.244.0.4:53 Masq 1 0 0
-> 10.244.0.5:53 Masq 1 0 0
[root@master ~]# kubectl get pod -o wide
NAME READY STATUS RESTARTS AGE IP NODE NOMINATED NODE READINESS GATES
nginx-deployment-5d98ff5667-45pz5 1/1 Running 0 23m 10.244.2.3 node2 <none> <none>
nginx-deployment-5d98ff5667-fpm5z 1/1 Running 0 23m 10.244.1.3 node1 <none> <none>
nginx-deployment-5d98ff5667-kzpfj 1/1 Running 0 26m 10.244.2.2 node2 <none> <none>
# 改成外部可访问内部容器
[root@master ~]# kubectl get svc
NAME TYPE CLUSTER-IP EXTERNAL-IP PORT(S) AGE
kubernetes ClusterIP 10.96.0.1 <none> 443/TCP 3h2m
nginx-deployment ClusterIP 10.110.122.239 <none> 30000/TCP 6m56s
[root@master ~]# kubectl edit svc nginx-deployment
# 将spec.type属性改成NodePort
service/nginx-deployment edited
[root@master ~]# kubectl get svc
NAME TYPE CLUSTER-IP EXTERNAL-IP PORT(S) AGE
kubernetes ClusterIP 10.96.0.1 <none> 443/TCP 3h4m
nginx-deployment NodePort 10.110.122.239 <none> 30000:30124/TCP 9m5s
[root@master ~]# netstat -anpt |grep :30124
tcp6 0 0 :::30124 :::* LISTEN 44074/kube-proxy
# 浏览器访问http://192.168.200.20:30124/显示如下![]()
