Kubernetes之Service
1、Service简介
1.1 概念
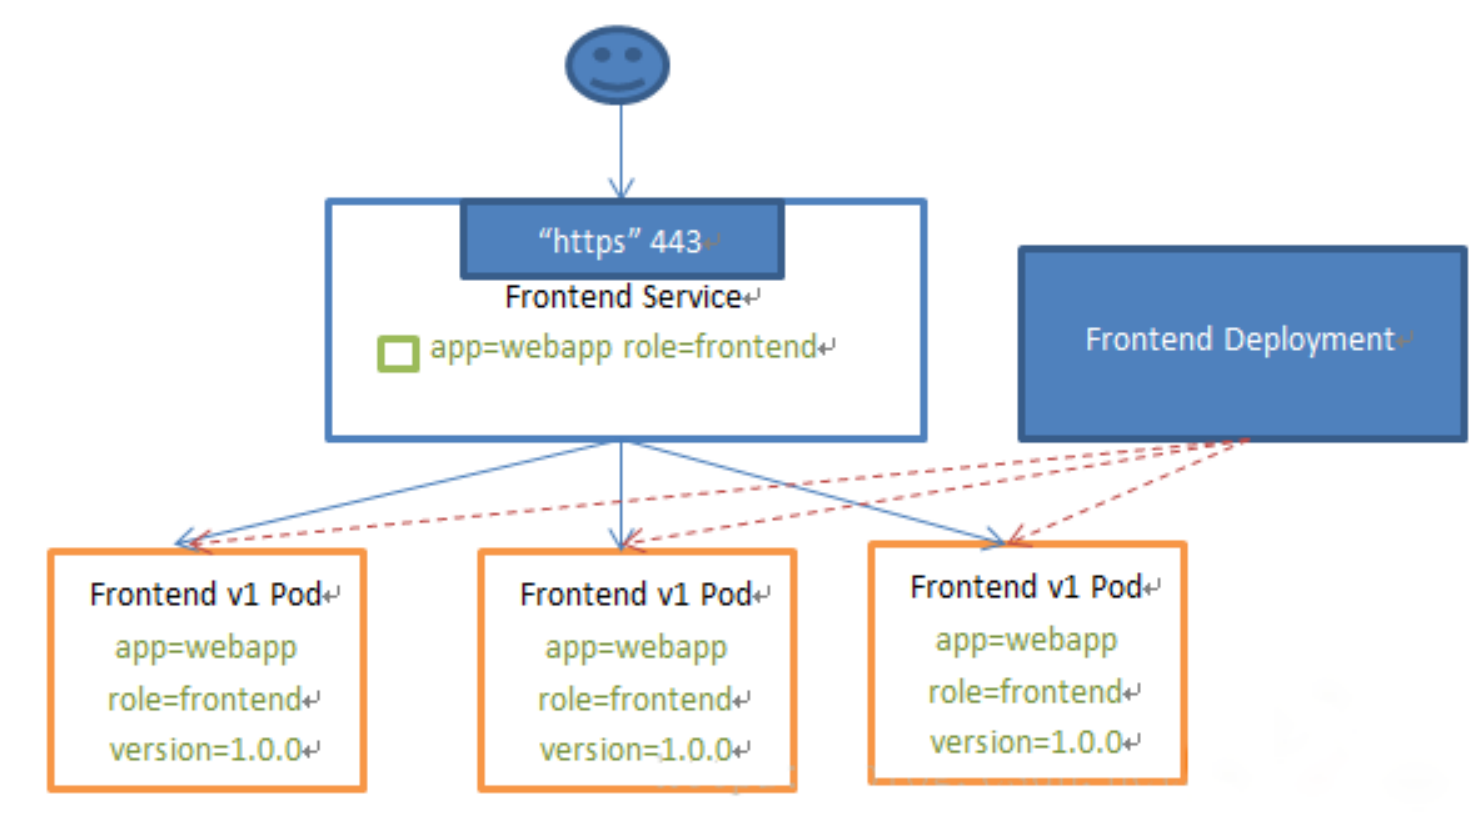
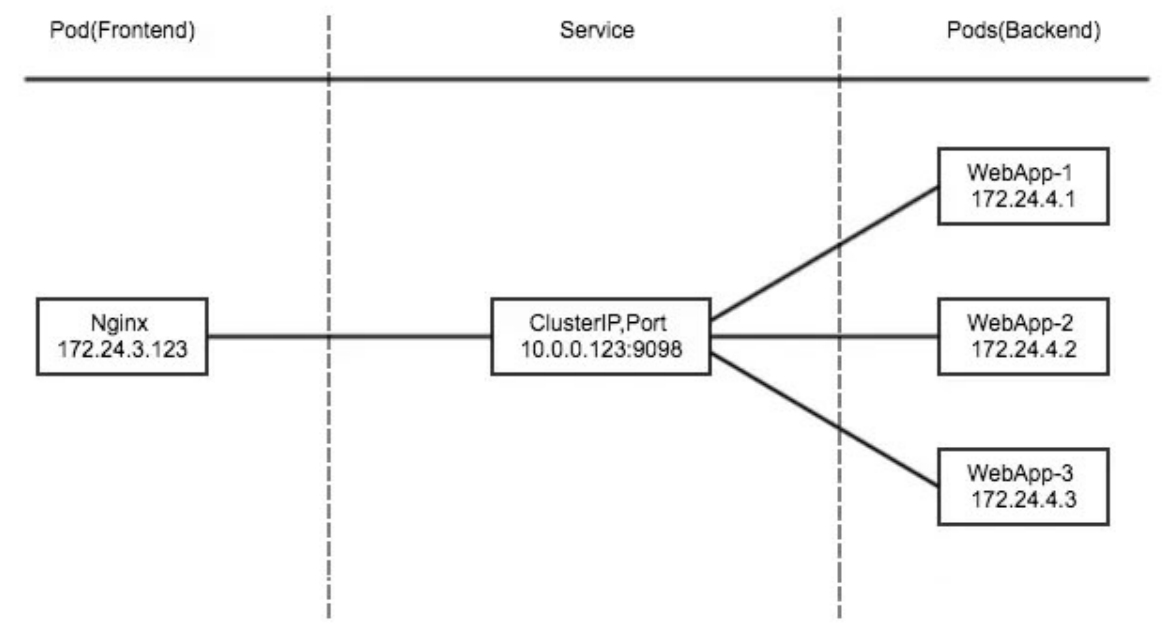
Kubernetes Service定义了这样一种抽象:Service是一种可以访问Pod逻辑分组的策略,Service通常是通过Label Selector访问Pod组。
![]()
Service能够提供负载均衡的能力,但是在使用上有以下限制:只提供4层负载均衡能力,而没有7层功能(即只能通过ip地址和端口转发,而不能通过域名),但有时我们可能需要更多的匹配规则来转发请求,这点上4 层负载均衡是不支持的。
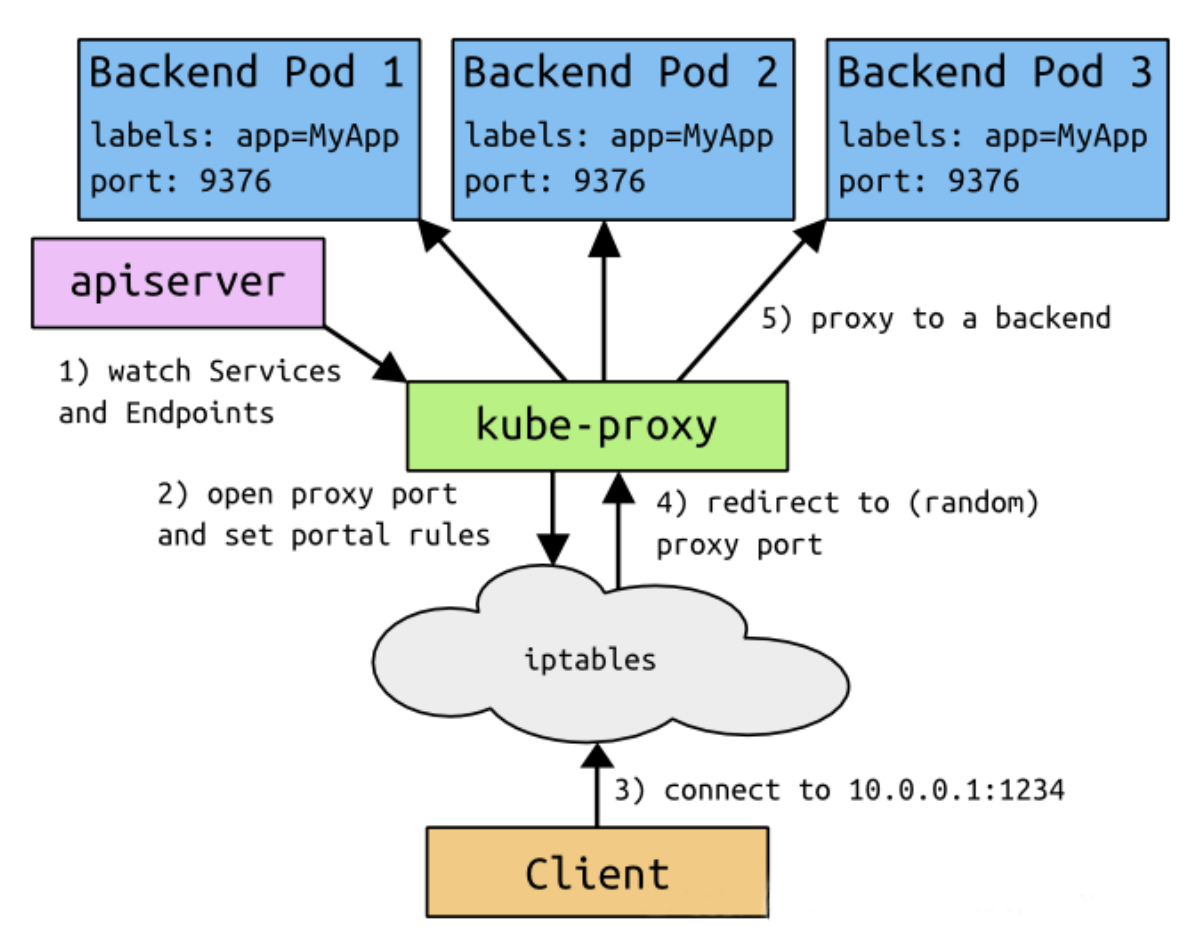
Service需要以下几个组件的配合:
![]()
- 客户端访问节点时通过iptables实现的。
- iptables规则是通过kube-proxy写入的。
- apiserver通过监控kube-proxy去进行对服务和端点的监控。
- kube-proxy通过pod的标签(lables)去判断这个断点信息是否写入到Endpoints里。
1.2 Service类型
Service在K8s中有以下四种类型:
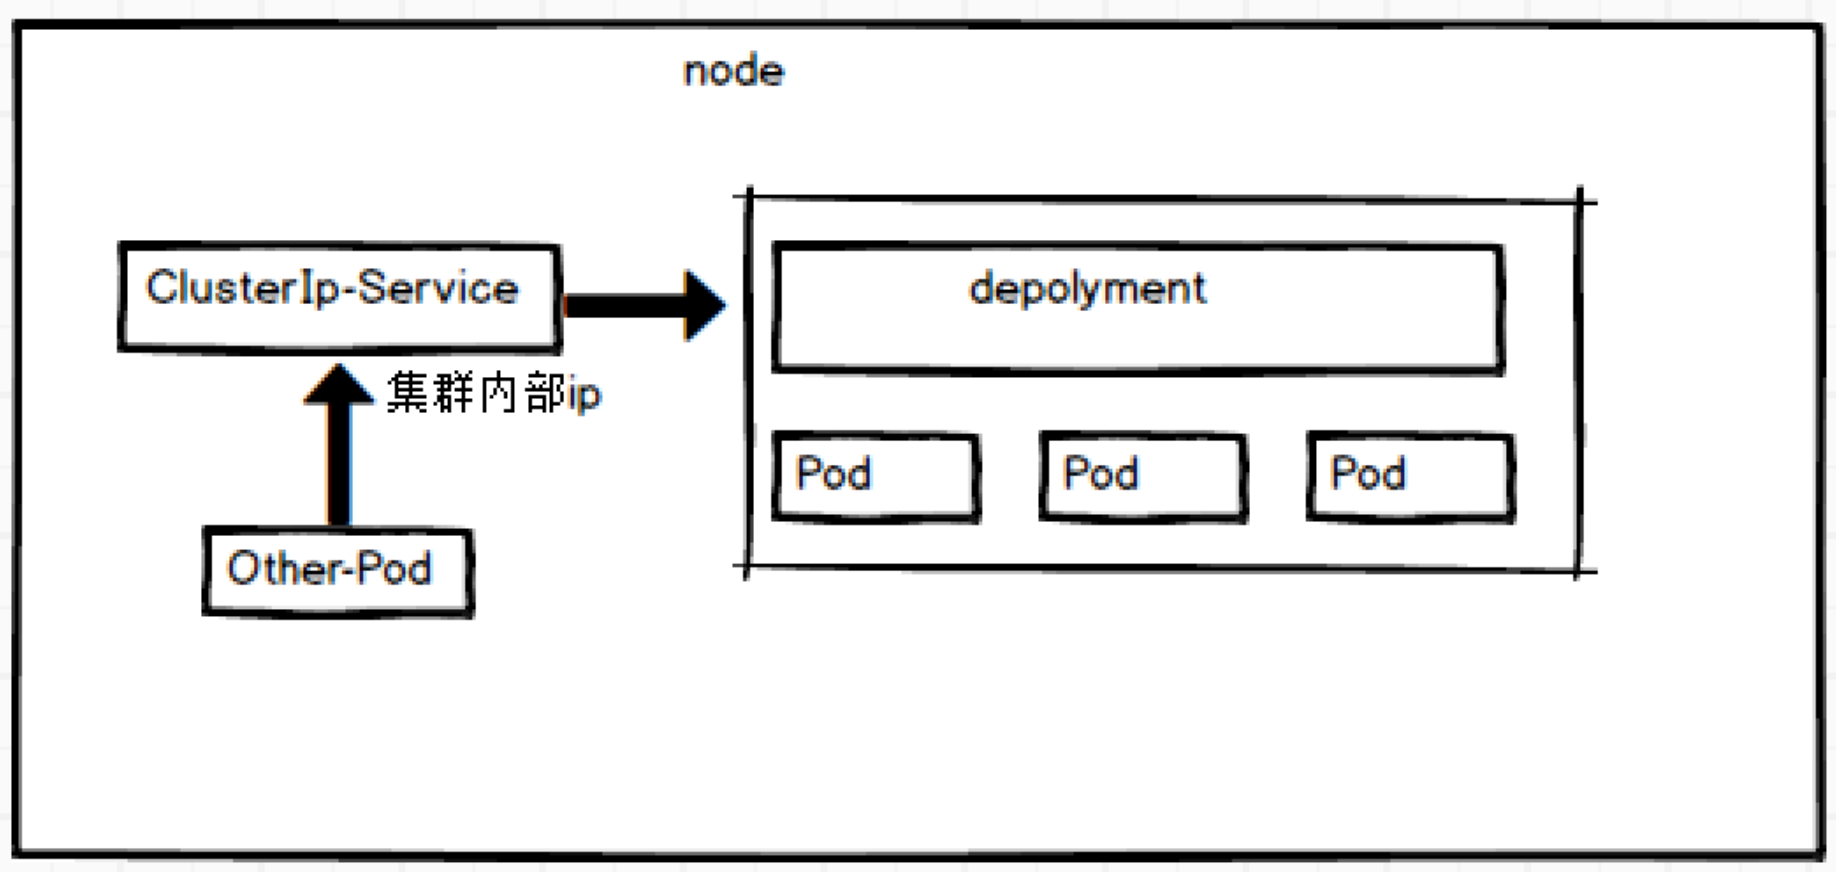
②ClusterIp: 默认类型,自动分配一个仅Cluster内部可以访问的虚拟IP。
![]()
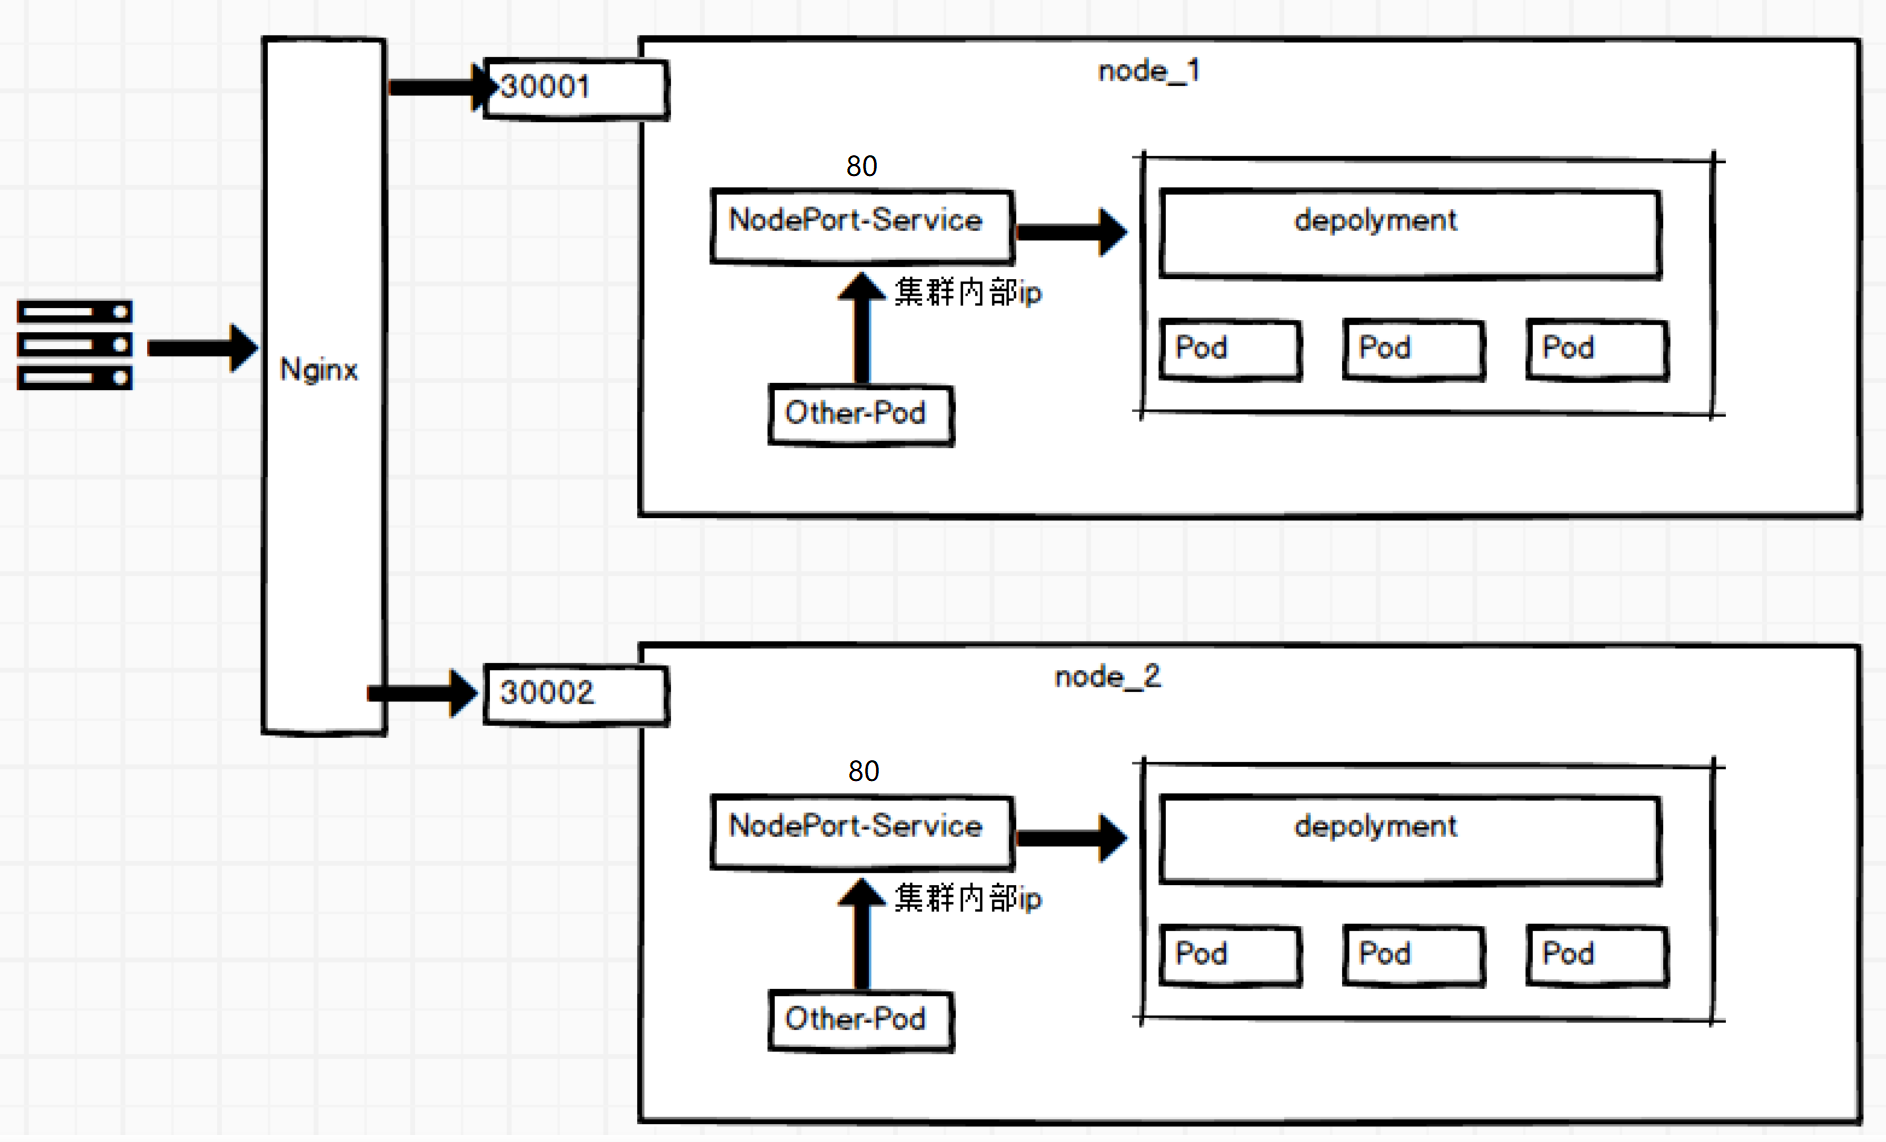
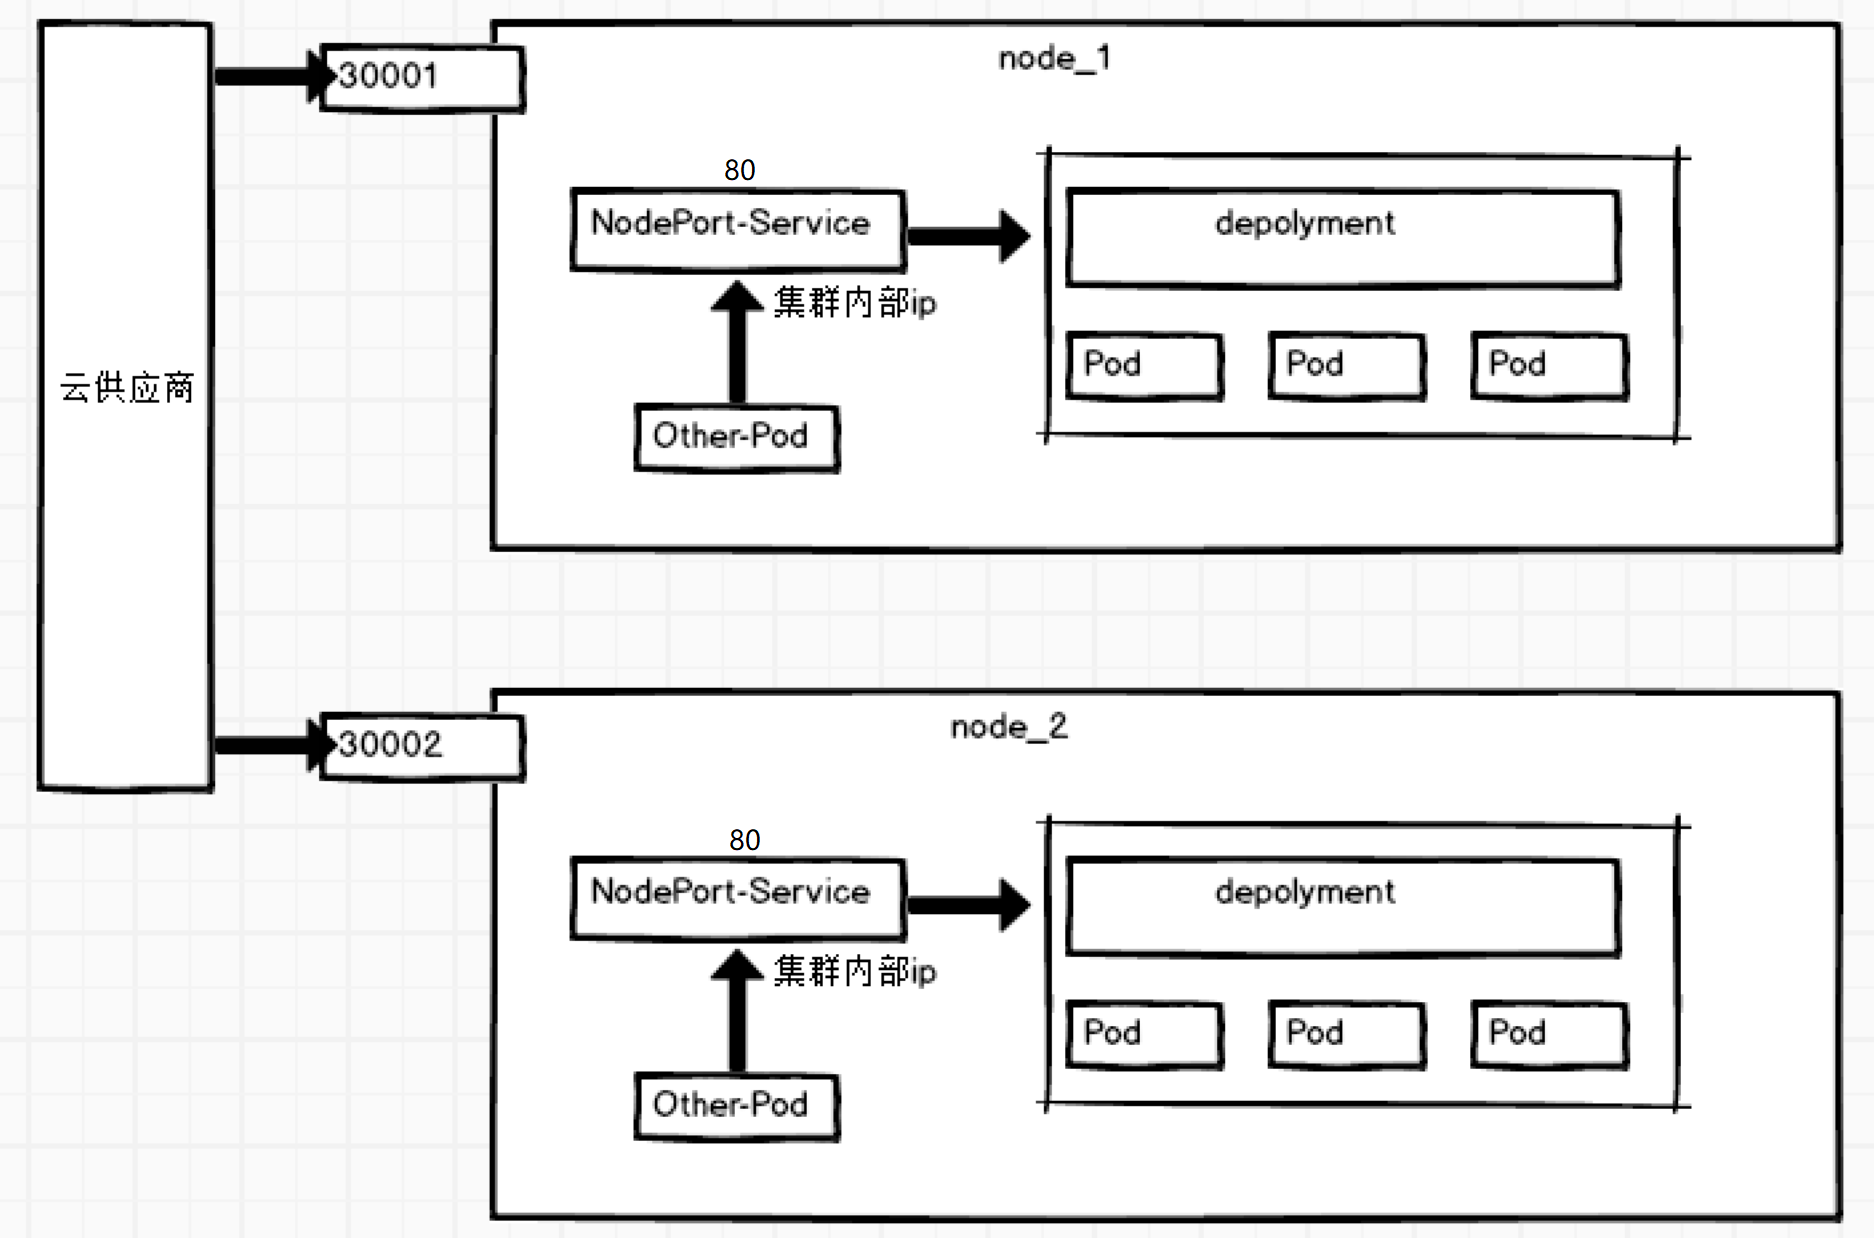
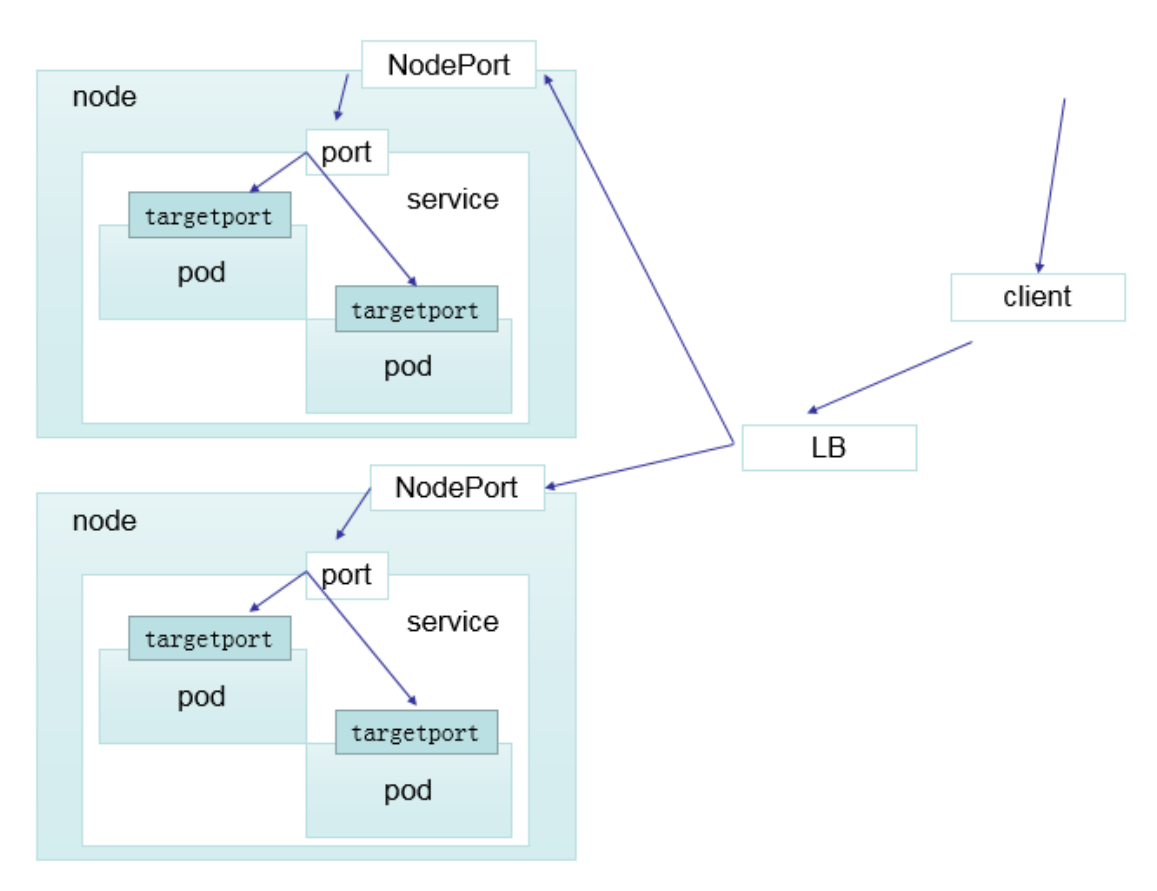
②NodePort:在ClusterIP基础上为Service在每台机器上绑定一个端口,这样就可以通过NodePort来访问该服务。
![]()
③LoadBalancer:在NodePort的基础上,借助Cloud Provider创建一个外部负载均衡器,并将请求转发到NodePort。
![]()
④ExternalName: 把集群外部的服务引入到集群内部来,在集群内部直接使用。没有任何类型代理被创建,这只有Kubernetes 1.7或更高版本的kube-dns才支持。
1.3 Service代理
1.3.1 VIP和Service代理
- 在Kubernetes集群中,每个Node运行一个kube-proxy进程。kube-proxy负责为Service实现了一种VIP(虚拟IP)的形式,而不是ExternalName的形式。在 Kubernetes v1.0版本,代理完全在userspace。在Kubernetes v1.1版本,新增了iptables代理,但并不是默认的运行模式。从Kubernetes v1.2起,默认就是iptables代理。在Kubernetes v1.8.0-beta.0中,添加了ipvs代理。
- 在Kubernetes 1.14版本开始默认使用ipvs代理;在Kubernetes v1.0版本,Service是4层(TCP/UDP over IP)概念。在Kubernetes v1.1版本,新增了Ingress API(beta版),用来表示7层(HTTP)服务。
- 为何不使用round-robin DNS?
- DNS会在很多的客户端里进行缓存,很多服务在访问DNS进行域名解析完成、得到地址后不会对DNS的解析进行清除缓存的操作,所以一旦有他的地址信息后,不管访问几次还是原来的地址信息,导致负载均衡无效。
1.3.2 代理模式分类
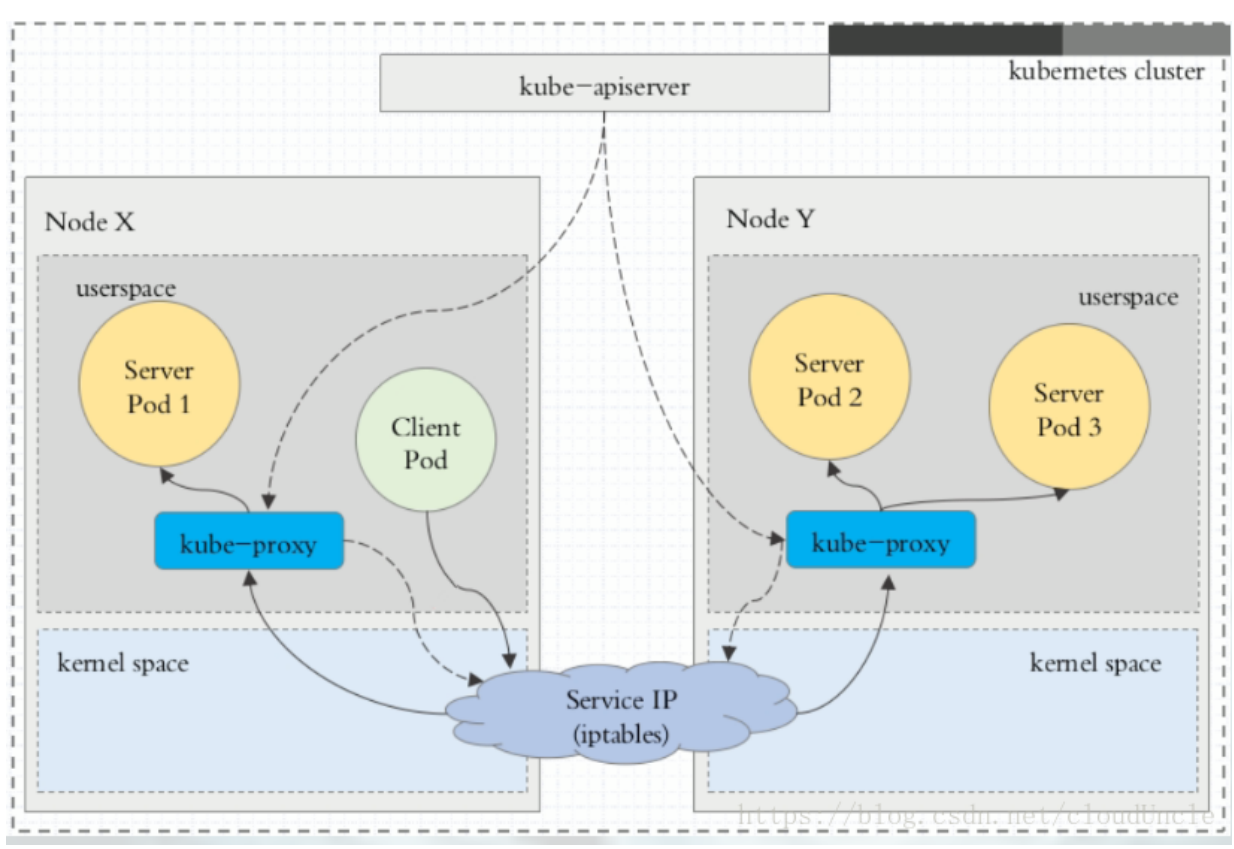
①userspace代理模式:
![]()
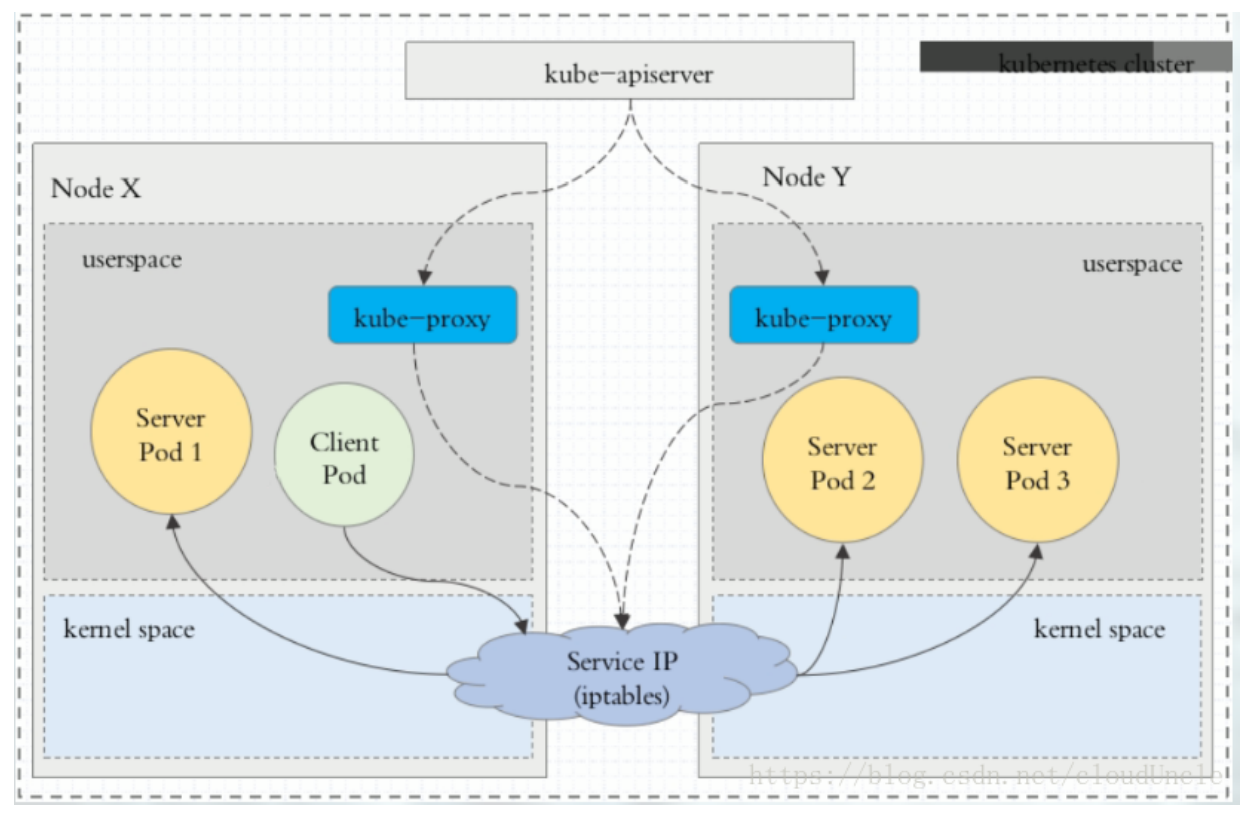
②iptables代理模式:
![]()
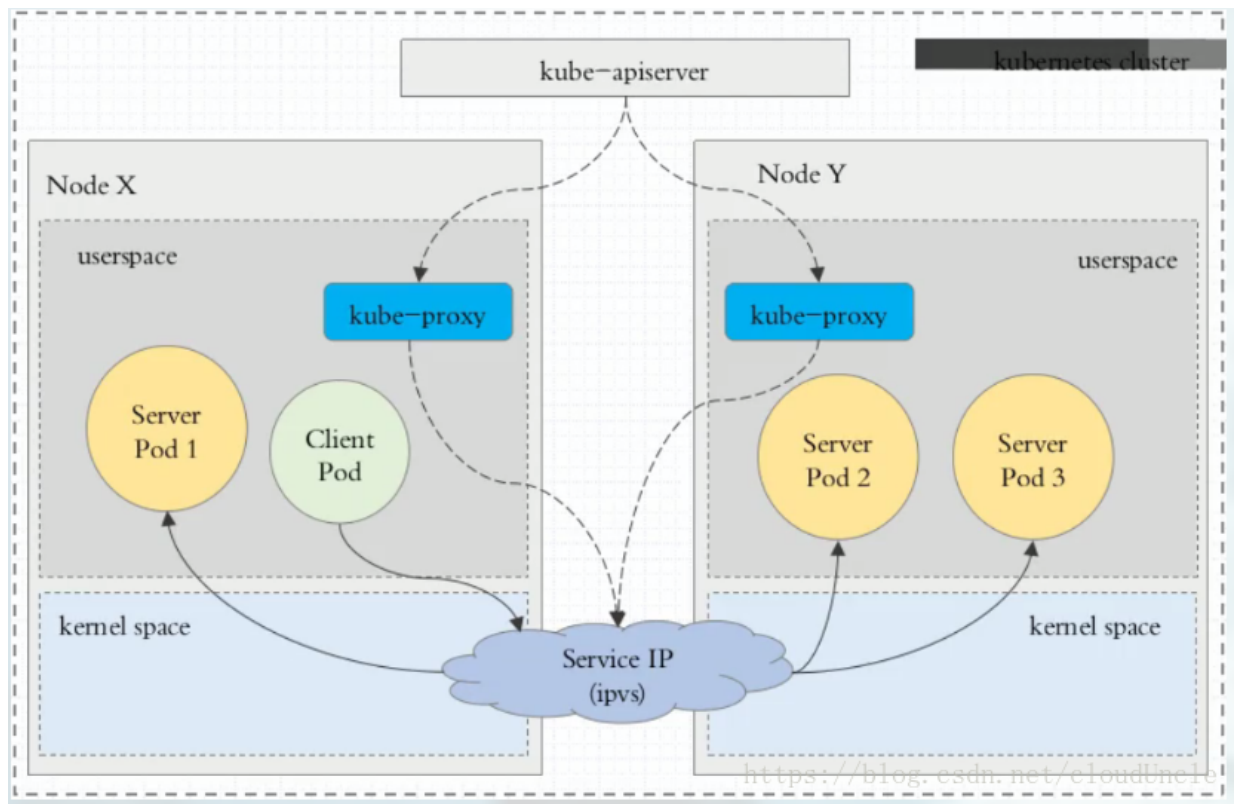
③ipvs代理模式:
![]()
ipvs代理模式中kube-proxy会监视Kubernetes Service对象和Endpoints,调用netlink接口以相应地创建ipvs规则并定期与Kubernetes Service对象和Endpoints对象同步ipvs规则,以确保ipvs状态与期望一致。访问服务时,流量将被重定向到其中一个后端Pod。
与iptables类似,ipvs于netfilter的hook功能,但使用哈希表作为底层数据结构并在内核空间中工作。这意味着ipvs可以更快地重定向流量,并且在同步代理规则时具有更好的性能。此外,ipvs为负载均衡算法提供了更多选项,例如:
rr:轮询调度lc:最小连接数dh:目标哈希sh:源哈希sed:最短期望延迟nq:不排队调度
1
2
3
4
5
6
7
8
9
10
11
12
13
14
15
16
17
18
[root@master ~]# ipvsadm -Ln
IP Virtual Server version 1.2.1 (size=4096)
Prot LocalAddress:Port Scheduler Flags
-> RemoteAddress:Port Forward Weight ActiveConn InActConn
TCP 10.96.0.1:443 rr
-> 192.168.200.20:6443 Masq 1 3 0
TCP 10.96.0.10:53 rr
-> 10.244.0.16:53 Masq 1 0 0
-> 10.244.0.17:53 Masq 1 0 0
TCP 10.96.0.10:9153 rr
-> 10.244.0.16:9153 Masq 1 0 0
-> 10.244.0.17:9153 Masq 1 0 0
UDP 10.96.0.10:53 rr
-> 10.244.0.16:53 Masq 1 0 0
-> 10.244.0.17:53 Masq 1 0 0
[root@master ~]# kubectl get svc
NAME TYPE CLUSTER-IP EXTERNAL-IP PORT(S) AGE
kubernetes ClusterIP 10.96.0.1 <none> 443/TCP 5d8h
2、Service实验
2.1 ClusterIp
ClusterIP主要在每个node节点使用iptables/ipvs,将发向ClusterIP对应端口的数据,转发到kube-proxy中。然后kube-proxy自己内部实现有负载均衡的方法,并可以查询到这个service下对应pod的地址和端口,进而把数据转发给对应的pod的地址和端口。
![]()
- 为了实现图上的功能,主要需要以下几个组件的协同工作:
- apiserver:用户通过kubectl命令向apiserver发送创建service的命令,apiserver接收到请求后将数据存储到etcd中。
- kube-proxy:Kubernetes的每个节点中都有一个叫做kube-porxy的进程,这个进程负责感知service、pod的变化,并将变化的信息写入本地的iptables/ipvs规则中。
- iptables/ipvs:使用NAT等技术将virtualIP的流量转至endpoint中。
- 为了实现图上的功能,主要需要以下几个组件的协同工作:
1 | # 创建deployment |
2.2 Handless Service
有时不需要或不想要负载均衡,以及单独的Service IP。遇到这种情况,可以通过指定spec.clusterIP的值为None来创建Headless Service。这类Service并不会分配Cluster IP,kube-proxy不会处理它们,而且平台也不会为它们进行负载均衡和路由。
1
2
3
4
5
6
7
8
9
10
11
12
13
14
15
16
17
18
19
20
21
22
23
24
25
26
27
28
29
30
31
32
33
34
35
36
37
38
39
40
41
42
43
44
45
46
47
48
49
50
51
52
53
54
55
56
57
58
59
60
61
62
63
64[root@master ~]# vim myapp-svc-headless.yaml
[root@master ~]# cat myapp-svc-headless.yaml
apiVersion: v1
kind: Service
metadata:
name: myapp-headless
namespace: default
spec:
selector:
app: myapp
clusterIP: "None"
ports:
- port: 80
targetPort: 80
[root@master ~]# kubectl apply -f myapp-svc-headless.yaml
service/myapp-headless created
[root@master ~]# kubectl get svc
NAME TYPE CLUSTER-IP EXTERNAL-IP PORT(S) AGE
kubernetes ClusterIP 10.96.0.1 <none> 443/TCP 5d8h
myapp-headless ClusterIP None <none> 80/TCP 51s
# svc创建完后会被写入coredns中
[root@master ~]# kubectl get pod -n kube-system -o wide
NAME READY STATUS RESTARTS AGE IP NODE NOMINATED NODE READINESS GATES
coredns-5c98db65d4-57sg8 1/1 Running 7 5d8h 10.244.0.17 master <none> <none>
coredns-5c98db65d4-77rjv 1/1 Running 7 5d8h 10.244.0.16 master <none> <none>
etcd-master 1/1 Running 8 5d8h 192.168.200.20 master <none> <none>
kube-apiserver-master 1/1 Running 7 5d8h 192.168.200.20 master <none> <none>
kube-controller-manager-master 1/1 Running 7 5d8h 192.168.200.20 master <none> <none>
kube-flannel-ds-amd64-8sn89 1/1 Running 7 5d8h 192.168.200.20 master <none> <none>
kube-flannel-ds-amd64-fr9dj 1/1 Running 8 5d7h 192.168.200.31 node2 <none> <none>
kube-flannel-ds-amd64-gvspv 1/1 Running 8 5d7h 192.168.200.30 node1 <none> <none>
kube-proxy-q7grf 1/1 Running 7 5d8h 192.168.200.20 master <none> <none>
kube-proxy-wk2pj 1/1 Running 7 5d7h 192.168.200.31 node2 <none> <none>
kube-proxy-zs5q2 1/1 Running 7 5d7h 192.168.200.30 node1 <none> <none>
kube-scheduler-master 1/1 Running 7 5d8h 192.168.200.20 master <none> <none>
# 安装dig命令
[root@master ~]# yum -y install bind-utils
# 解析coredns
# handless Service只能通过访问域名的方案来访问其他节点
[root@master ~]# dig -t A myapp-headless.default.svc.cluster.local. @10.244.0.17
; <<>> DiG 9.11.4-P2-RedHat-9.11.4-26.P2.el7_9.7 <<>> -t A myapp-headless.default.svc.cluster.local. @10.244.0.17
;; global options: +cmd
;; Got answer:
;; WARNING: .local is reserved for Multicast DNS
;; You are currently testing what happens when an mDNS query is leaked to DNS
;; ->>HEADER<<- opcode: QUERY, status: NOERROR, id: 56542
;; flags: qr aa rd; QUERY: 1, ANSWER: 3, AUTHORITY: 0, ADDITIONAL: 1
;; WARNING: recursion requested but not available
;; OPT PSEUDOSECTION:
; EDNS: version: 0, flags:; udp: 4096
;; QUESTION SECTION:
;myapp-headless.default.svc.cluster.local. IN A
;; ANSWER SECTION:
myapp-headless.default.svc.cluster.local. 30 IN A 10.244.1.36
myapp-headless.default.svc.cluster.local. 30 IN A 10.244.1.37
myapp-headless.default.svc.cluster.local. 30 IN A 10.244.2.40
;; Query time: 0 msec
;; SERVER: 10.244.0.17#53(10.244.0.17)
;; WHEN: 一 10月 11 22:20:16 CST 2021
;; MSG SIZE rcvd: 237
2.3 NodePort
NodePort的原理在于在Node上开了一个端口,将向该端口的流量导入到kube-proxy,然后由kube-proxy进一步到给对应的pod。
1
2
3
4
5
6
7
8
9
10
11
12
13
14
15
16
17
18
19
20
21
22
23
24
25
26
27
28
29
30
31
32
33
34
35
36
37
38
39
40
41
42
43
44
45
46
47
48
49
50
51
52
53
54
55
56
57
58
59
60
61
62
63
64
65
66
67
68
69
70# 承接2.2节的实验
[root@master ~]# vim myapp-nodeport-service.yaml
[root@master ~]# cat myapp-nodeport-service.yaml
apiVersion: v1
kind: Service
metadata:
name: myapp
namespace: default
spec:
type: NodePort
selector:
app: myapp
release: stabel
ports:
- name: http
port: 80
targetPort: 80
[root@master ~]# kubectl get pod
NAME READY STATUS RESTARTS AGE
myapp-deploy-7465fd7cdb-nt5pm 1/1 Running 0 37m
myapp-deploy-7465fd7cdb-q5q4c 1/1 Running 0 37m
myapp-deploy-7465fd7cdb-rln6p 1/1 Running 0 37m
[root@master ~]# kubectl get svc
NAME TYPE CLUSTER-IP EXTERNAL-IP PORT(S) AGE
kubernetes ClusterIP 10.96.0.1 <none> 443/TCP 5d8h
myapp NodePort 10.105.241.216 <none> 80:32227/TCP 32m
myapp-headless ClusterIP None <none> 80/TCP 20m
# 访问http://192.168.200.20:32227/成功访问到容器内部(访问node1或者node2的ip也可以)
[root@master ~]# netstat -nlp | grep 32227
tcp6 0 0 :::32227 :::* LISTEN 3066/kube-proxy
[root@master ~]# ipvsadm -Ln
IP Virtual Server version 1.2.1 (size=4096)
Prot LocalAddress:Port Scheduler Flags
-> RemoteAddress:Port Forward Weight ActiveConn InActConn
# 负载均衡到三个节点
TCP 192.168.200.20:32227 rr
-> 10.244.1.36:80 Masq 1 0 0
-> 10.244.1.37:80 Masq 1 0 0
-> 10.244.2.40:80 Masq 1 0 0
TCP 10.96.0.1:443 rr
-> 192.168.200.20:6443 Masq 1 3 0
TCP 10.96.0.10:53 rr
-> 10.244.0.16:53 Masq 1 0 0
-> 10.244.0.17:53 Masq 1 0 0
TCP 10.96.0.10:9153 rr
-> 10.244.0.16:9153 Masq 1 0 0
-> 10.244.0.17:9153 Masq 1 0 0
TCP 10.105.241.216:80 rr
-> 10.244.1.36:80 Masq 1 0 0
-> 10.244.1.37:80 Masq 1 0 0
-> 10.244.2.40:80 Masq 1 0 0
TCP 10.244.0.0:32227 rr
-> 10.244.1.36:80 Masq 1 0 0
-> 10.244.1.37:80 Masq 1 0 0
-> 10.244.2.40:80 Masq 1 0 0
TCP 10.244.0.1:32227 rr
-> 10.244.1.36:80 Masq 1 0 0
-> 10.244.1.37:80 Masq 1 0 0
-> 10.244.2.40:80 Masq 1 0 0
TCP 127.0.0.1:32227 rr
-> 10.244.1.36:80 Masq 1 0 0
-> 10.244.1.37:80 Masq 1 0 0
-> 10.244.2.40:80 Masq 1 0 0
TCP 172.17.0.1:32227 rr
-> 10.244.1.36:80 Masq 1 0 0
-> 10.244.1.37:80 Masq 1 0 0
-> 10.244.2.40:80 Masq 1 0 0
UDP 10.96.0.10:53 rr
-> 10.244.0.16:53 Masq 1 0 0
-> 10.244.0.17:53 Masq 1 0 0![]()
2.4 LoadBalancer
LoadBalancer和NodePort其实是同一种方式。区别在于LoadBalancer比NodePort多了一步,就是可以调用Cloud provider去创建LB来向节点导流。
![]()
2.5 ExternalName
这种类型的Service通过返回CNAME和它的值,可以将服务映射到externalName字段的内容(例:hub.hc.com )。ExternalName Service是Service的特例,它没有selector,也没有定义任何的端口和Endpoint。相反的,对于运行在集群外部的服务,它通过返回该外部服务的别名这种方式来提供服务。
1
2
3
4
5
6
7
8
9
10
11
12
13
14
15
16
17
18
19
20
21
22
23
24
25
26
27
28
29
30
31
32
33
34
35
36
37
38
39
40
41[root@master ~]# vim externalName.yaml
[root@master ~]# vim externalName.yaml
[root@master ~]# cat externalName.yaml
kind: Service
apiVersion: v1
metadata:
name: my-service-1
namespace: default
spec:
type: ExternalName
externalName: hub.hc.com
[root@master ~]# kubectl get svc
NAME TYPE CLUSTER-IP EXTERNAL-IP PORT(S) AGE
kubernetes ClusterIP 10.96.0.1 <none> 443/TCP 5d9h
my-service-1 ExternalName <none> hub.hc.com <none> 13s
myapp NodePort 10.105.241.216 <none> 80:32227/TCP 53m
myapp-headless ClusterIP None <none> 80/TCP 41m
[root@master ~]# dig -t A my-service-1.default.svc.cluster.local. @10.244.0.17
; <<>> DiG 9.11.4-P2-RedHat-9.11.4-26.P2.el7_9.7 <<>> -t A my-service-1.default.svc.cluster.local. @10.244.0.17
;; global options: +cmd
;; Got answer:
;; WARNING: .local is reserved for Multicast DNS
;; You are currently testing what happens when an mDNS query is leaked to DNS
;; ->>HEADER<<- opcode: QUERY, status: NOERROR, id: 27564
;; flags: qr aa rd; QUERY: 1, ANSWER: 2, AUTHORITY: 0, ADDITIONAL: 1
;; WARNING: recursion requested but not available
;; OPT PSEUDOSECTION:
; EDNS: version: 0, flags:; udp: 4096
;; QUESTION SECTION:
;my-service-1.default.svc.cluster.local. IN A
;; ANSWER SECTION:
my-service-1.default.svc.cluster.local. 5 IN CNAME hub.hc.com.
hub.hc.com. 5 IN A 184.106.44.78
;; Query time: 2174 msec
;; SERVER: 10.244.0.17#53(10.244.0.17)
;; WHEN: 一 10月 11 22:52:13 CST 2021
;; MSG SIZE rcvd: 155- 当查询主机my-service-1.defalut.svc.cluster.local时,集群的DNS服务将返回一个值hub.hc.com的CNAME记录。访问这个服务的工作方式和其他的相同,唯一不同的是重定向发生在DNS层,而且不会进行代理或转发。
3、Ingress
3.1 简介
Service只支持4层负载均衡,而Ingress有7层功能。
K8S引入了ingress自动进行服务的调度,ingress包含两大组件:ingress controller和ingress。
ingress:修改Nginx配置操作被抽象成了ingress对象。
ingress controller:ingress controller通过与kubernetes API交互,动态的去感知进集群中Ingress规则变化,然后读取它,然后读取它,按照它自己的模板生成一段nginx配置,再写到nginx Pod中,最后reload以下,工作流程如下图:
![]()
3.2 安装部署
①下载Ingress镜像,由于国内下载镜像速度过慢,这里我先在国外vps服务器上下载并打包,接着再传送给三个节点的主机并使用docker载入即可。
1
2
3
4
5
6
7
8
9
10
11
12
13
14
15
16
17
18
19
20
21
22
23
24
25
26
27
28
29
30
31
32
33
34
35
36
37
38
39
40
41[root@vultr ~]# docker pull quay.io/kubernetes-ingress-controller/nginx-ingress-controller:0.25.0
0.25.0: Pulling from kubernetes-ingress-controller/nginx-ingress-controller
459b13eb7e9c: Pull complete
6f82c4c1d796: Pull complete
2f37159a1ace: Pull complete
8ccd34767e24: Pull complete
24e507f46e7d: Pull complete
0313b3d0dfb4: Pull complete
85a4332b1f45: Pull complete
6301cf4a3fd7: Pull complete
14bea420585f: Pull complete
e9d57ad14431: Pull complete
58b6184e6694: Pull complete
7223364db9aa: Pull complete
Digest: sha256:464db4880861bd9d1e74e67a4a9c975a6e74c1e9968776d8d4cc73492a56dfa5
Status: Downloaded newer image for quay.io/kubernetes-ingress-controller/nginx-ingress-controller:0.25.0
quay.io/kubernetes-ingress-controller/nginx-ingress-controller:0.25.0
[root@vultr ~]# docker images
REPOSITORY TAG IMAGE ID CREATED SIZE
quay.io/kubernetes-ingress-controller/nginx-ingress-controller 0.25.0 02149b6f439f 2 years ago 508MB
[root@vultr ~]# docker save -o ingress.contr.tar quay.io/kubernetes-ingress-controller/nginx-ingress-controller:0.25.0
[root@vultr ~]# tar -zcvf ingress.contr.tar.gz ingress.contr.tar
ingress.contr.tar
# 将打包好的ingress.contr.tar.gz上传到三台主机上并载入
[root@master ~]# tar -zxvf ingress.contr.tar.gz
ingress.contr.tar
[root@master ~]# docker load -i ingress.contr.tar
861ac8268e83: Loading layer [==================================================>] 54MB/54MB
65108a495798: Loading layer [==================================================>] 26.45MB/26.45MB
b0f2b459d4e3: Loading layer [==================================================>] 1.931MB/1.931MB
dc166b174efb: Loading layer [==================================================>] 330.1MB/330.1MB
e3e97f070635: Loading layer [==================================================>] 728.6kB/728.6kB
b87f06926b0d: Loading layer [==================================================>] 43.05MB/43.05MB
17b3679fe89a: Loading layer [==================================================>] 8.192kB/8.192kB
2bb74ea2be4a: Loading layer [==================================================>] 2.56kB/2.56kB
f1980a0b3af3: Loading layer [==================================================>] 6.144kB/6.144kB
74e8ef22671f: Loading layer [==================================================>] 35.78MB/35.78MB
6dd0b74b8a3e: Loading layer [==================================================>] 21.37MB/21.37MB
6bcbfd84ac45: Loading layer [==================================================>] 7.168kB/7.168kB
Loaded image: quay.io/kubernetes-ingress-controller/nginx-ingress-controller:0.25.0②在
https://github.com/kubernetes/ingress-nginx/raw/nginx-0.25.0/deploy/static/mandatory.yaml下载配置文件mandatory.yaml,在https://github.com/kubernetes/ingress-nginx/raw/nginx-0.25.0/deploy/static/provider/baremetal/service-nodeport.yaml下载配置文件service-nodeport.yaml。③部署ingress-controller对外提供服务。
1
2
3
4
5
6
7
8
9
10
11
12
13
14[root@master ~]# kubectl apply -f mandatory.yaml
namespace/ingress-nginx created
configmap/nginx-configuration created
configmap/tcp-services created
configmap/udp-services created
serviceaccount/nginx-ingress-serviceaccount created
clusterrole.rbac.authorization.k8s.io/nginx-ingress-clusterrole configured
role.rbac.authorization.k8s.io/nginx-ingress-role created
rolebinding.rbac.authorization.k8s.io/nginx-ingress-role-nisa-binding created
clusterrolebinding.rbac.authorization.k8s.io/nginx-ingress-clusterrole-nisa-binding unchanged
deployment.apps/nginx-ingress-controller created
[root@master ~]# kubectl get pod -n ingress-nginx
NAME READY STATUS RESTARTS AGE
nginx-ingress-controller-7995bd9c47-rtc75 1/1 Running 0 9s④给ingress-controller建立一个servcie,用于接收集群外部流量。
1
2
3
4
5[root@master ~]# kubectl apply -f service-nodeport.yaml
service/ingress-nginx created
[root@master ~]# kubectl get svc -n ingress-nginx
NAME TYPE CLUSTER-IP EXTERNAL-IP PORT(S) AGE
ingress-nginx NodePort 10.102.204.189 <none> 80:32210/TCP,443:30621/TCP 9s
3.3 Ingress HTTP代理访问
配置Ingress HTTP代理访问。
①创建deployment和svc。
1
2
3
4
5
6
7
8
9
10
11
12
13
14
15
16
17
18
19
20
21
22
23
24
25
26
27
28
29
30
31
32
33
34
35
36
37
38
39
40
41
42
43
44
45
46
47
48
49
50
51
52
53
54
55
56
57
58
59
60
61
62
63
64
65
66
67
68[root@master ~]# vim ingress-deploy-svc.yaml
[root@master ~]# cat ingress-deploy-svc.yaml
apiVersion: extensions/v1beta1
kind: Deployment
metadata:
name: nginx-dm
spec:
replicas: 2
template:
metadata:
labels:
name: nginx
spec:
containers:
- name: nginx
image: nginx:latest
imagePullPolicy: IfNotPresent
ports:
- containerPort: 80
---
apiVersion: v1
kind: Service
metadata:
name: nginx-svc
spec:
ports:
- port: 80
targetPort: 80
protocol: TCP
selector:
name: nginx
[root@master ~]# kubectl apply -f ingress-deploy-svc.yaml
deployment.extensions/nginx-dm created
service/nginx-svc created
[root@master ~]# kubectl get pod
NAME READY STATUS RESTARTS AGE
nginx-dm-7cfbb49d9f-qfd6m 1/1 Running 0 14s
nginx-dm-7cfbb49d9f-xxbvr 1/1 Running 0 14s
[root@master ~]# kubectl get svc
NAME TYPE CLUSTER-IP EXTERNAL-IP PORT(S) AGE
kubernetes ClusterIP 10.96.0.1 <none> 443/TCP 9d
nginx-svc ClusterIP 10.105.250.51 <none> 80/TCP 20s
[root@master ~]# curl 10.105.250.51
<!DOCTYPE html>
<html>
<head>
<title>Welcome to nginx!</title>
<style>
html { color-scheme: light dark; }
body { width: 35em; margin: 0 auto;
font-family: Tahoma, Verdana, Arial, sans-serif; }
</style>
</head>
<body>
<h1>Welcome to nginx!</h1>
<p>If you see this page, the nginx web server is successfully installed and
working. Further configuration is required.</p>
<p>For online documentation and support please refer to
<a href="http://nginx.org/">nginx.org</a>.<br/>
Commercial support is available at
<a href="http://nginx.com/">nginx.com</a>.</p>
<p><em>Thank you for using nginx.</em></p>
</body>
</html>②创建ingress。
1
2
3
4
5
6
7
8
9
10
11
12
13
14
15
16
17
18
19
20
21
22
23[root@master ~]# vim ingress1.yaml
[root@master ~]# cat ingress1.yaml
apiVersion: extensions/v1beta1
kind: Ingress
metadata:
name: nginx-test
spec:
rules:
- host: www1.hc.com
http:
paths:
- path: /
backend:
serviceName: nginx-svc
servicePort: 80
[root@master ~]# kubectl create -f ingress1.yaml
ingress.extensions/nginx-test created
[root@master ~]# kubectl get ingress -o wide
NAME HOSTS ADDRESS PORTS AGE
nginx-test www1.hc.com 80 7s
[root@master ~]# kubectl get svc -n ingress-nginx
NAME TYPE CLUSTER-IP EXTERNAL-IP PORT(S) AGE
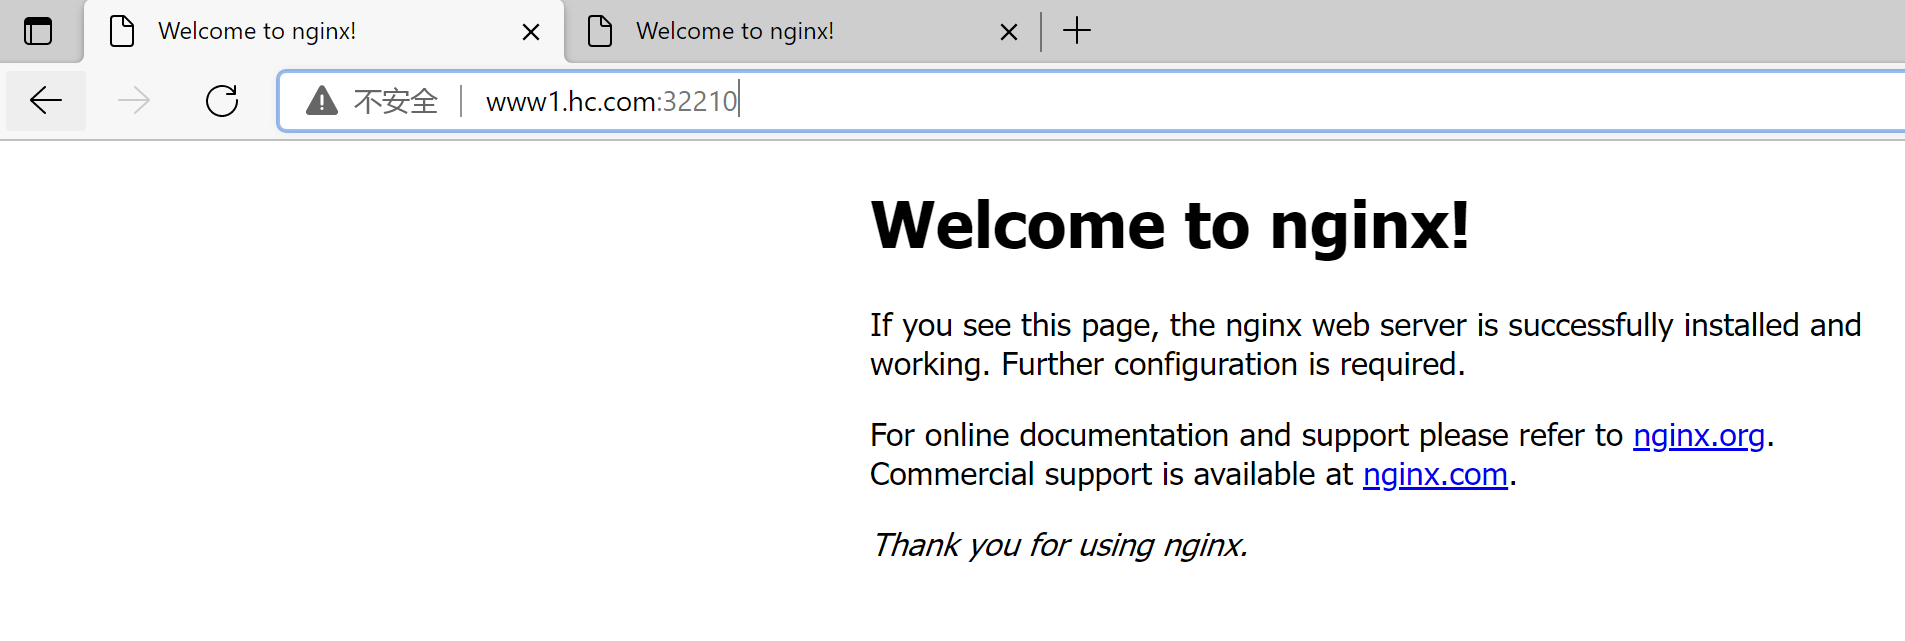
ingress-nginx NodePort 10.102.204.189 <none> 80:32210/TCP,443:30621/TCP 11m③在本地配置hosts域名映射后访问。
1
192.168.200.20 www1.hc.com
![]()
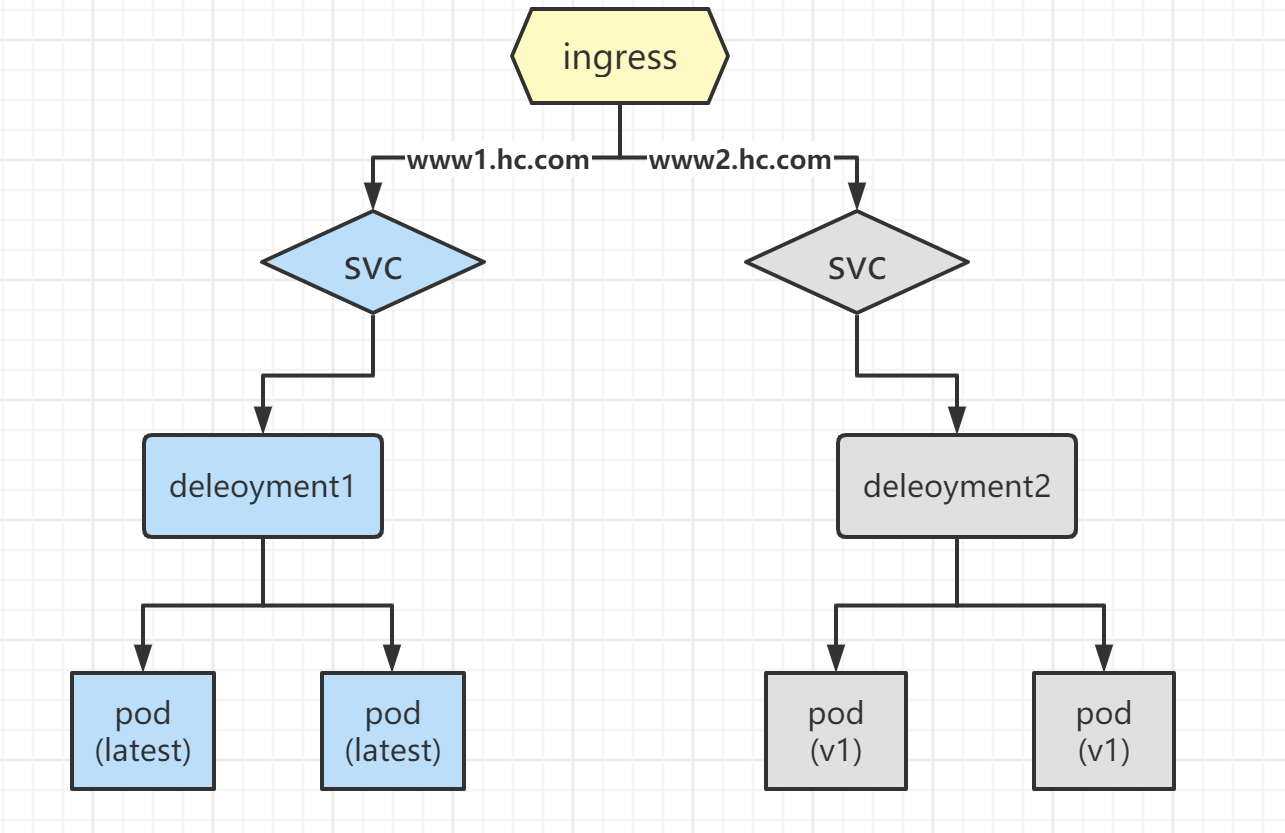
②Ingress HTTP实现虚拟主机的方案。
![]()
1
2
3
4[root@master ~]# kubectl delete svc nginx-svc
service "nginx-svc" deleted
[root@master ~]# kubectl delete deployment --all
deployment.extensions "nginx-dm" deleted①创建deployment和svc。
1
2
3
4
5
6
7
8
9
10
11
12
13
14
15
16
17
18
19
20
21
22
23
24
25
26
27
28
29
30
31
32
33
34
35
36
37
38
39
40
41
42
43
44
45
46
47
48
49
50
51
52
53
54
55
56
57
58
59
60
61
62
63
64
65
66
67
68
69
70
71
72
73
74
75
76
77
78
79
80
81
82
83
84
85
86
87
88
89
90
91
92
93
94
95
96
97
98
99
100
101
102
103
104
105
106
107
108
109
110
111
112
113
114
115
116
117
118
119
120
121
122
123
124
125
126
127
128[root@master ~]# cat ingress-deploy-svc-http.yaml
apiVersion: extensions/v1beta1
kind: Deployment
metadata:
name: deployment1
spec:
replicas: 2
template:
metadata:
labels:
name: nginx
spec:
containers:
- name: nginx
image: nginx:latest
imagePullPolicy: IfNotPresent
ports:
- containerPort: 80
---
apiVersion: v1
kind: Service
metadata:
name: svc-1
spec:
ports:
- port: 80
targetPort: 80
protocol: TCP
selector:
name: nginx
[root@master ~]# kubectl get svc
NAME TYPE CLUSTER-IP EXTERNAL-IP PORT(S) AGE
kubernetes ClusterIP 10.96.0.1 <none> 443/TCP 9d
svc-1 ClusterIP 10.108.190.208 <none> 80/TCP 16s
[root@master ~]# curl 10.108.190.208
<!DOCTYPE html>
<html>
<head>
<title>Welcome to nginx!</title>
<style>
html { color-scheme: light dark; }
body { width: 35em; margin: 0 auto;
font-family: Tahoma, Verdana, Arial, sans-serif; }
</style>
</head>
<body>
<h1>Welcome to nginx!</h1>
<p>If you see this page, the nginx web server is successfully installed and
working. Further configuration is required.</p>
<p>For online documentation and support please refer to
<a href="http://nginx.org/">nginx.org</a>.<br/>
Commercial support is available at
<a href="http://nginx.com/">nginx.com</a>.</p>
<p><em>Thank you for using nginx.</em></p>
</body>
</html>
[root@master ~]# cp ingress-deploy-svc-http1.yaml ingress-deploy-svc-http2.yaml
[root@master ~]# vim ingress-deploy-svc-http2.yaml
[root@master ~]# cat ingress-deploy-svc-http2.yaml
apiVersion: extensions/v1beta1
kind: Deployment
metadata:
name: deployment2
spec:
replicas: 2
template:
metadata:
labels:
name: nginx2
spec:
containers:
- name: nginx2
image: nginx:v1
imagePullPolicy: IfNotPresent
ports:
- containerPort: 80
---
apiVersion: v1
kind: Service
metadata:
name: svc-2
spec:
ports:
- port: 80
targetPort: 80
protocol: TCP
selector:
name: nginx2
[root@master ~]# kubectl apply -f ingress-deploy-svc-http2.yaml
deployment.extensions/deployment2 created
service/svc-2 created
[root@master ~]# kubectl get svc
NAME TYPE CLUSTER-IP EXTERNAL-IP PORT(S) AGE
kubernetes ClusterIP 10.96.0.1 <none> 443/TCP 9d
svc-1 ClusterIP 10.108.190.208 <none> 80/TCP 5m6s
svc-2 ClusterIP 10.99.136.52 <none> 80/TCP 10s
[root@master ~]# curl 10.99.136.52
<!DOCTYPE html>
<html>
<head>
<title>Welcome to nginx!</title>
<style>
html { color-scheme: light dark; }
body { width: 35em; margin: 0 auto;
font-family: Tahoma, Verdana, Arial, sans-serif; }
</style>
</head>
<body>
<h1>Welcome to nginx!</h1>
<p>If you see this page, the nginx web server is successfully installed and
working. Further configuration is required.</p>
<p>For online documentation and support please refer to
<a href="http://nginx.org/">nginx.org</a>.<br/>
Commercial support is available at
<a href="http://nginx.com/">nginx.com</a>.</p>
<p><em>Thank you for using nginx.</em></p>
</body>
</html>②创建ingress。
1
2
3
4
5
6
7
8
9
10
11
12
13
14
15
16
17
18
19
20
21
22
23
24
25
26
27
28
29
30
31
32
33
34
35
36
37
38
39[root@master ~]# vim ingress-http.yaml
[root@master ~]# cat ingress-http.yaml
apiVersion: extensions/v1beta1
kind: Ingress
metadata:
name: ingress1
spec:
rules:
- host: www1.hc.com
http:
paths:
- path: /
backend:
serviceName: svc-1
servicePort: 80
---
apiVersion: extensions/v1beta1
kind: Ingress
metadata:
name: ingress2
spec:
rules:
- host: www2.hc.com
http:
paths:
- path: /
backend:
serviceName: svc-2
servicePort: 80
[root@master ~]# kubectl apply -f ingress-http.yaml
ingress.extensions/ingress1 created
ingress.extensions/ingress2 created
[root@master ~]# kubectl get svc -n ingress-nginx
NAME TYPE CLUSTER-IP EXTERNAL-IP PORT(S) AGE
ingress-nginx NodePort 10.102.204.189 <none> 80:32210/TCP,443:30621/TCP 51m
[root@master ~]# kubectl get ingress
NAME HOSTS ADDRESS PORTS AGE
ingress1 www1.hc.com 80 7m2s
ingress2 www2.hc.com 80 7m2s③在本地配置hosts域名映射后访问。
1
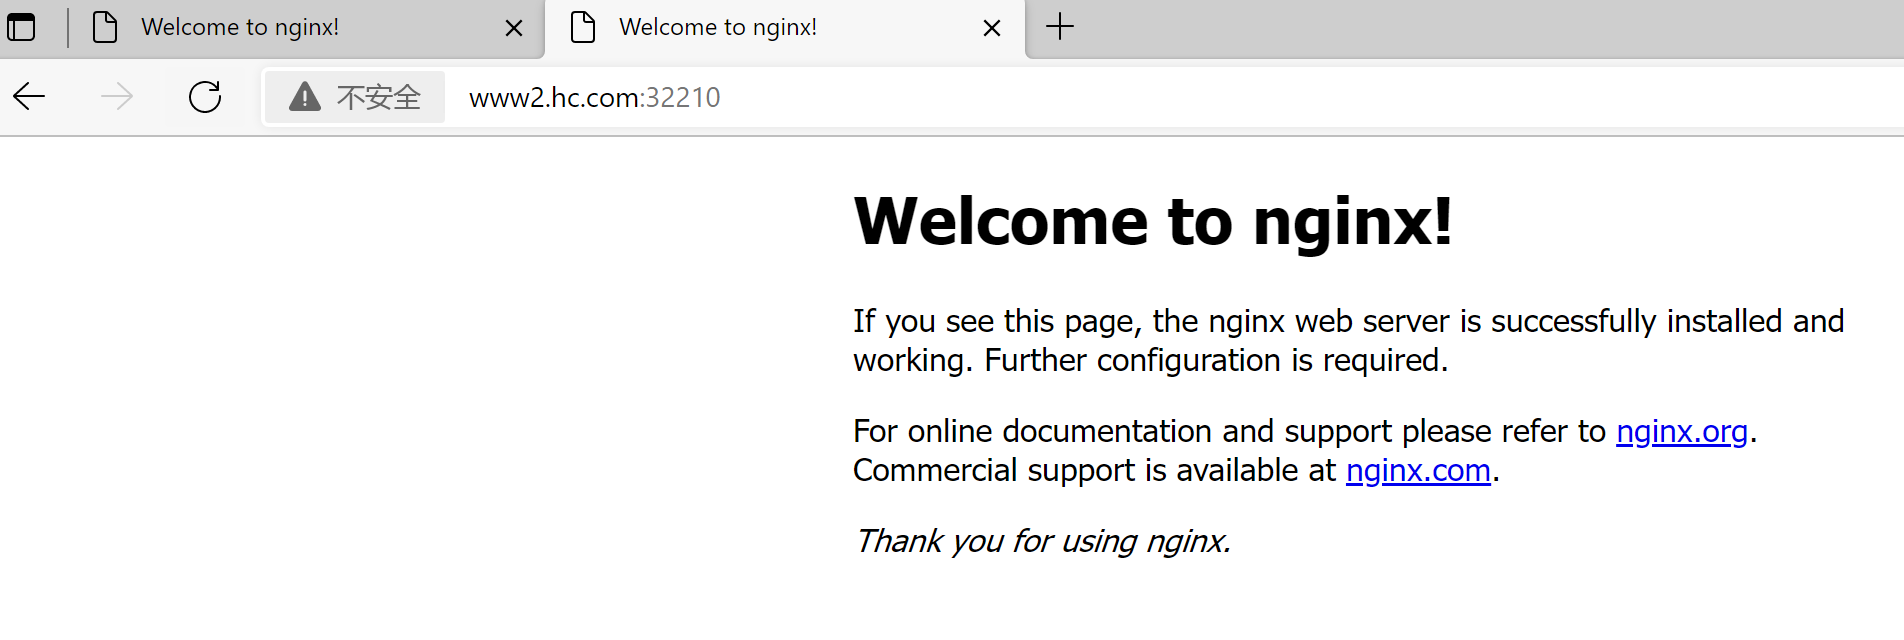
2192.168.200.20 www1.hc.com
192.168.200.20 www2.hc.com![]()
![]()
3.4 Ingress HTTPS代理访问
①配置Ingress HTTPS代理访问。
①创建证书,以及cert存储方式。
1
2
3
4
5
6
7
8
9
10
11
12[root@master ~]# openssl req -x509 -sha256 -nodes -days 365 -newkey rsa:2048 -keyout tls.key -out tls.crt -subj "/CN=nginxsvc/O=nginxsvc"
Generating a 2048 bit RSA private key
..+++
.................+++
writing new private key to 'tls.key'
-----
[root@master ~]# kubectl create secret tls tls-secret --key tls.key --cert tls.crt
secret/tls-secret created
[root@master ~]# kubectl get secret
NAME TYPE DATA AGE
default-token-4q5xv kubernetes.io/service-account-token 3 9d
tls-secret kubernetes.io/tls 2 7s②创建deployment和svc。
1
2
3
4
5
6
7
8
9
10
11
12
13
14
15
16
17
18
19
20
21
22
23
24
25
26
27
28
29
30
31
32
33
34
35
36
37
38
39
40
41
42
43
44
45
46
47
48
49
50
51
52
53
54
55
56
57
58
59
60
61
62
63[root@master ~]# vim ingress-deploy-svc-https.yaml
[root@master ~]# cat ingress-deploy-svc-https.yaml
apiVersion: extensions/v1beta1
kind: Deployment
metadata:
name: nginx-https
spec:
replicas: 2
template:
metadata:
labels:
name: nginx3
spec:
containers:
- name: nginx3
image: nginx:latest
imagePullPolicy: IfNotPresent
ports:
- containerPort: 80
---
apiVersion: v1
kind: Service
metadata:
name: svc-3
spec:
ports:
- port: 80
targetPort: 80
protocol: TCP
selector:
name: nginx3
[root@master ~]# kubectl apply -f ingress-deploy-svc-https.yaml
deployment.extensions/nginx-https created
service/svc-3 created
[root@master ~]# kubectl get svc
NAME TYPE CLUSTER-IP EXTERNAL-IP PORT(S) AGE
kubernetes ClusterIP 10.96.0.1 <none> 443/TCP 9d
svc-3 ClusterIP 10.97.155.38 <none> 80/TCP 25s
[root@master ~]# curl 10.97.155.38
<!DOCTYPE html>
<html>
<head>
<title>Welcome to nginx!</title>
<style>
html { color-scheme: light dark; }
body { width: 35em; margin: 0 auto;
font-family: Tahoma, Verdana, Arial, sans-serif; }
</style>
</head>
<body>
<h1>Welcome to nginx!</h1>
<p>If you see this page, the nginx web server is successfully installed and
working. Further configuration is required.</p>
<p>For online documentation and support please refer to
<a href="http://nginx.org/">nginx.org</a>.<br/>
Commercial support is available at
<a href="http://nginx.com/">nginx.com</a>.</p>
<p><em>Thank you for using nginx.</em></p>
</body>
</html>③创建ingress。
1
2
3
4
5
6
7
8
9
10
11
12
13
14
15
16
17
18
19
20
21[root@master ~]# cat ingress-https.yaml
apiVersion: extensions/v1beta1
kind: Ingress
metadata:
name: nginx-https
spec:
tls:
- hosts:
- www3.hc.com
secretName: tls-secret
rules:
- host: www3.hc.com
http:
paths:
- path: /
backend:
serviceName: svc-3
servicePort: 80
[root@master ~]# kubectl get svc -n ingress-nginx
NAME TYPE CLUSTER-IP EXTERNAL-IP PORT(S) AGE
ingress-nginx NodePort 10.102.204.189 <none> 80:32210/TCP,443:30621/TCP 80m④在本地配置hosts域名映射后访问。
1
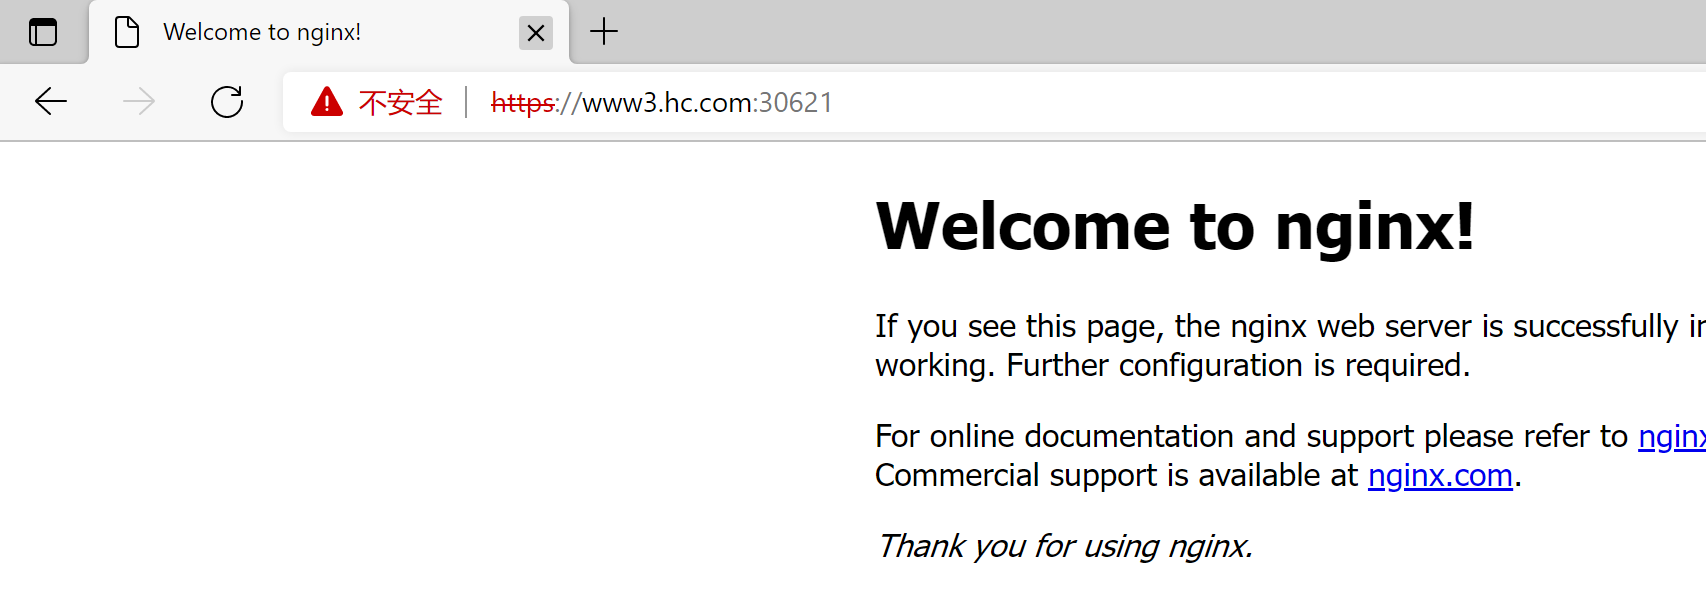
192.168.200.20 www3.hc.com
![]()
3.5 Nginx进行BasicAuth
Nginx进行BasicAuth。
1
2
3
4
5
6
7
8
9
10
11
12
13
14
15
16
17
18
19
20
21
22
23
24
25
26
27
28
29
30
31
32
33
34
35[root@master ~]# yum -y install httpd
[root@master ~]# htpasswd -c auth foo
[root@master ~]# kubectl create secret generic basic-auth --from-file=auth
[root@master ~]# vim ingress-auth.yaml
[root@master ~]# cat ingress-auth.yaml
apiVersion: extensions/v1beta1
kind: Ingress
metadata:
name: ingress-with-auth
annotations:
nginx.ingress.kubernetes.io/auth-type: basic
nginx.ingress.kubernetes.io/auth-secret: basic-auth
nginx.ingress.kubernetes.io/auth-realm: 'Authentication Required - foo'
spec:
rules:
- host: auth.hc.com
http:
paths:
- path: /
backend:
serviceName: svc-1
servicePort: 80
[root@master ~]# kubectl apply -f ingress-auth.yaml
ingress.extensions/ingress-with-auth created
[root@master ~]# kubectl get ingress
NAME HOSTS ADDRESS PORTS AGE
ingress-with-auth auth.hc.com 80 8s
nginx-https www3.hc.com 80, 443 10m
[root@master ~]# kubectl get svc -n ingress-nginx
NAME TYPE CLUSTER-IP EXTERNAL-IP PORT(S) AGE
ingress-nginx NodePort 10.102.204.189 <none> 80:32210/TCP,443:30621/TCP 93m在本地配置hosts域名映射后访问。
1
192.168.200.20 auth.hc.com
![]()
![]()
3.6 Nginx进行重写
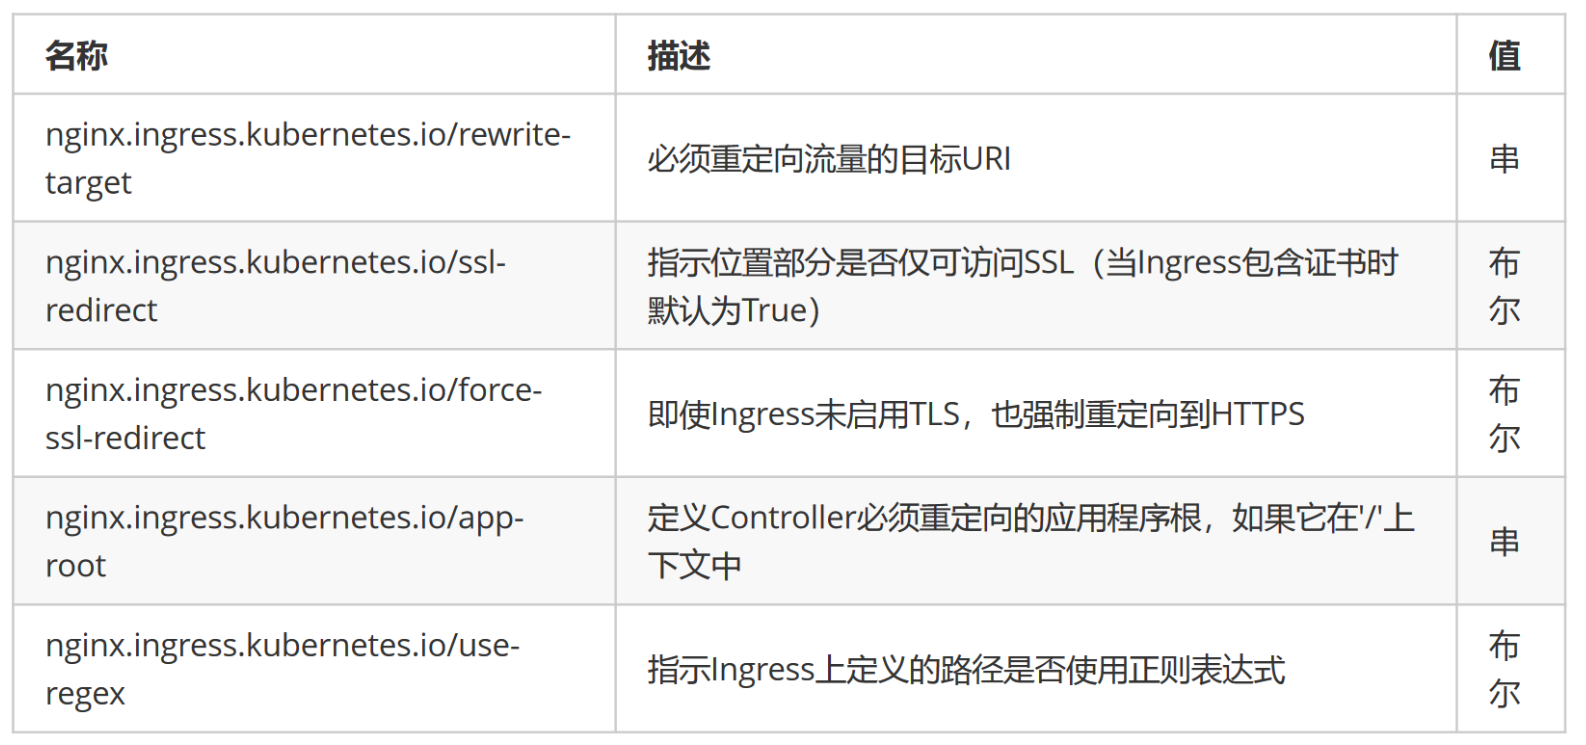
Nginx重写字段:
![]()
①创建ingress。
1
2
3
4
5
6
7
8
9
10
11
12
13
14
15
16
17
18
19
20
21
22[root@master ~]# vim ingress-re.yaml
[root@master ~]# cat ingress-re.yaml
apiVersion: extensions/v1beta1
kind: Ingress
metadata:
name: nginx-re
annotations:
nginx.ingress.kubernetes.io/rewrite-target: https://www3.hc.com:30621
spec:
rules:
- host: re.hc.com
http:
paths:
- path: /
backend:
serviceName: nginx-svc
servicePort: 80
[root@master ~]# kubectl apply -f ingress-re.yaml
ingress.extensions/nginx-re created
[root@master ~]# kubectl get svc -n ingress-nginx
NAME TYPE CLUSTER-IP EXTERNAL-IP PORT(S) AGE
ingress-nginx NodePort 10.102.204.189 <none> 80:32210/TCP,443:30621/TCP 93m②在本地配置hosts域名映射后访问。
1
192.168.200.20 re.hc.com
![]()
![]()
