Vue3新特性
1、创建Vue3.0工程
1.1 使用vue-cli创建
1 | ## 查看@vue/cli版本,确保@vue/cli版本在4.5.0以上 |
1.2 使用vite创建
vite官网:https://vitejs.cn
什么是vite?—— 新一代前端构建工具。
优势如下:
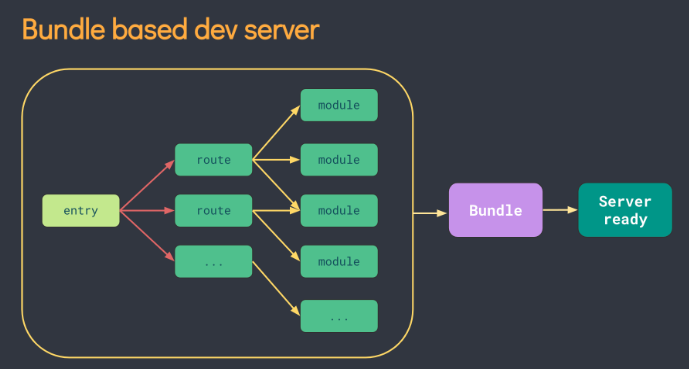
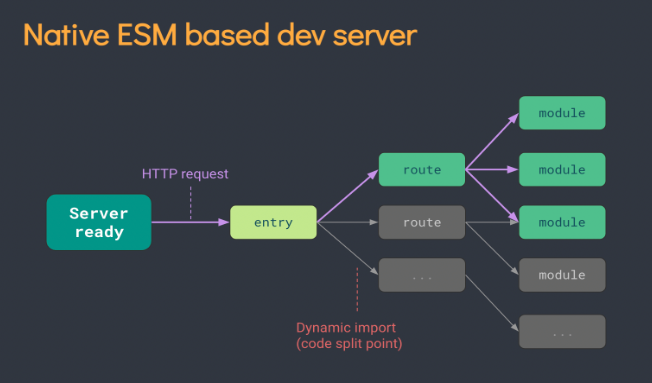
- 开发环境中,无需打包操作,可快速的冷启动。
- 轻量快速的热重载(HMR)。
- 真正的按需编译,不再等待整个应用编译完成。
传统构建与vite构建对比图。
![]()
![]()
1 | ## 创建工程 |
2、Vue3项目文件对比
查看main.js文件,发现Vue3对比Vue2有如下改变:
1
2
3
4
5
6
7
8
9//引入的不再是Vue构造函数了,引入的是一个名为createApp的工厂函数
import { createApp } from 'vue'
import App from './App.vue'
//创建应用实例对象——app(类似于之前Vue2中的vm,但app比vm更“轻”)
const app = createApp(App)
//挂载
app.mount('#app')查看App.vue,发现Vue3组件中的模板结构可以没有根标签。
1
2
3
4
5
6
7
8
9
10
11
12
13
14
15
16
17
18
19
20
21
22
23
24
25
26
27<template>
<!-- Vue3组件中的模板结构可以没有根标签 -->
<img alt="Vue logo" src="./assets/logo.png">
<HelloWorld msg="Welcome to Your Vue.js App"/>
</template>
<script>
import HelloWorld from './components/HelloWorld.vue'
export default {
name: 'App',
components: {
HelloWorld
}
}
</script>
<style>
#app {
font-family: Avenir, Helvetica, Arial, sans-serif;
-webkit-font-smoothing: antialiased;
-moz-osx-font-smoothing: grayscale;
text-align: center;
color: #2c3e50;
margin-top: 60px;
}
</style>
3、常用Composition API
3.1 拉开序幕的setup
理解:Vue3.0中一个新的配置项,值为一个函数。
setup是所有Composition API(组合API)“表演的舞台”。
组件中所用到的:数据、方法等等,均要配置在setup中。
setup函数的两种返回值:
- 若返回一个对象,则对象中的属性、方法,在模板中均可以直接使用。(重点关注!)
- 若返回一个渲染函数:则可以自定义渲染内容。(了解)
注意点:
- 尽量不要与Vue2.x配置混用。
- Vue2.x配置(data、methos、computed…)中可以访问到setup中的属性、方法。
- 但在setup中不能访问到Vue2.x配置(data、methos、computed…)。
- 如果有重名, setup优先。
- setup不能是一个async函数,因为返回值不再是return的对象, 而是promise, 模板看不到return对象中的属性。(后期也可以返回一个Promise实例,但需要Suspense和异步组件的配合)
- 尽量不要与Vue2.x配置混用。
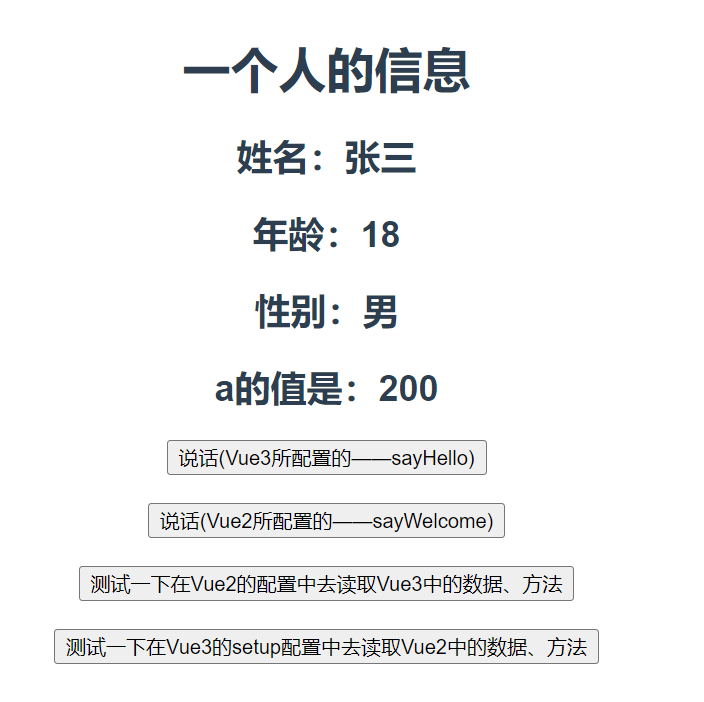
案例:
1
2
3
4
5
6
7
8
9
10
11
12
13
14
15
16
17
18
19
20
21
22
23
24
25
26
27
28
29
30
31
32
33
34
35
36
37
38
39
40
41
42
43
44
45
46
47
48
49
50
51
52
53
54
55
56
57
58
59
60
61
62
63
64
65
66
67
68
69
70
71
72
73<template>
<h1>一个人的信息</h1>
<h2>姓名:{{name}}</h2>
<h2>年龄:{{age}}</h2>
<h2>性别:{{sex}}</h2>
<h2>a的值是:{{a}}</h2>
<button @click="sayHello">说话(Vue3所配置的——sayHello)</button>
<br>
<br>
<button @click="sayWelcome">说话(Vue2所配置的——sayWelcome)</button>
<br>
<br>
<button @click="test1">测试一下在Vue2的配置中去读取Vue3中的数据、方法</button>
<br>
<br>
<button @click="test2">测试一下在Vue3的setup配置中去读取Vue2中的数据、方法</button>
</template>
<script>
// import {h} from 'vue'
export default {
name: 'App',
data() {
return {
sex:'男',
a:100
}
},
methods: {
sayWelcome(){
alert('欢迎来到尚硅谷学习')
},
test1(){
console.log(this.sex)
console.log(this.name)
console.log(this.age)
console.log(this.sayHello)
}
},
//此处只是测试一下setup,暂时不考虑响应式的问题。
async setup(){
//数据
let name = '张三'
let age = 18
let a = 200
//方法
function sayHello(){
alert(`我叫${name},我${age}岁了,你好啊!`)
}
function test2(){
console.log(name)
console.log(age)
console.log(sayHello)
console.log(this.sex)
console.log(this.sayWelcome)
}
//返回一个对象(常用)
return {
name,
age,
sayHello,
test2,
a
}
//返回一个函数(渲染函数)
// return ()=> h('h1','尚硅谷')
}
}
</script>![]()
3.2 ref函数
作用:定义一个响应式的数据。
语法:
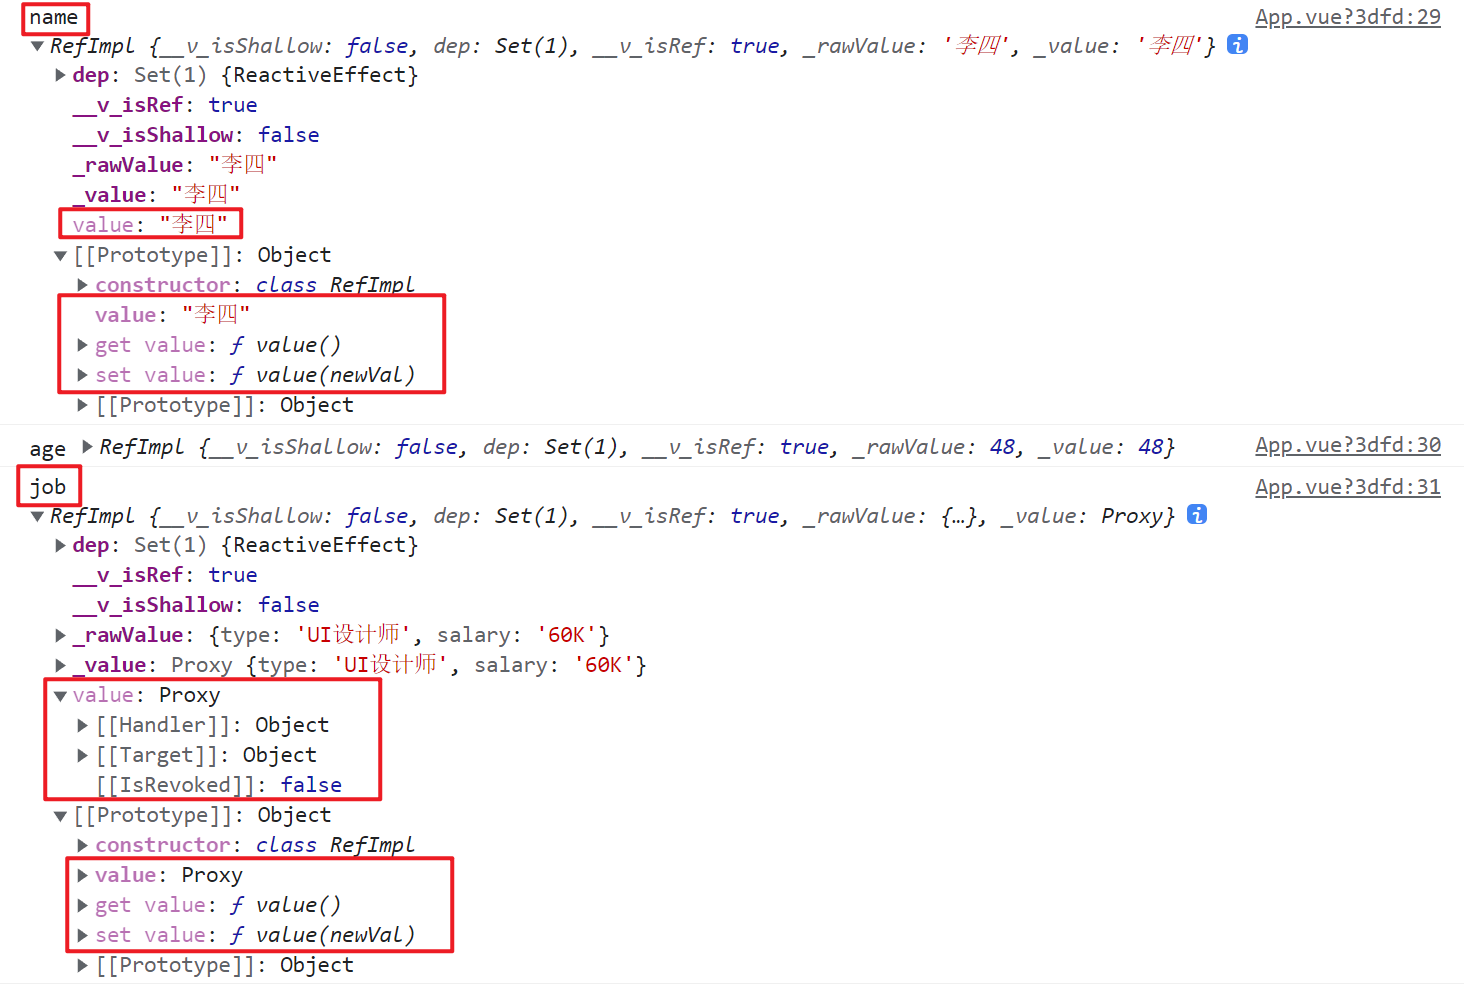
const xxx = ref(initValue)- 创建一个包含响应式数据的引用对象(reference对象,简称ref对象)。
- JS中操作数据:
xxx.value - 模板中读取数据:不需要.value,直接:
<div>{{xxx}}</div>。
备注:
- 接收的数据可以是:基本类型、也可以是对象类型。
- 基本类型的数据:响应式依然是靠
Object.defineProperty()的get与set完成的。 - 对象类型的数据:内部“求助”了Vue3.0中的一个新函数——
reactive函数(封装了对Proxy的操作)。
案例:
1
2
3
4
5
6
7
8
9
10
11
12
13
14
15
16
17
18
19
20
21
22
23
24
25
26
27
28
29
30
31
32
33
34
35
36
37
38
39
40
41
42
43<template>
<h1>一个人的信息</h1>
<h2>姓名:{{name}}</h2>
<h2>年龄:{{age}}</h2>
<h3>工作种类:{{job.type}}</h3>
<h3>工作薪水:{{job.salary}}</h3>
<button @click="changeInfo">修改人的信息</button>
</template>
<script>
import {ref} from 'vue'
export default {
name: 'App',
setup(){
//数据
let name = ref('张三')
let age = ref(18)
let job = ref({
type:'前端工程师',
salary:'30K'
})
//方法
function changeInfo(){
name.value = '李四'
age.value = 48
job.value.type = 'UI设计师'
job.value.salary = '60K'
console.log('name',name)
console.log('age',age)
console.log('job',job)
}
//返回一个对象(常用)
return {
name,
age,
job,
changeInfo
}
}
}
</script>![]()
3.3 reactive函数
作用:定义一个对象类型的响应式数据(基本类型不要用它,要用
ref函数)。语法:
const 代理对象= reactive(源对象)接收一个对象(或数组),返回一个代理对象(Proxy的实例对象,简称proxy对象)。reactive定义的响应式数据是“深层次的”。
内部基于 ES6 的 Proxy 实现,通过代理对象操作源对象内部数据进行操作。
案例:
1
2
3
4
5
6
7
8
9
10
11
12
13
14
15
16
17
18
19
20
21
22
23
24
25
26
27
28
29
30
31
32
33
34
35
36
37
38
39
40
41
42
43
44
45
46
47
48
49
50
51<template>
<h1>一个人的信息</h1>
<h2>姓名:{{person.name}}</h2>
<h2>年龄:{{person.age}}</h2>
<h3>工作种类:{{person.job.type}}</h3>
<h3>工作薪水:{{person.job.salary}}</h3>
<h3>爱好:{{person.hobby}}</h3>
<h3>测试的数据c:{{person.job.a.b.c}}</h3>
<button @click="changeInfo">修改人的信息</button>
</template>
<script>
import {reactive} from 'vue'
export default {
name: 'App',
setup(){
//数据
let person = reactive({
name:'张三',
age:18,
job:{
type:'前端工程师',
salary:'30K',
a:{
b:{
c:666
}
}
},
hobby:['抽烟','喝酒','烫头']
})
//方法
function changeInfo(){
person.name = '李四'
person.age = 48
person.job.type = 'UI设计师'
person.job.salary = '60K'
person.job.a.b.c = 999
person.hobby[0] = '学习'
console.log('person',person)
}
//返回一个对象(常用)
return {
person,
changeInfo
}
}
}
</script>![]()
3.4 Vue3.0中的响应式原理
3.4.1 vue2.x的响应式
实现原理:
对象类型:通过
Object.defineProperty()对属性的读取、修改进行拦截(数据劫持)。数组类型:通过重写更新数组的一系列方法来实现拦截。(对数组的变更方法进行了包裹)。
1
2
3
4Object.defineProperty(data, 'count', {
get () {},
set () {}
})
存在问题:
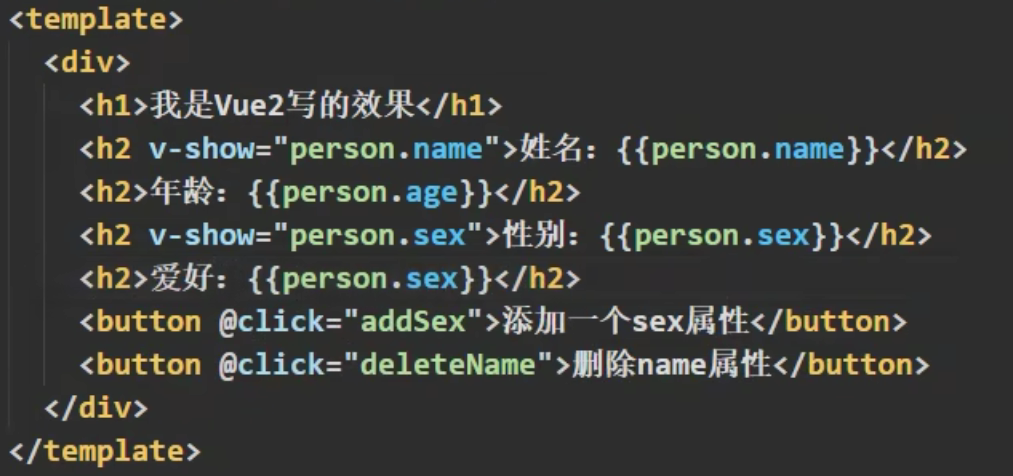
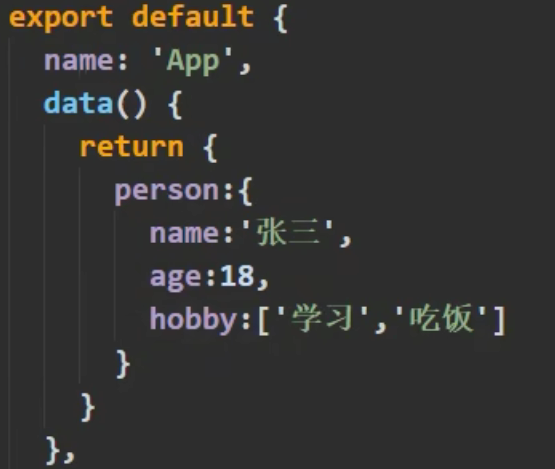
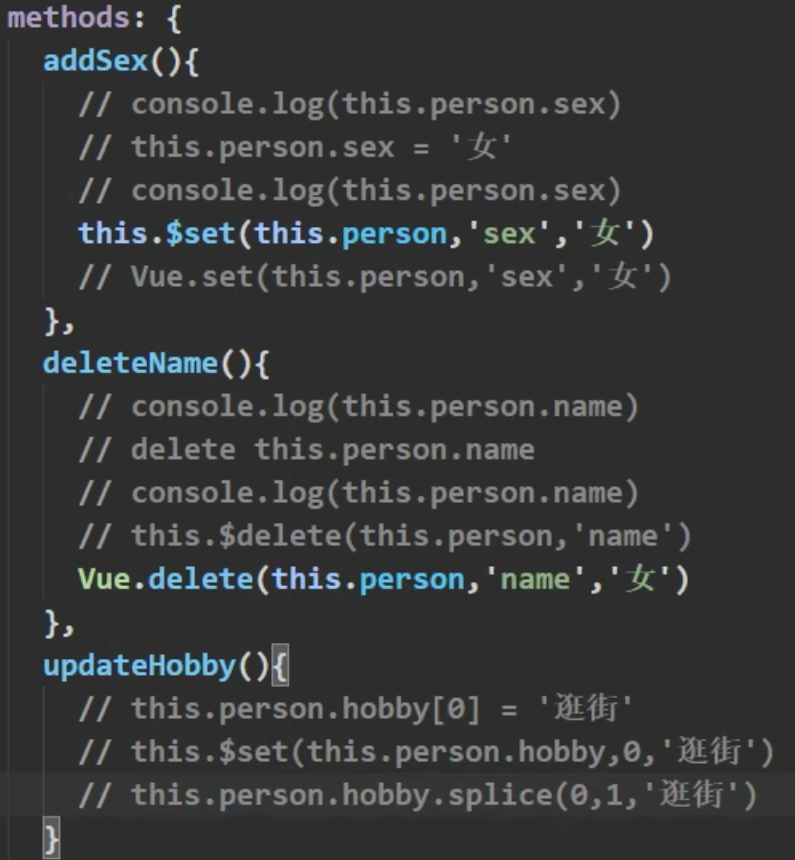
- 新增属性、删除属性, 界面不会更新。
- 直接通过下标修改数组, 界面不会自动更新。
![1653034616522]()
![1653034635575]()
![1653034581867]()
3.4.2 Vue3.0的响应式
- 实现原理:
- 通过Proxy(代理): 拦截对象中任意属性的变化, 包括:属性值的读写、属性的添加、属性的删除等。
- 通过Reflect(反射): 对源对象的属性进行操作。
- MDN文档中描述的Proxy与Reflect:
Proxy:https://developer.mozilla.org/zh-CN/docs/Web/JavaScript/Reference/Global_Objects/Proxy
Reflect:https://developer.mozilla.org/zh-CN/docs/Web/JavaScript/Reference/Global_Objects/Reflect
1
2
3
4
5
6
7
8
9
10
11
12
13
14
15
16new Proxy(data, {
// 拦截读取属性值
get (target, prop) {
return Reflect.get(target, prop)
},
// 拦截设置属性值或添加新属性
set (target, prop, value) {
return Reflect.set(target, prop, value)
},
// 拦截删除属性
deleteProperty (target, prop) {
return Reflect.deleteProperty(target, prop)
}
})
proxy.name = 'tom'
案例:
1
2
3
4
5
6
7
8
9
10
11
12
13
14
15
16
17
18
19
20
21
22
23
24
25
26
27
28
29
30
31
32
33
34
35
36
37
38
39
40
41
42
43
44
45
46
47
48
49
50
51
52
53
54
55
56
57
58
59
60
61
62
63
64
65
66
67
68
69
70
71
72
73
74
75
76
77
78
79
80
81
82
83
84
85
86
87
88
89
90
91
92//源数据
let person = {
name:'张三',
age:18
}
//模拟Vue2中实现响应式
//#region
let p = {}
Object.defineProperty(p,'name',{
// 使得delete p.name成功
configurable:true,
get(){ //有人读取name时调用
return person.name
},
set(value){ //有人修改name时调用
console.log('有人修改了name属性,我发现了,我要去更新界面!')
person.name = value
}
})
Object.defineProperty(p,'age',{
get(){ //有人读取age时调用
return person.age
},
set(value){ //有人修改age时调用
console.log('有人修改了age属性,我发现了,我要去更新界面!')
person.age = value
}
})
//#endregion
//模拟Vue3中实现响应式
//#region
const p = new Proxy(person,{
//有人读取p的某个属性时调用
get(target,propName){
console.log(`有人读取了p身上的${propName}属性`)
return Reflect.get(target,propName)
},
//有人修改p的某个属性、或给p追加某个属性时调用
set(target,propName,value){
console.log(`有人修改了p身上的${propName}属性,我要去更新界面了!`)
Reflect.set(target,propName,value)
},
//有人删除p的某个属性时调用
deleteProperty(target,propName){
console.log(`有人删除了p身上的${propName}属性,我要去更新界面了!`)
return Reflect.deleteProperty(target,propName)
}
})
//#endregion
let obj = {a:1,b:2}
//通过Object.defineProperty去操作
//#region
try {
Object.defineProperty(obj,'c',{
get(){
return 3
}
})
//重名会报错
Object.defineProperty(obj,'c',{
get(){
return 4
}
})
} catch (error) {
console.log(error)
}
//#endregion
//通过Reflect.defineProperty去操作
//#region
const x1 = Reflect.defineProperty(obj,'c',{
get(){
return 3
}
})
console.log(x1)
const x2 = Reflect.defineProperty(obj,'c',{
get(){
return 4
}
})
if(x2){
console.log('某某某操作成功了!')
}else{
console.log('某某某操作失败了!')
}
//#endregion
3.5 reactive对比ref
- 从定义数据角度对比:
- ref用来定义:基本类型数据。
- reactive用来定义:对象(或数组)类型数据。
- 备注:ref也可以用来定义对象(或数组)类型数据, 它内部会自动通过
reactive转为代理对象。
- 从原理角度对比:
- ref通过
Object.defineProperty()的get与set来实现响应式(数据劫持)。 - reactive通过使用Proxy来实现响应式(数据劫持), 并通过Reflect操作源对象内部的数据。
- ref通过
- 从使用角度对比:
- ref定义的数据:操作数据需要
.value,读取数据时模板中直接读取不需要.value。 - reactive定义的数据:操作数据与读取数据:均不需要
.value。
- ref定义的数据:操作数据需要
3.6 setup的两个注意点
setup执行的时机
- 在beforeCreate之前执行一次,this是undefined。
setup的参数
- props:值为对象,包含:组件外部传递过来,且组件内部声明接收了的属性。
- context:上下文对象
- attrs: 值为对象,包含:组件外部传递过来,但没有在props配置中声明的属性, 相当于
this.$attrs。 - slots: 收到的插槽内容, 相当于
this.$slots。 - emit: 分发自定义事件的函数, 相当于
this.$emit。
- attrs: 值为对象,包含:组件外部传递过来,但没有在props配置中声明的属性, 相当于
案例:
App.vue。
1
2
3
4
5
6
7
8
9
10
11
12
13
14
15
16
17
18
19
20
21
22
23
24
25
26
27// app.vue
<template>
<Demo @hello="showHelloMsg" msg="你好啊" school="尚硅谷">
<template v-slot:qwe>
<span>尚硅谷</span>
</template>
<template v-slot:asd>
<span>尚硅谷</span>
</template>
</Demo>
</template>
<script>
import Demo from './components/Demo'
export default {
name: 'App',
components:{Demo},
setup(){
function showHelloMsg(value){
alert(`你好啊,你触发了hello事件,我收到的参数是:${value}!`)
}
return {
showHelloMsg
}
}
}
</script>Demo.vue。
1
2
3
4
5
6
7
8
9
10
11
12
13
14
15
16
17
18
19
20
21
22
23
24
25
26
27
28
29
30
31
32
33
34
35
36
37
38<template>
<h1>一个人的信息</h1>
<h2>姓名:{{person.name}}</h2>
<h2>年龄:{{person.age}}</h2>
<button @click="test">测试触发一下Demo组件的Hello事件</button>
</template>
<script>
import {reactive} from 'vue'
export default {
name: 'Demo',
props:['msg','school'],
emits:['hello'],
setup(props,context){
// console.log('---setup---',props)
// console.log('---setup---',context)
// console.log('---setup---',context.attrs) //相当于Vue2中的$attrs
// console.log('---setup---',context.emit) //触发自定义事件的。
console.log('---setup---',context.slots) //插槽
//数据
let person = reactive({
name:'张三',
age:18
})
//方法
function test(){
context.emit('hello',666)
}
//返回一个对象(常用)
return {
person,
test
}
}
}
</script>
3.7 计算属性与监视
3.7.1 computed函数
与Vue2.x中computed配置功能一致
写法
1
2
3
4
5
6
7
8
9
10
11
12
13
14
15
16
17
18
19
20import {computed} from 'vue'
setup(){
...
//计算属性——简写
let fullName = computed(()=>{
return person.firstName + '-' + person.lastName
})
//计算属性——完整
let fullName = computed({
get(){
return person.firstName + '-' + person.lastName
},
set(value){
const nameArr = value.split('-')
person.firstName = nameArr[0]
person.lastName = nameArr[1]
}
})
}案例:
1
2
3
4
5
6
7
8
9
10
11
12
13
14
15
16
17
18
19
20
21
22
23
24
25
26
27
28
29
30
31
32
33
34
35
36
37
38
39
40
41
42
43
44
45<template>
<h1>一个人的信息</h1>
姓:<input type="text" v-model="person.firstName">
<br>
名:<input type="text" v-model="person.lastName">
<br>
<span>全名:{{person.fullName}}</span>
<br>
全名:<input type="text" v-model="person.fullName">
</template>
<script>
import {reactive,computed} from 'vue'
export default {
name: 'Demo',
setup(){
//数据
let person = reactive({
firstName:'张',
lastName:'三'
})
//计算属性——简写(没有考虑计算属性被修改的情况)
/* person.fullName = computed(()=>{
return person.firstName + '-' + person.lastName
}) */
//计算属性——完整写法(考虑读和写)
person.fullName = computed({
get(){
return person.firstName + '-' + person.lastName
},
set(value){
const nameArr = value.split('-')
person.firstName = nameArr[0]
person.lastName = nameArr[1]
}
})
//返回一个对象(常用)
return {
person
}
}
}
</script>
3.7.2 watch函数
与Vue2.x中watch配置功能一致
两个小“坑”:
- 监视reactive定义的响应式数据时:oldValue无法正确获取、强制开启了深度监视(deep配置失效)。
- 监视reactive定义的响应式数据中某个属性时:deep配置有效。
1
2
3
4
5
6
7
8
9
10
11
12
13
14
15
16
17
18
19
20
21
22
23
24
25
26
27
28
29
30
31
32//情况一:监视ref定义的响应式数据
watch(sum,(newValue,oldValue)=>{
console.log('sum变化了',newValue,oldValue)
},{immediate:true})
//情况二:监视多个ref定义的响应式数据
watch([sum,msg],(newValue,oldValue)=>{
console.log('sum或msg变化了',newValue,oldValue)
})
/* 情况三:监视reactive定义的响应式数据
若watch监视的是reactive定义的响应式数据,则无法正确获得oldValue!!
若watch监视的是reactive定义的响应式数据,则强制开启了深度监视
*/
watch(person,(newValue,oldValue)=>{
console.log('person变化了',newValue,oldValue)
},{immediate:true,deep:false}) //此处的deep配置不再奏效
//情况四:监视reactive定义的响应式数据中的某个属性
watch(()=>person.job,(newValue,oldValue)=>{
console.log('person的job变化了',newValue,oldValue)
},{immediate:true,deep:true})
//情况五:监视reactive定义的响应式数据中的某些属性
watch([()=>person.job,()=>person.name],(newValue,oldValue)=>{
console.log('person的job变化了',newValue,oldValue)
},{immediate:true,deep:true})
//特殊情况
watch(()=>person.job,(newValue,oldValue)=>{
console.log('person的job变化了',newValue,oldValue)
},{deep:true}) //此处由于监视的是reactive素定义的对象中的某个属性,所以deep配置有效案例:
1
2
3
4
5
6
7
8
9
10
11
12
13
14
15
16
17
18
19
20
21
22
23
24
25
26
27
28
29
30
31
32
33
34
35
36
37
38
39
40
41
42
43
44
45
46
47
48
49
50
51
52
53
54
55
56
57
58
59
60
61
62
63
64
65
66
67
68
69
70
71
72
73
74
75
76
77<template>
<h2>当前求和为:{{sum}}</h2>
<button @click="sum++">点我+1</button>
<hr>
<h2>当前的信息为:{{msg}}</h2>
<button @click="msg+='!'">修改信息</button>
<hr>
<h2>姓名:{{person.name}}</h2>
<h2>年龄:{{person.age}}</h2>
<h2>薪资:{{person.job.j1.salary}}K</h2>
<button @click="person.name+='~'">修改姓名</button>
<button @click="person.age++">增长年龄</button>
<button @click="person.job.j1.salary++">涨薪</button>
</template>
<script>
import {ref,reactive,watch} from 'vue'
export default {
name: 'Demo',
setup(){
//数据
let sum = ref(0)
let msg = ref('你好啊')
let person = reactive({
name:'张三',
age:18,
job:{
j1:{
salary:20
}
}
})
//情况一:监视ref所定义的一个响应式数据
/* watch(sum,(newValue,oldValue)=>{
console.log('sum变了',newValue,oldValue)
},{immediate:true}) */
//情况二:监视ref所定义的多个响应式数据
/* watch([sum,msg],(newValue,oldValue)=>{
console.log('sum或msg变了',newValue,oldValue)
},{immediate:true}) */
/*
情况三:监视reactive所定义的一个响应式数据的全部属性
1.注意:此处无法正确的获取oldValue
2.注意:强制开启了深度监视(deep配置无效)
*/
/* watch(person,(newValue,oldValue)=>{
console.log('person变化了',newValue,oldValue)
},{deep:false}) //此处的deep配置无效 */
//情况四:监视reactive所定义的一个响应式数据中的某个属性
/* watch(()=>person.name,(newValue,oldValue)=>{
console.log('person的name变化了',newValue,oldValue)
}) */
//情况五:监视reactive所定义的一个响应式数据中的某些属性
/* watch([()=>person.name,()=>person.age],(newValue,oldValue)=>{
console.log('person的name或age变化了',newValue,oldValue)
}) */
//特殊情况
/* watch(()=>person.job,(newValue,oldValue)=>{
console.log('person的job变化了',newValue,oldValue)
},{deep:true}) //此处由于监视的是reactive素定义的对象中的某个属性,所以deep配置有效 */
//返回一个对象(常用)
return {
sum,
msg,
person
}
}
}
</script>watch监视ref函数说明:
1
2
3
4
5
6
7
8
9
10
11
12
13
14
15
16
17
18
19
20
21
22
23
24
25
26
27
28
29
30
31
32
33
34
35
36
37
38
39
40
41
42
43
44
45
46
47
48
49
50
51
52
53
54
55
56
57<template>
<h2>当前求和为:{{sum}}</h2>
<button @click="sum++">点我+1</button>
<hr>
<h2>当前的信息为:{{msg}}</h2>
<button @click="msg+='!'">修改信息</button>
<hr>
<h2>姓名:{{person.name}}</h2>
<h2>年龄:{{person.age}}</h2>
<h2>薪资:{{person.job.j1.salary}}K</h2>
<button @click="person.name+='~'">修改姓名</button>
<button @click="person.age++">增长年龄</button>
<button @click="person.job.j1.salary++">涨薪</button>
</template>
<script>
import {ref,reactive,watch} from 'vue'
export default {
name: 'Demo',
setup(){
//数据
let sum = ref(0)
let msg = ref('你好啊')
let person = ref({
name:'张三',
age:18,
job:{
j1:{
salary:20
}
}
})
console.log(person)
// 对于基本数据类型不需要加.value
watch(sum,(newValue,oldValue)=>{
console.log('sum的值变化了',newValue,oldValue)
})
// 要么使用person.value,要么开启deep:true
// 当使用person.value时,监视的是proxy对象,其已经自动开启了深度监视
// 当使用person时,监视的是RefImpl对象,其没有自动开启深度监视
watch(person,(newValue,oldValue)=>{
console.log('person的值变化了',newValue,oldValue)
},{deep:true})
//返回一个对象(常用)
return {
sum,
msg,
person
}
}
}
</script>
3.7.3 watchEffect函数
watch的套路是:既要指明监视的属性,也要指明监视的回调。
watchEffect的套路是:不用指明监视哪个属性,监视的回调中用到哪个属性,那就监视哪个属性。
watchEffect有点像computed:
- 但computed注重的计算出来的值(回调函数的返回值),所以必须要写返回值。
- 而watchEffect更注重的是过程(回调函数的函数体),所以不用写返回值。
1
2
3
4
5
6//watchEffect所指定的回调中用到的数据只要发生变化,则直接重新执行回调。
watchEffect(()=>{
const x1 = sum.value
const x2 = person.age
console.log('watchEffect配置的回调执行了')
})
案例:
1
2
3
4
5
6
7
8
9
10
11
12
13
14
15
16
17
18
19
20
21
22
23
24
25
26
27
28
29
30
31
32
33
34
35
36
37
38
39
40
41
42
43
44
45
46
47
48
49
50
51
52
53<template>
<h2>当前求和为:{{sum}}</h2>
<button @click="sum++">点我+1</button>
<hr>
<h2>当前的信息为:{{msg}}</h2>
<button @click="msg+='!'">修改信息</button>
<hr>
<h2>姓名:{{person.name}}</h2>
<h2>年龄:{{person.age}}</h2>
<h2>薪资:{{person.job.j1.salary}}K</h2>
<button @click="person.name+='~'">修改姓名</button>
<button @click="person.age++">增长年龄</button>
<button @click="person.job.j1.salary++">涨薪</button>
</template>
<script>
import {ref,reactive,watch,watchEffect} from 'vue'
export default {
name: 'Demo',
setup(){
//数据
let sum = ref(0)
let msg = ref('你好啊')
let person = reactive({
name:'张三',
age:18,
job:{
j1:{
salary:20
}
}
})
//监视
/* watch(sum,(newValue,oldValue)=>{
console.log('sum的值变化了',newValue,oldValue)
},{immediate:true}) */
watchEffect(()=>{
const x1 = sum.value
const x2 = person.job.j1.salary
console.log('watchEffect所指定的回调执行了')
})
//返回一个对象(常用)
return {
sum,
msg,
person
}
}
}
</script>
3.8 生命周期
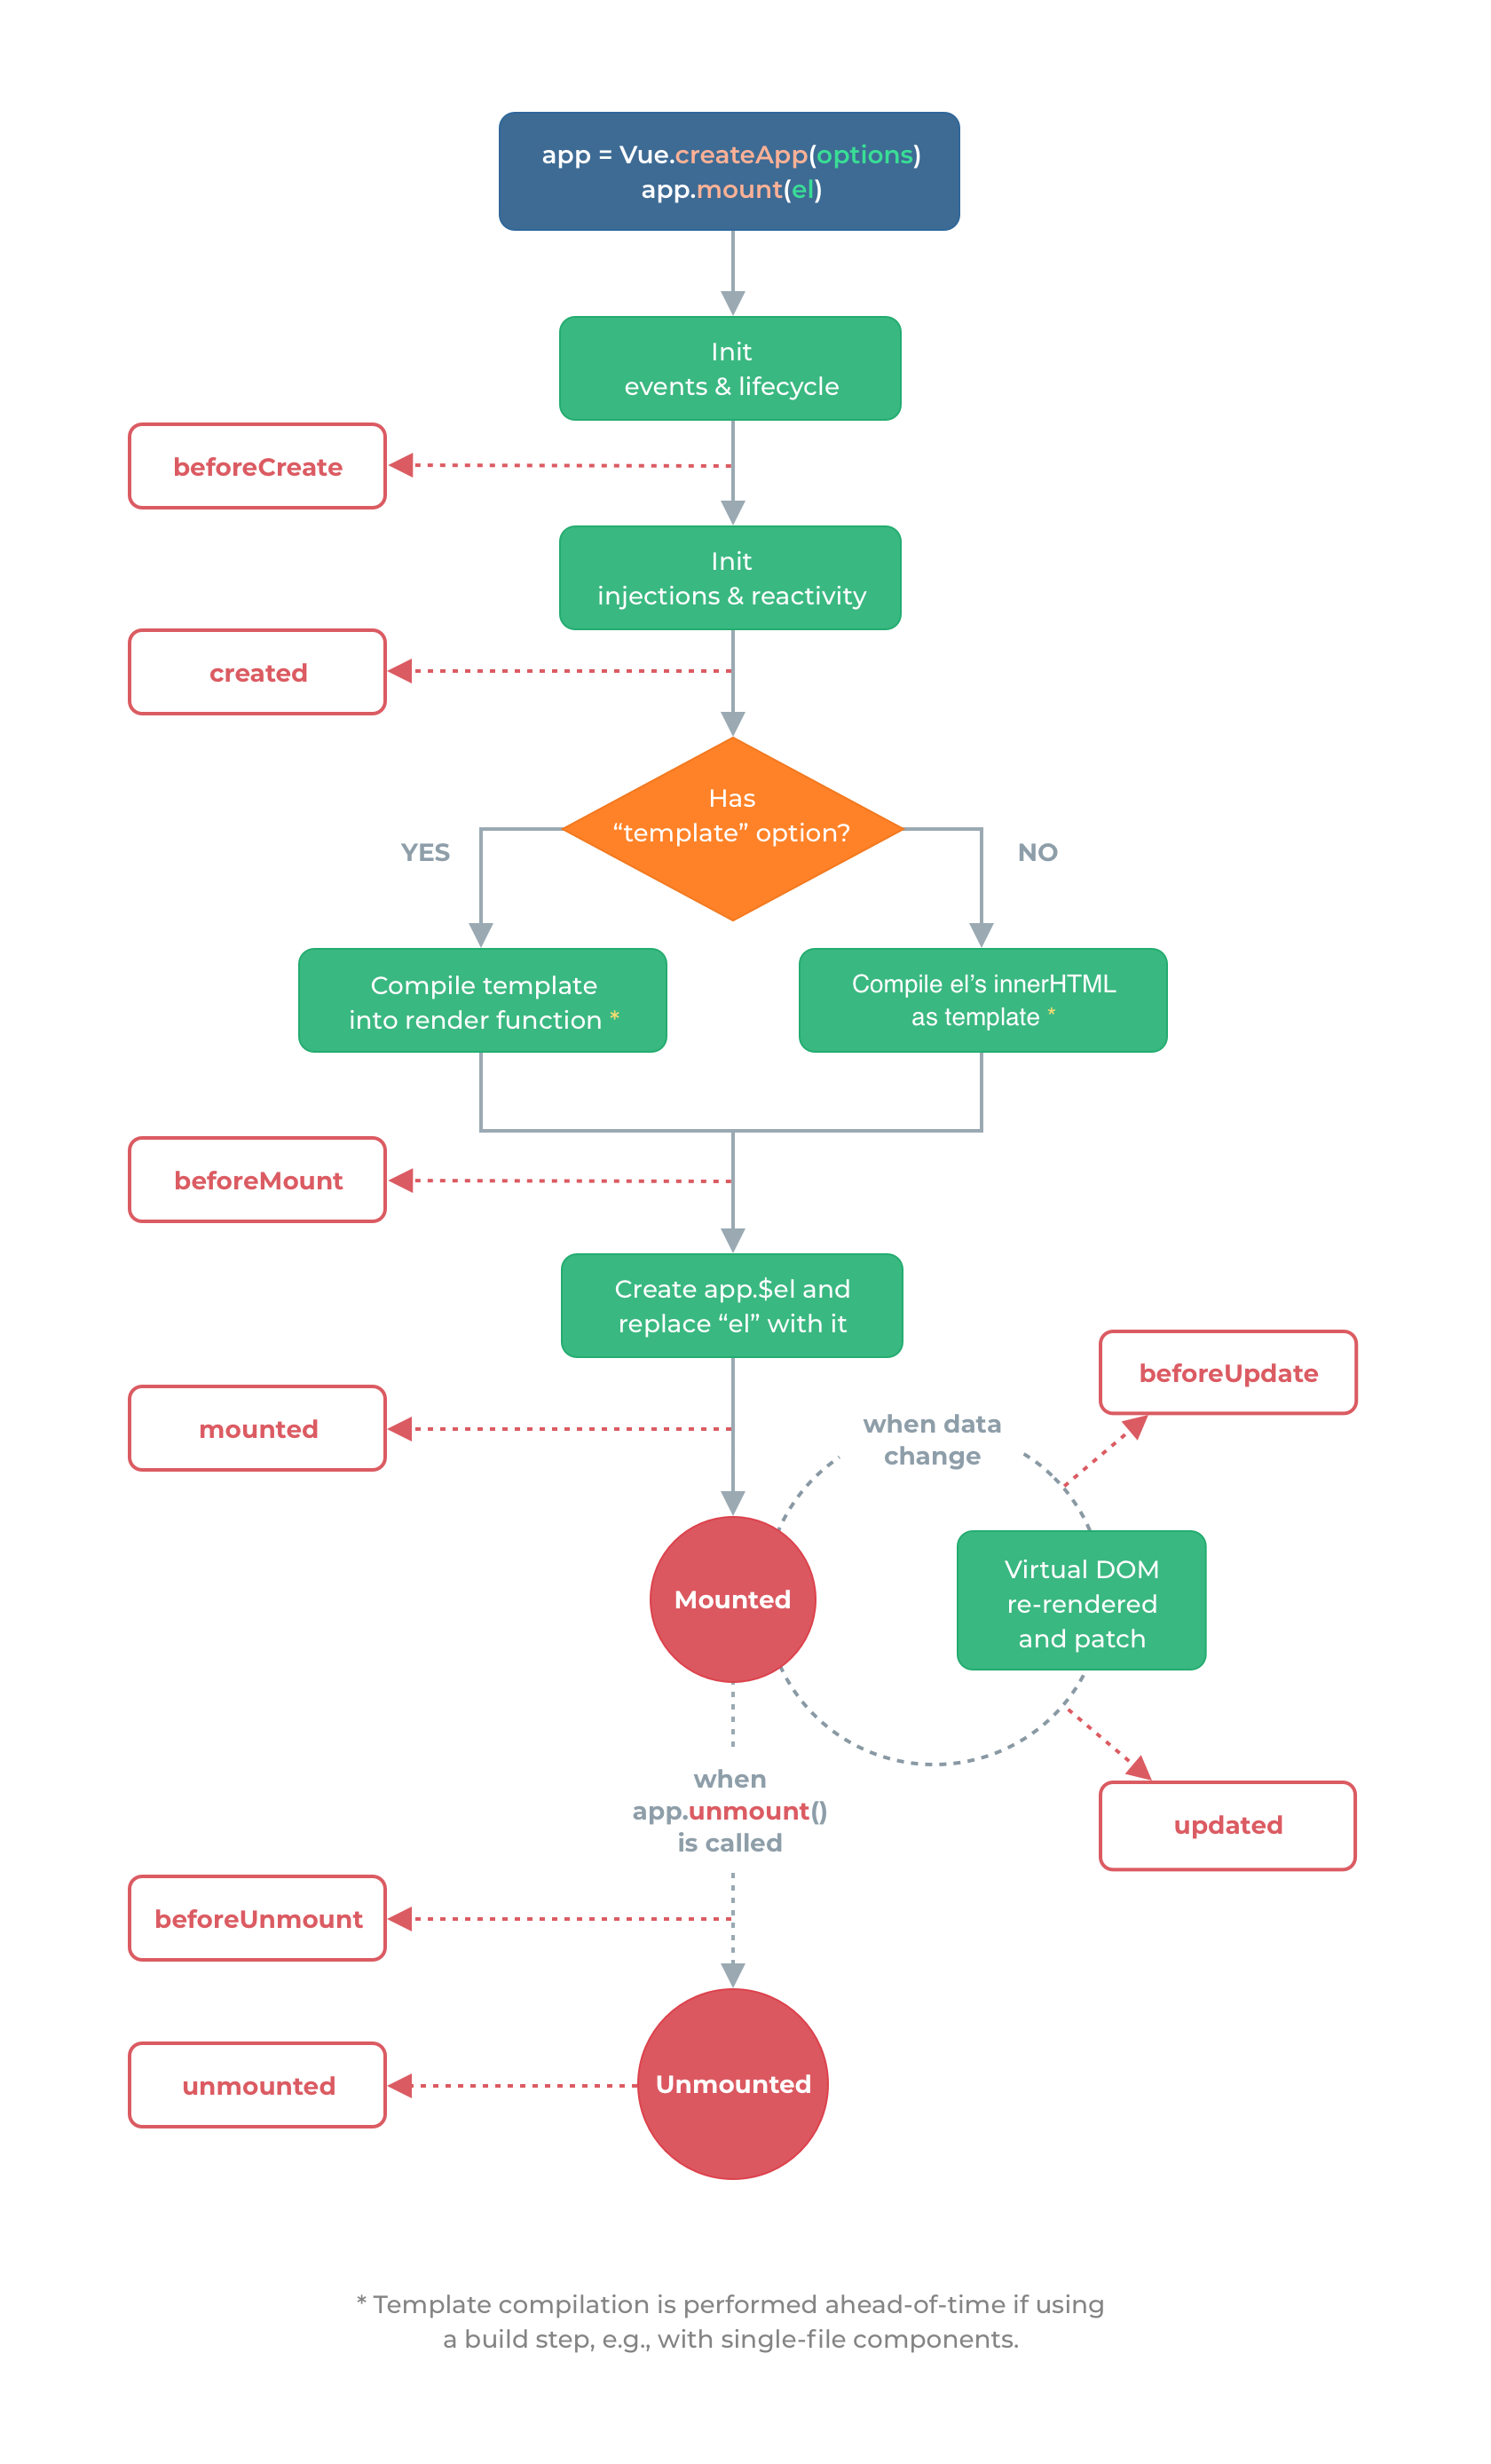
Vue3.0中可以继续使用Vue2.x中的生命周期钩子,但有有两个被更名:
beforeDestroy改名为beforeUnmount。destroyed改名为unmounted。
Vue3.0也提供了 Composition API 形式的生命周期钩子,与Vue2.x中钩子对应关系如下:
beforeCreate===>setup()created=======>setup()beforeMount===>onBeforeMountmounted=======>onMountedbeforeUpdate===>onBeforeUpdateupdated=======>onUpdatedbeforeUnmount==>onBeforeUnmountunmounted=====>onUnmounted
案例:
1
2
3
4
5
6
7
8
9
10
11
12
13
14
15
16
17
18
19
20
21
22
23
24
25
26
27
28
29
30
31
32
33
34
35
36
37
38
39
40
41
42
43
44
45
46
47
48
49
50
51
52
53
54
55
56
57
58
59
60
61
62
63
64
65
66
67<template>
<h2>当前求和为:{{sum}}</h2>
<button @click="sum++">点我+1</button>
</template>
<script>
import {ref,onBeforeMount,onMounted,onBeforeUpdate,onUpdated,onBeforeUnmount,onUnmounted} from 'vue'
export default {
name: 'Demo',
setup(){
console.log('---setup---')
//数据
let sum = ref(0)
//通过组合式API的形式去使用生命周期钩子
onBeforeMount(()=>{
console.log('---onBeforeMount---')
})
onMounted(()=>{
console.log('---onMounted---')
})
onBeforeUpdate(()=>{
console.log('---onBeforeUpdate---')
})
onUpdated(()=>{
console.log('---onUpdated---')
})
onBeforeUnmount(()=>{
console.log('---onBeforeUnmount---')
})
onUnmounted(()=>{
console.log('---onUnmounted---')
})
//返回一个对象(常用)
return {sum}
},
//通过配置项的形式使用生命周期钩子
//#region
beforeCreate() {
console.log('---beforeCreate---')
},
created() {
console.log('---created---')
},
beforeMount() {
console.log('---beforeMount---')
},
mounted() {
console.log('---mounted---')
},
beforeUpdate(){
console.log('---beforeUpdate---')
},
updated() {
console.log('---updated---')
},
beforeUnmount() {
console.log('---beforeUnmount---')
},
unmounted() {
console.log('---unmounted---')
},
//#endregion
}
</script>
3.9 自定义hook函数
什么是hook?——本质是一个函数,把setup函数中使用的Composition API进行了封装。
类似于vue2.x中的mixin。
自定义hook的优势:复用代码, 让setup中的逻辑更清楚易懂。
案例:
usePoint.js:
1
2
3
4
5
6
7
8
9
10
11
12
13
14
15
16
17
18
19
20
21
22
23
24
25
26import {reactive,onMounted,onBeforeUnmount} from 'vue'
export default function (){
//实现鼠标“打点”相关的数据
let point = reactive({
x:0,
y:0
})
//实现鼠标“打点”相关的方法
function savePoint(event){
point.x = event.pageX
point.y = event.pageY
console.log(event.pageX,event.pageY)
}
//实现鼠标“打点”相关的生命周期钩子
onMounted(()=>{
window.addEventListener('click',savePoint)
})
onBeforeUnmount(()=>{
window.removeEventListener('click',savePoint)
})
return point
}Demo.vue:
1
2
3
4
5
6
7
8
9
10
11
12
13
14
15
16
17
18
19
20
21
22<template>
<h2>当前求和为:{{sum}}</h2>
<button @click="sum++">点我+1</button>
<hr>
<h2>当前点击时鼠标的坐标为:x:{{point.x}},y:{{point.y}}</h2>
</template>
<script>
import {ref} from 'vue'
import usePoint from '../hooks/usePoint'
export default {
name: 'Demo',
setup(){
//数据
let sum = ref(0)
let point = usePoint()
//返回一个对象(常用)
return {sum,point}
}
}
</script>
3.10 toRef
作用:创建一个 ref 对象,其value值指向另一个对象中的某个属性。
语法:
const name = toRef(person,'name')。应用: 要将响应式对象中的某个属性单独提供给外部使用时。
扩展:
toRefs与toRef功能一致,但可以批量创建多个ref对象,语法:toRefs(person)。案例:
1
2
3
4
5
6
7
8
9
10
11
12
13
14
15
16
17
18
19
20
21
22
23
24
25
26
27
28
29
30
31
32
33
34
35
36
37
38
39
40
41
42
43
44
45
46<template>
<h4>{{person}}</h4>
<h2>姓名:{{name}}</h2>
<h2>年龄:{{age}}</h2>
<h2>薪资:{{job.j1.salary}}K</h2>
<button @click="name+='~'">修改姓名</button>
<button @click="age++">增长年龄</button>
<button @click="job.j1.salary++">涨薪</button>
</template>
<script>
import {ref,reactive,toRef,toRefs} from 'vue'
export default {
name: 'Demo',
setup(){
//数据
let person = reactive({
name:'张三',
age:18,
job:{
j1:{
salary:20
}
}
})
// const name1 = person.name
// console.log('%%%',name1)
// const name2 = toRef(person,'name')
// console.log('####',name2)
const x = toRefs(person)
console.log('******',x)
//返回一个对象(常用)
return {
person,
// name:toRef(person,'name'),
// age:toRef(person,'age'),
// salary:toRef(person.job.j1,'salary'),
...toRefs(person)
}
}
}
</script>
4、其它Composition API
4.1 shallowReactive与shallowRef
shallowReactive:只处理对象最外层属性的响应式(浅响应式)。
shallowRef:只处理基本数据类型的响应式, 不进行对象的响应式处理。
什么时候使用?
- 如果有一个对象数据,结构比较深, 但变化时只是外层属性变化 ===> shallowReactive。
- 如果有一个对象数据,后续功能不会修改该对象中的属性,而是生新的对象来替换 ===> shallowRef。
案例:
1
2
3
4
5
6
7
8
9
10
11
12
13
14
15
16
17
18
19
20
21
22
23
24
25
26
27
28
29
30
31
32
33
34
35
36
37
38
39
40
41
42
43
44<template>
<h4>当前的x.y值是:{{x.y}}</h4>
<button @click="x={y:888}">点我替换x</button>
<button @click="x.y++">点我x.y++</button>
<hr>
<h4>{{person}}</h4>
<h2>姓名:{{name}}</h2>
<h2>年龄:{{age}}</h2>
<h2>薪资:{{job.j1.salary}}K</h2>
<button @click="name+='~'">修改姓名</button>
<button @click="age++">增长年龄</button>
<button @click="job.j1.salary++">涨薪</button>
</template>
<script>
import {ref,reactive,toRef,toRefs,shallowReactive,shallowRef} from 'vue'
export default {
name: 'Demo',
setup(){
//数据
// let person = shallowReactive({ //只考虑第一层数据的响应式
let person = reactive({
name:'张三',
age:18,
job:{
j1:{
salary:20
}
}
})
let x = shallowRef({
y:0
})
console.log('******',x)
//返回一个对象(常用)
return {
x,
person,
...toRefs(person)
}
}
}
</script>
4.2 readonly与shallowReadonly
readonly: 让一个响应式数据变为只读的(深只读)。
shallowReadonly:让一个响应式数据变为只读的(浅只读)。
应用场景:不希望数据被修改时。
案例:
1
2
3
4
5
6
7
8
9
10
11
12
13
14
15
16
17
18
19
20
21
22
23
24
25
26
27
28
29
30
31
32
33
34
35
36
37
38
39
40
41
42<template>
<h4>当前求和为:{{sum}}</h4>
<button @click="sum++">点我++</button>
<hr>
<h2>姓名:{{name}}</h2>
<h2>年龄:{{age}}</h2>
<h2>薪资:{{job.j1.salary}}K</h2>
<button @click="name+='~'">修改姓名</button>
<button @click="age++">增长年龄</button>
<button @click="job.j1.salary++">涨薪</button>
</template>
<script>
import {ref,reactive,toRefs,readonly,shallowReadonly} from 'vue'
export default {
name: 'Demo',
setup(){
//数据
let sum = ref(0)
let person = reactive({
name:'张三',
age:18,
job:{
j1:{
salary:20
}
}
})
person = readonly(person)
// person = shallowReadonly(person)
// sum = readonly(sum)
// sum = shallowReadonly(sum)
//返回一个对象(常用)
return {
sum,
...toRefs(person)
}
}
}
</script>
4.3 toRaw与markRaw
toRaw:
- 作用:将一个由
reactive生成的响应式对象转为普通对象(ref不行)。 - 使用场景:用于读取响应式对象对应的普通对象,对这个普通对象的所有操作,不会引起页面更新。
- 作用:将一个由
markRaw:
- 作用:标记一个对象,使其永远不会再成为响应式对象。
- 应用场景:
- 有些值不应被设置为响应式的,例如复杂的第三方类库等。
- 当渲染具有不可变数据源的大列表时,跳过响应式转换可以提高性能。
案例:
1
2
3
4
5
6
7
8
9
10
11
12
13
14
15
16
17
18
19
20
21
22
23
24
25
26
27
28
29
30
31
32
33
34
35
36
37
38
39
40
41
42
43
44
45
46
47
48
49
50
51
52
53
54
55
56
57
58
59
60
61
62<template>
<h4>当前求和为:{{sum}}</h4>
<button @click="sum++">点我++</button>
<hr>
<h2>姓名:{{name}}</h2>
<h2>年龄:{{age}}</h2>
<h2>薪资:{{job.j1.salary}}K</h2>
<h3 v-show="person.car">座驾信息:{{person.car}}</h3>
<button @click="name+='~'">修改姓名</button>
<button @click="age++">增长年龄</button>
<button @click="job.j1.salary++">涨薪</button>
<button @click="showRawPerson">输出最原始的person</button>
<button @click="addCar">给人添加一台车</button>
<button @click="person.car.name+='!'">换车名</button>
<button @click="changePrice">换价格</button>
</template>
<script>
import {ref,reactive,toRefs,toRaw,markRaw} from 'vue'
export default {
name: 'Demo',
setup(){
//数据
let sum = ref(0)
let person = reactive({
name:'张三',
age:18,
job:{
j1:{
salary:20
}
}
})
function showRawPerson(){
const p = toRaw(person)
p.age++
console.log(p)
}
function addCar(){
let car = {name:'奔驰',price:40}
person.car = markRaw(car)
}
function changePrice(){
person.car.price++
console.log(person.car.price)
}
//返回一个对象(常用)
return {
sum,
person,
...toRefs(person),
showRawPerson,
addCar,
changePrice
}
}
}
</script>
4.4 customRef
作用:创建一个自定义的ref,并对其依赖项跟踪和更新触发进行显式控制。
实现防抖效果:
1
2
3
4
5
6
7
8
9
10
11
12
13
14
15
16
17
18
19
20
21
22
23
24
25
26
27
28
29
30
31
32
33
34
35
36
37
38<template>
<input type="text" v-model="keyword">
<h3>{{keyword}}</h3>
</template>
<script>
import {ref,customRef} from 'vue'
export default {
name:'Demo',
setup(){
// let keyword = ref('hello') //使用Vue准备好的内置ref
//自定义一个myRef
function myRef(value,delay){
let timer
//通过customRef去实现自定义
return customRef((track,trigger)=>{
return{
get(){
track() //告诉Vue这个value值是需要被“追踪”的
return value
},
set(newValue){
clearTimeout(timer)
timer = setTimeout(()=>{
value = newValue
trigger() //告诉Vue去更新界面
},delay)
}
}
})
}
let keyword = myRef('hello',500) //使用程序员自定义的ref
return {
keyword
}
}
}
</script>
4.5 provide与inject
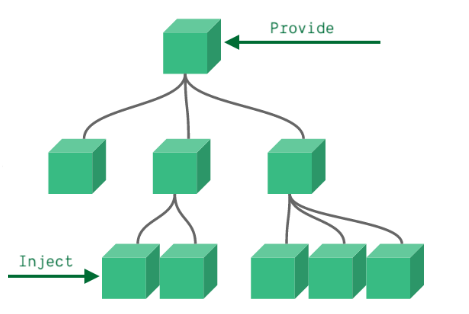
作用:实现祖与后代组件间通信。
套路:父组件有一个
provide选项来提供数据,后代组件有一个inject选项来开始使用这些数据。具体写法:
祖组件中:
1
2
3
4
5
6setup(){
......
let car = reactive({name:'奔驰',price:'40万'})
provide('car',car)
......
}后代组件中:
1
2
3
4
5
6setup(props,context){
......
const car = inject('car')
return {car}
......
}
案例:
App.vue:
1
2
3
4
5
6
7
8
9
10
11
12
13
14
15
16
17
18
19
20
21
22
23
24
25
26
27<template>
<div class="app">
<h3>我是App组件(祖),{{name}}--{{price}}</h3>
<Child/>
</div>
</template>
<script>
import { reactive,toRefs,provide } from 'vue'
import Child from './components/Child.vue'
export default {
name:'App',
components:{Child},
setup(){
let car = reactive({name:'奔驰',price:'40W'})
provide('car',car) //给自己的后代组件传递数据
return {...toRefs(car)}
}
}
</script>
<style>
.app{
background-color: gray;
padding: 10px;
}
</style>Child.vue:
1
2
3
4
5
6
7
8
9
10
11
12
13
14
15
16
17
18
19
20
21
22
23
24
25
26<template>
<div class="child">
<h3>我是Child组件(子)</h3>
<Son/>
</div>
</template>
<script>
import {inject} from 'vue'
import Son from './Son.vue'
export default {
name:'Child',
components:{Son},
/* setup(){
let x = inject('car')
console.log(x,'Child-----')
} */
}
</script>
<style>
.child{
background-color: skyblue;
padding: 10px;
}
</style>Son.vue:
1
2
3
4
5
6
7
8
9
10
11
12
13
14
15
16
17
18
19
20
21
22
23<template>
<div class="son">
<h3>我是Son组件(孙),{{car.name}}--{{car.price}}</h3>
</div>
</template>
<script>
import {inject} from 'vue'
export default {
name:'Son',
setup(){
let car = inject('car')
return {car}
}
}
</script>
<style>
.son{
background-color: orange;
padding: 10px;
}
</style>
4.6 响应式数据的判断
- isRef:检查一个值是否为一个 ref 对象。
- isReactive:检查一个对象是否是由
reactive创建的响应式代理。 - isReadonly:检查一个对象是否是由
readonly创建的只读代理。 - isProxy:检查一个对象是否是由
reactive或者readonly方法创建的代理。
案例:
1
2
3
4
5
6
7
8
9
10
11
12
13
14
15
16
17
18
19
20
21
22
23
24
25
26
27
28
29
30
31<template>
<h3>我是App组件</h3>
</template>
<script>
import {ref, reactive,toRefs,readonly,isRef,isReactive,isReadonly,isProxy } from 'vue'
export default {
name:'App',
setup(){
let car = reactive({name:'奔驰',price:'40W'})
let sum = ref(0)
let car2 = readonly(car)
console.log(isRef(sum))
console.log(isReactive(car))
console.log(isReadonly(car2))
console.log(isProxy(car))
console.log(isProxy(sum))
return {...toRefs(car)}
}
}
</script>
<style>
.app{
background-color: gray;
padding: 10px;
}
</style>
5、Composition API的优势
5.1 Options API存在的问题
使用传统OptionsAPI中,新增或者修改一个需求,就需要分别在data,methods,computed里修改。
5.2 Composition API的优势
我们可以更加优雅的组织我们的代码,函数。让相关功能的代码更加有序的组织在一起。
6、新的组件
6.1 Fragment
- 在Vue2中:组件必须有一个根标签。
- 在Vue3中:组件可以没有根标签,内部会将多个标签包含在一个Fragment虚拟元素中。
- 好处:减少标签层级,减小内存占用。
6.2 Teleport
什么是Teleport?——
Teleport是一种能够将我们的组件html结构移动到指定位置的技术。1
2
3
4
5
6
7
8<teleport to="移动位置">
<div v-if="isShow" class="mask">
<div class="dialog">
<h3>我是一个弹窗</h3>
<button @click="isShow = false">关闭弹窗</button>
</div>
</div>
</teleport>案例:
App.vue:
1
2
3
4
5
6
7
8
9
10
11
12
13
14
15
16
17
18
19
20
21<template>
<div class="app">
<h3>我是App组件</h3>
<Child/>
</div>
</template>
<script>
import Child from './components/Child'
export default {
name:'App',
components:{Child},
}
</script>
<style>
.app{
background-color: gray;
padding: 10px;
}
</style>Dialog.vue:
1
2
3
4
5
6
7
8
9
10
11
12
13
14
15
16
17
18
19
20
21
22
23
24
25
26
27
28
29
30
31
32
33
34
35
36
37
38
39
40
41
42
43
44
45<template>
<div>
<button @click="isShow = true">点我弹个窗</button>
<teleport to="body">
<div v-if="isShow" class="mask">
<div class="dialog">
<h3>我是一个弹窗</h3>
<h4>一些内容</h4>
<h4>一些内容</h4>
<h4>一些内容</h4>
<button @click="isShow = false">关闭弹窗</button>
</div>
</div>
</teleport>
</div>
</template>
<script>
import {ref} from 'vue'
export default {
name:'Dialog',
setup(){
let isShow = ref(false)
return {isShow}
}
}
</script>
<style>
.mask{
position: absolute;
top: 0;bottom: 0;left: 0;right: 0;
background-color: rgba(0, 0, 0, 0.5);
}
.dialog{
position: absolute;
top: 50%;
left: 50%;
transform: translate(-50%,-50%);
text-align: center;
width: 300px;
height: 300px;
background-color: green;
}
</style>Child.vue:
1
2
3
4
5
6
7
8
9
10
11
12
13
14
15
16
17
18
19
20
21<template>
<div class="child">
<h3>我是Child组件</h3>
<Son/>
</div>
</template>
<script>
import Son from './Son'
export default {
name:'Child',
components:{Son},
}
</script>
<style>
.child{
background-color: skyblue;
padding: 10px;
}
</style>Son.vue:
1
2
3
4
5
6
7
8
9
10
11
12
13
14
15
16
17
18
19
20
21<template>
<div class="son">
<h3>我是Son组件</h3>
<Dialog/>
</div>
</template>
<script>
import Dialog from './Dialog.vue'
export default {
name:'Son',
components:{Dialog}
}
</script>
<style>
.son{
background-color: orange;
padding: 10px;
}
</style>
6.3 Suspense
等待异步组件时渲染一些额外内容,让应用有更好的用户体验
使用步骤:
异步引入组件
1
2import {defineAsyncComponent} from 'vue'
const Child = defineAsyncComponent(()=>import('./components/Child.vue'))使用
Suspense包裹组件,并配置好default与fallback1
2
3
4
5
6
7
8
9
10
11
12
13<template>
<div class="app">
<h3>我是App组件</h3>
<Suspense>
<template v-slot:default>
<Child/>
</template>
<template v-slot:fallback>
<h3>加载中.....</h3>
</template>
</Suspense>
</div>
</template>
案例:
App.vue:
1
2
3
4
5
6
7
8
9
10
11
12
13
14
15
16
17
18
19
20
21
22
23
24
25
26
27
28
29
30<template>
<div class="app">
<h3>我是App组件</h3>
<Suspense>
<template v-slot:default>
<Child/>
</template>
<template v-slot:fallback>
<h3>稍等,加载中...</h3>
</template>
</Suspense>
</div>
</template>
<script>
// import Child from './components/Child'//静态引入
import {defineAsyncComponent} from 'vue'
const Child = defineAsyncComponent(()=>import('./components/Child')) //异步引入
export default {
name:'App',
components:{Child},
}
</script>
<style>
.app{
background-color: gray;
padding: 10px;
}
</style>Child.vue:
1
2
3
4
5
6
7
8
9
10
11
12
13
14
15
16
17
18
19
20
21
22
23
24
25
26
27
28
29<template>
<div class="child">
<h3>我是Child组件</h3>
{{sum}}
</div>
</template>
<script>
import {ref} from 'vue'
export default {
name:'Child',
async setup(){
let sum = ref(0)
let p = new Promise((resolve,reject)=>{
setTimeout(()=>{
resolve({sum})
},3000)
})
return await p
}
}
</script>
<style>
.child{
background-color: skyblue;
padding: 10px;
}
</style>
7、其他
7.1 全局API的转移
Vue 2.x 有许多全局 API 和配置。
例如:注册全局组件、注册全局指令等。
1
2
3
4
5
6
7
8
9
10
11
12//注册全局组件
Vue.component('MyButton', {
data: () => ({
count: 0
}),
template: '<button @click="count++">Clicked {{ count }} times.</button>'
})
//注册全局指令
Vue.directive('focus', {
inserted: el => el.focus()
}
Vue3.0中对这些API做出了调整:
将全局的API,即:
Vue.xxx调整到应用实例(app)上2.x 全局 API( Vue)3.x 实例 API ( app)Vue.config.xxxx app.config.xxxx Vue.config.productionTip 移除 Vue.component app.component Vue.directive app.directive Vue.mixin app.mixin Vue.use app.use Vue.prototype app.config.globalProperties
7.2 其他改变
data选项应始终被声明为一个函数。
过度类名的更改:
Vue2.x写法
1
2
3
4
5
6
7
8.v-enter,
.v-leave-to {
opacity: 0;
}
.v-leave,
.v-enter-to {
opacity: 1;
}Vue3.x写法
1
2
3
4
5
6
7
8
9.v-enter-from,
.v-leave-to {
opacity: 0;
}
.v-leave-from,
.v-enter-to {
opacity: 1;
}
移除keyCode作为 v-on 的修饰符,同时也不再支持
config.keyCodes移除
v-on.native修饰符父组件中绑定事件
1
2
3
4
<my-component
v-on:close="handleComponentEvent"
v-on:click="handleNativeClickEvent"
/>子组件中声明自定义事件
1
2
3
4
5
<script>
export default {
emits: ['close']
}
</script>
移除过滤器(filter)
过滤器虽然这看起来很方便,但它需要一个自定义语法,打破大括号内表达式是 “只是 JavaScript” 的假设,这不仅有学习成本,而且有实现成本!建议用方法调用或计算属性去替换过滤器。
……
