Netty优化与源码
1、netty优化
1.1 扩展序列化算法
编码和解码的基本介绍:
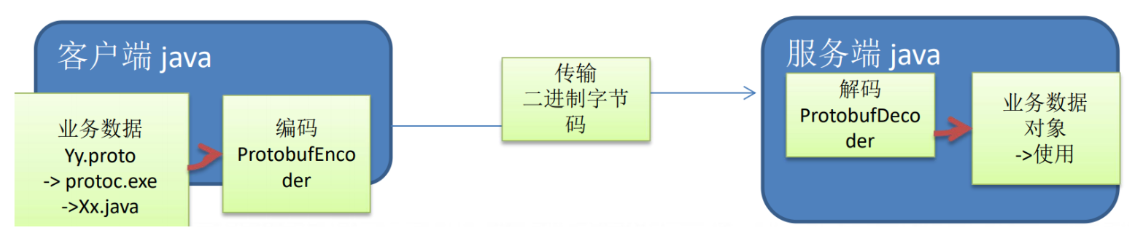
编写网络应用程序时,因为数据在网络中传输的都是二进制字节码数据,在发送数据时就需要编码,接收数据时就需要解码。
codec(编解码器)的组成部分有两个:decoder(解码器)和encoder(编码器)。encoder负责把业务数据转换成字节码数据,decoder负责把字节码数据转换成业务数据。
![]()

Netty自身提供了一些codec(编解码器):StringEncoder,对字符串数据进行编码;ObjectEncoder,对 Java 对象进行编码等等。
Netty提供的解码器:StringDecoder, 对字符串数据进行解码;ObjectDecoder,对Java对象进行解码等等。
Netty本身自带的ObjectDecoder和ObjectEncoder可以用来实现POJO对象或各种业务对象的编码和解码,底层使用的仍是Java序列化技术 , 而Java序列化技术本身效率就不高,存在如下问题:
- 无法跨语言。
- 序列化后的体积太大,是二进制编码的5倍多。
- 序列化性能太低。
序列化,反序列化主要用在消息正文的转换上。
- 序列化时,需要将Java对象变为要传输的数据(可以是byte[],或json等,最终都需要变成byte[])。
- 反序列化时,需要将传入的正文数据还原成Java对象,便于处理。
目前的代码仅支持Java自带的序列化,反序列化机制,核心代码如下:
1
2
3
4
5
6
7
8
9
10
11
// 反序列化
byte[] body = new byte[bodyLength];
byteByf.readBytes(body);
ObjectInputStream in = new ObjectInputStream(new ByteArrayInputStream(body));
Message message = (Message) in.readObject();
message.setSequenceId(sequenceId);
// 序列化
ByteArrayOutputStream out = new ByteArrayOutputStream();
new ObjectOutputStream(out).writeObject(message);
byte[] bytes = out.toByteArray();为了支持更多序列化算法,可以抽象一个Serializer接口,并添加不同序列化算法的实现,可以结合配置文件使用。
1
2
3
4
5
6
7
8
9
10
11
12
13
14
15
16
17
18
19
20
21
22
23
24
25
26
27
28
29
30
31
32
33
34
35
36
37
38
39
40
41
42
43
44
45
46
47
48
49
50
51
52
53
54
55
56
57
58
59
60
61
62
63
64
65
66
67
68
69
70
/**
* 用于扩展序列化、反序列化算法
*/
public interface Serializer {
// 反序列化方法
<T> T deserialize(Class<T> clazz, byte[] bytes);
// 序列化方法
<T> byte[] serialize(T object);
enum Algorithm implements Serializer {
Java {
public <T> T deserialize(Class<T> clazz, byte[] bytes) {
try {
ObjectInputStream ois = new ObjectInputStream(new ByteArrayInputStream(bytes));
return (T) ois.readObject();
} catch (IOException | ClassNotFoundException e) {
throw new RuntimeException("反序列化失败", e);
}
}
public <T> byte[] serialize(T object) {
try {
ByteArrayOutputStream bos = new ByteArrayOutputStream();
ObjectOutputStream oos = new ObjectOutputStream(bos);
oos.writeObject(object);
return bos.toByteArray();
} catch (IOException e) {
throw new RuntimeException("序列化失败", e);
}
}
},
Json {
public <T> T deserialize(Class<T> clazz, byte[] bytes) {
Gson gson = new GsonBuilder().registerTypeAdapter(Class.class, new ClassCodec()).create();
String json = new String(bytes, StandardCharsets.UTF_8);
return gson.fromJson(json, clazz);
}
public <T> byte[] serialize(T object) {
Gson gson = new GsonBuilder().registerTypeAdapter(Class.class, new ClassCodec()).create();
String json = gson.toJson(object);
return json.getBytes(StandardCharsets.UTF_8);
}
}
}
class ClassCodec implements JsonSerializer<Class<?>>, JsonDeserializer<Class<?>> {
public Class<?> deserialize(JsonElement json, Type typeOfT, JsonDeserializationContext context) throws JsonParseException {
try {
String str = json.getAsString();
return Class.forName(str);
} catch (ClassNotFoundException e) {
throw new JsonParseException(e);
}
}
// String.class
public JsonElement serialize(Class<?> src, Type typeOfSrc, JsonSerializationContext context) {
// class -> json
return new JsonPrimitive(src.getName());
}
}
}1
2
3
4
5
6
7
8
9
10
11
12
13
14
15
16
17
18
19
20
21
22
23
24
25
26
27
28
29public abstract class Config {
static Properties properties;
static {
try (InputStream in = Config.class.getResourceAsStream("/application.properties")) {
properties = new Properties();
properties.load(in);
} catch (IOException e) {
throw new ExceptionInInitializerError(e);
}
}
public static int getServerPort() {
String value = properties.getProperty("server.port");
if(value == null) {
return 8080;
} else {
return Integer.parseInt(value);
}
}
public static Serializer.Algorithm getSerializerAlgorithm() {
String value = properties.getProperty("serializer.algorithm");
if(value == null) {
return Serializer.Algorithm.Java;
} else {
return Serializer.Algorithm.valueOf(value);
}
}
}1
2
3
4
5
6
7
8
9
10
11
12
13
14
15
16
17
18
19
20
21
22
23
24
25
26
27
28
29
30
31
32
33
34
35
36
37
38
39
40
41
42
43
44
45
46
47
48
49
50
51
52
53
.Sharable
/**
* 必须和LengthFieldBasedFrameDecoder一起使用,确保接到的ByteBuf消息是完整的
*/
public class MessageCodecSharable extends MessageToMessageCodec<ByteBuf, Message> {
protected void encode(ChannelHandlerContext ctx, Message msg, List<Object> outList) throws Exception {
ByteBuf out = ctx.alloc().buffer();
// 1、4个字节的魔数
out.writeBytes(new byte[]{1, 2, 3, 4});
// 2、1个字节的版本
out.writeByte(1);
// 3、1个字节的序列化方式,0代表jdk, 1代表json
// out.writeByte(0);
out.writeByte(Config.getSerializerAlgorithm().ordinal());
// 4、1个字节的指令类型
out.writeByte(msg.getMessageType());
// 5、4个字节的请求序号
out.writeInt(msg.getSequenceId());
// 无意义,对齐填充
out.writeByte(0xff);
// 6、获取内容的字节数组
byte[] bytes = Config.getSerializerAlgorithm().serialize(msg);
// 7、4个字节的正文长度
out.writeInt(bytes.length);
// 8、写入正文内容
out.writeBytes(bytes);
outList.add(out);
}
protected void decode(ChannelHandlerContext ctx, ByteBuf in, List<Object> out) throws Exception {
int magicNum = in.readInt();
byte version = in.readByte();
byte serializerAlgorithm = in.readByte();// 0或1
byte messageType = in.readByte();
int sequenceId = in.readInt();
in.readByte();
int length = in.readInt();
byte[] bytes = new byte[length];
in.readBytes(bytes, 0, length);
// 找到反序列化算法
Serializer.Algorithm algorithm = Serializer.Algorithm.values()[serializerAlgorithm];
// 确定具体消息类型
Class<? extends Message> messageClass = Message.getMessageClass(messageType);
Message message = algorithm.deserialize(messageClass, bytes);
log.debug("{}, {}, {}, {}, {}, {}", magicNum, version, serializerAlgorithm, messageType, sequenceId, length);
log.debug("{}", message);
// 将解析好的对象加入集合中给下个handler调用
out.add(message);
}
}1
2# resources目录下新建application.properties文件
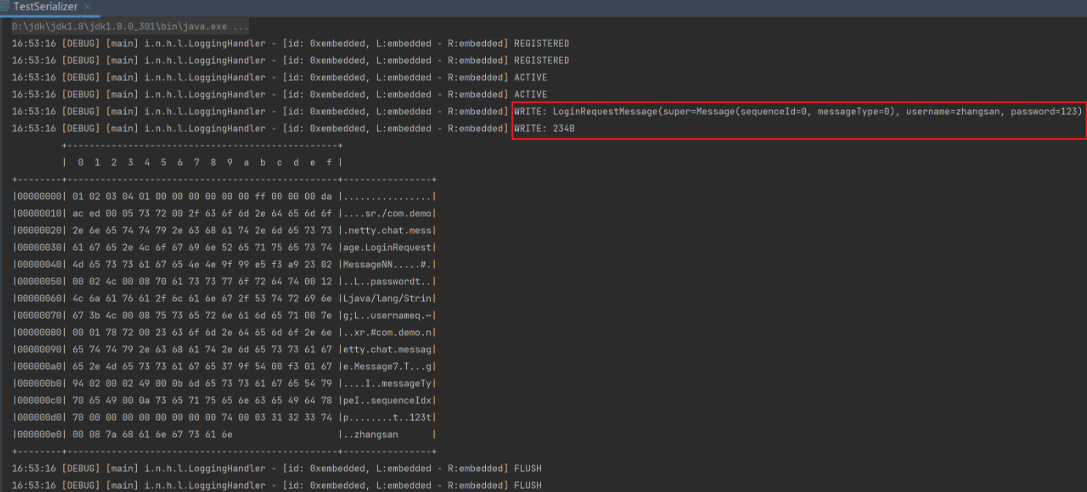
serializer.algorithm=Java测试编码:
1
2
3
4
5
6
7
8
9
10public class TestSerializer {
public static void main(String[] args) {
MessageCodecSharable CODEC = new MessageCodecSharable();
LoggingHandler LOGGING = new LoggingHandler();
EmbeddedChannel channel = new EmbeddedChannel(LOGGING, CODEC, LOGGING);
LoginRequestMessage message = new LoginRequestMessage("zhangsan", "123");
channel.writeOutbound(message);
}
}使用Jdk序列化机制:
![]()
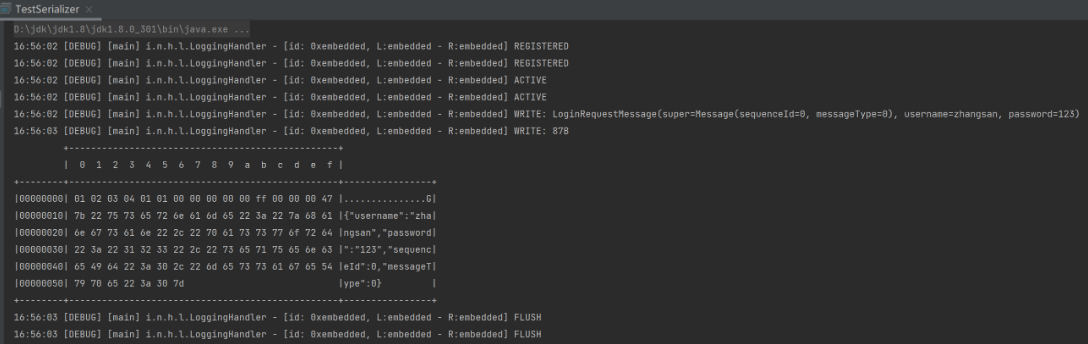
使用Json序列化机制:
![]()
测试解码:
1
2
3
4
5
6
7
8
9
10
11
12
13
14
15
16
17
18
19
20
21
22
23
24
25
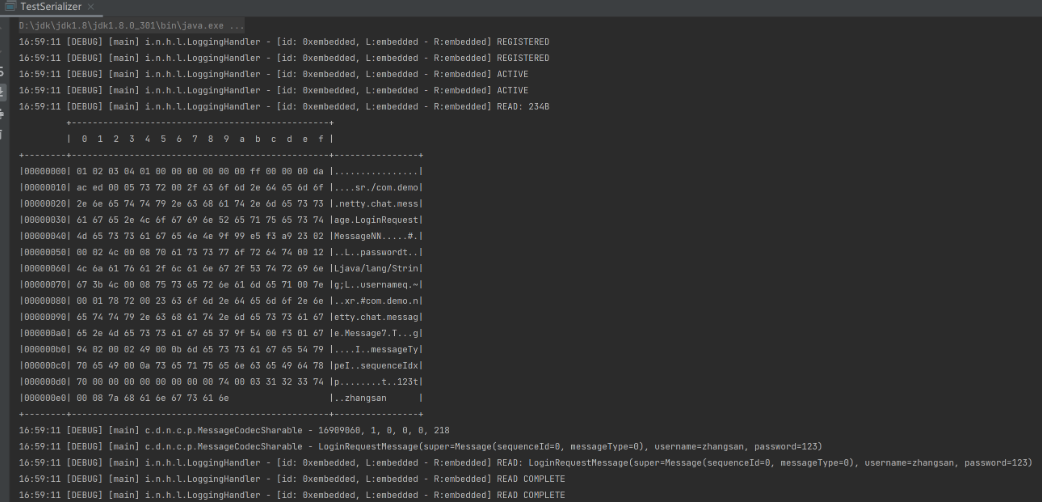
26public class TestSerializer {
public static void main(String[] args) {
MessageCodecSharable CODEC = new MessageCodecSharable();
LoggingHandler LOGGING = new LoggingHandler();
EmbeddedChannel channel = new EmbeddedChannel(LOGGING, CODEC, LOGGING);
LoginRequestMessage message = new LoginRequestMessage("zhangsan", "123");
ByteBuf buf = messageToByteBuf(message);
channel.writeInbound(buf);
}
public static ByteBuf messageToByteBuf(Message msg) {
int algorithm = Config.getSerializerAlgorithm().ordinal();
ByteBuf out = ByteBufAllocator.DEFAULT.buffer();
out.writeBytes(new byte[]{1, 2, 3, 4});
out.writeByte(1);
out.writeByte(algorithm);
out.writeByte(msg.getMessageType());
out.writeInt(msg.getSequenceId());
out.writeByte(0xff);
byte[] bytes = Serializer.Algorithm.values()[algorithm].serialize(msg);
out.writeInt(bytes.length);
out.writeBytes(bytes);
return out;
}
}使用Jdk序列化机制:
![]()
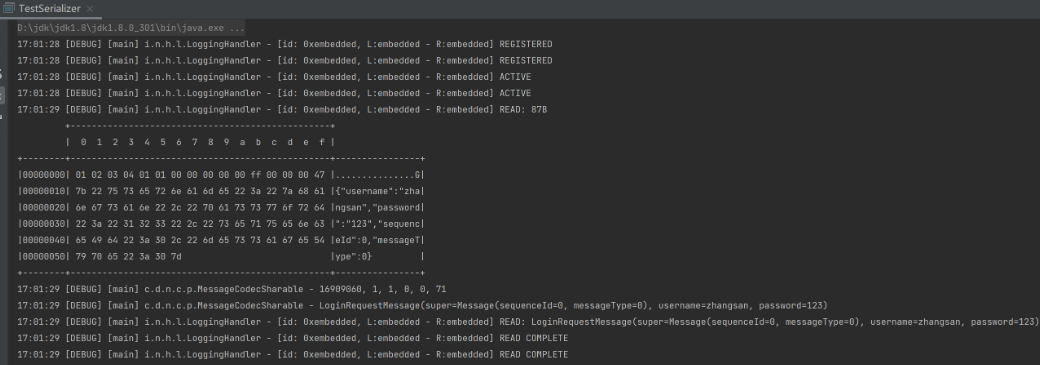
使用Json序列化机制:
![]()
1.2 Google Protobuf编解码器
Protobuf是Google发布的开源项目,全称Google Protocol Buffers,是一种轻便高效的结构化数据存储格式,可以用于结构化数据串行化,或者说序列化。它很适合做数据存储或RPC[远程过程调用:remote procedure call]数据交换格式。(目前很多公司http+json—>tcp+protobuf)
Protobuf是以message的方式来管理数据的。
优点:
- 支持跨平台、跨语言,即客户端和服务器端可以是不同的语言编写的(支持目前绝 大多数语言,例如C++、C#、Java、python等)
- 高性能,高可靠性。
使用protobuf编译器能自动生成代码,Protobuf是将类的定义使用.proto文件进行描述。说明,在idea中编写.proto文件时,会自动提示是否下载.ptotot编写插件,可以让语法高亮。然后通过protoc.exe编译器根据.proto自动生成.java文件。
![]()
编写案例,即客户端可以发送一个Student PoJo对象到服务器(通过Protobuf编码),服务端能接收Student PoJo对象,并显示信息(通过Protobuf解码)。
①引入maven相关依赖:
1
2
3
4
5
6<!-- https://mvnrepository.com/artifact/com.google.protobuf/protobuf-java -->
<dependency>
<groupId>com.google.protobuf</groupId>
<artifactId>protobuf-java</artifactId>
<version>3.15.1</version>
</dependency>②去https://github.com/protocolbuffers/protobuf/releases下载对应3.15.1版本的Protobuf编码器。
③编写Student.proto文件:
1
2
3
4
5
6
7syntax = "proto3"; //版本
option java_outer_classname = "StudentPOJO";//生成的外部类名,同时也是文件名
//protobuf使用message管理数据
message Student { //会在StudentPOJO外部类生成一个内部类Student,他是真正发送的POJO对象
int32 id = 1; //Student类中有一个属性名字为id类型为int32(protobuf类型),1表示属性序号,不是值
string name = 2;
}④将Student.proto放进Protobuf中bin目录下,运行protoc.exe –java_out=. Student.proto后在当前目录成功出现经过Protobuf编码后的StudentPOJO.java文件。
⑤编写相关代码:
客户端:
1
2
3
4
5
6
7
8
9
10
11
12
13
14
15
16
17
18
19
20
21
22
23
24
25
26
27
28
29
30
31
32
33
34
35
36
37
38
39
40
41
42
43
44
45
46
47
48
49
50
51
52
53
54
55
56
57public class NettyClient {
public static void main(String[] args) throws Exception {
//客户端需要一个事件循环组
EventLoopGroup group = new NioEventLoopGroup();
try {
//创建客户端启动对象
//注意客户端使用的不是 ServerBootstrap 而是 Bootstrap
Bootstrap bootstrap = new Bootstrap();
//设置相关参数
bootstrap.group(group) //设置线程组
.channel(NioSocketChannel.class) // 设置客户端通道的实现类(反射)
.handler(new ChannelInitializer<SocketChannel>() {
protected void initChannel(SocketChannel ch) throws Exception {
ChannelPipeline pipeline = ch.pipeline();
//在pipeline中加入ProtoBufEncoder
pipeline.addLast("encoder", new ProtobufEncoder());
pipeline.addLast(new NettyClientHandler()); //加入自己的处理器
}
});
System.out.println("客户端 ok..");
//启动客户端去连接服务器端
//关于 ChannelFuture 要分析,涉及到netty的异步模型
ChannelFuture channelFuture = bootstrap.connect("127.0.0.1", 6668).sync();
//给关闭通道进行监听
channelFuture.channel().closeFuture().sync();
}finally {
group.shutdownGracefully();
}
}
}
public class NettyClientHandler extends ChannelInboundHandlerAdapter {
//当通道就绪就会触发该方法
public void channelActive(ChannelHandlerContext ctx) throws Exception {
//发生一个Student 对象到服务器
StudentPOJO.Student student = StudentPOJO.Student.newBuilder().setId(4).setName("智多星 吴用").build();
ctx.writeAndFlush(student);
}
//当通道有读取事件时,会触发
public void channelRead(ChannelHandlerContext ctx, Object msg) throws Exception {
ByteBuf buf = (ByteBuf) msg;
System.out.println("服务器回复的消息:" + buf.toString(CharsetUtil.UTF_8));
System.out.println("服务器的地址: "+ ctx.channel().remoteAddress());
}
public void exceptionCaught(ChannelHandlerContext ctx, Throwable cause) throws Exception {
cause.printStackTrace();
ctx.close();
}
}服务端:
1
2
3
4
5
6
7
8
9
10
11
12
13
14
15
16
17
18
19
20
21
22
23
24
25
26
27
28
29
30
31
32
33
34
35
36
37
38
39
40
41
42
43
44
45
46
47
48
49
50
51
52
53
54
55
56
57
58
59
60
61
62
63
64
65
66
67
68
69
70
71
72
73
74
75public class NettyServer {
public static void main(String[] args) throws Exception {
EventLoopGroup bossGroup = new NioEventLoopGroup(1);
EventLoopGroup workerGroup = new NioEventLoopGroup();
try {
//创建服务器端的启动对象,配置参数
ServerBootstrap bootstrap = new ServerBootstrap();
//使用链式编程来进行设置
bootstrap.group(bossGroup, workerGroup) //设置两个线程组
.channel(NioServerSocketChannel.class) //使用NioSocketChannel 作为服务器的通道实现
.option(ChannelOption.SO_BACKLOG, 128) // 设置线程队列得到连接个数
.childOption(ChannelOption.SO_KEEPALIVE, true) //设置保持活动连接状态
.childHandler(new ChannelInitializer<SocketChannel>() {//创建一个通道初始化对象(匿名对象)
//给pipeline 设置处理器
protected void initChannel(SocketChannel ch) throws Exception {
ChannelPipeline pipeline = ch.pipeline();
//在pipeline加入ProtoBufDecoder
//指定对哪种对象进行解码
pipeline.addLast("decoder", new ProtobufDecoder(StudentPOJO.Student.getDefaultInstance()));
pipeline.addLast(new NettyServerHandler());
}
}); // 给我们的workerGroup 的 EventLoop 对应的管道设置处理器
System.out.println(".....服务器 is ready...");
//绑定一个端口并且同步, 生成了一个 ChannelFuture 对象
//启动服务器(并绑定端口)
ChannelFuture cf = bootstrap.bind(6668).sync();
//给cf 注册监听器,监控我们关心的事件
cf.addListener(new ChannelFutureListener() {
public void operationComplete(ChannelFuture future) throws Exception {
if (cf.isSuccess()) {
System.out.println("监听端口 6668 成功");
} else {
System.out.println("监听端口 6668 失败");
}
}
});
//对关闭通道进行监听
cf.channel().closeFuture().sync();
}finally {
bossGroup.shutdownGracefully();
workerGroup.shutdownGracefully();
}
}
}
public class NettyServerHandler extends SimpleChannelInboundHandler<StudentPOJO.Student> {
public void channelRead0(ChannelHandlerContext ctx, StudentPOJO.Student msg) throws Exception {
//读取从客户端发送的StudentPojo.Student
System.out.println("客户端发送的数据 id=" + msg.getId() + " 名字=" + msg.getName());
}
//数据读取完毕
public void channelReadComplete(ChannelHandlerContext ctx) throws Exception {
//writeAndFlush 是 write + flush
//将数据写入到缓存,并刷新
//一般讲,我们对这个发送的数据进行编码
ctx.writeAndFlush(Unpooled.copiedBuffer("hello, 客户端~", CharsetUtil.UTF_8));
}
//处理异常, 一般是需要关闭通道
public void exceptionCaught(ChannelHandlerContext ctx, Throwable cause) throws Exception {
ctx.close();
}
}
进阶案例:
客户端可以随机发送Student PoJo/Worker PoJo对象到服务器(通过Protobuf编码)。
服务端能接收Student PoJo/Worker PoJo对象(需要判断是哪种类型),并显示信息(通过Protobuf解码)。
protobuf文件。
1
2
3
4
5
6
7
8
9
10
11
12
13
14
15
16
17
18
19
20
21
22
23
24
25
26
27
28
29
30
31
32syntax = "proto3";
option optimize_for = SPEED; //加快解析
option java_package = "org.Netty.proto.demo"; //指定生成到哪个包下
option java_outer_classname = "MyDataInfo"; //外部类名, 文件名
//protobuf可以使用message管理其他的message
message MyMessage {
//定义一个枚举类型
enum DataType {
StudentType = 0; //在proto3要求enum的编号从0开始
WorkerType = 1;
}
//用data_type来标识传的是哪一个枚举类型
DataType data_type = 1;
//表示每次枚举类型最多只能出现其中的一个,节省空间
oneof dataBody {
Student student = 2;
Worker worker = 3;
}
}
message Student {
int32 id = 1;//Student类的属性
string name = 2;
}
message Worker {
string name = 1;
int32 age = 2;
}客户端:
1
2
3
4
5
6
7
8
9
10
11
12
13
14
15
16
17
18
19
20
21
22
23
24
25
26
27
28
29
30
31
32
33
34
35
36
37
38
39
40
41
42
43
44
45
46
47
48
49
50
51
52
53
54
55
56
57
58
59
60
61
62
63
64public class NettyClient {
public static void main(String[] args) throws Exception {
//客户端需要一个事件循环组
EventLoopGroup group = new NioEventLoopGroup();
try {
//创建客户端启动对象
//注意客户端使用的不是 ServerBootstrap 而是 Bootstrap
Bootstrap bootstrap = new Bootstrap();
//设置相关参数
bootstrap.group(group) //设置线程组
.channel(NioSocketChannel.class) // 设置客户端通道的实现类(反射)
.handler(new ChannelInitializer<SocketChannel>() {
protected void initChannel(SocketChannel ch) throws Exception {
ChannelPipeline pipeline = ch.pipeline();
//在pipeline中加入ProtoBufEncoder
pipeline.addLast("encoder", new ProtobufEncoder());
pipeline.addLast(new NettyClientHandler()); //加入自己的处理器
}
});
System.out.println("客户端 ok..");
//启动客户端去连接服务器端
//关于 ChannelFuture 要分析,涉及到netty的异步模型
ChannelFuture channelFuture = bootstrap.connect("127.0.0.1", 6668).sync();
//给关闭通道进行监听
channelFuture.channel().closeFuture().sync();
}finally {
group.shutdownGracefully();
}
}
}
public class NettyClientHandler extends ChannelInboundHandlerAdapter {
//当通道就绪就会触发该方法
public void channelActive(ChannelHandlerContext ctx) throws Exception {
//随机的发送Student或者Worker对象
int random = new Random().nextInt(3);
MyDataInfo.MyMessage myMessage = null;
if(0 == random) { //发送Student对象
myMessage = MyDataInfo.MyMessage.newBuilder().setDataType(MyDataInfo.MyMessage.DataType.StudentType).setStudent(MyDataInfo.Student.newBuilder().setId(5).setName("玉麒麟 卢俊义").build()).build();
} else { //发送一个Worker对象
myMessage = MyDataInfo.MyMessage.newBuilder().setDataType(MyDataInfo.MyMessage.DataType.WorkerType).setWorker(MyDataInfo.Worker.newBuilder().setAge(20).setName("老李").build()).build();
}
ctx.writeAndFlush(myMessage);
}
//当通道有读取事件时,会触发
public void channelRead(ChannelHandlerContext ctx, Object msg) throws Exception {
ByteBuf buf = (ByteBuf) msg;
System.out.println("服务器回复的消息:" + buf.toString(CharsetUtil.UTF_8));
System.out.println("服务器的地址: "+ ctx.channel().remoteAddress());
}
public void exceptionCaught(ChannelHandlerContext ctx, Throwable cause) throws Exception {
cause.printStackTrace();
ctx.close();
}
}服务端:
1
2
3
4
5
6
7
8
9
10
11
12
13
14
15
16
17
18
19
20
21
22
23
24
25
26
27
28
29
30
31
32
33
34
35
36
37
38
39
40
41
42
43
44
45
46
47
48
49
50
51
52
53
54
55
56
57
58
59
60
61
62
63
64
65
66
67
68
69
70
71
72
73
74
75
76
77
78
79
80
81
82
83public class NettyServer {
public static void main(String[] args) throws Exception {
EventLoopGroup bossGroup = new NioEventLoopGroup(1);
EventLoopGroup workerGroup = new NioEventLoopGroup();
try {
//创建服务器端的启动对象,配置参数
ServerBootstrap bootstrap = new ServerBootstrap();
//使用链式编程来进行设置
bootstrap.group(bossGroup, workerGroup) //设置两个线程组
.channel(NioServerSocketChannel.class) //使用NioSocketChannel 作为服务器的通道实现
.option(ChannelOption.SO_BACKLOG, 128) // 设置线程队列得到连接个数
.childOption(ChannelOption.SO_KEEPALIVE, true) //设置保持活动连接状态
.childHandler(new ChannelInitializer<SocketChannel>() {//创建一个通道初始化对象(匿名对象)
//给pipeline 设置处理器
protected void initChannel(SocketChannel ch) throws Exception {
ChannelPipeline pipeline = ch.pipeline();
//在pipeline加入ProtoBufDecoder
//指定对哪种对象进行解码
pipeline.addLast("decoder", new ProtobufDecoder(MyDataInfo.MyMessage.getDefaultInstance()));
pipeline.addLast(new NettyServerHandler());
}
}); // 给我们的workerGroup 的 EventLoop 对应的管道设置处理器
System.out.println(".....服务器 is ready...");
//绑定一个端口并且同步, 生成了一个 ChannelFuture 对象
//启动服务器(并绑定端口)
ChannelFuture cf = bootstrap.bind(6668).sync();
//给cf 注册监听器,监控我们关心的事件
cf.addListener(new ChannelFutureListener() {
public void operationComplete(ChannelFuture future) throws Exception {
if (cf.isSuccess()) {
System.out.println("监听端口 6668 成功");
} else {
System.out.println("监听端口 6668 失败");
}
}
});
//对关闭通道进行监听
cf.channel().closeFuture().sync();
}finally {
bossGroup.shutdownGracefully();
workerGroup.shutdownGracefully();
}
}
}
public class NettyServerHandler extends SimpleChannelInboundHandler<MyDataInfo.MyMessage> {
public void channelRead0(ChannelHandlerContext ctx, MyDataInfo.MyMessage msg) throws Exception {
//根据dataType来显示不同的信息
MyDataInfo.MyMessage.DataType dataType = msg.getDataType();
if(dataType == MyDataInfo.MyMessage.DataType.StudentType) {
MyDataInfo.Student student = msg.getStudent();
System.out.println("学生id=" + student.getId() + " 学生名字=" + student.getName());
} else if(dataType == MyDataInfo.MyMessage.DataType.WorkerType) {
MyDataInfo.Worker worker = msg.getWorker();
System.out.println("工人的名字=" + worker.getName() + " 年龄=" + worker.getAge());
} else {
System.out.println("传输的类型不正确");
}
}
//数据读取完毕
public void channelReadComplete(ChannelHandlerContext ctx) throws Exception {
//writeAndFlush 是 write + flush
//将数据写入到缓存,并刷新
//一般讲,我们对这个发送的数据进行编码
ctx.writeAndFlush(Unpooled.copiedBuffer("hello, 客户端~(>^ω^<)喵1", CharsetUtil.UTF_8));
}
//处理异常, 一般是需要关闭通道
public void exceptionCaught(ChannelHandlerContext ctx, Throwable cause) throws Exception {
ctx.close();
}
}
1.3 参数调优
1.3.1 CONNECT_TIMEOUT_MILLIS
属于SocketChannal参数。
用在客户端建立连接时,如果在指定毫秒内无法连接,会抛出timeout异常。
SO_TIMEOUT参数则主要用在阻塞IO,阻塞IO中accept,read等都是无限等待的,如果不希望永远阻塞,使用它调整超时时间。所以此参数和NIO与Netty无关。
1
2
3
4
5
6
7
8
9
10
11
12
13
14
15
16
17
18
19
20
21
22
23
24
public class TestConnectionTimeout {
public static void main(String[] args) {
// 服务器端
// new ServerBootstrap().option() // 是给ServerSocketChannel配置参数
// new ServerBootstrap().childOption() // 给SocketChannel配置参数
NioEventLoopGroup group = new NioEventLoopGroup();
try {
Bootstrap bootstrap = new Bootstrap()
.group(group)
// 客户端通过.option()方法配置参数给SocketChannel配置参数,这里设置如果1秒内没能与服务器建立连接则报超时异常
.option(ChannelOption.CONNECT_TIMEOUT_MILLIS, 1000)
.channel(NioSocketChannel.class)
.handler(new LoggingHandler());
ChannelFuture future = bootstrap.connect("127.0.0.1", 8080);
future.sync().channel().closeFuture().sync();
} catch (Exception e) {
e.printStackTrace();
log.debug("timeout");
} finally {
group.shutdownGracefully();
}
}
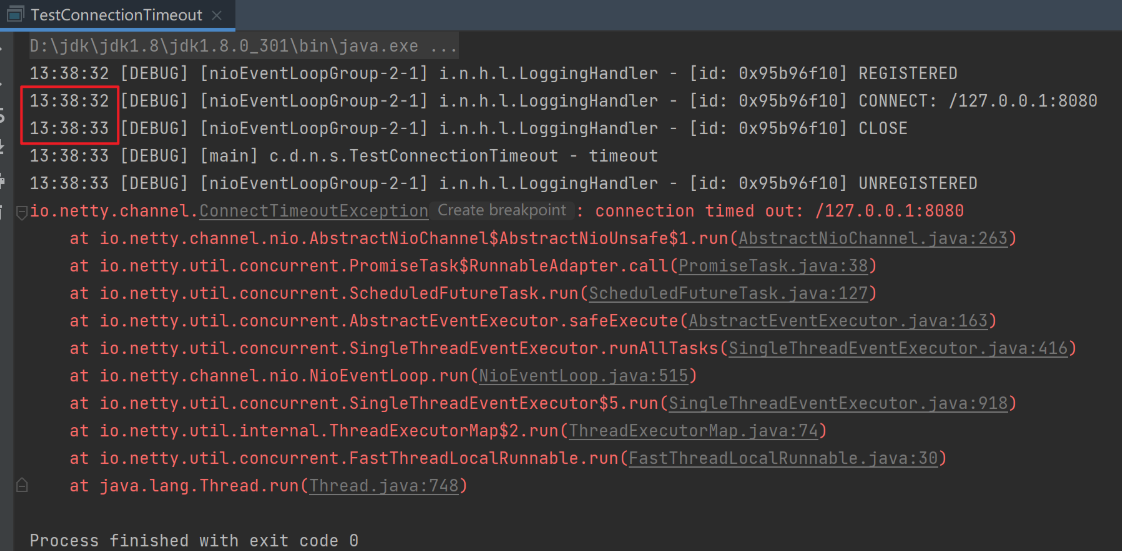
}![]()
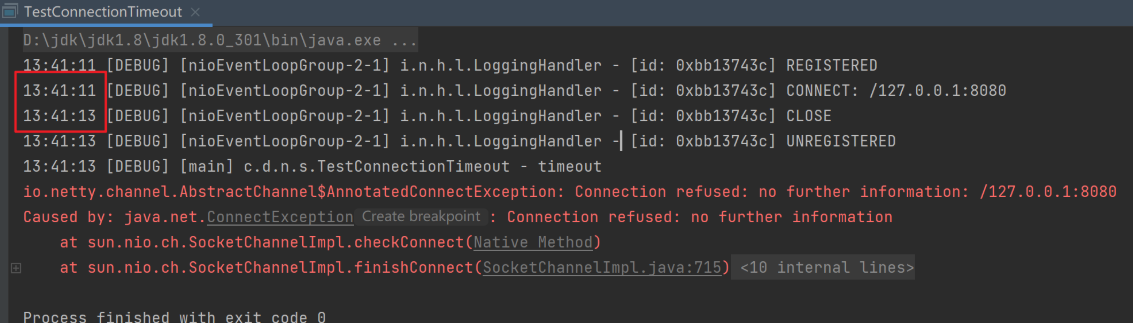
如果服务器没开,并将超时时间设置更长些,例如5秒,则控制台在等待2秒后会报另一个异常java.net.ConnectException,即因为服务器没开而确认无法连接,不需要等够5秒:
![]()
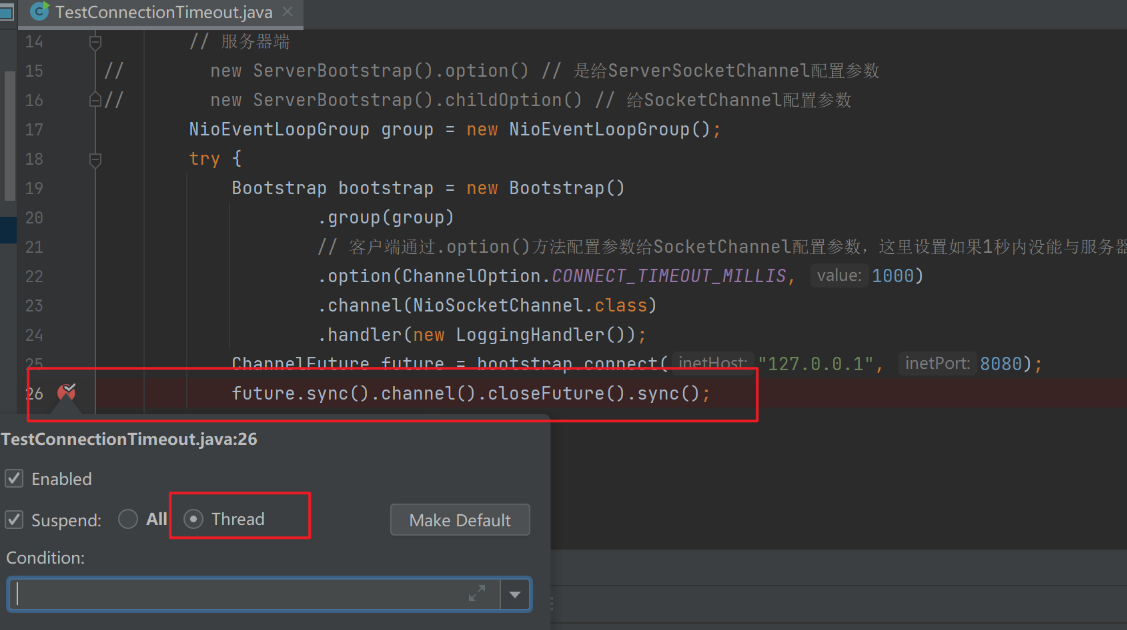
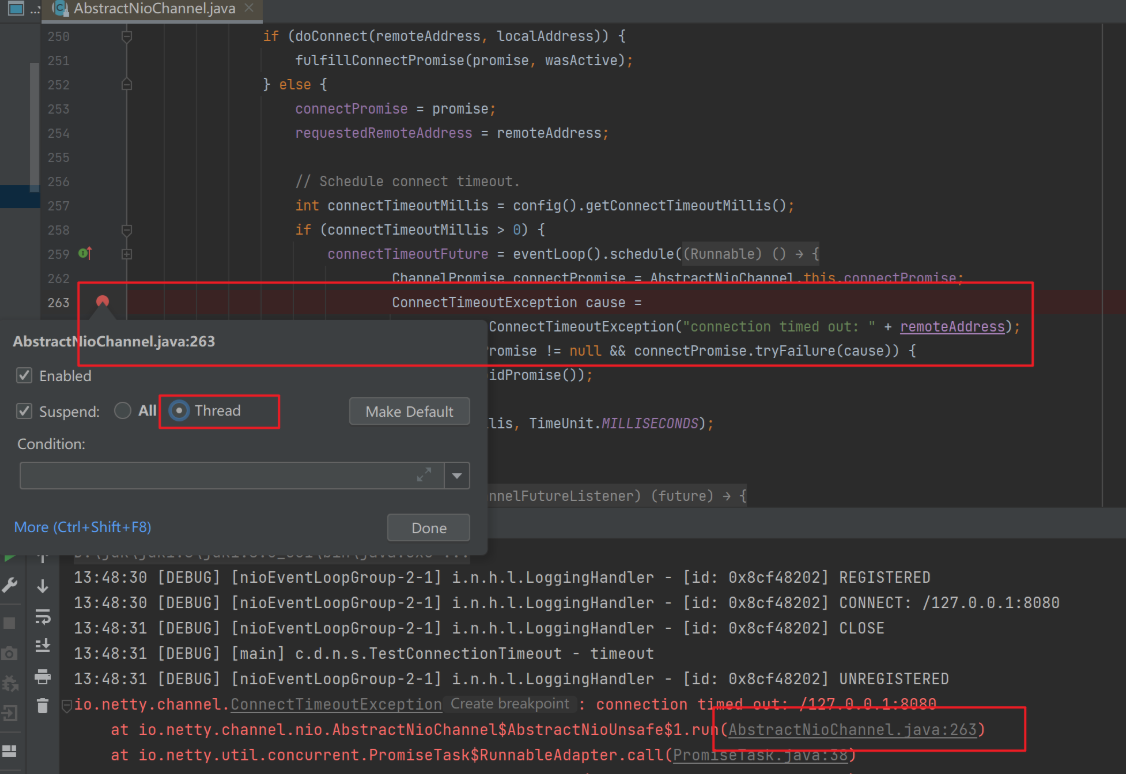
现在进行源码分析,首先分别在以下两处打下断点。
![]()
![]()
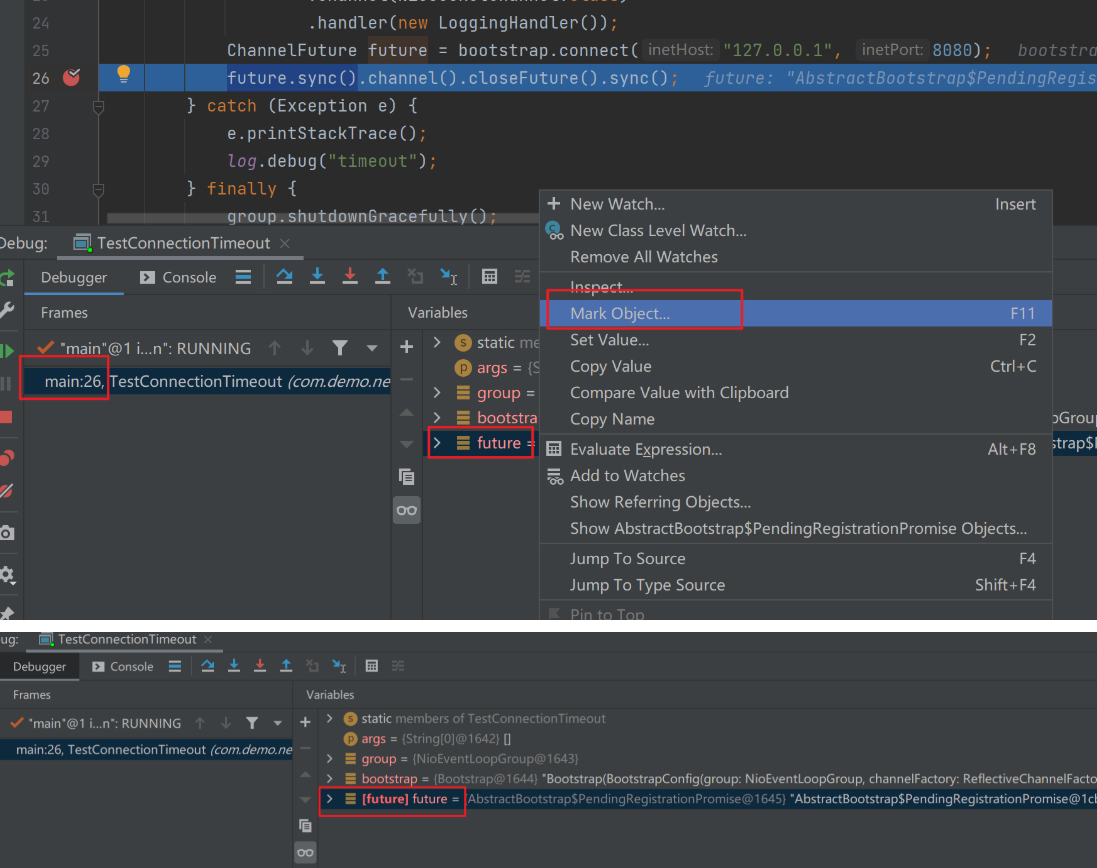
以debug模式运行客户端,主线程会来到future.sync()阻塞住,先在future变量上作个标记:
![]()
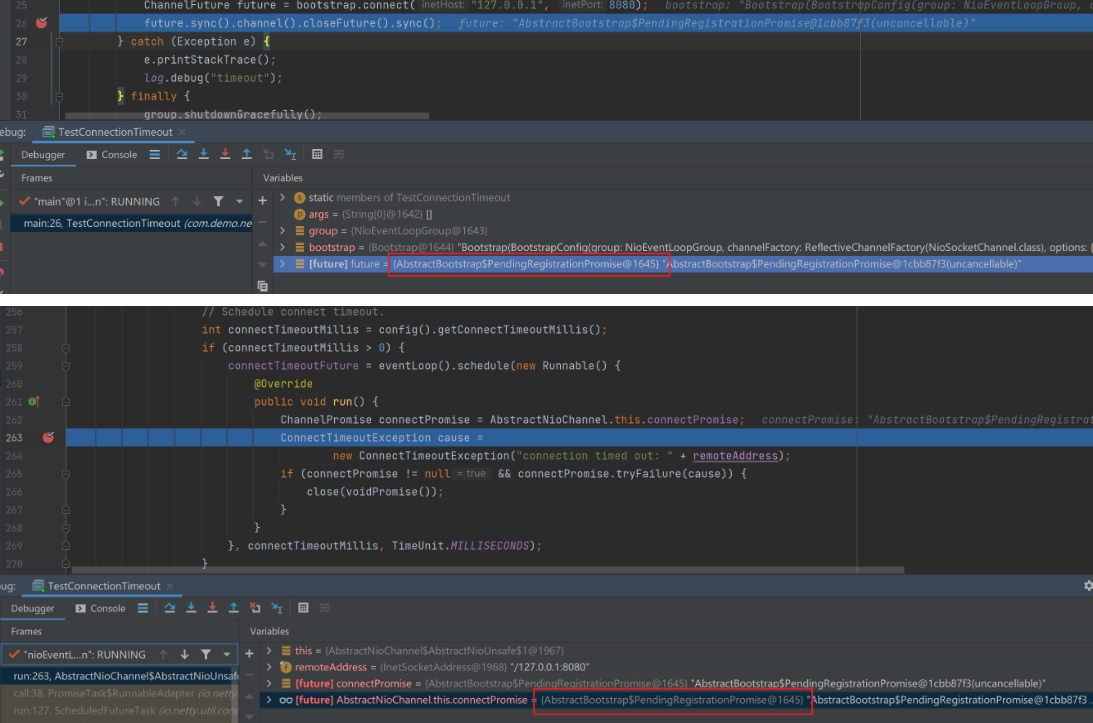
切换到NIO线程,发现由于经过1秒后还没连接上服务器,则会执行任务调度线程的代码,即创建一个异常对象ConnectTimeoutException,并通过Promise对象的tryFailure方法告诉主线程抛出异常,注意主线程和NIO线程此时共用一个Promise对象才能进行通信:
![]()
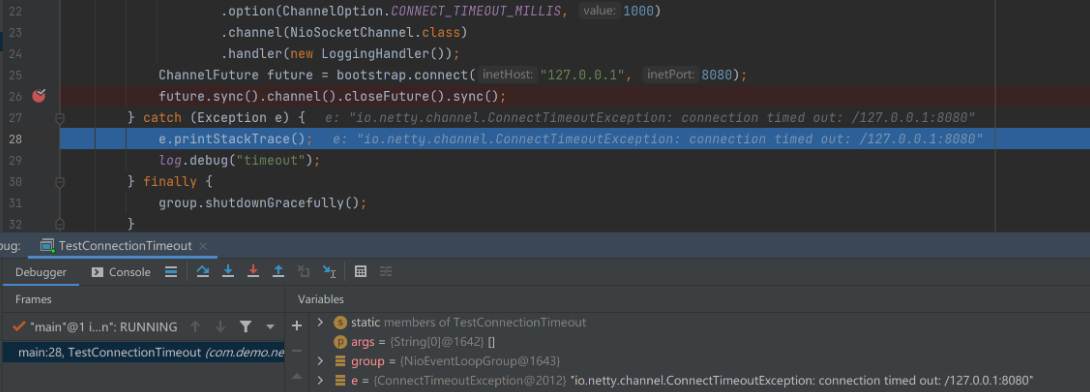
放行NIO线程后,主线程获得超时异常进入了catch块打印了异常信息。
![]()
1.3.2 SO_BACKLOG
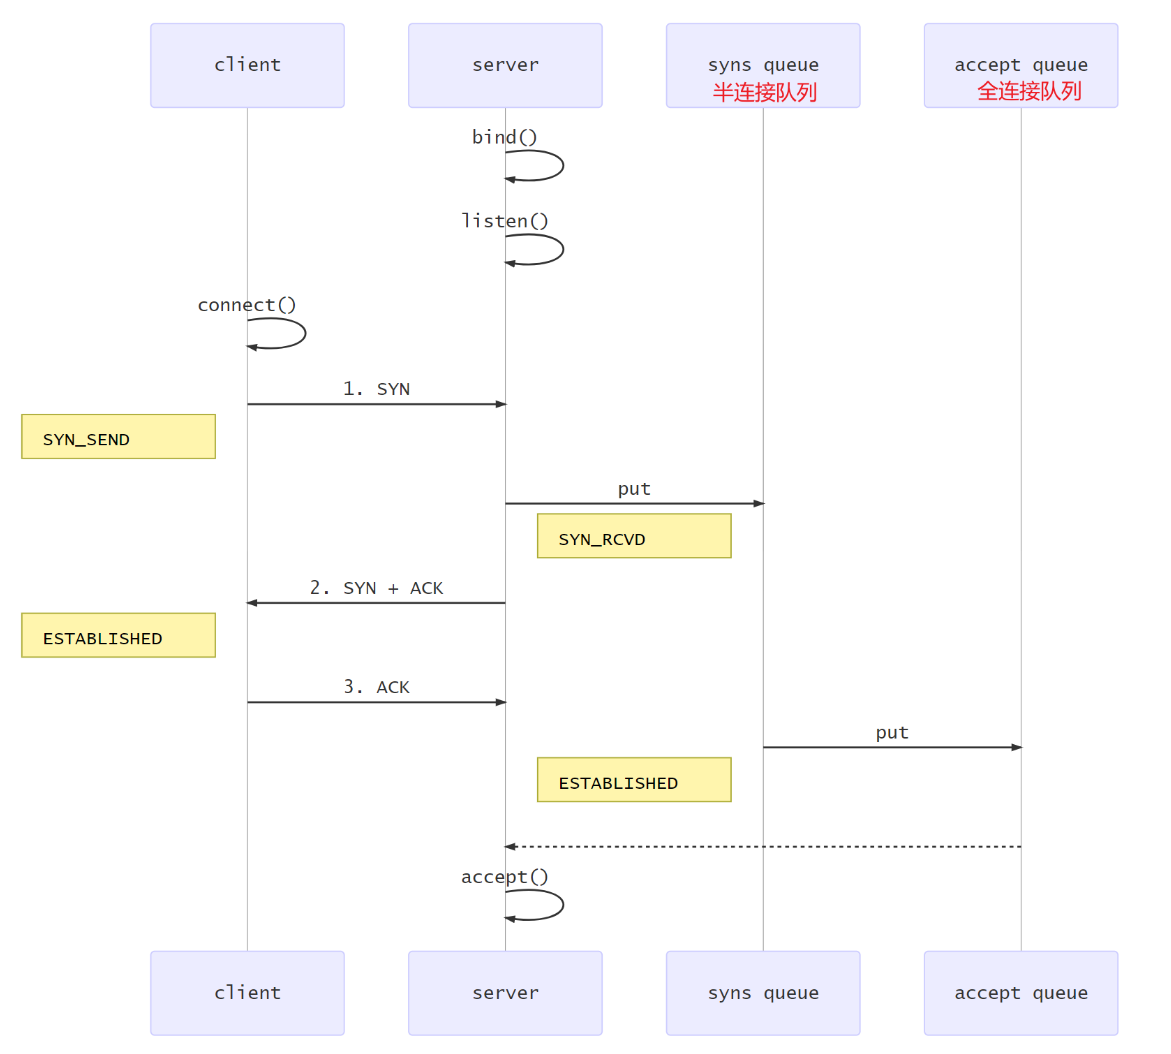
该参数属于ServerSocketChannal参数。先看看tcp三次握手过程:
![]()
- 第一次握手,client发送SYN到server,状态修改为SYN_SEND,server收到,状态改变为SYN_REVD,并将该请求放入sync queue队列。
- 第二次握手,server回复SYN+ACK给client,client收到,状态改变为ESTABLISHED,并发送ACK给server。
- 第三次握手,server收到ACK,状态改变为ESTABLISHED,将该请求从sync queue放入accept queue。
- 之后服务器端通过accpet从accept queue中获取连接。
在linux 2.2之前,backlog大小包括了两个队列的大小,在2.2之后,分别用下面两个参数来控制:
sync queue:半连接队列。大小通过
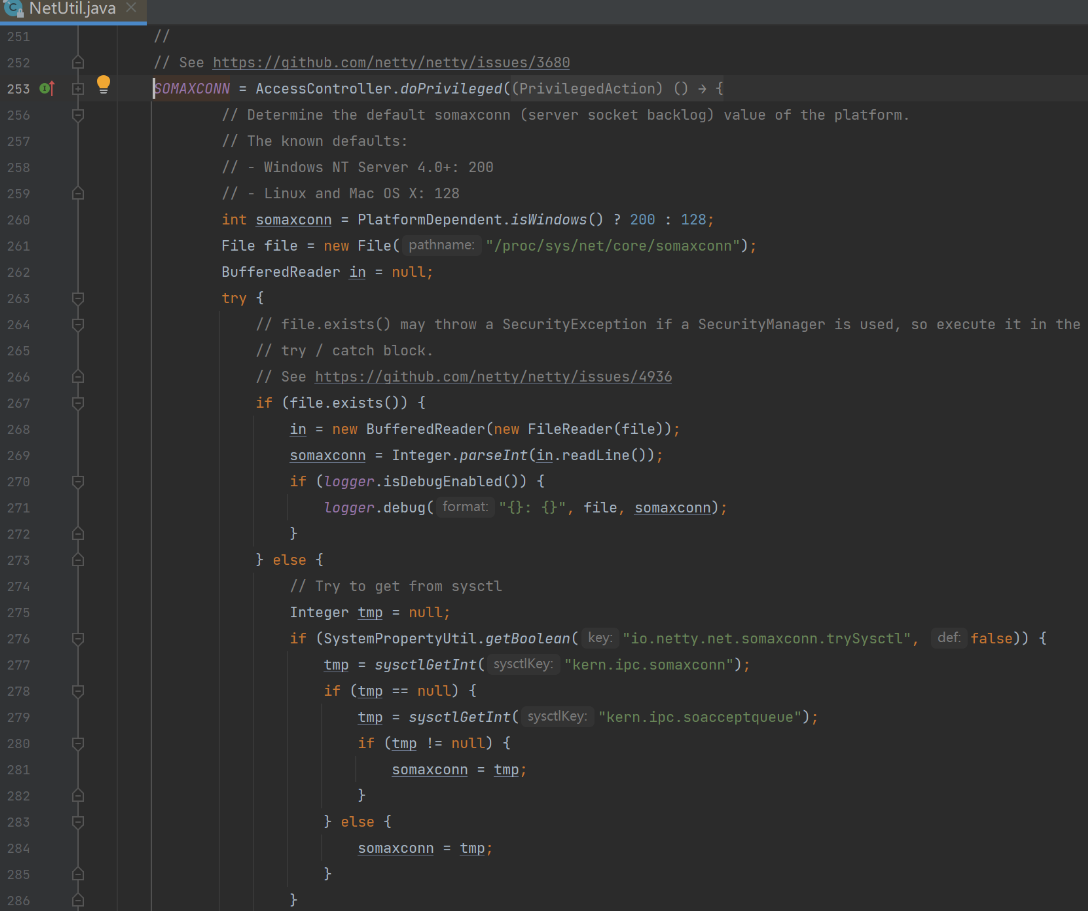
/proc/sys/net/ipv4/tcp_max_syn_backlog指定,在syncookies启用的情况下,逻辑上没有最大值限制,这个设置便被忽略。accept queue:全连接队列。其大小通过
/proc/sys/net/core/somaxconn指定,在使用listen函数时,内核会根据传入的backlog参数与系统参数,取二者的较小值。如果accpet queue队列满了,server将发送一个拒绝连接的错误信息到client。源码如下:![]()
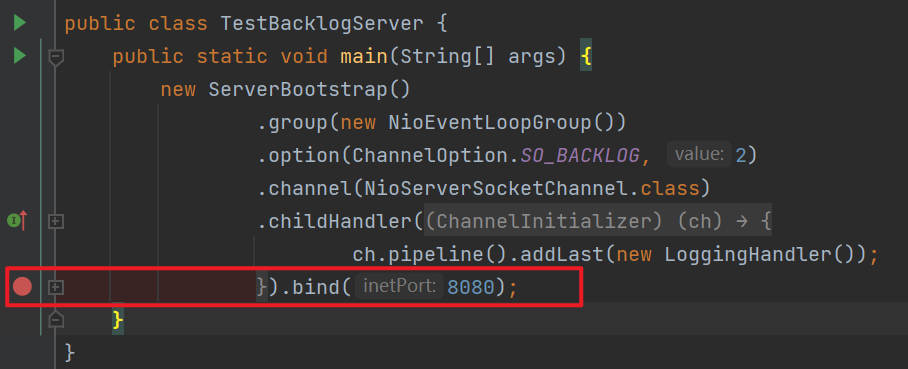
案例如下,设置全连接队列长度为2:
1
2
3
4
5
6
7
8
9
10
11
12
13
14public class TestBacklogServer {
public static void main(String[] args) {
new ServerBootstrap()
.group(new NioEventLoopGroup())
.option(ChannelOption.SO_BACKLOG, 2)
.channel(NioServerSocketChannel.class)
.childHandler(new ChannelInitializer<NioSocketChannel>() {
protected void initChannel(NioSocketChannel ch) {
ch.pipeline().addLast(new LoggingHandler());
}
}).bind(8080);
}
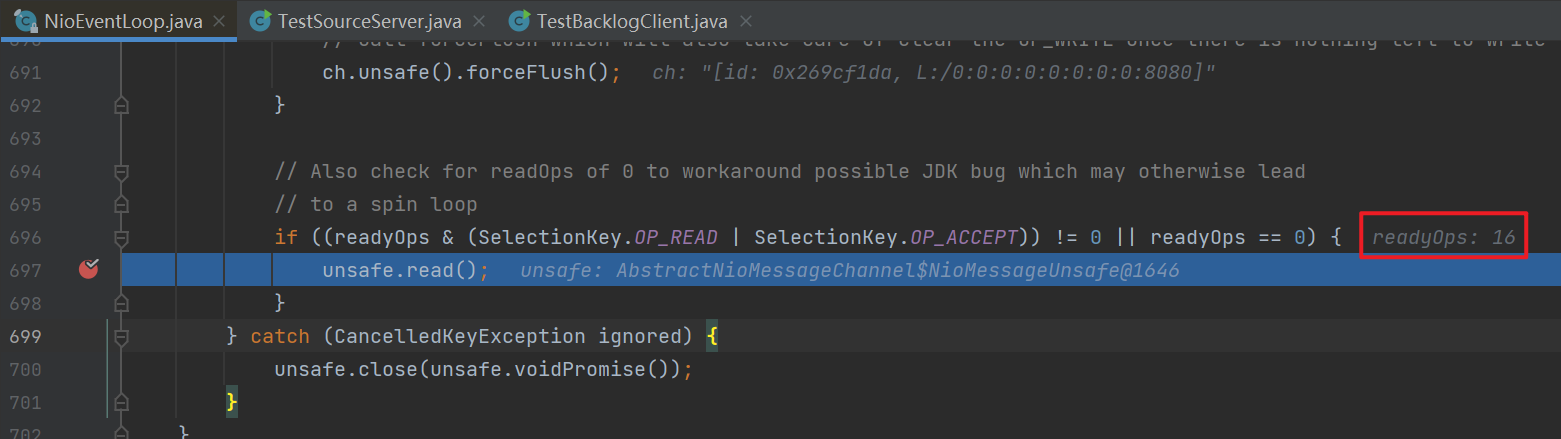
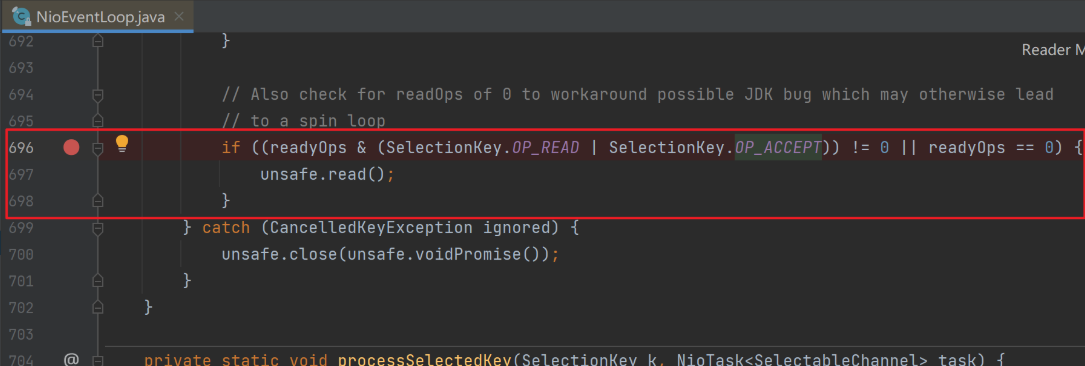
}现在通过使用打断点的方式验证服务器在全连接队列满时,如果客户端再发起连接会报错。先在NioEventLoop类的696行处加上断点,即阻止NIO线程调用unsafe.read()方法(相当于调用accept方法)从全连接队列里拿连接。
![]()
服务器先以debug模式启动,再依次启动3个客户端,客户端代码如下:
1
2
3
4
5
6
7
8
9
10
11
12
13
14
15
16
17
18
19
20
21
22
23
24
25
26
27
28
29
30
public class TestBacklogClient {
public static void main(String[] args) {
NioEventLoopGroup worker = new NioEventLoopGroup();
try {
Bootstrap bootstrap = new Bootstrap();
bootstrap.channel(NioSocketChannel.class);
bootstrap.group(worker);
bootstrap.handler(new ChannelInitializer<SocketChannel>() {
protected void initChannel(SocketChannel ch) throws Exception {
ch.pipeline().addLast(new LoggingHandler());
ch.pipeline().addLast(new ChannelInboundHandlerAdapter(){
public void channelActive(ChannelHandlerContext ctx) throws Exception {
ctx.writeAndFlush(ctx.alloc().buffer().writeBytes("hello!".getBytes()));
}
});
}
});
ChannelFuture channelFuture = bootstrap.connect("127.0.0.1", 8080).sync();
channelFuture.channel().closeFuture().sync();
} catch (InterruptedException e) {
log.error("client error", e);
} finally {
worker.shutdownGracefully();
}
}
}服务器阻塞在断点处。
![]()
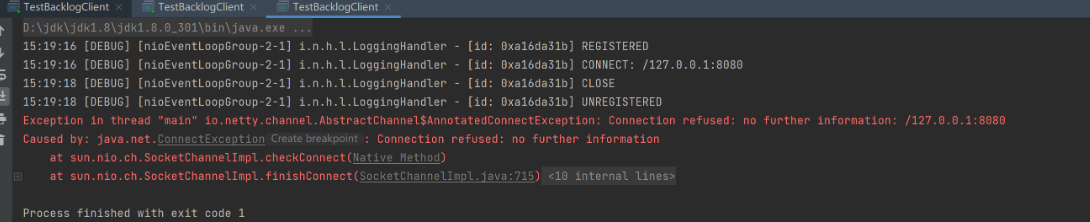
由于服务器端设置的全连接队列设置为2,并且服务器端因为打了断点从而没有及时从全连接队列里拿连接导致满了,因此当创建第3个客户端时报错。
![]()

1.3.3 ulimit -n
- 属于操作系统参数,表示一个进程能够打开的最多文件描述符(FD)的数量。
1.3.4 TCP_NODELAY
- 属于SocketChannal参数,默认值为false,即开启了nagle算法,消息会在客户端累积延迟发送。
1.3.5 SO_SNDBUF & SO_RCVBUF
- 即发送缓冲区和接收缓冲区,决定了滑动窗口的上限。建议不手动设置这两个参数,而是由操作系统智能自动调节。
- SO_SNDBUF属于SocketChannal参数。
- SO_RCVBUF既可用于SocketChannal参数,也可以用于ServerSocketChannal参数(建议设置到 ServerSocketChannal上)。
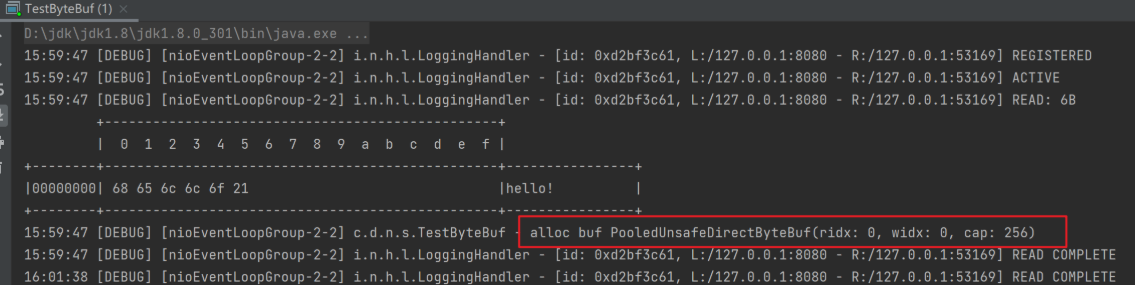
1.3.6 ALLOCATOR
属于SocketChannal参数。
用来分配ByteBuf,ctx.alloc()。
在netty中默认是池化的直接内存。
1
2
3
4
5
6
7
8
9
10
11
12
13
14
15
16
17
18
19
20
21
public class TestByteBuf {
public static void main(String[] args) {
new ServerBootstrap()
.group(new NioEventLoopGroup())
.channel(NioServerSocketChannel.class)
.childHandler(new ChannelInitializer<NioSocketChannel>() {
protected void initChannel(NioSocketChannel ch) {
ch.pipeline().addLast(new LoggingHandler());
ch.pipeline().addLast(new ChannelInboundHandlerAdapter() {
public void channelRead(ChannelHandlerContext ctx, Object msg) throws Exception {
ByteBuf buf = ctx.alloc().buffer();
log.debug("alloc buf {}", buf);
}
});
}
}).bind(8080);
}
}![]()
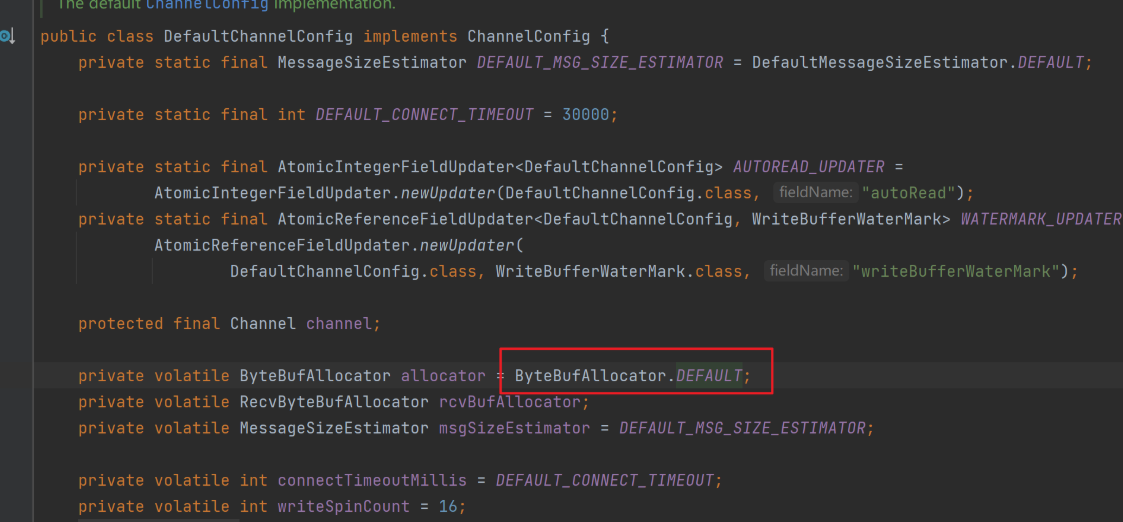
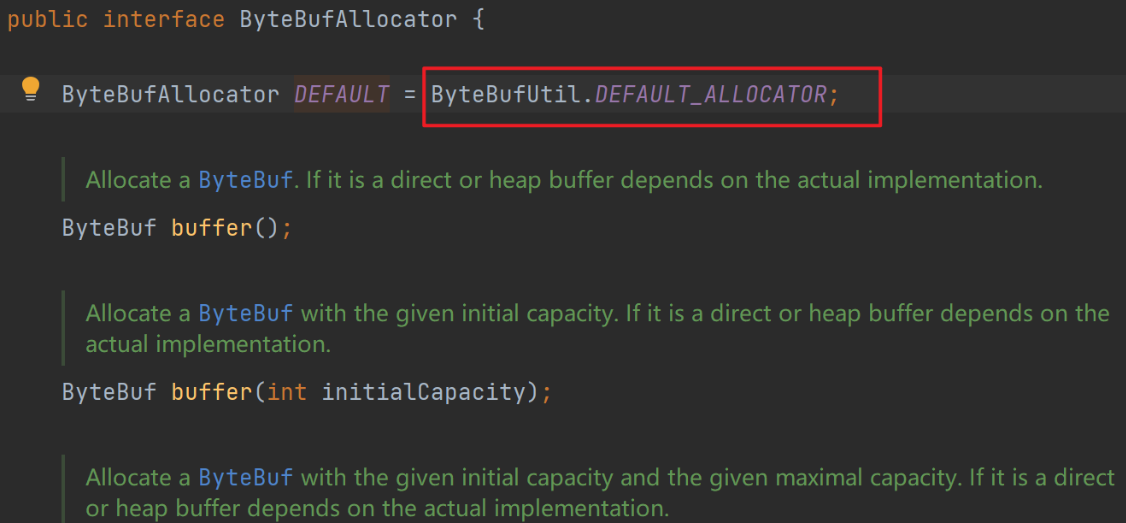
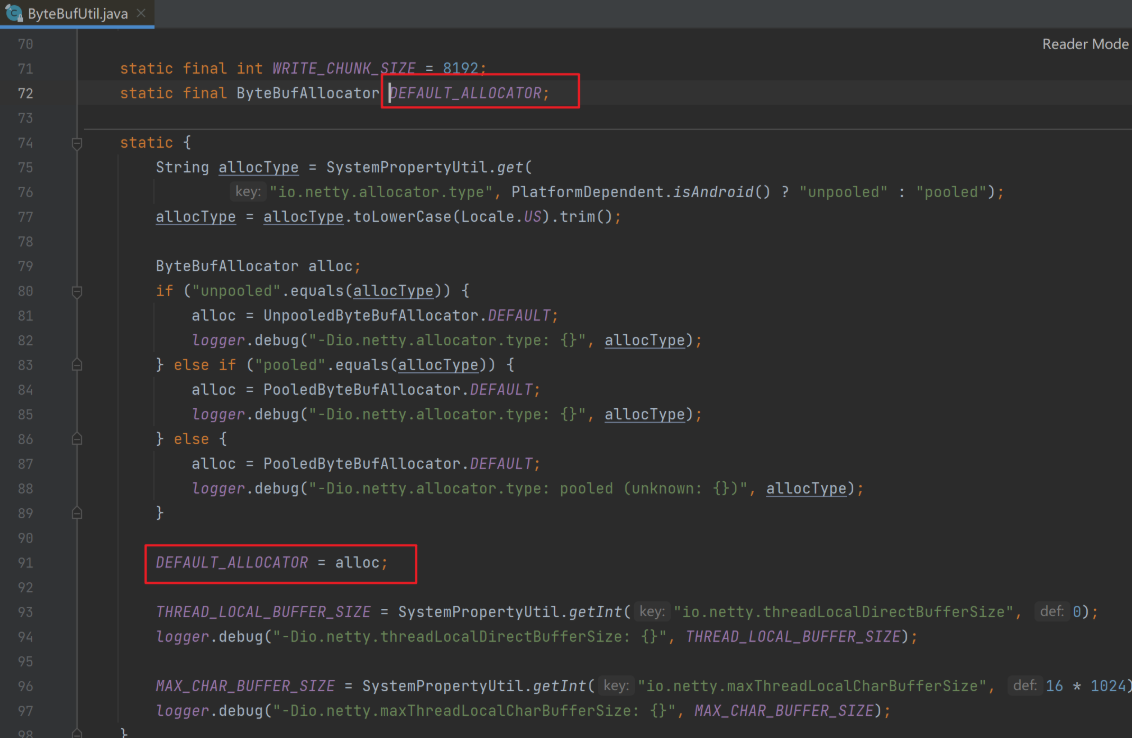
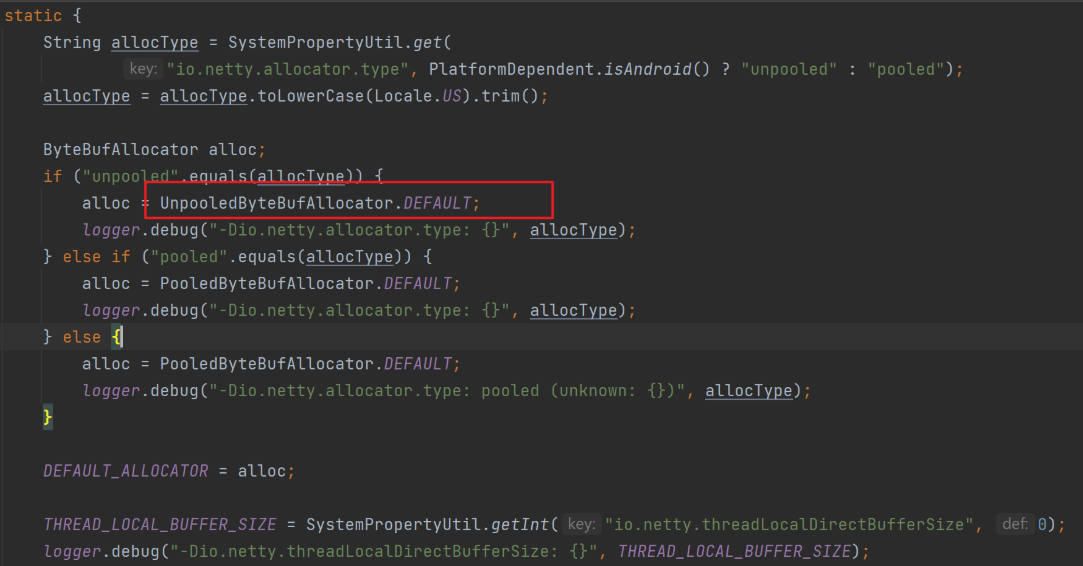
追踪源码如何修改默认的池化类型:
![]()
![]()
![]()
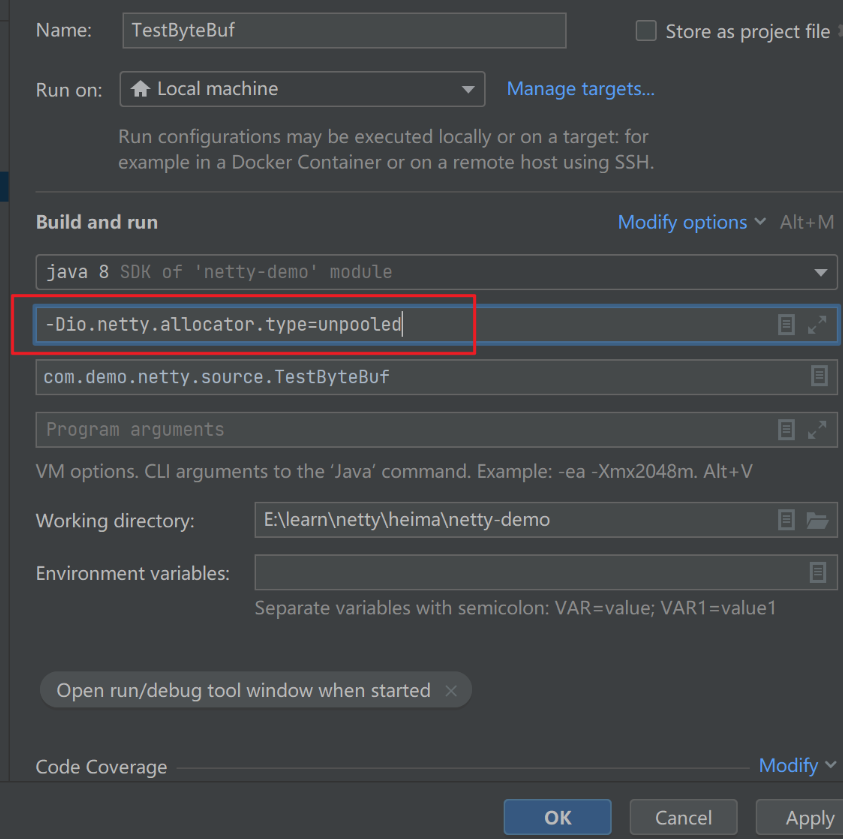
可以看到池化还是非池化类型由环境变量io.netty.allocator.type决定,现在加上这个环境变量(
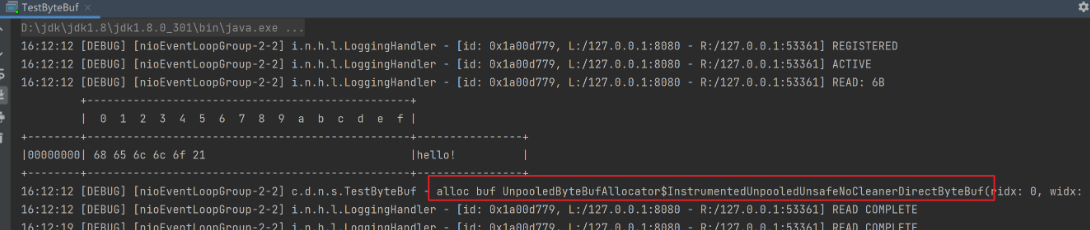
-Dio.netty.allocator.type=unpooled)做测试。![1653657099718]()
结果变成了非池化的ByteBuf。
![]()
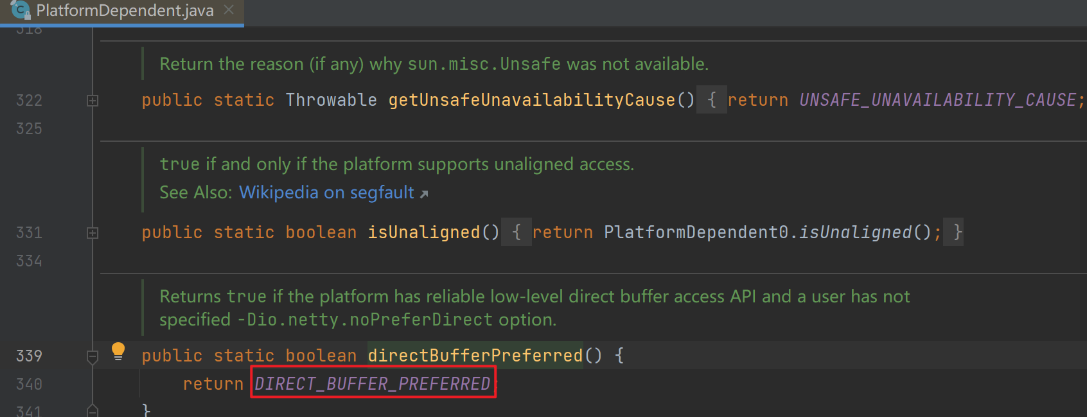
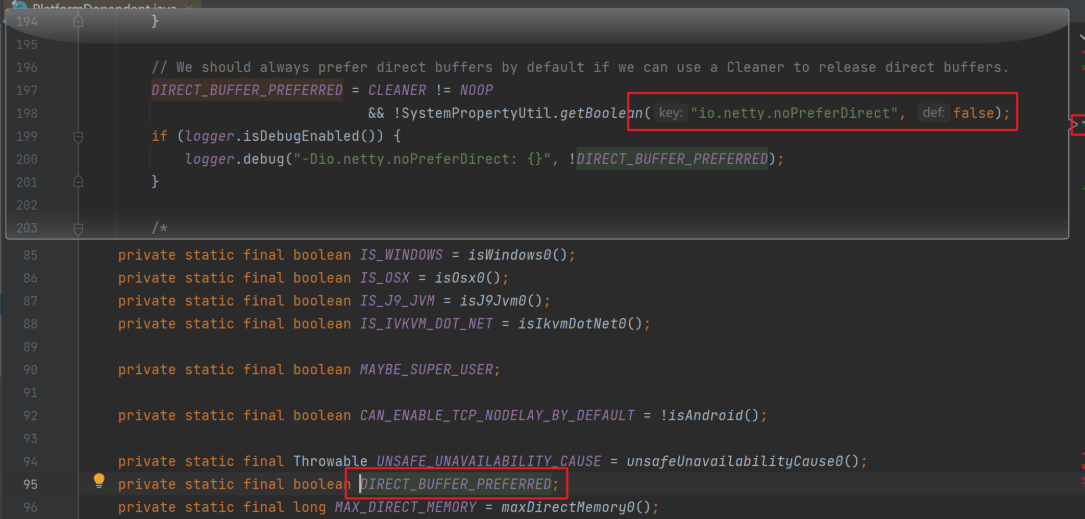
追踪源码如何修改默认的直接内存类型,由上方源码处继续查看到
UnpooledByteBufAllocator.DEFAULT。![]()
![]()
![]()
![]()
可以看到是直接内存还是堆内存由环境变量
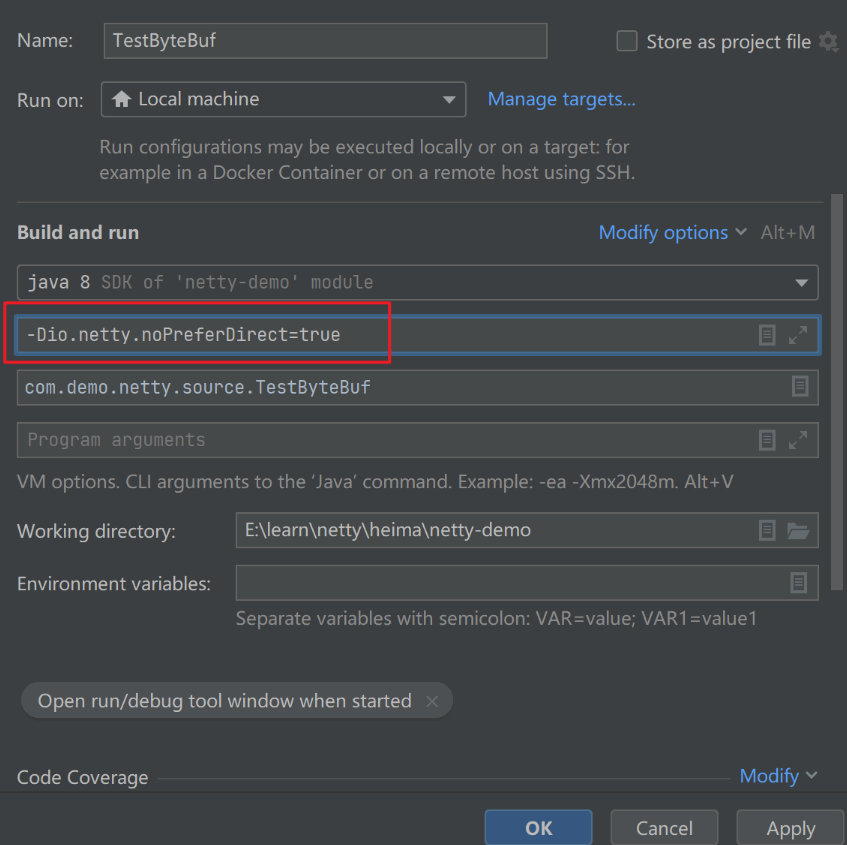
io.netty.noPreferDirect决定的,且默认是false,即默认为直接内存。现在加上这个环境变量(-Dio.netty.noPreferDirect=true)做测试。![1653657451957]()
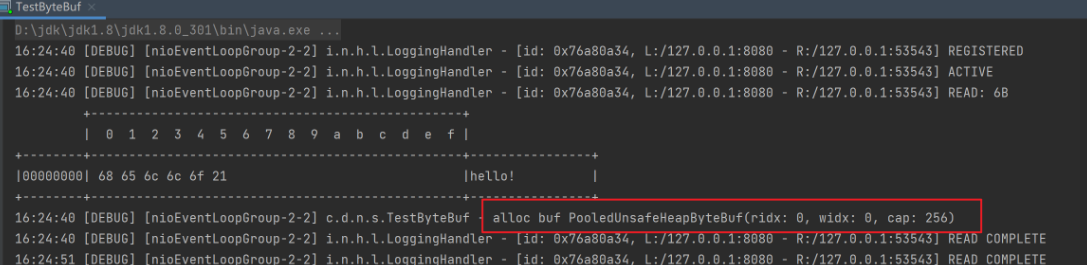
结果变成了使用了堆内存的ByteBuf。
![]()

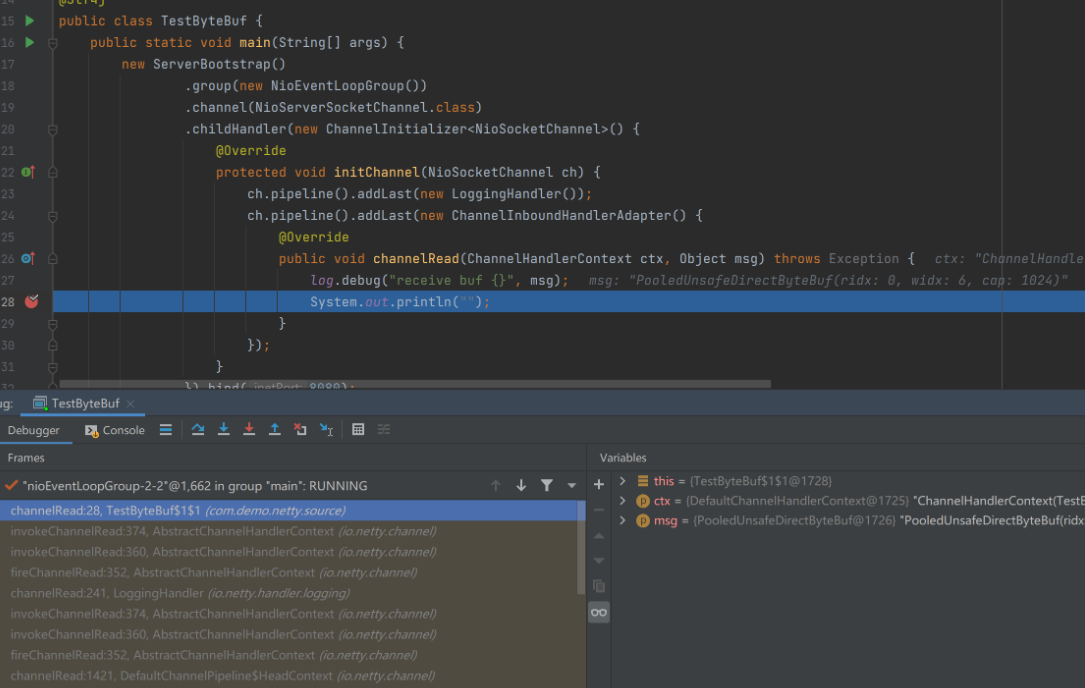
1.3.7 RCVBUF_ALLOCATOR
属于SocketChannal参数。
控制netty接收缓冲区大小。
负责入站数据的分配,决定入站缓冲区(ByteBuf)的大小(并可动态调整),统一采用direct直接内存,具体池化还是非池化由allocator决定。
测试代码如下:
1
2
3
4
5
6
7
8
9
10
11
12
13
14
15
16
17
18
19
20
21
public class TestByteBuf {
public static void main(String[] args) {
new ServerBootstrap()
.group(new NioEventLoopGroup())
.channel(NioServerSocketChannel.class)
.childHandler(new ChannelInitializer<NioSocketChannel>() {
protected void initChannel(NioSocketChannel ch) {
ch.pipeline().addLast(new LoggingHandler());
ch.pipeline().addLast(new ChannelInboundHandlerAdapter() {
public void channelRead(ChannelHandlerContext ctx, Object msg) throws Exception {
log.debug("receive buf {}", msg);
System.out.println("");
}
});
}
}).bind(8080);
}
}加上系统变量
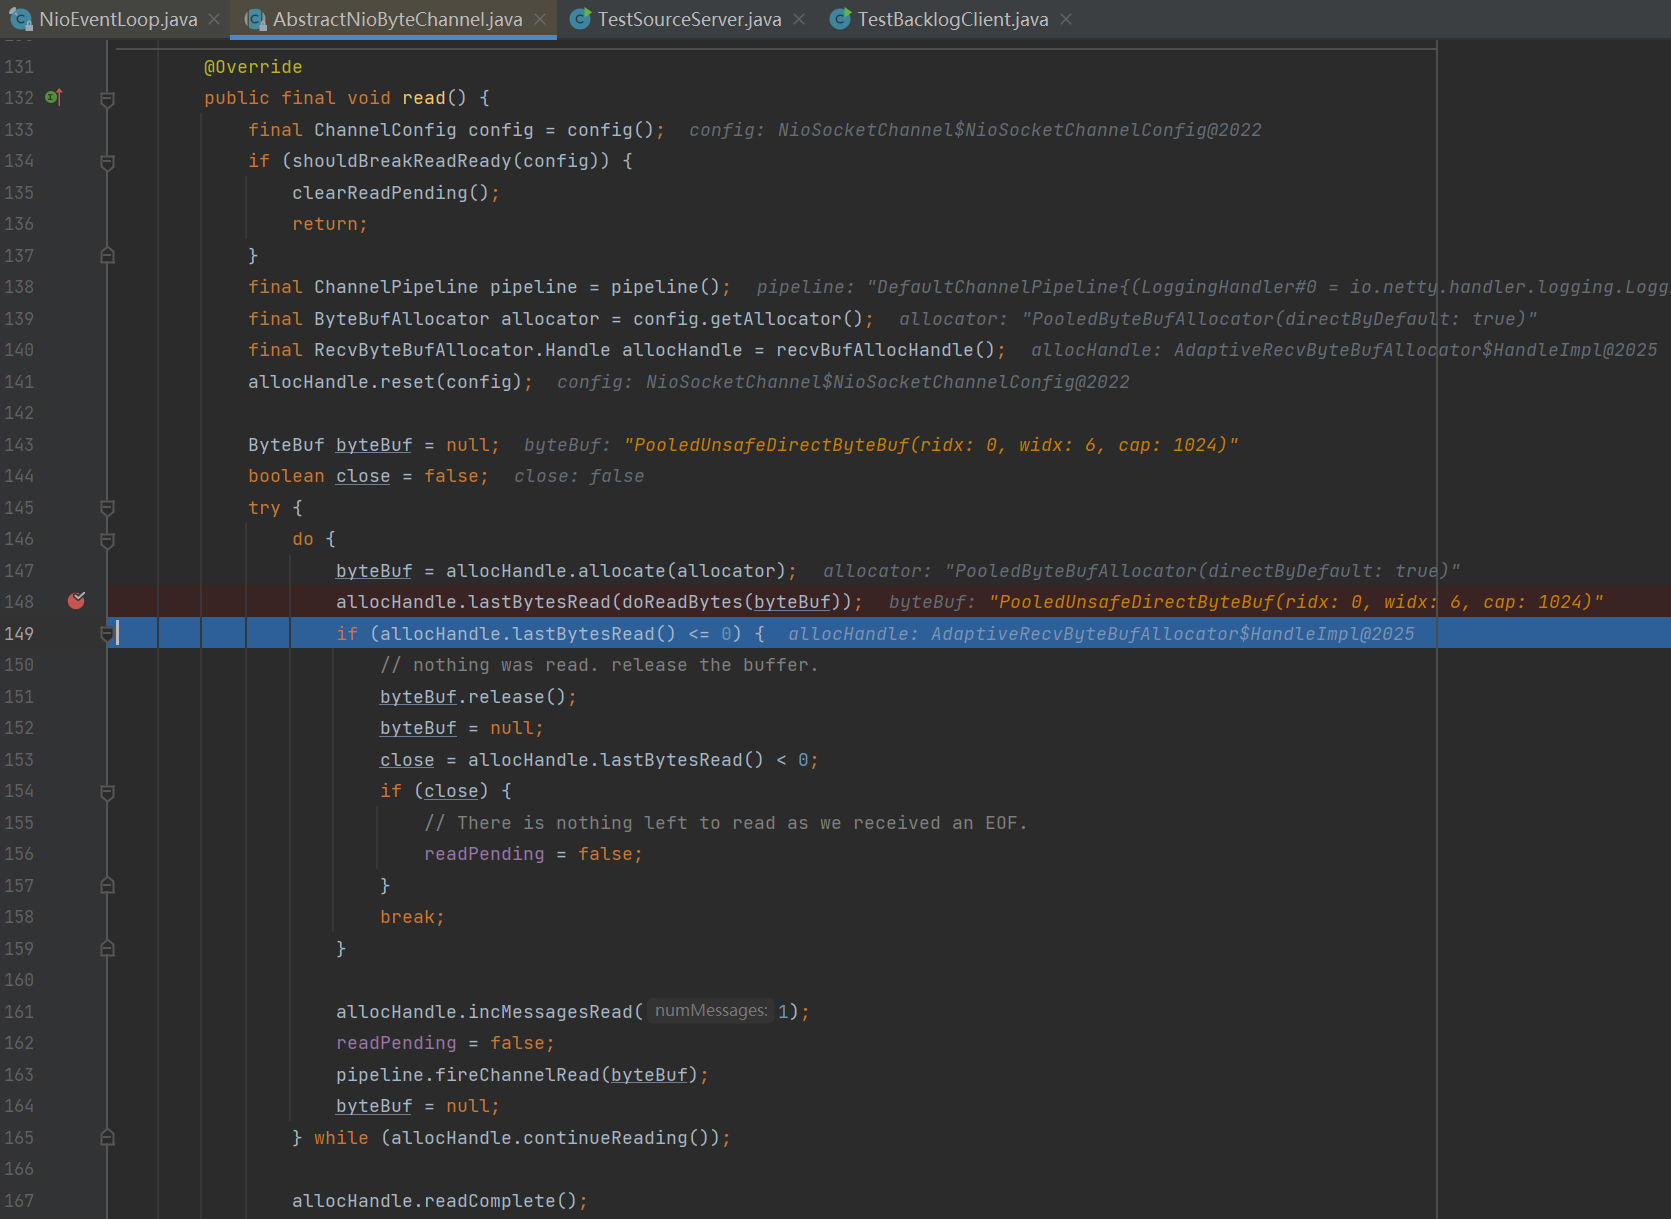
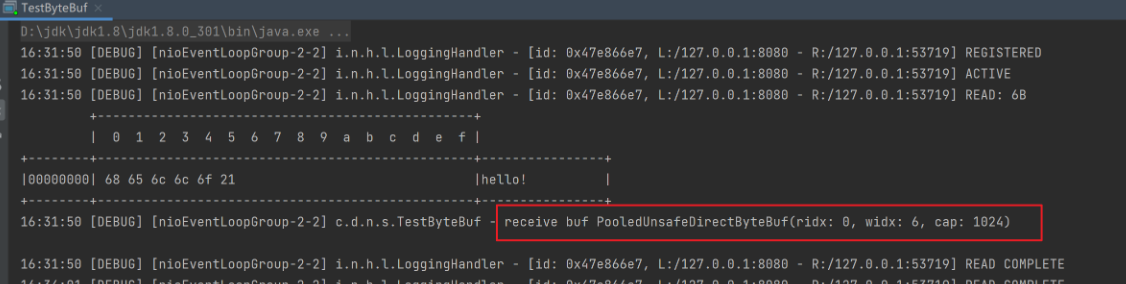
-Dio.netty.noPreferDirect=true设置成使用堆内存的ByteBuf,但是程序启动并用客户端给服务器端发数据后,发现读取到的ByteBuf依旧是直接内存类型的,这是因为做网络io读取数据的操作时直使用直接内存的效率比堆内存要高,netty对于这种io读写操作强制使用直接内存。![]()
下面通过源码分析netty对于io读写操作强制使用直接内存并且ByteBuf的初始容量默认为1024的原因:
在如下第28行处打断点,运行服务端并在客户端发送数据后来到此断点处。
![]()
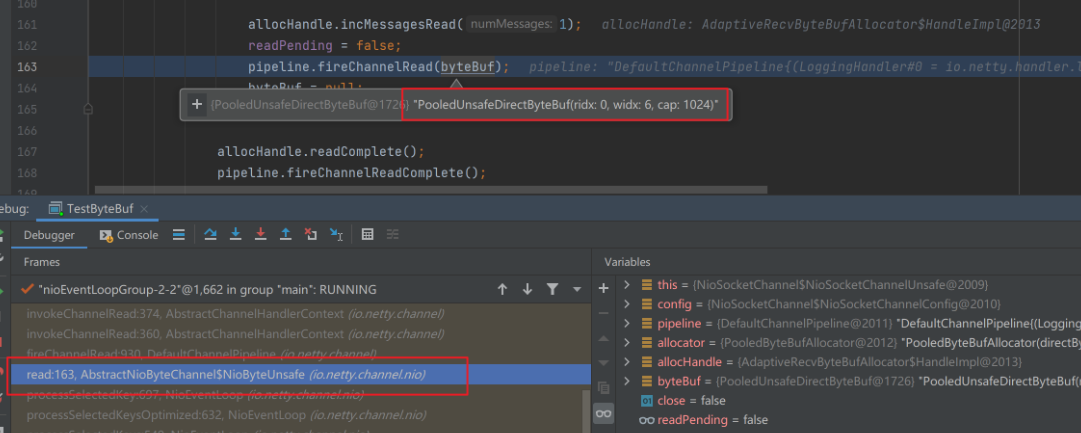
在堆栈信息中能找到创建ByteBuf后的位置。
![]()
往上追溯能查到创建ByteBuf的关键信息。
![]()
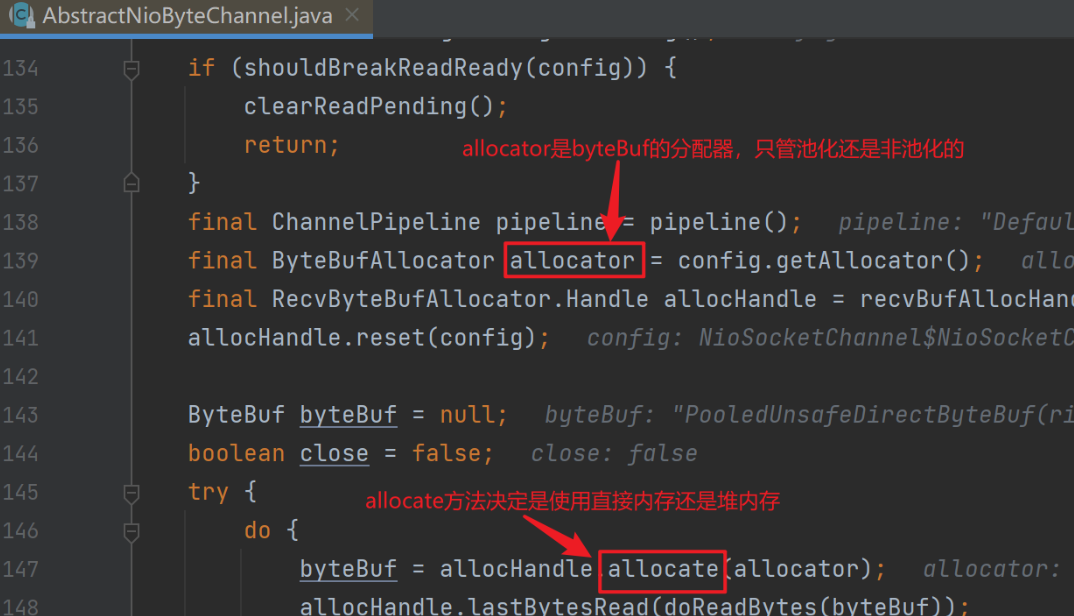
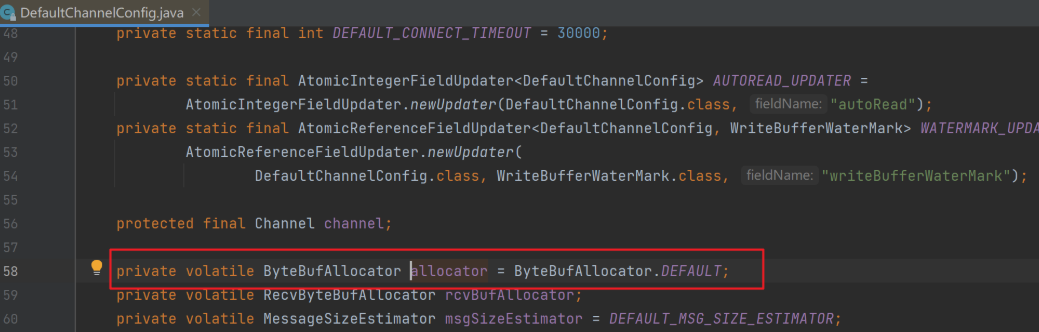
config.getAllocator()方法获得ByteBuf的分配器。
![]()
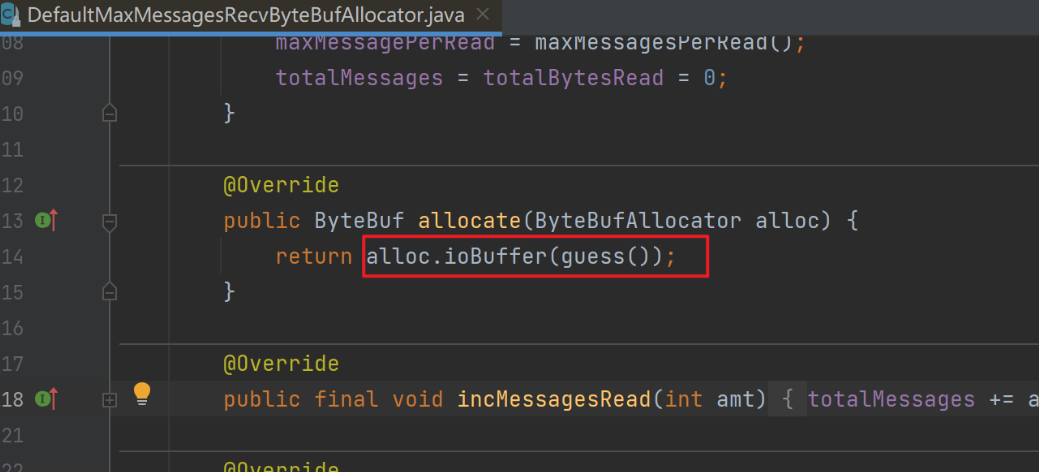
allocHandle.allocate(allocator)中调用了allocator的ioBuffer(guess())方法强制使用直接内存。其中的guess()会动态根据最近几次实际传输的数据量进行自动大小调整。
![]()
1.4 RPC框架
1.4.1 准备工作
为了简化起见,在原来聊天项目的基础上新增Rpc请求和响应消息。
1
2
3
4
5
6
7
8
9
10
11
12
13
14
15
public abstract class Message implements Serializable {
// 省略旧的代码
public static final int RPC_MESSAGE_TYPE_REQUEST = 101;
public static final int RPC_MESSAGE_TYPE_RESPONSE = 102;
static {
// ...
messageClasses.put(RPC_MESSAGE_TYPE_REQUEST, RpcRequestMessage.class);
messageClasses.put(RPC_MESSAGE_TYPE_RESPONSE, RpcResponseMessage.class);
}
}请求消息。
1
2
3
4
5
6
7
8
9
10
11
12
13
14
15
16
17
18
19
20
21
22
23
24
25
26
27
28
29
30
31
32
33
34
35
36
37
38
39
public class RpcRequestMessage extends Message {
/**
* 调用的接口全限定名,服务端根据它找到实现
*/
private String interfaceName;
/**
* 调用接口中的方法名
*/
private String methodName;
/**
* 方法返回类型
*/
private Class<?> returnType;
/**
* 方法参数类型数组
*/
private Class[] parameterTypes;
/**
* 方法参数值数组
*/
private Object[] parameterValue;
public RpcRequestMessage(int sequenceId, String interfaceName, String methodName, Class<?> returnType, Class[] parameterTypes, Object[] parameterValue) {
super.setSequenceId(sequenceId);
this.interfaceName = interfaceName;
this.methodName = methodName;
this.returnType = returnType;
this.parameterTypes = parameterTypes;
this.parameterValue = parameterValue;
}
public int getMessageType() {
return RPC_MESSAGE_TYPE_REQUEST;
}
}响应消息。
1
2
3
4
5
6
7
8
9
10
11
12
13
14
15
16
17
public class RpcResponseMessage extends Message {
/**
* 返回值
*/
private Object returnValue;
/**
* 异常值
*/
private Exception exceptionValue;
public int getMessageType() {
return RPC_MESSAGE_TYPE_RESPONSE;
}
}服务器架子。
1
2
3
4
5
6
7
8
9
10
11
12
13
14
15
16
17
18
19
20
21
22
23
24
25
26
27
28
29
30
31
public class RpcServer {
public static void main(String[] args) {
NioEventLoopGroup boss = new NioEventLoopGroup();
NioEventLoopGroup worker = new NioEventLoopGroup();
LoggingHandler LOGGING_HANDLER = new LoggingHandler(LogLevel.DEBUG);
MessageCodecSharable MESSAGE_CODEC = new MessageCodecSharable();
RpcRequestMessageHandler RPC_HANDLER = new RpcRequestMessageHandler();
try {
ServerBootstrap serverBootstrap = new ServerBootstrap();
serverBootstrap.channel(NioServerSocketChannel.class);
serverBootstrap.group(boss, worker);
serverBootstrap.childHandler(new ChannelInitializer<SocketChannel>() {
protected void initChannel(SocketChannel ch) throws Exception {
ch.pipeline().addLast(new ProcotolFrameDecoder());
ch.pipeline().addLast(LOGGING_HANDLER);
ch.pipeline().addLast(MESSAGE_CODEC);
ch.pipeline().addLast(RPC_HANDLER);
}
});
Channel channel = serverBootstrap.bind(8080).sync().channel();
channel.closeFuture().sync();
} catch (InterruptedException e) {
log.error("server error", e);
} finally {
boss.shutdownGracefully();
worker.shutdownGracefully();
}
}
}客户端架子。
1
2
3
4
5
6
7
8
9
10
11
12
13
14
15
16
17
18
19
20
21
22
23
24
25
26
27
28
29
public class RpcClient {
public static void main(String[] args) {
NioEventLoopGroup group = new NioEventLoopGroup();
LoggingHandler LOGGING_HANDLER = new LoggingHandler(LogLevel.DEBUG);
MessageCodecSharable MESSAGE_CODEC = new MessageCodecSharable();
RpcResponseMessageHandler RPC_HANDLER = new RpcResponseMessageHandler();
try {
Bootstrap bootstrap = new Bootstrap();
bootstrap.channel(NioSocketChannel.class);
bootstrap.group(group);
bootstrap.handler(new ChannelInitializer<SocketChannel>() {
protected void initChannel(SocketChannel ch) throws Exception {
ch.pipeline().addLast(new ProcotolFrameDecoder());
ch.pipeline().addLast(LOGGING_HANDLER);
ch.pipeline().addLast(MESSAGE_CODEC);
ch.pipeline().addLast(RPC_HANDLER);
}
});
Channel channel = bootstrap.connect("localhost", 8080).sync().channel();
channel.closeFuture().sync();
} catch (Exception e) {
log.error("client error", e);
} finally {
group.shutdownGracefully();
}
}
}服务器端的service实现类获取。
1
2
3
4
5
6
7
8
9
10
11
12
13
14
15
16
17
18
19
20
21
22
23
24
25public class ServicesFactory {
static Properties properties;
static Map<Class<?>, Object> map = new ConcurrentHashMap<>();
static {
try (InputStream in = Config.class.getResourceAsStream("/application.properties")) {
properties = new Properties();
properties.load(in);
Set<String> names = properties.stringPropertyNames();
for (String name : names) {
if (name.endsWith("Service")) {
Class<?> interfaceClass = Class.forName(name);
Class<?> instanceClass = Class.forName(properties.getProperty(name));
map.put(interfaceClass, instanceClass.newInstance());
}
}
} catch (IOException | ClassNotFoundException | InstantiationException | IllegalAccessException e) {
throw new ExceptionInInitializerError(e);
}
}
public static <T> T getService(Class<T> interfaceClass) {
return (T) map.get(interfaceClass);
}
}相关配置application.properties:
1
2serializer.algorithm=Json
com.demo.rpc.service.HelloService=com.demo.rpc.service.HelloServiceImpl对应的HelloService接口以及实现类如下:
1
2
3public interface HelloService {
String sayHello(String name);
}1
2
3
4
5
6public class HelloServiceImpl implements HelloService {
public String sayHello(String msg) {
return "你好, " + msg;
}
}
1.4.2 服务器handler
1 |
|
1.4.3 客户端与handler第一版
客户端:
1
2
3
4
5
6
7
8
9
10
11
12
13
14
15
16
17
18
19
20
21
22
23
24
25
26
27
28
29
30
31
32
33
34
35
36
37
38
39
40
41
42
43
44
public class RpcClient {
public static void main(String[] args) {
NioEventLoopGroup group = new NioEventLoopGroup();
LoggingHandler LOGGING_HANDLER = new LoggingHandler(LogLevel.DEBUG);
MessageCodecSharable MESSAGE_CODEC = new MessageCodecSharable();
RpcResponseMessageHandler RPC_HANDLER = new RpcResponseMessageHandler();
try {
Bootstrap bootstrap = new Bootstrap();
bootstrap.channel(NioSocketChannel.class);
bootstrap.group(group);
bootstrap.handler(new ChannelInitializer<SocketChannel>() {
protected void initChannel(SocketChannel ch) throws Exception {
ch.pipeline().addLast(new ProtocolFrameDecoder());
ch.pipeline().addLast(LOGGING_HANDLER);
ch.pipeline().addLast(MESSAGE_CODEC);
ch.pipeline().addLast(RPC_HANDLER);
}
});
Channel channel = bootstrap.connect("localhost", 8080).sync().channel();
ChannelFuture future = channel.writeAndFlush(new RpcRequestMessage(
1,
"com.demo.rpc.service.HelloService",
"sayHello",
String.class,
new Class[]{String.class},
new Object[]{"张三"}
)).addListener(promise -> {
if (!promise.isSuccess()) {
Throwable cause = promise.cause();
log.error("error", cause);
}
});
channel.closeFuture().sync();
} catch (Exception e) {
log.error("client error", e);
} finally {
group.shutdownGracefully();
}
}
}客户端handler:
1
2
3
4
5
6
7
8
9
.Sharable
public class RpcResponseMessageHandler extends SimpleChannelInboundHandler<RpcResponseMessage> {
protected void channelRead0(ChannelHandlerContext ctx, RpcResponseMessage msg) throws Exception {
log.debug("{}", msg);
}
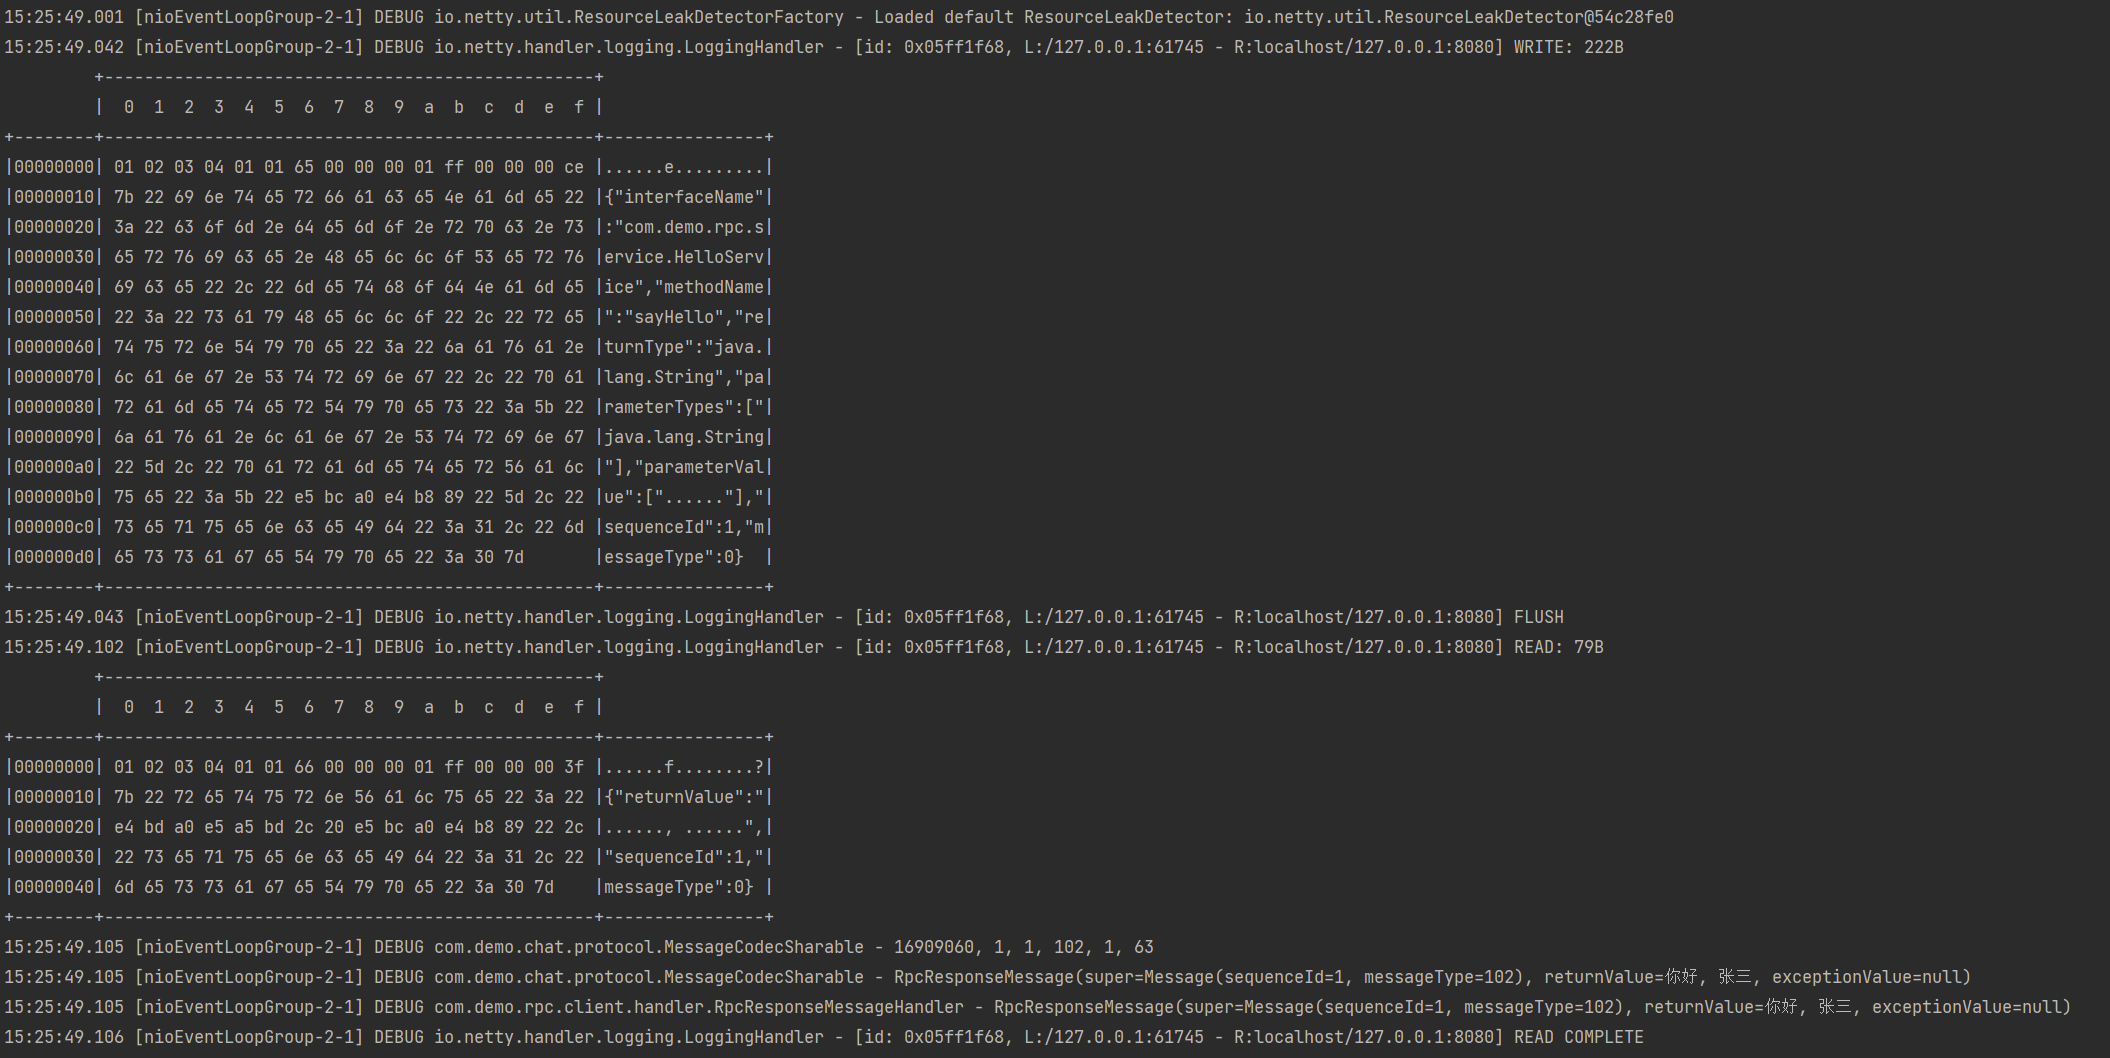
}启动服务器端再启动客户端后,客户端控制台打印如下:
![]()
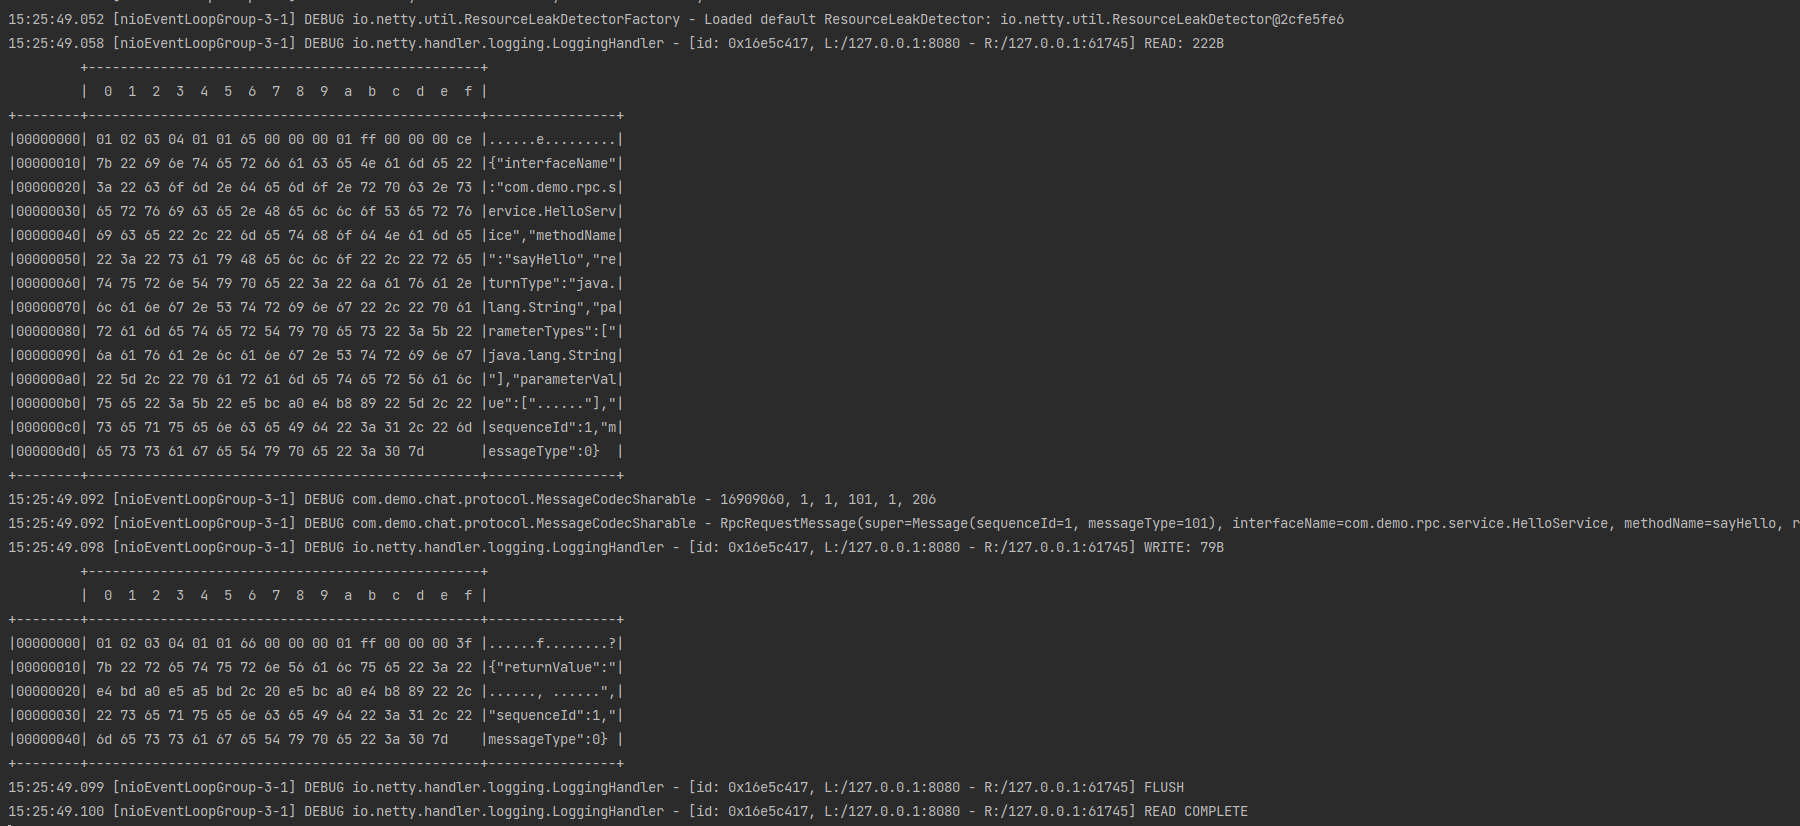
服务器端控制台打印如下:
![]()
1.4.4 客户端与handler第二版
客户端:
1
2
3
4
5
6
7public abstract class SequenceIdGenerator {
private static final AtomicInteger id = new AtomicInteger();
public static int nextId() {
return id.incrementAndGet();
}
}1
2
3
4
5
6
7
8
9
10
11
12
13
14
15
16
17
18
19
20
21
22
23
24
25
26
27
28
29
30
31
32
33
34
35
36
37
38
39
40
41
42
43
44
45
46
47
48
49
50
51
52
53
54
55
56
57
58
59
60
61
62
63
64
65
66
67
68
69
70
71
72
73
74
75
76
77
78
79
80
81
82
83
84
85
86
87
88
89
90
91
92
93
94
public class RpcClientManager {
public static void main(String[] args) {
HelloService service = getProxyService(HelloService.class);
System.out.println(service.sayHello("zhangsan"));
// System.out.println(service.sayHello("lisi"));
// System.out.println(service.sayHello("wangwu"));
}
// 创建代理类
public static <T> T getProxyService(Class<T> serviceClass) {
ClassLoader loader = serviceClass.getClassLoader();
Class<?>[] interfaces = new Class[]{serviceClass};
// sayHello "张三"
Object o = Proxy.newProxyInstance(loader, interfaces, (proxy, method, args) -> {
// 1. 将方法调用转换为 消息对象
int sequenceId = SequenceIdGenerator.nextId();
RpcRequestMessage msg = new RpcRequestMessage(
sequenceId,
serviceClass.getName(),
method.getName(),
method.getReturnType(),
method.getParameterTypes(),
args
);
// 2. 将消息对象发送出去
getChannel().writeAndFlush(msg);
// 3. 准备一个空 Promise 对象,来接收结果 指定 promise 对象异步接收结果线程
DefaultPromise<Object> promise = new DefaultPromise<>(getChannel().eventLoop());
RpcResponseMessageHandler.PROMISES.put(sequenceId, promise);
// promise.addListener(future -> {
// // 上方指定的getChannel().eventLoop()线程来接收
// });
// 4. 等待 promise 结果
promise.await();
if(promise.isSuccess()) {
// 调用正常
return promise.getNow();
} else {
// 调用失败
throw new RuntimeException(promise.cause());
}
});
return (T) o;
}
private static Channel channel = null;
private static final Object LOCK = new Object();
// 获取唯一的 channel 对象
public static Channel getChannel() {
if (channel != null) {
return channel;
}
synchronized (LOCK) { // t2
if (channel != null) { // t1
return channel;
}
initChannel();
return channel;
}
}
// 初始化 channel 方法
private static void initChannel() {
NioEventLoopGroup group = new NioEventLoopGroup();
LoggingHandler LOGGING_HANDLER = new LoggingHandler(LogLevel.DEBUG);
MessageCodecSharable MESSAGE_CODEC = new MessageCodecSharable();
RpcResponseMessageHandler RPC_HANDLER = new RpcResponseMessageHandler();
Bootstrap bootstrap = new Bootstrap();
bootstrap.channel(NioSocketChannel.class);
bootstrap.group(group);
bootstrap.handler(new ChannelInitializer<SocketChannel>() {
protected void initChannel(SocketChannel ch) throws Exception {
ch.pipeline().addLast(new ProtocolFrameDecoder());
ch.pipeline().addLast(LOGGING_HANDLER);
ch.pipeline().addLast(MESSAGE_CODEC);
ch.pipeline().addLast(RPC_HANDLER);
}
});
try {
channel = bootstrap.connect("localhost", 8080).sync().channel();
channel.closeFuture().addListener(future -> {
group.shutdownGracefully();
});
} catch (Exception e) {
log.error("client error", e);
}
}
}客户端handler:
1
2
3
4
5
6
7
8
9
10
11
12
13
14
15
16
17
18
19
20
21
22
23
24
.Sharable
public class RpcResponseMessageHandler extends SimpleChannelInboundHandler<RpcResponseMessage> {
// 序号 用来接收结果的 promise 对象
public static final Map<Integer, Promise<Object>> PROMISES = new ConcurrentHashMap<>();
protected void channelRead0(ChannelHandlerContext ctx, RpcResponseMessage msg) throws Exception {
log.debug("{}", msg);
// 拿到空的 promise
Promise<Object> promise = PROMISES.remove(msg.getSequenceId());
if (promise != null) {
Object returnValue = msg.getReturnValue();
Exception exceptionValue = msg.getExceptionValue();
if(exceptionValue != null) {
promise.setFailure(exceptionValue);
} else {
promise.setSuccess(returnValue);
}
}
}
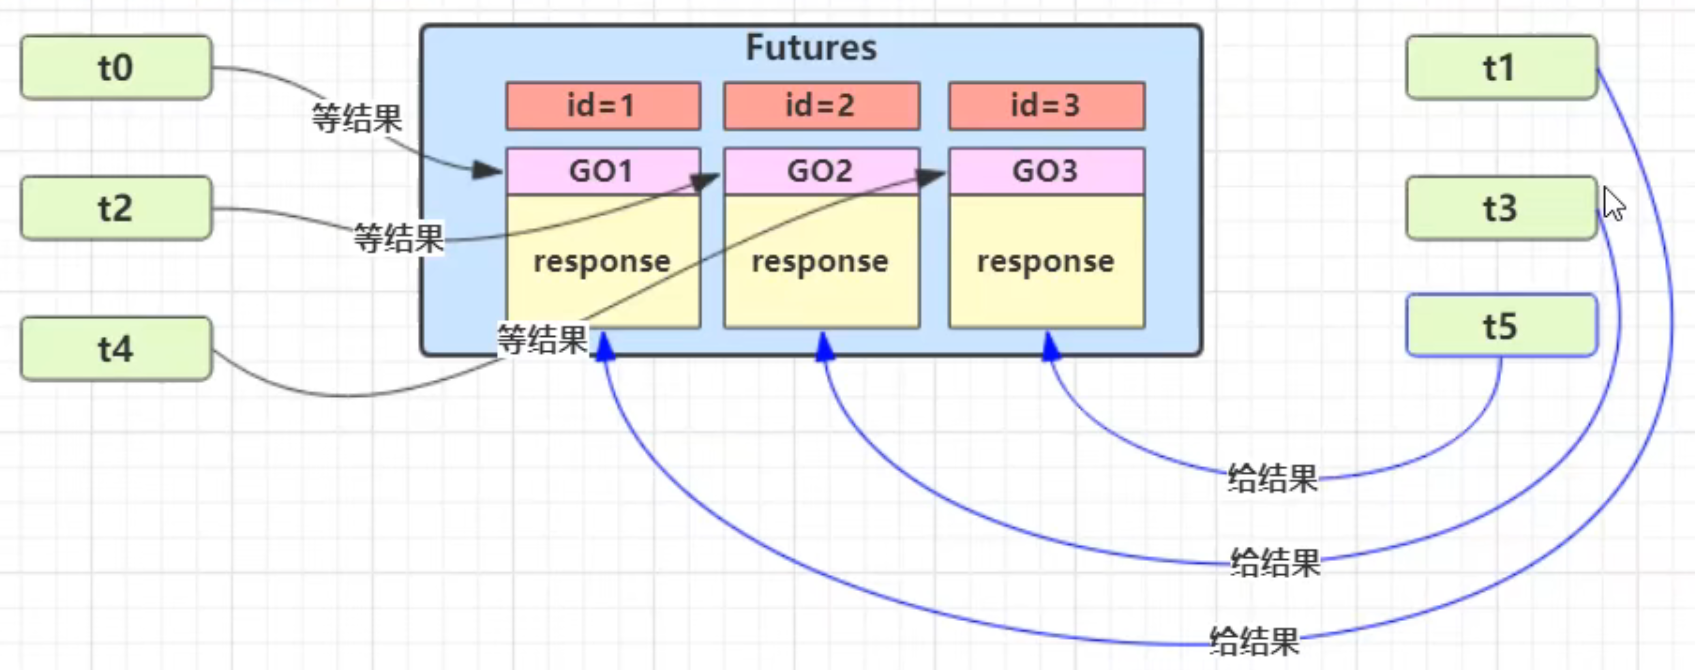
}![]()
2、源码分析
2.1 启动剖析
先看看netty中对下面的代码是怎样进行处理的:
1
2
3
4
5
6
7
8
9
10
11
12
13
14
15
16
17
18
19
20
21
22// netty 中使用 NioEventLoopGroup (简称 nio boss 线程)来封装线程和 selector
Selector selector = Selector.open();
// 创建 NioServerSocketChannel,同时会初始化它关联的 handler,以及为原生 ssc 存储 config
NioServerSocketChannel attachment = new NioServerSocketChannel();
// 创建 NioServerSocketChannel 时,创建了 java 原生的 ServerSocketChannel
ServerSocketChannel serverSocketChannel = ServerSocketChannel.open();
serverSocketChannel.configureBlocking(false);
// 启动 nio boss 线程执行接下来的操作
//注册(仅关联 selector 和 NioServerSocketChannel),未关注事件
SelectionKey selectionKey = serverSocketChannel.register(selector, 0, attachment);
// head -> 初始化器 -> ServerBootstrapAcceptor -> tail,初始化器是一次性的,只为添加 acceptor
// 绑定端口
serverSocketChannel.bind(new InetSocketAddress(8080));
// 触发 channel active 事件,在 head 中关注 op_accept 事件
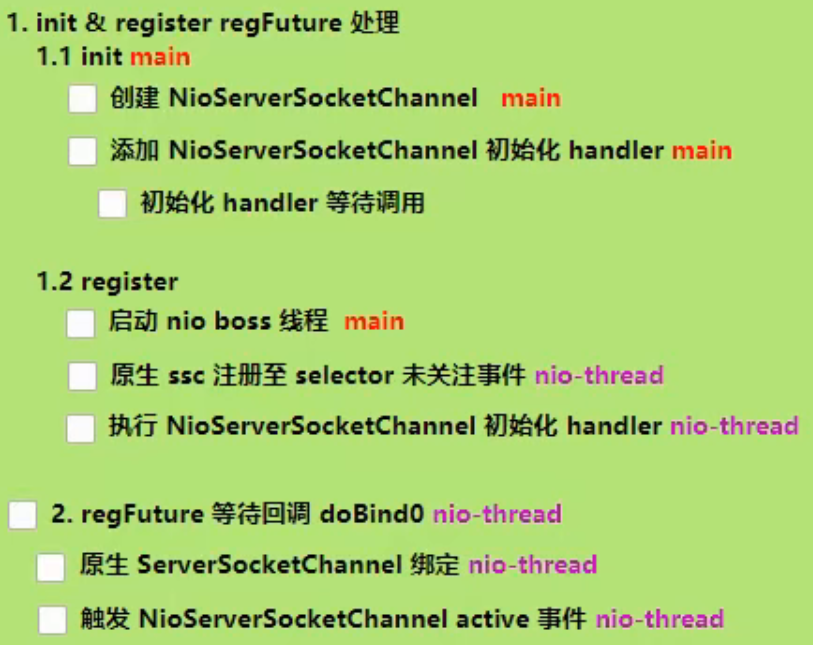
selectionKey.interestOps(SelectionKey.OP_ACCEPT);获得选择器Selector,Netty中使用NioEventloopGroup中的NioEventloop封装了线程和选择器。
创建
NioServerSocketChannel,该Channel作为附件添加到ServerSocketChannel中。创建
ServerSocketChannel,将其设置为非阻塞模式,并注册到Selector中,此时未关注事件,但是添加了附件NioServerSocketChannel。绑定端口。
通过
interestOps设置感兴趣的事件。1
2
3
4
5// 简化为以下四个主要方法
ServerSocketChannel ssc=ServerSocketChannel.open();
SelectionKey selectionKey=ssc.register(selector,0, nettySsc);
ssc.bind(new InetSocketAddress(8080, backlog));
selectionKey.interestOps(SelectionKey.OP_ACCEPT);
以上的步骤在netty中其实是在bind方法中执行的,在以下代码中打断点并以debug模式启动:
1
2
3
4
5
6
7
8
9
10
11
12
13public class TestSourceServer {
public static void main(String[] args) {
new ServerBootstrap()
.group(new NioEventLoopGroup())
.channel(NioServerSocketChannel.class)
.childHandler(new ChannelInitializer<NioSocketChannel>() {
protected void initChannel(NioSocketChannel ch) {
ch.pipeline().addLast(new LoggingHandler());
}
}).bind(8080);
}
}![]()
进入bind方法。
![]()
![]()
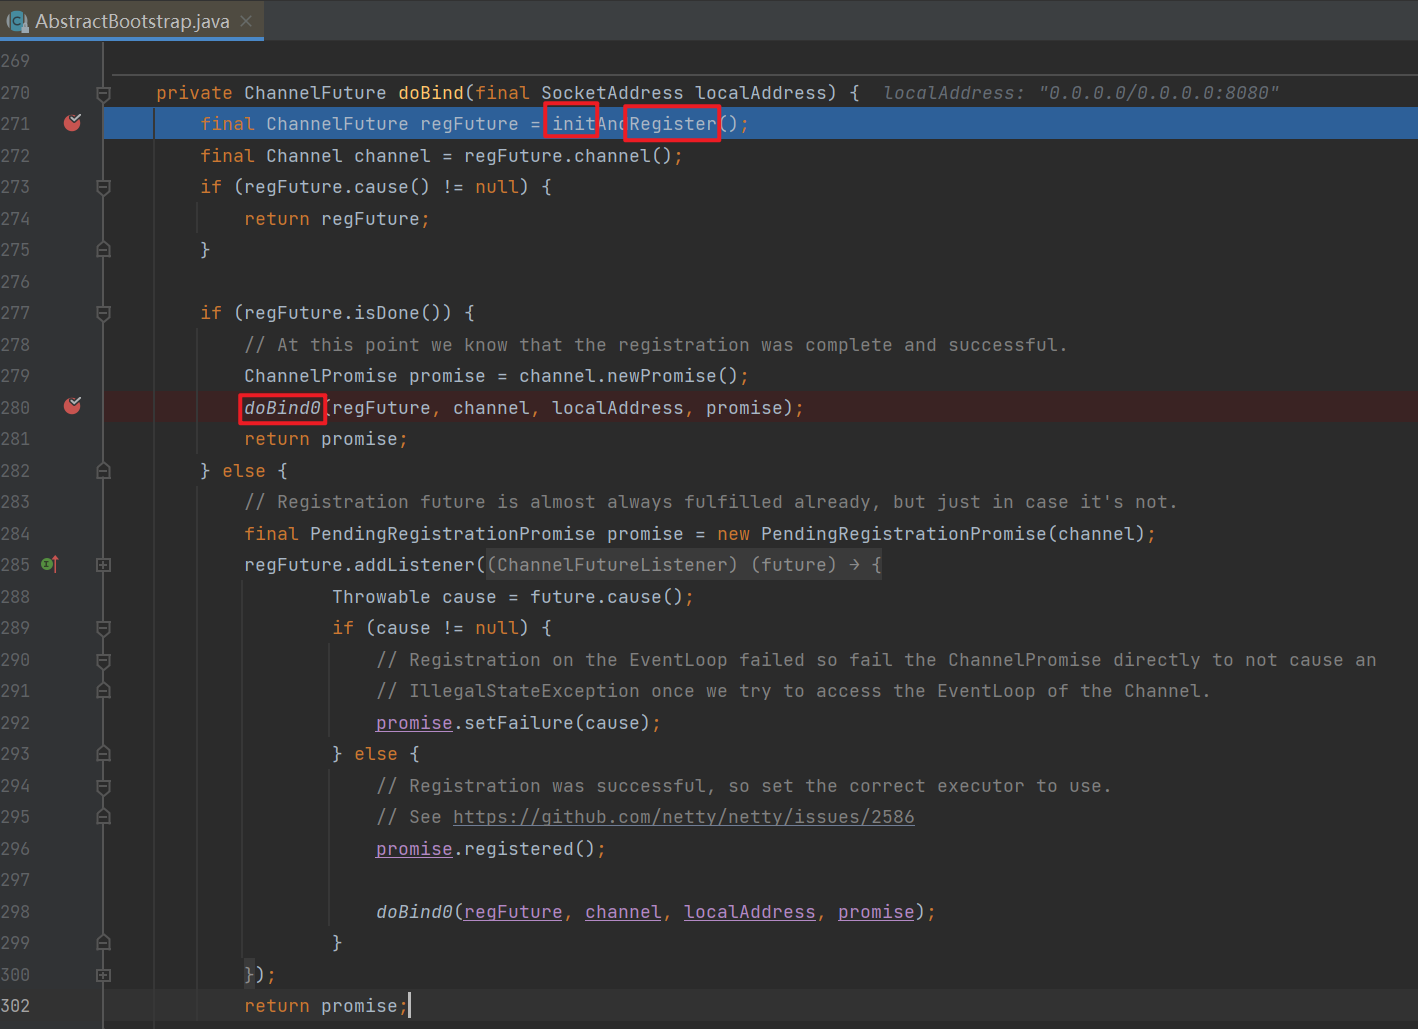
紧接着进入关键代码
io.netty.bootstrap.AbstractBootstrap#doBind。里面的操作有些是在main线程有些是在NIO线程中执行,主要做了三个操作分别是:- init => ServerSocketChannel ssc=ServerSocketChannel.open();
- Register => SelectionKey selectionKey=ssc.register(selector,0, nettySsc);
- doBind0 => ssc.bind(new InetSocketAddress(8080, backlog));
![1653741707783]()
![]()
1
2
3
4
5
6
7
8
9
10
11
12
13
14
15
16
17
18
19
20
21
22
23
24
25
26
27
28
29
30
31
32
33
34
35
36
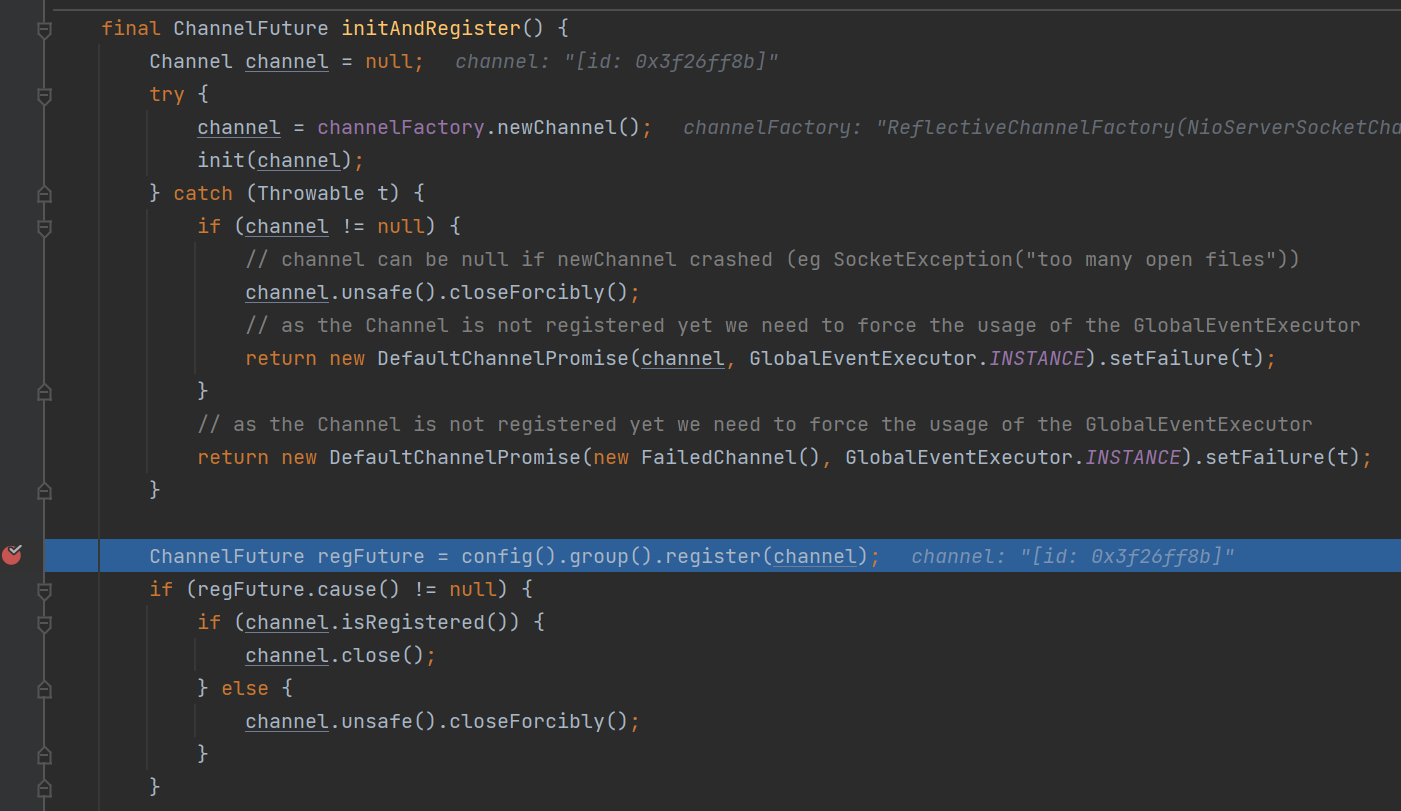
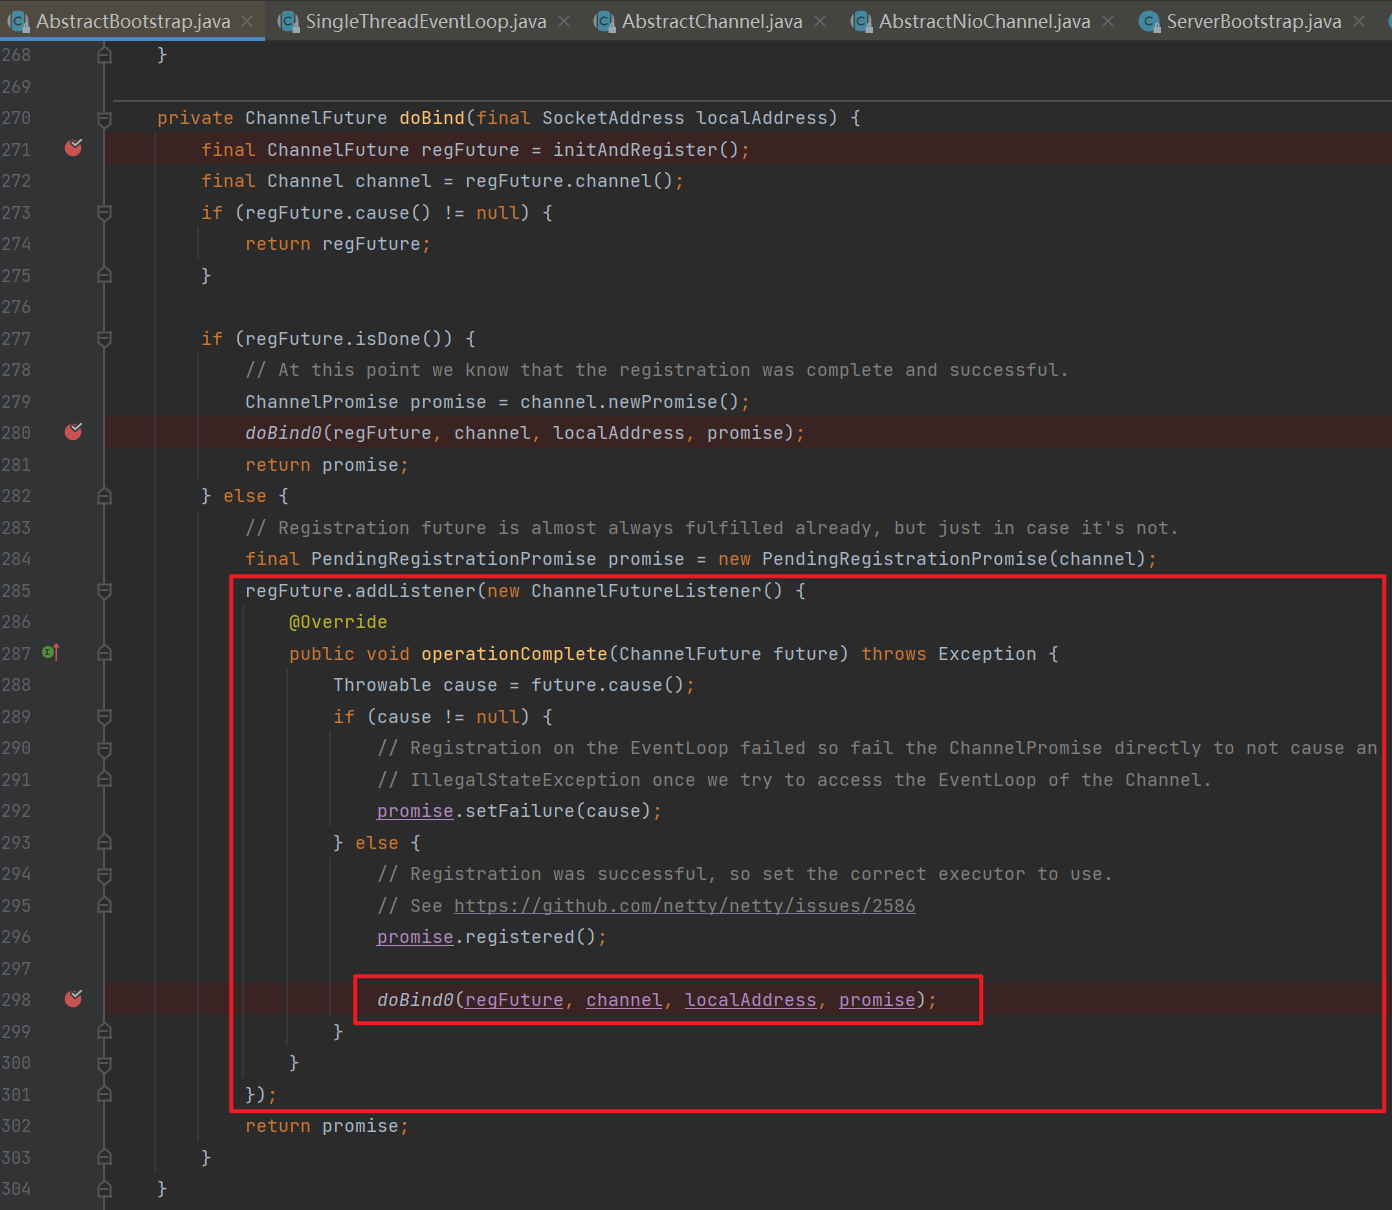
37private ChannelFuture doBind(final SocketAddress localAddress) {
// 1. 执行初始化和注册 regFuture 会由 initAndRegister 设置其是否完成,从而回调 3.2 处代码
final ChannelFuture regFuture = initAndRegister();
final Channel channel = regFuture.channel();
if (regFuture.cause() != null) {
return regFuture;
}
// 2. 因为是 initAndRegister 异步执行,需要分两种情况来看,调试时也需要通过 suspend 断点类型加以区分
// 2.1 如果已经完成
if (regFuture.isDone()) {
ChannelPromise promise = channel.newPromise();
// 3.1 立刻调用 doBind0
doBind0(regFuture, channel, localAddress, promise);
return promise;
}
// 2.2 还没有完成
else {
final PendingRegistrationPromise promise = new PendingRegistrationPromise(channel);
// 3.2 回调 doBind0
regFuture.addListener(new ChannelFutureListener() {
public void operationComplete(ChannelFuture future) throws Exception {
Throwable cause = future.cause();
if (cause != null) {
// 处理异常...
promise.setFailure(cause);
} else {
promise.registered();
// 3. 由注册线程去执行 doBind0
doBind0(regFuture, channel, localAddress, promise);
}
}
});
return promise;
}
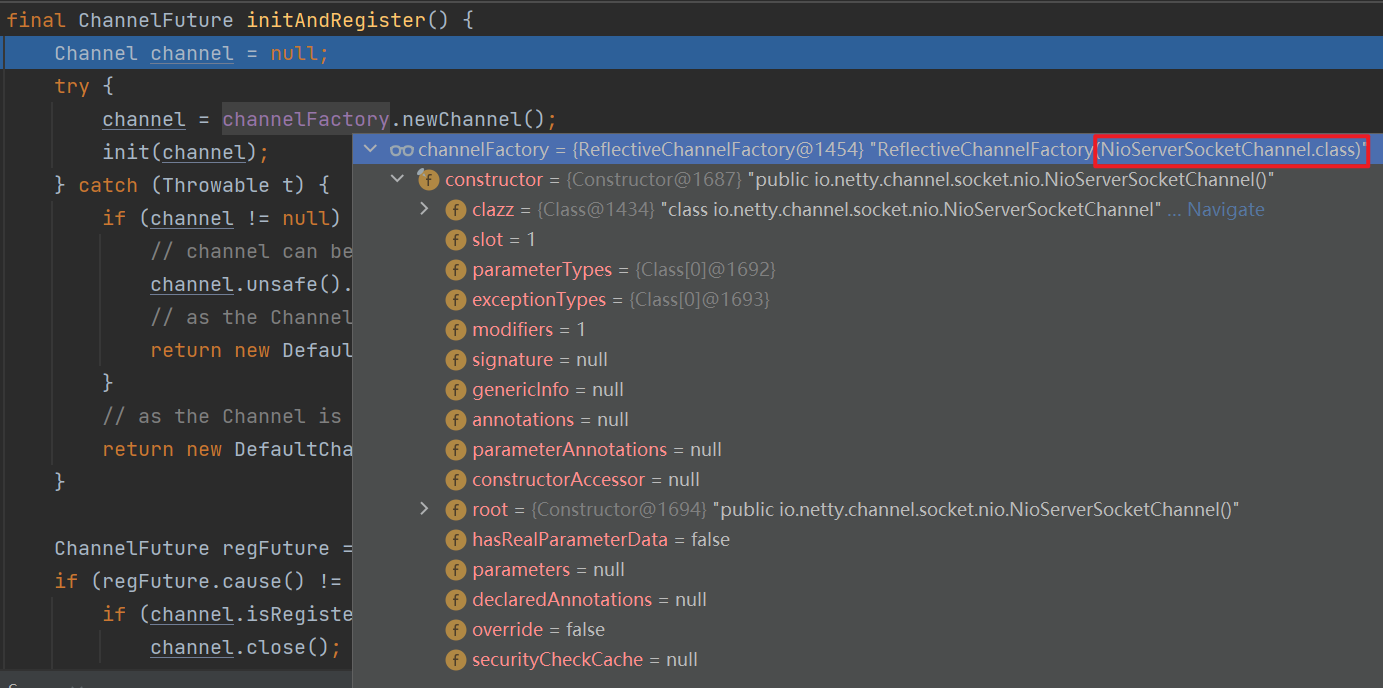
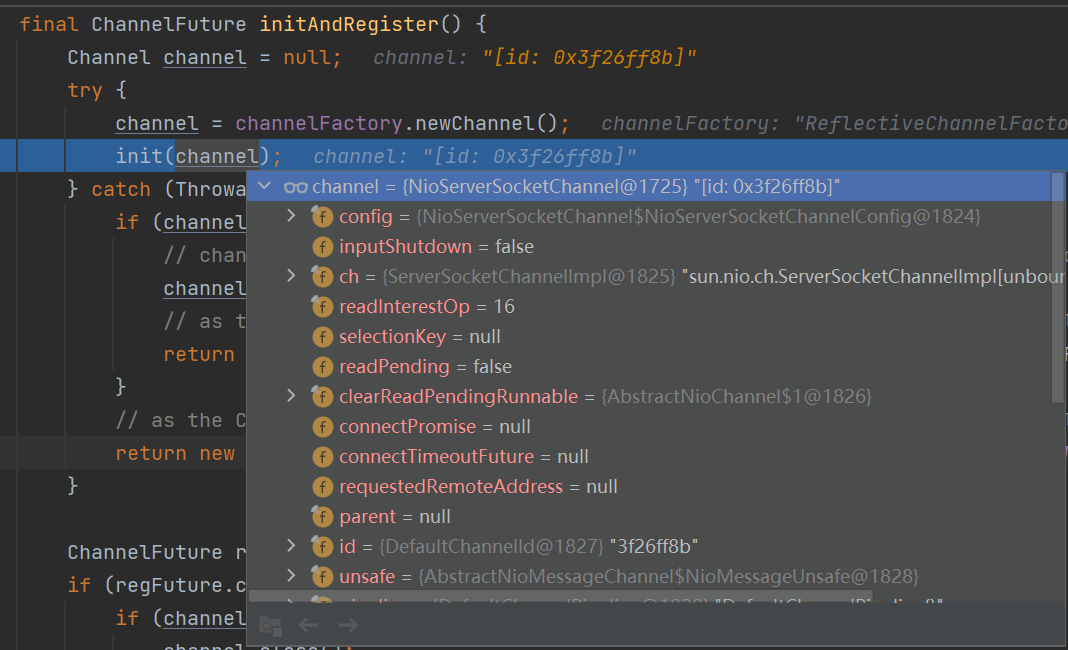
}进入initAndRegister()方法。
1
2
3
4
5
6
7
8
9
10
11
12
13
14
15
16
17
18final ChannelFuture initAndRegister() {
Channel channel = null;
try {
channel = channelFactory.newChannel();
// 1.1 初始化 - 做的事就是添加一个初始化器 ChannelInitializer
init(channel);
} catch (Throwable t) {
// 处理异常...
return new DefaultChannelPromise(new FailedChannel(), GlobalEventExecutor.INSTANCE).setFailure(t);
}
// 1.2 注册 - 做的事就是将原生 channel 注册到 selector 上
ChannelFuture regFuture = config().group().register(channel);
if (regFuture.cause() != null) {
// 处理异常...
}
return regFuture;
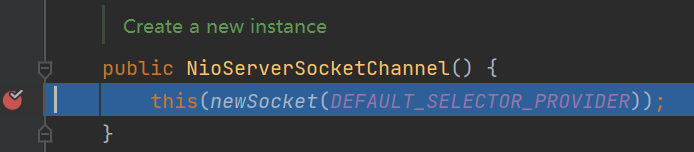
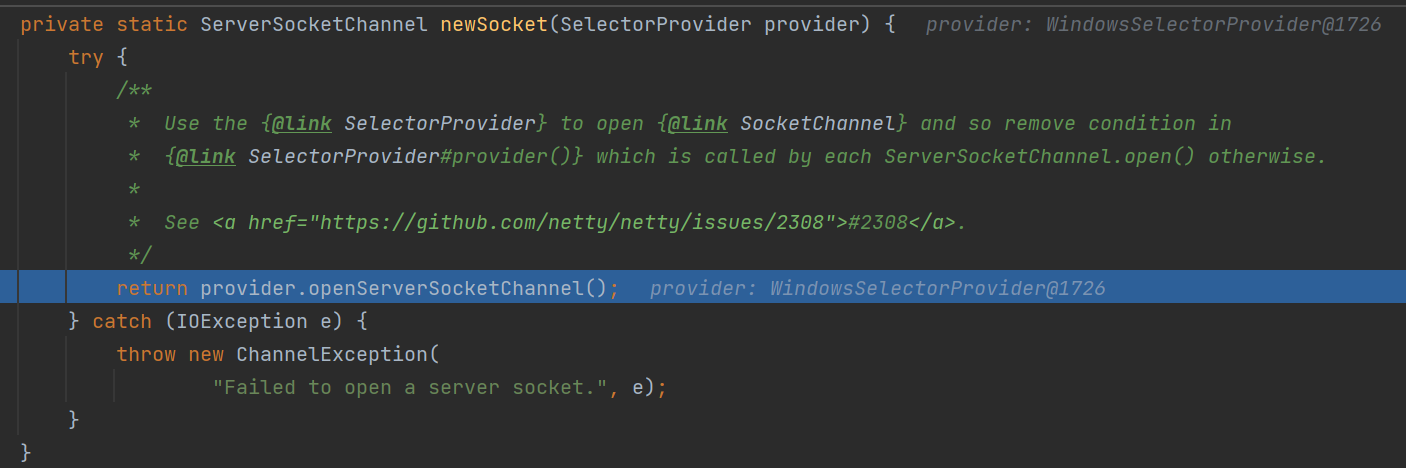
}调用channelFactory.newChannel()创建一个NioServerSocketChannel实例。
![]()
![]()
往NioServerSocketChannel类的的构造方法中打断点并放行程序后会来到此构造方法:
![]()
其中的newSocket(DEFAULT_SELECTOR_PROVIDER)其实就是执行前面说的四个主要方法之一的ServerSocketChannel.open(),即创建jdk中原生的ssc。
![]()
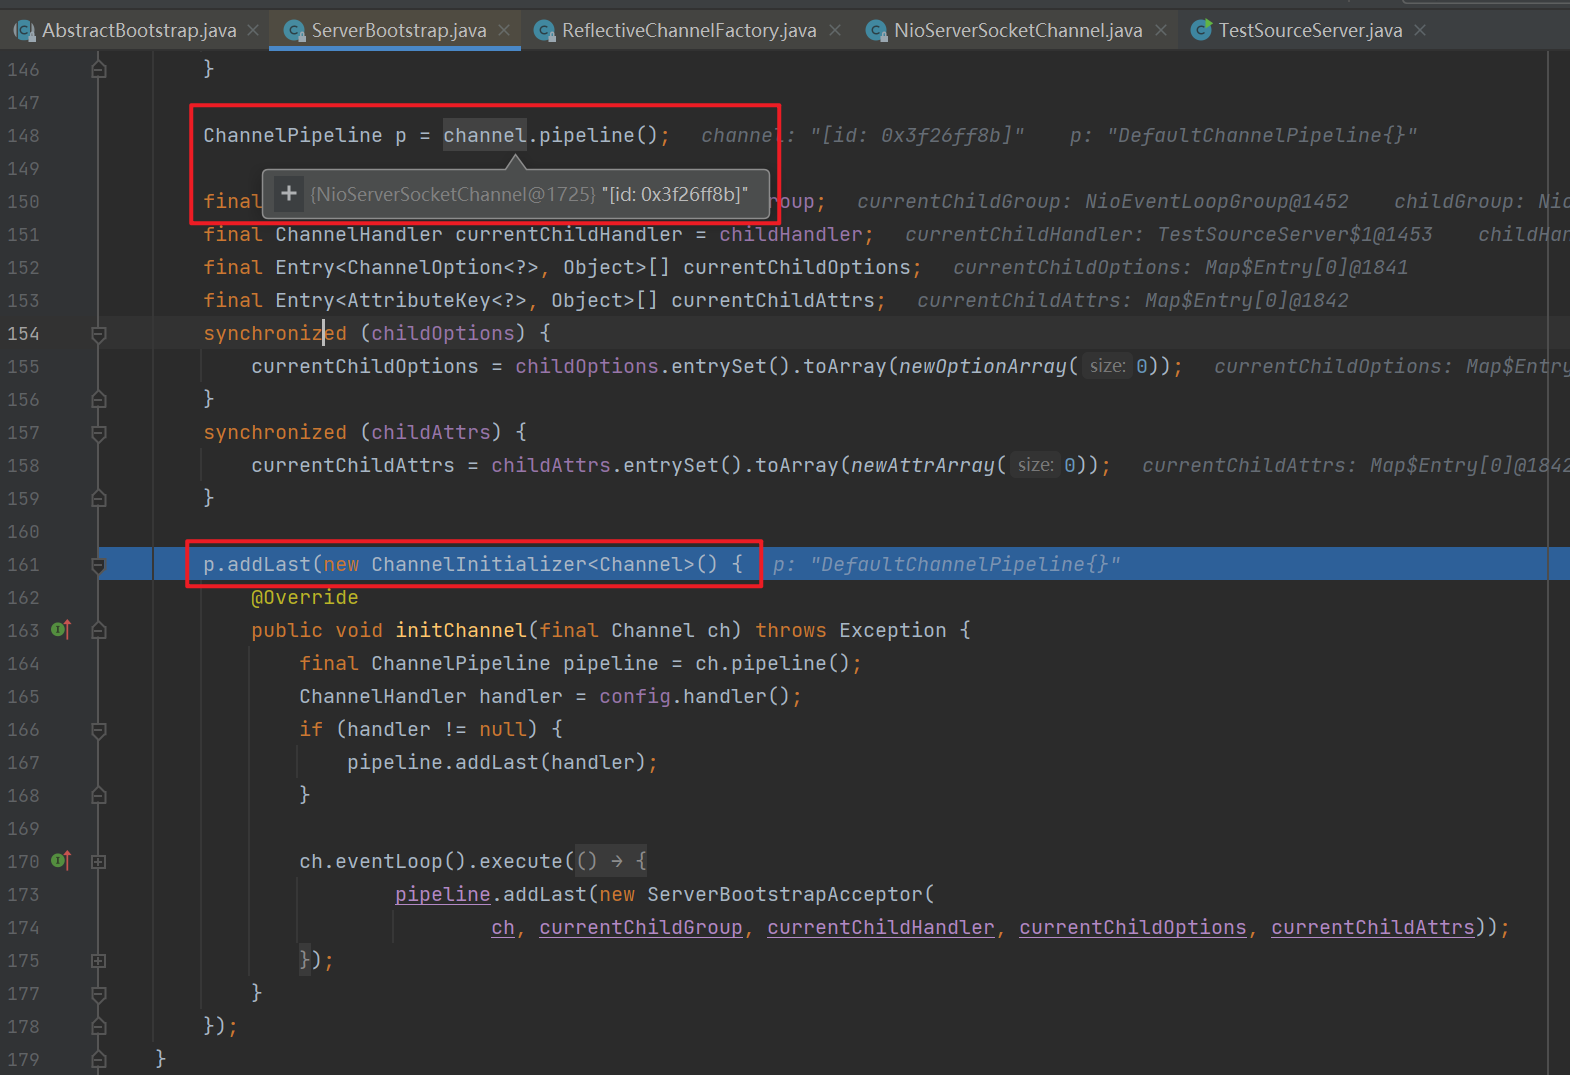
此时NioServerSocketChannel创建完毕,接下来开始进行初始化,即执行init(channel)方法。其主要目的是往NioServerSocketChannel的流水线中添加一个名为ChannelInitializer的handler,它与其它handler的不同之处是它的initChannel方法只会执行一次。但这里只是将该handler加入流水线中,并没有执行initChannel方法,可先在initChannel方法加上断点。
![]()
![]()
1
2
3
4
5
6
7
8
9
10
11
12
13
14
15
16
17
18
19
20
21
22
23
24
25
26
27
28
29
30
31
32
33
34
35
36
37
38
39
40
41
42
43
44
45
46
47
48
49
50// 这里 channel 实际上是 NioServerSocketChannel
void init(Channel channel) throws Exception {
final Map<ChannelOption<?>, Object> options = options0();
synchronized (options) {
setChannelOptions(channel, options, logger);
}
final Map<AttributeKey<?>, Object> attrs = attrs0();
synchronized (attrs) {
for (Entry<AttributeKey<?>, Object> e: attrs.entrySet()) {
AttributeKey<Object> key = (AttributeKey<Object>) e.getKey();
channel.attr(key).set(e.getValue());
}
}
ChannelPipeline p = channel.pipeline();
final EventLoopGroup currentChildGroup = childGroup;
final ChannelHandler currentChildHandler = childHandler;
final Entry<ChannelOption<?>, Object>[] currentChildOptions;
final Entry<AttributeKey<?>, Object>[] currentChildAttrs;
synchronized (childOptions) {
currentChildOptions = childOptions.entrySet().toArray(newOptionArray(0));
}
synchronized (childAttrs) {
currentChildAttrs = childAttrs.entrySet().toArray(newAttrArray(0));
}
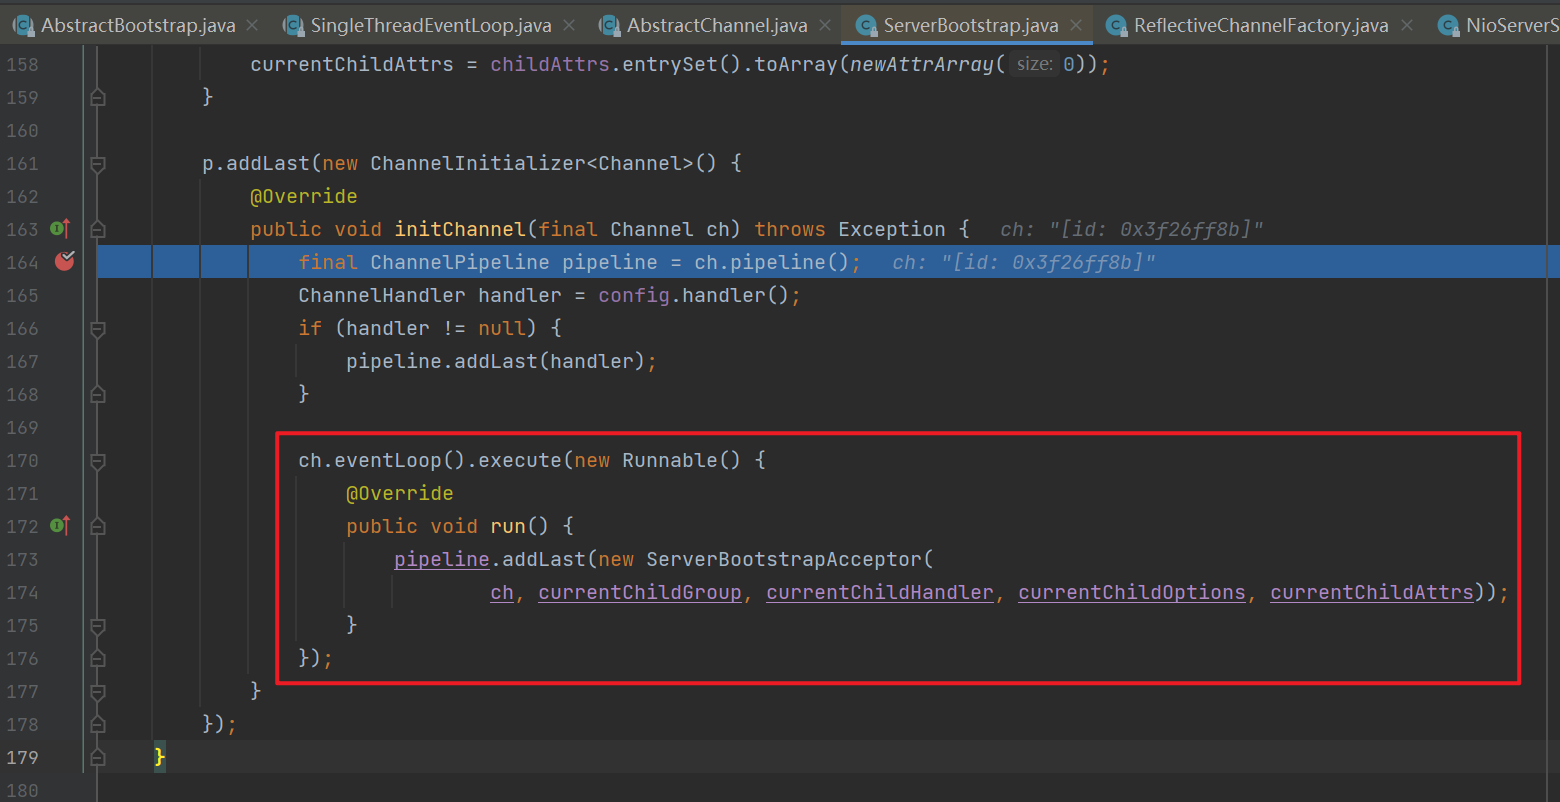
// 为 NioServerSocketChannel 添加初始化器
p.addLast(new ChannelInitializer<Channel>() {
public void initChannel(final Channel ch) throws Exception {
final ChannelPipeline pipeline = ch.pipeline();
ChannelHandler handler = config.handler();
if (handler != null) {
pipeline.addLast(handler);
}
// 初始化器的职责是将 ServerBootstrapAcceptor 加入至 NioServerSocketChannel
ch.eventLoop().execute(new Runnable() {
public void run() {
pipeline.addLast(new ServerBootstrapAcceptor(
ch, currentChildGroup, currentChildHandler, currentChildOptions, currentChildAttrs));
}
});
}
});
}接下来来到register(channel)方法,即将原生ServerSocketChannel注册到selector上。
![]()
![]()
![]()
![]()
![]()
1
2
3
4
5
6
7
8
9
10
11
12
13
14
15
16
17
18
19
20
21
22
23
24
25
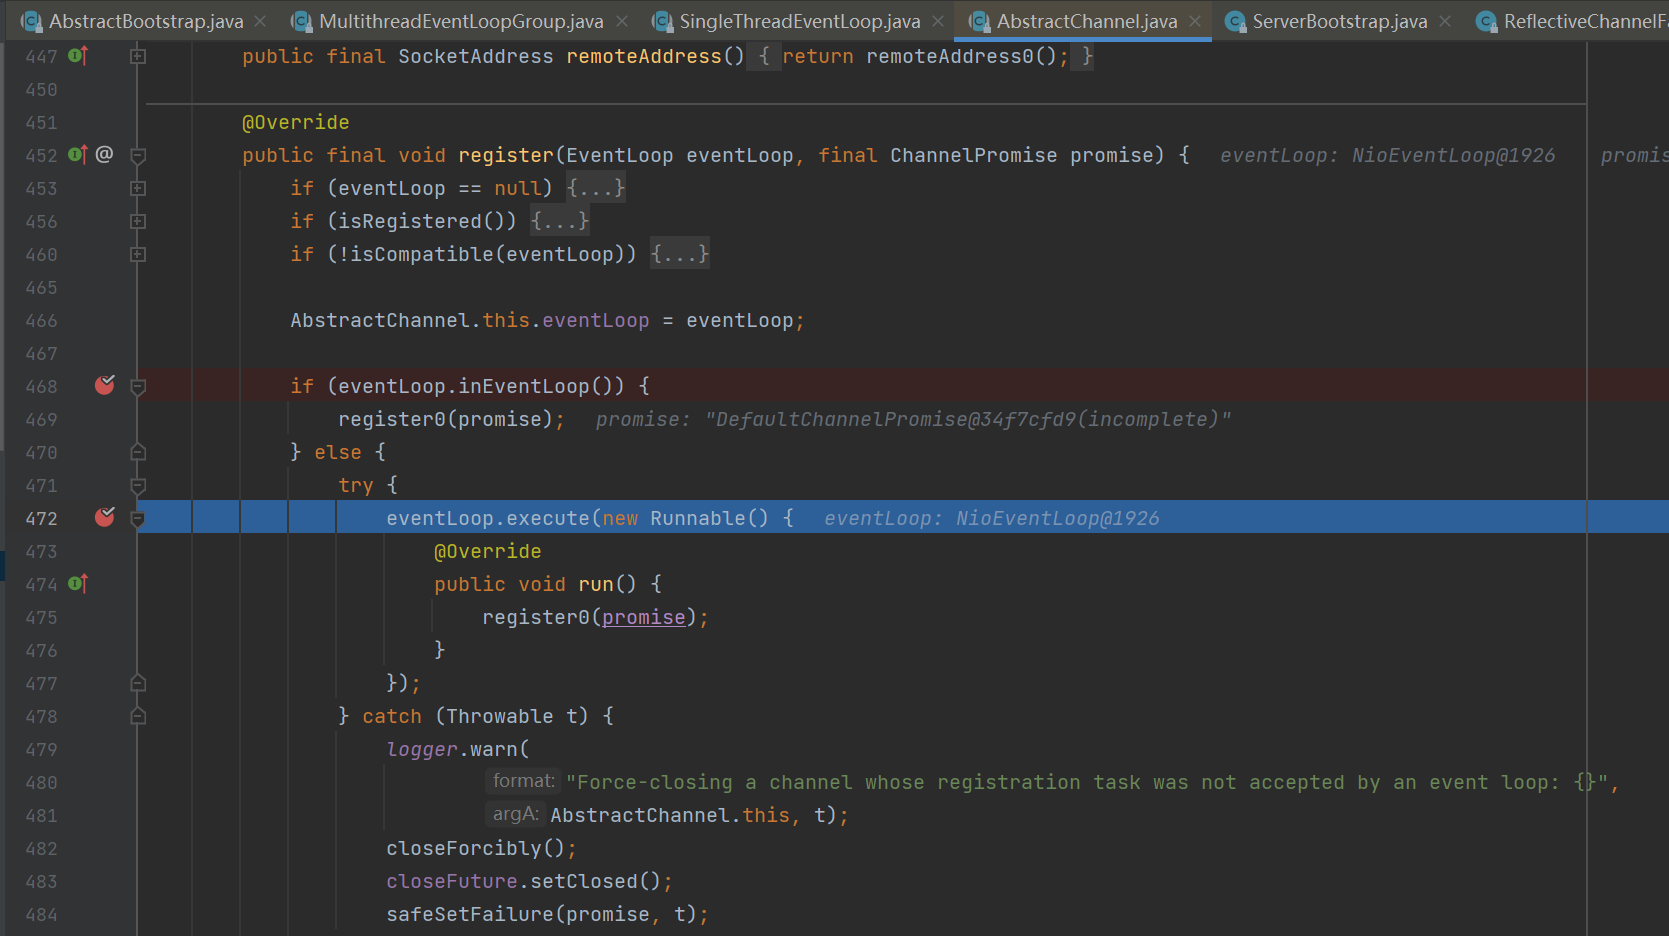
26public final void register(EventLoop eventLoop, final ChannelPromise promise) {
// 一些检查,略...
AbstractChannel.this.eventLoop = eventLoop;
// 检查当前线程是不是NIO线程,这里为false
if (eventLoop.inEventLoop()) {
register0(promise);
} else {
try {
// 首次执行 execute 方法时,会启动 nio 线程,之后注册等操作在 nio 线程上执行
// 因为只有一个 NioServerSocketChannel 因此,也只会有一个 boss nio 线程
// 这行代码完成的事实是 main -> nio boss 线程的切换
eventLoop.execute(new Runnable() {
public void run() {
register0(promise);
}
});
} catch (Throwable t) {
// 日志记录...
closeForcibly();
closeFuture.setClosed();
safeSetFailure(promise, t);
}
}
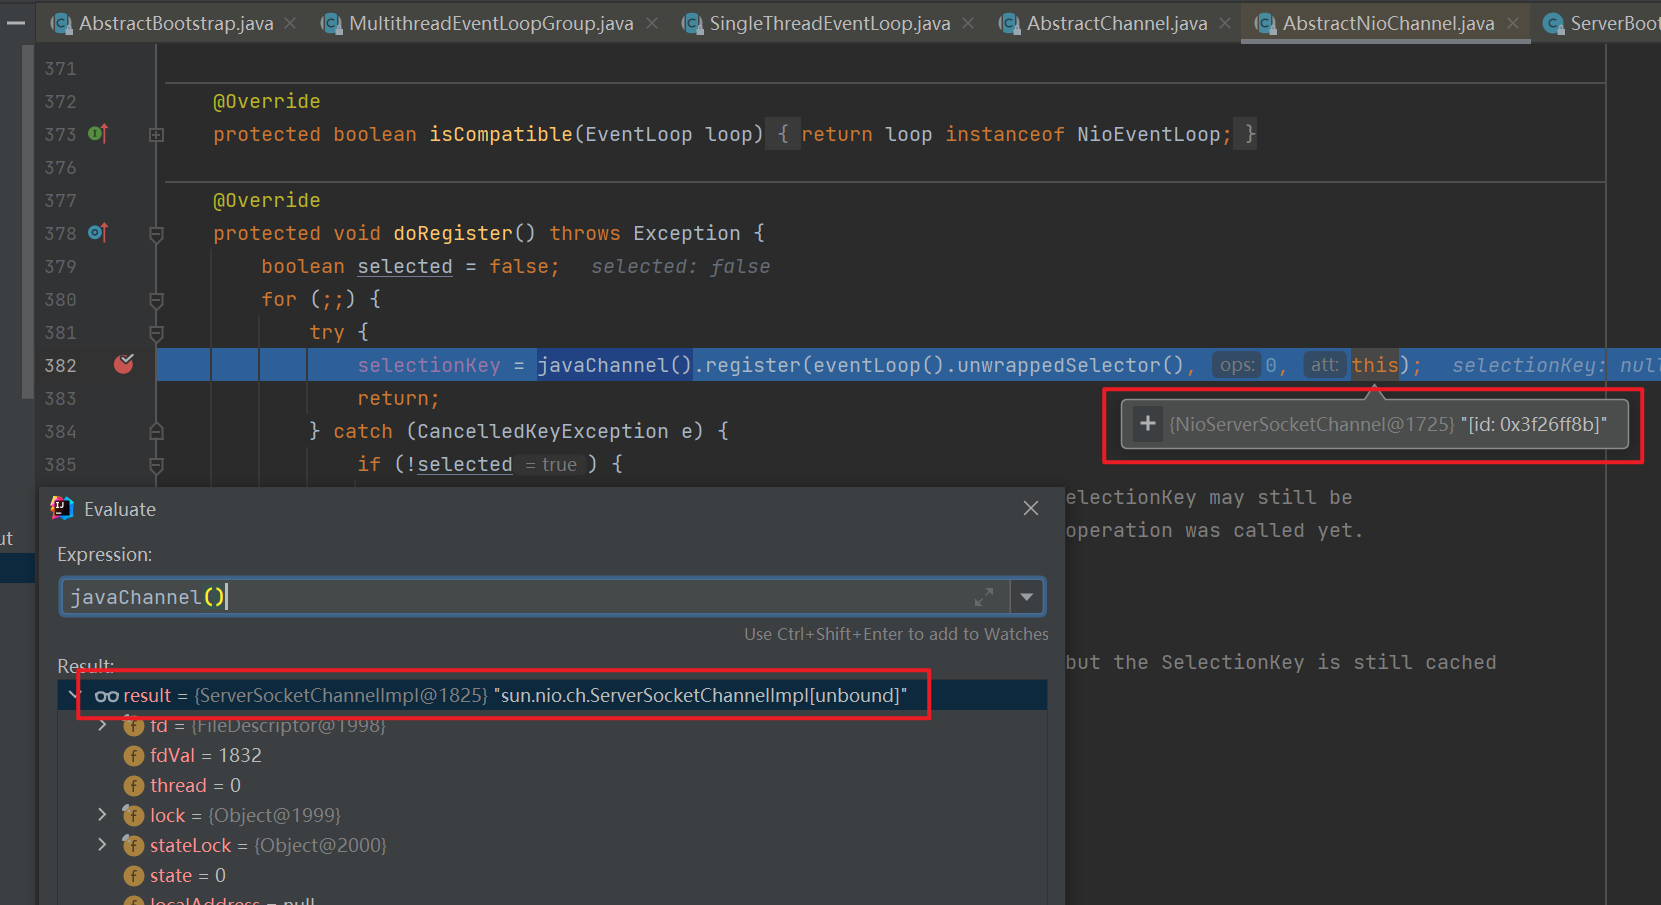
}进入register0(promise)方法后会发现一个核心方法doRegister(),作用是将原生的ServerSocketChannel绑定到selector上,没有注册selector关注事件,附件为NioServerSocketChannel,即当selector上发生事件时会交由附件NioServerSocketChannel来处理。
![]()
1
2
3
4
5
6
7
8
9
10
11
12
13
14
15
16
17
18
19
20
21
22
23
24
25
26
27
28
29
30
31
32
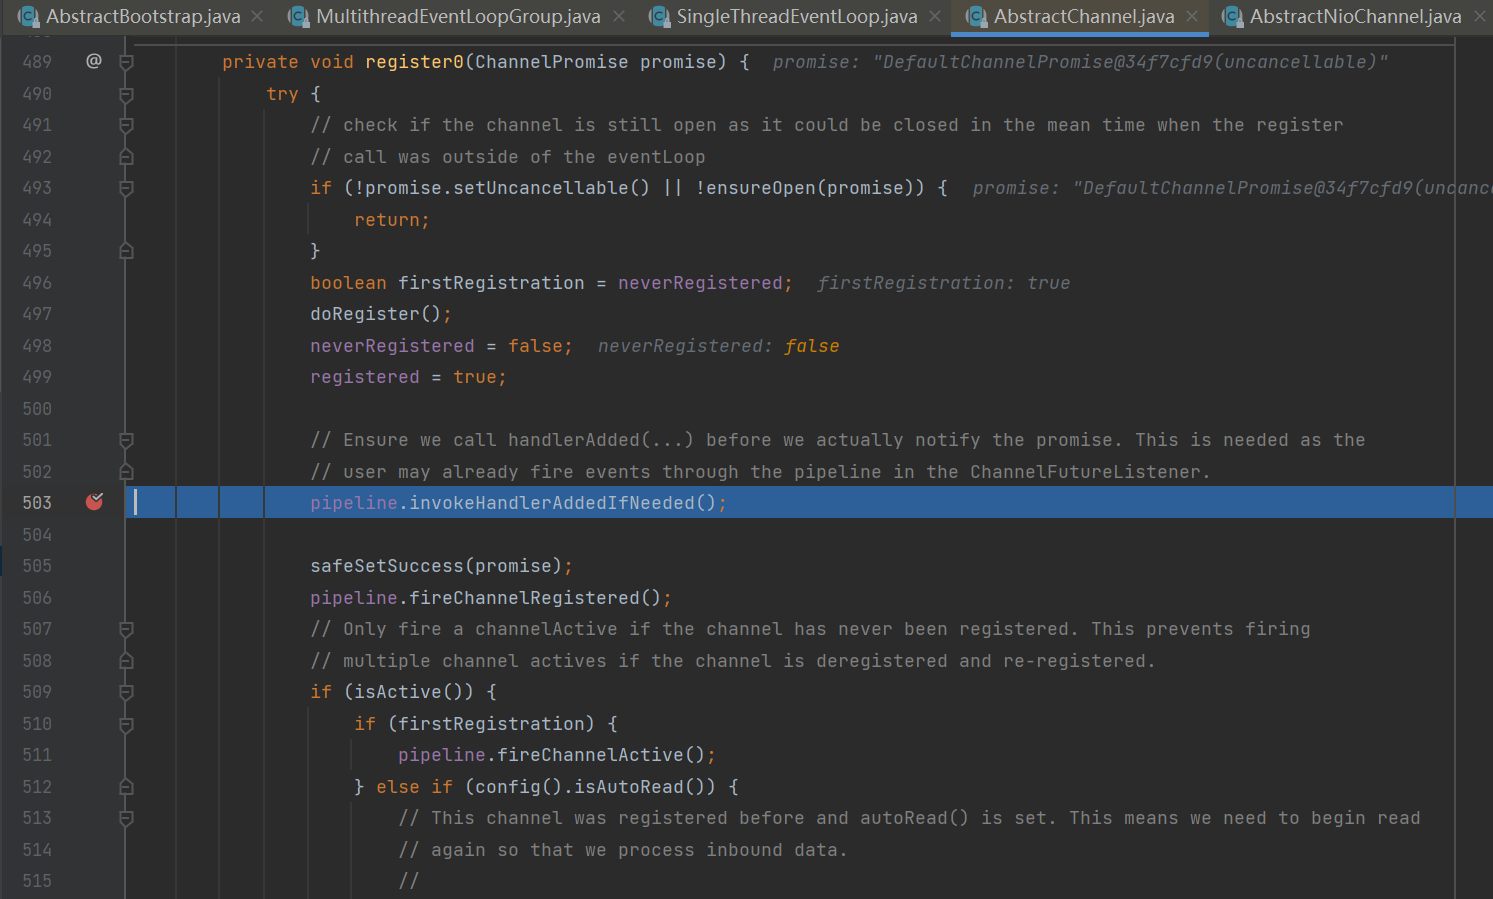
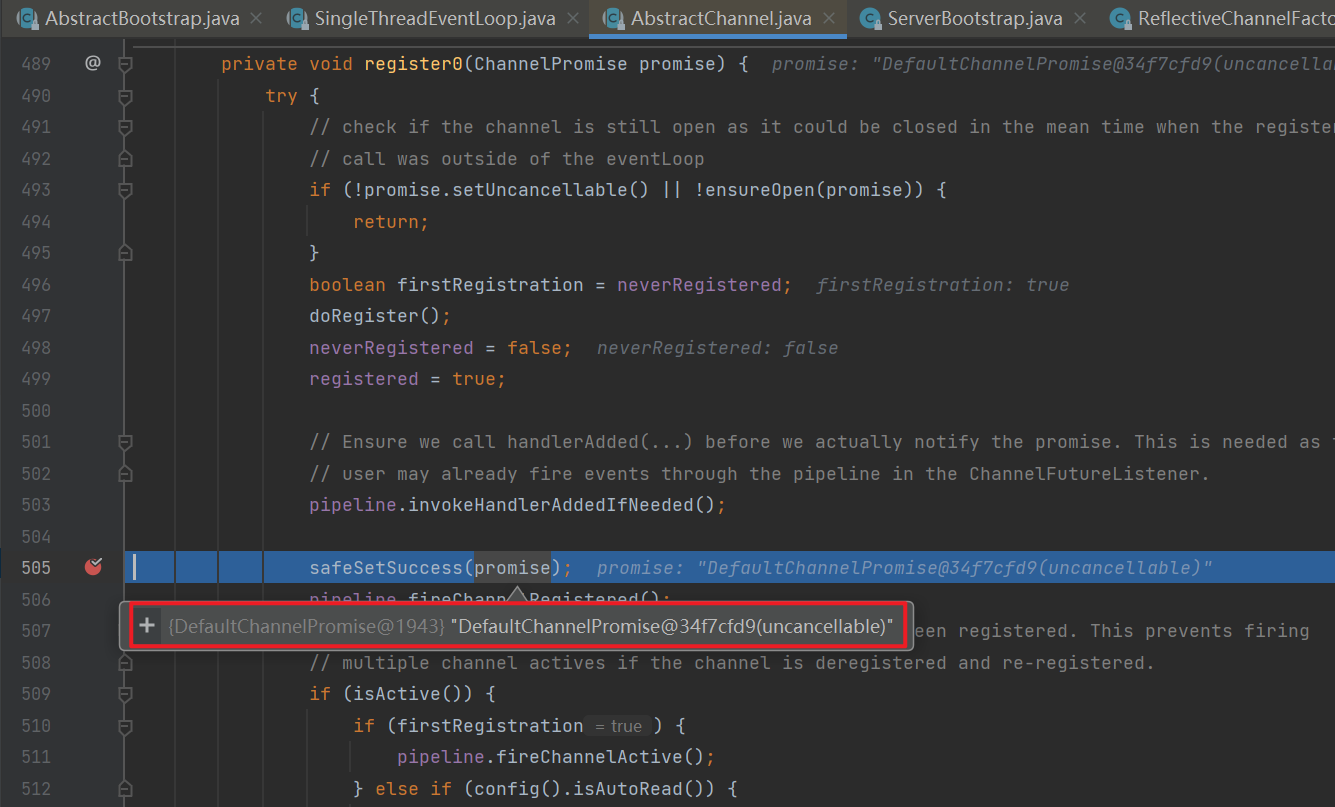
33private void register0(ChannelPromise promise) {
try {
if (!promise.setUncancellable() || !ensureOpen(promise)) {
return;
}
boolean firstRegistration = neverRegistered;
// 1.2.1 原生的 nio channel 绑定到 selector 上,注意此时没有注册 selector 关注事件,附件为 NioServerSocketChannel
doRegister();
neverRegistered = false;
registered = true;
// 1.2.2 执行 NioServerSocketChannel 初始化器的 initChannel
pipeline.invokeHandlerAddedIfNeeded();
// 回调 3.2 io.netty.bootstrap.AbstractBootstrap#doBind0
safeSetSuccess(promise);
pipeline.fireChannelRegistered();
// 对应 server socket channel 还未绑定,isActive 为 false
if (isActive()) {
if (firstRegistration) {
pipeline.fireChannelActive();
} else if (config().isAutoRead()) {
beginRead();
}
}
} catch (Throwable t) {
// Close the channel directly to avoid FD leak.
closeForcibly();
closeFuture.setClosed();
safeSetFailure(promise, t);
}
}![]()
紧接着调用pipeline.invokeHandlerAddedIfNeeded()来执行NioServerSocketChannel初始化器的initChannel方法,该初始化方法的目的是在NioServerSocketChannel的流水线中再加一个名为ServerBootstrapAcceptor的handler(作用是在accept事件发生后建立连接)。注意它是通过NioServerSocketChannel.eventLoop().execute方法将加入新的handler的行为交给与该Channel绑定的线程去执行。
![]()
![]()
接下来调用safeSetSuccess(promise)给promise对象设置一个成功的结果后,之前
io.netty.bootstrap.AbstractBootstrap#doBind的回调会被执行,即执行doBind0方法。注意此时的promise对象和doBind方法里的regFuture对象是同一个。![]()
![]()
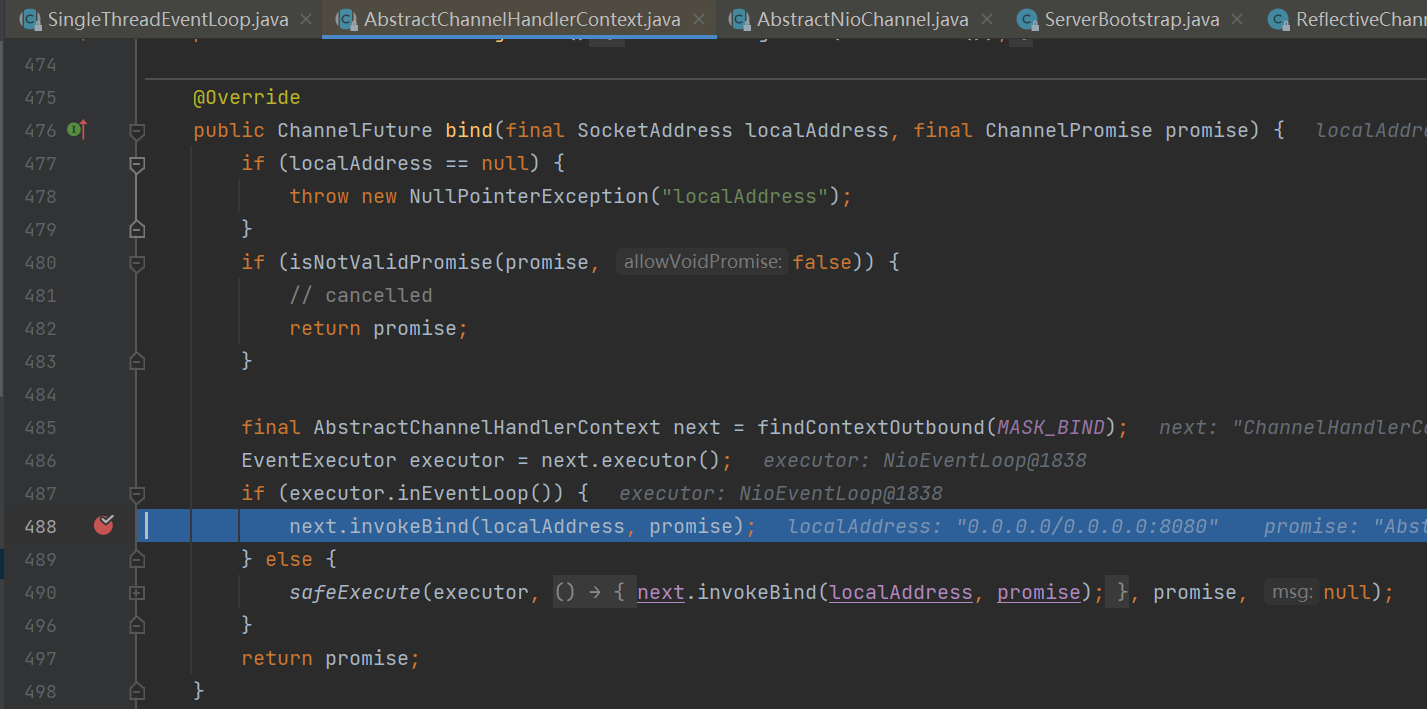
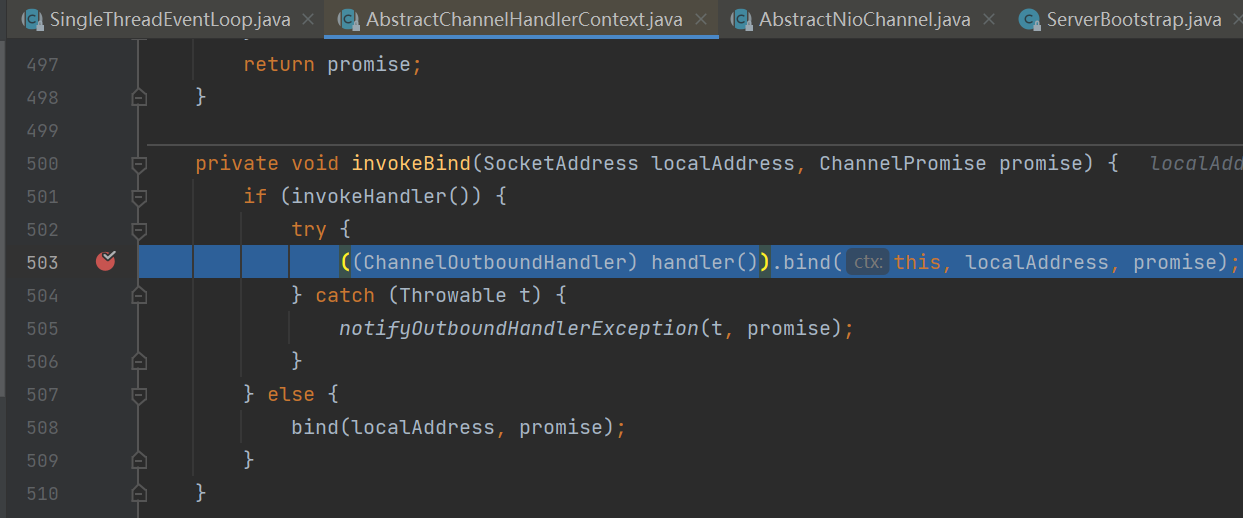
接下来来到
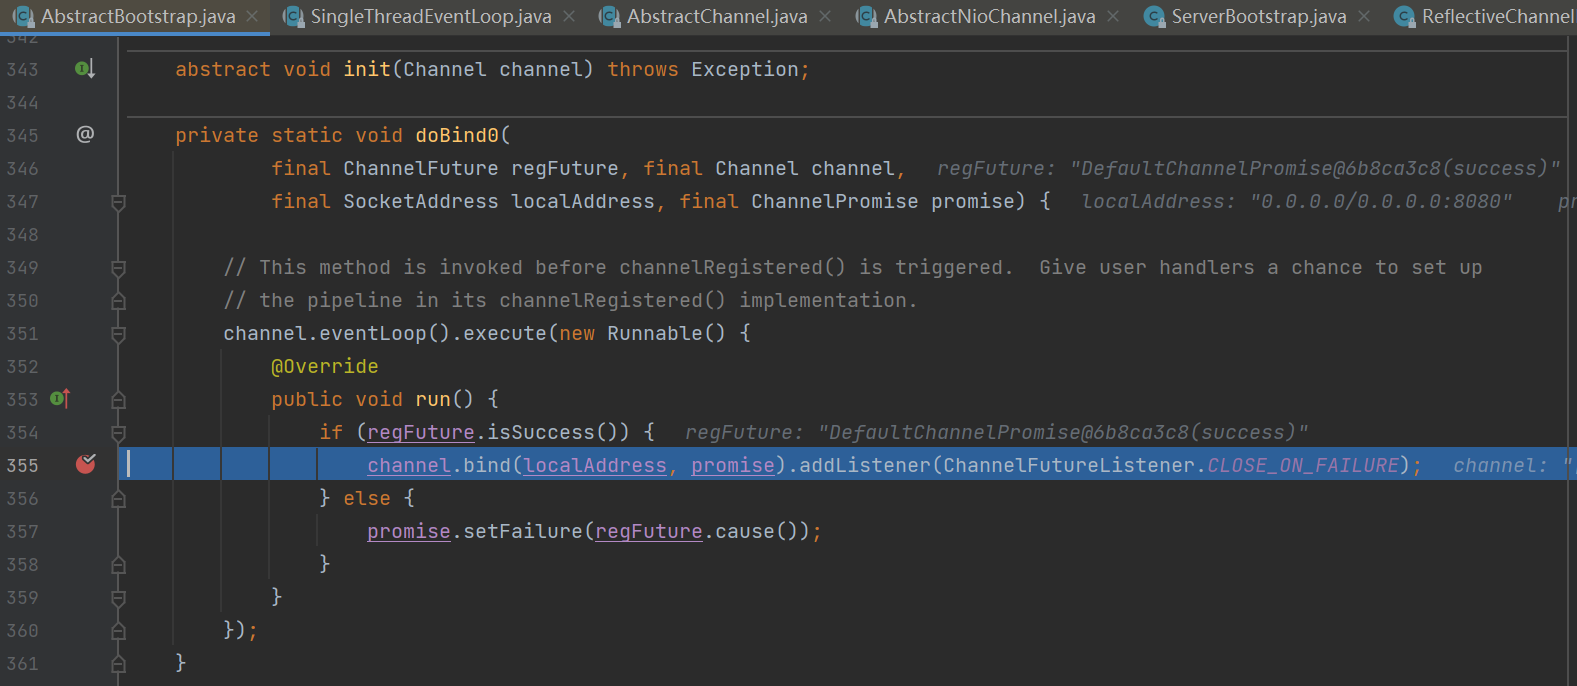
io.netty.bootstrap.AbstractBootstrap#doBind0。沿着调用链往下找关键代码,最终来到io.netty.channel.AbstractChannel.AbstractUnsafe#bind。![]()
1
2
3
4
5
6
7
8
9
10
11
12
13
14
15
16// 3.1 或 3.2 执行 doBind0
private static void doBind0(
final ChannelFuture regFuture, final Channel channel,
final SocketAddress localAddress, final ChannelPromise promise) {
channel.eventLoop().execute(new Runnable() {
public void run() {
if (regFuture.isSuccess()) {
channel.bind(localAddress, promise).addListener(ChannelFutureListener.CLOSE_ON_FAILURE);
} else {
promise.setFailure(regFuture.cause());
}
}
});
}![]()
![]()
![]()
![]()
![]()
![]()
1
2
3
4
5
6
7
8
9
10
11
12
13
14
15
16
17
18
19
20
21
22
23
24
25
26
27
28
29
30
31
32
33
34
35
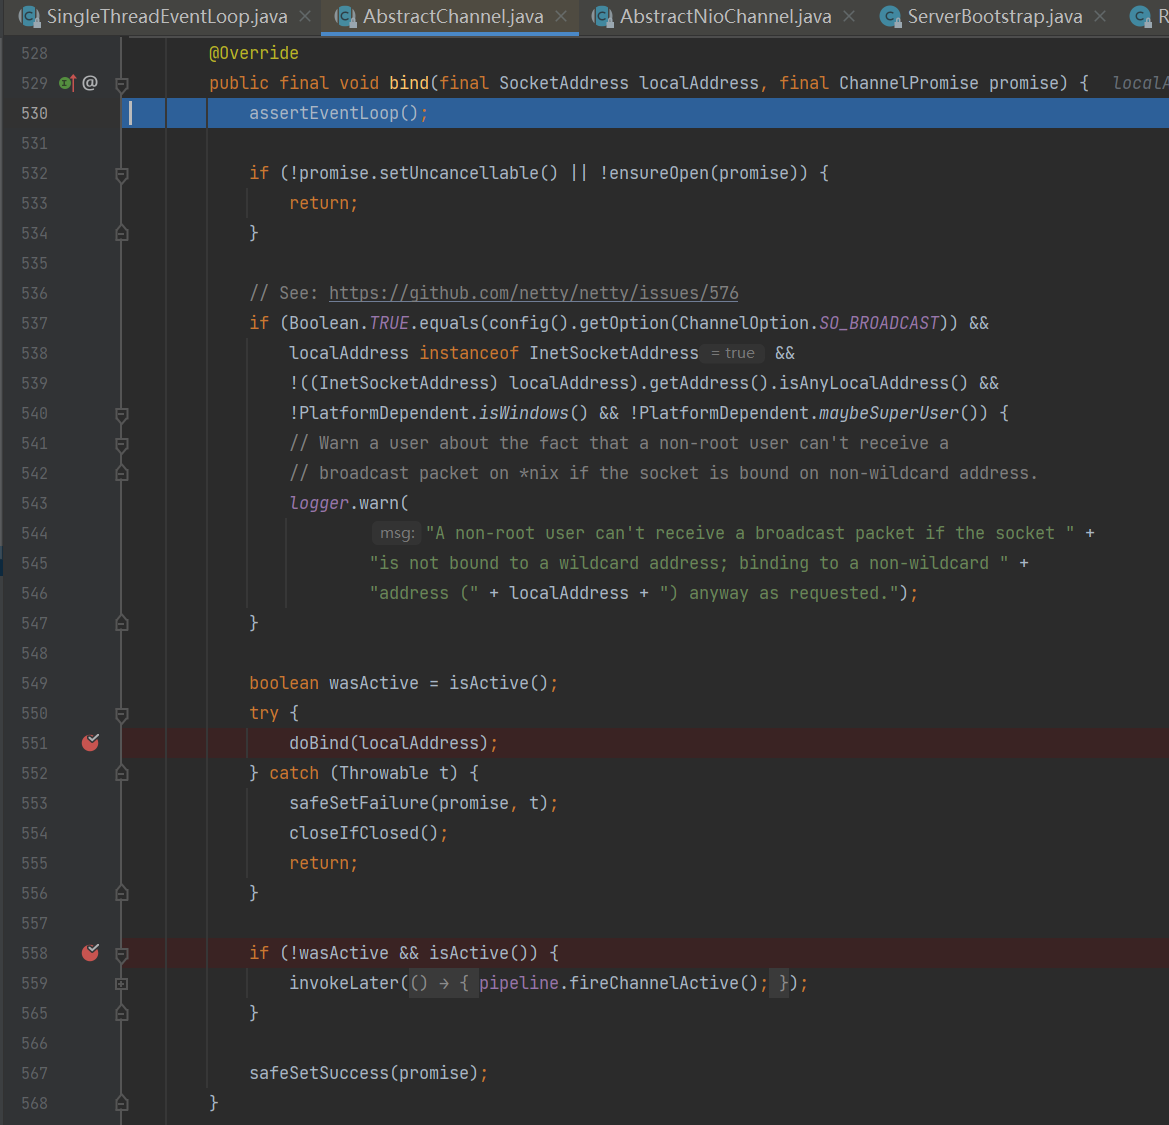
36public final void bind(final SocketAddress localAddress, final ChannelPromise promise) {
assertEventLoop();
if (!promise.setUncancellable() || !ensureOpen(promise)) {
return;
}
if (Boolean.TRUE.equals(config().getOption(ChannelOption.SO_BROADCAST)) &&
localAddress instanceof InetSocketAddress &&
!((InetSocketAddress) localAddress).getAddress().isAnyLocalAddress() &&
!PlatformDependent.isWindows() && !PlatformDependent.maybeSuperUser()) {
// 记录日志...
}
boolean wasActive = isActive();
try {
// 3.3 执行端口绑定
doBind(localAddress);
} catch (Throwable t) {
safeSetFailure(promise, t);
closeIfClosed();
return;
}
if (!wasActive && isActive()) {
invokeLater(new Runnable() {
public void run() {
// 3.4 触发 active 事件
pipeline.fireChannelActive();
}
});
}
safeSetSuccess(promise);
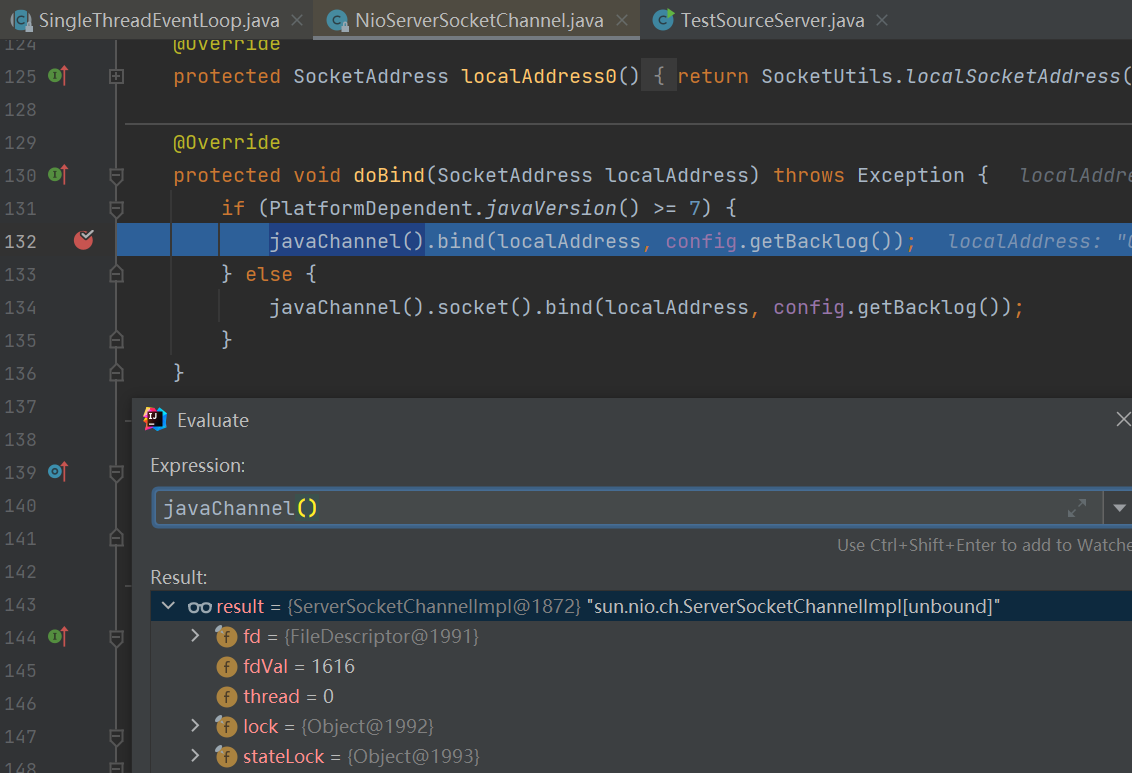
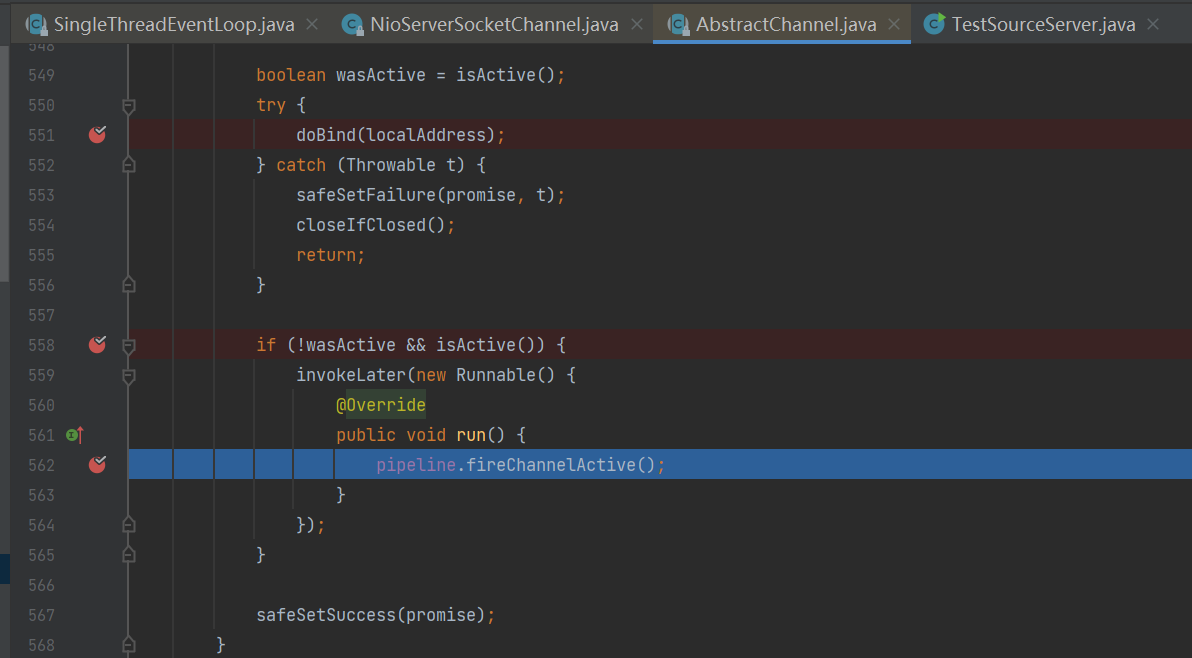
}首先执行
io.netty.channel.socket.nio.NioServerSocketChannel#doBind。这个方法完成了ServerSocketChannel与端口号的绑定,即ssc.bind(new InetSocketAddress(8080, backlog))。![]()
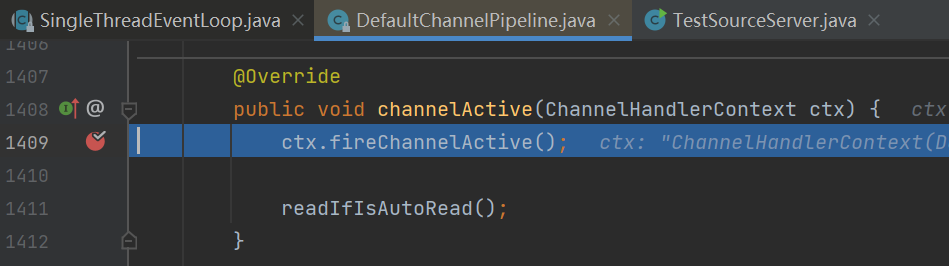
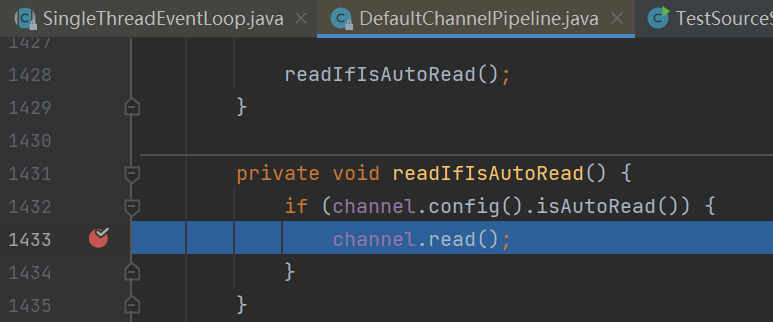
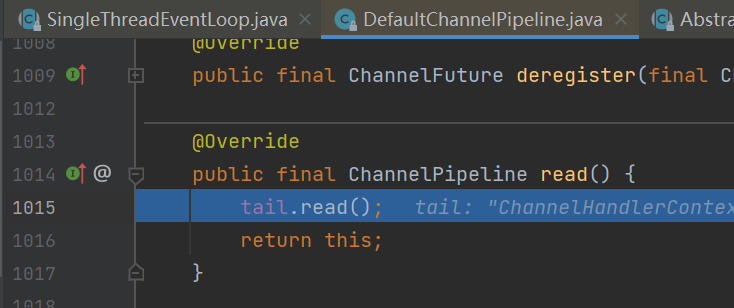
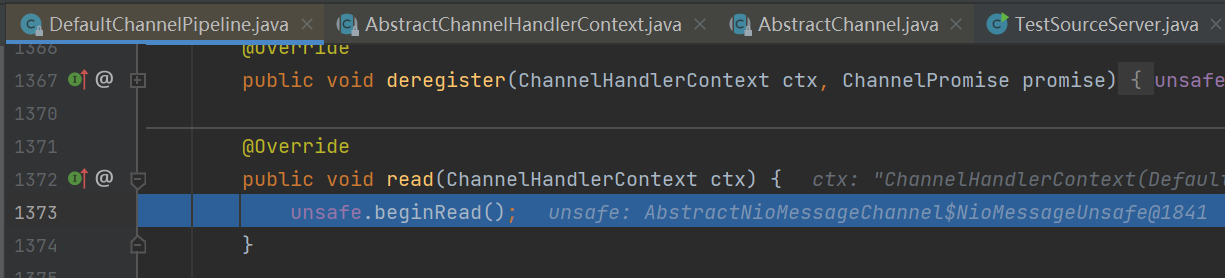
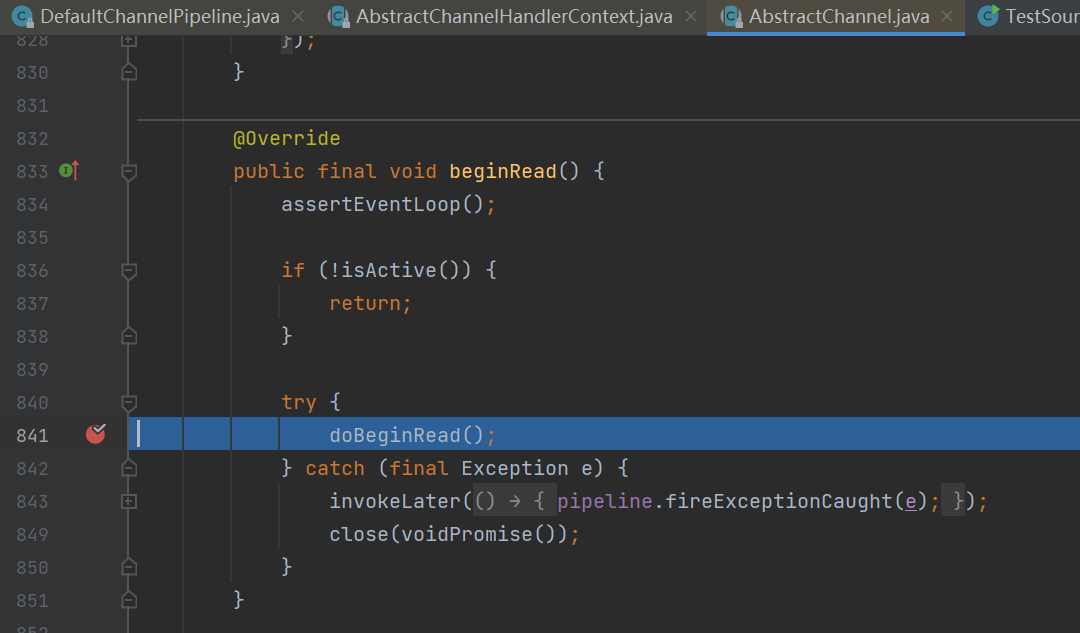
此时ServerSocketChannel已经可用了,将会触发这个Channel流水线上所有handler的channelActive()方法的执行。主要工作是在头部handler的fireChannelActive()方法即
io.netty.channel.DefaultChannelPipeline.HeadContext#channelActive中执行,其最终目的是在ServerSocketChannel的selectionKey上关注accept事件,相当于selectionKey.interestOps(SelectionKey.OP_ACCEPT)。![]()
![]()
1
2
3
4
5public void channelActive(ChannelHandlerContext ctx) {
ctx.fireChannelActive();
// 触发 read (NioServerSocketChannel 上的 read 不是读取数据,只是为了触发 channel 的事件注册)
readIfIsAutoRead();
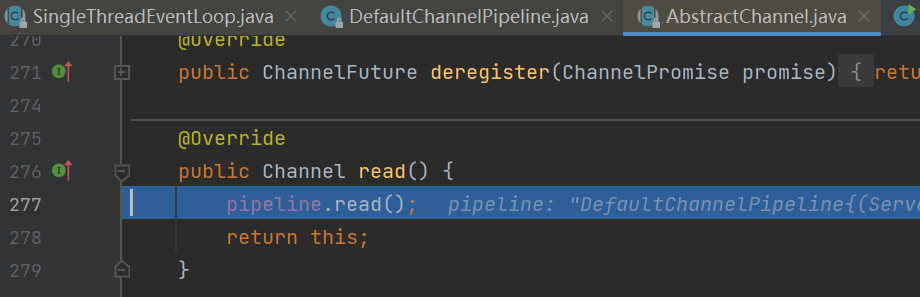
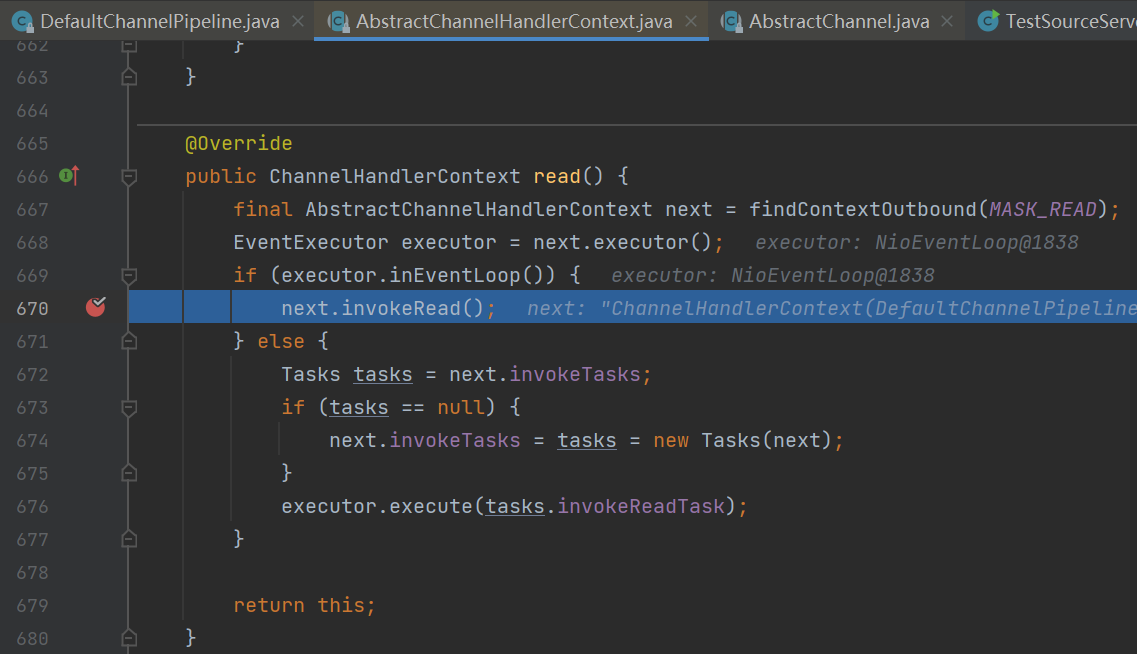
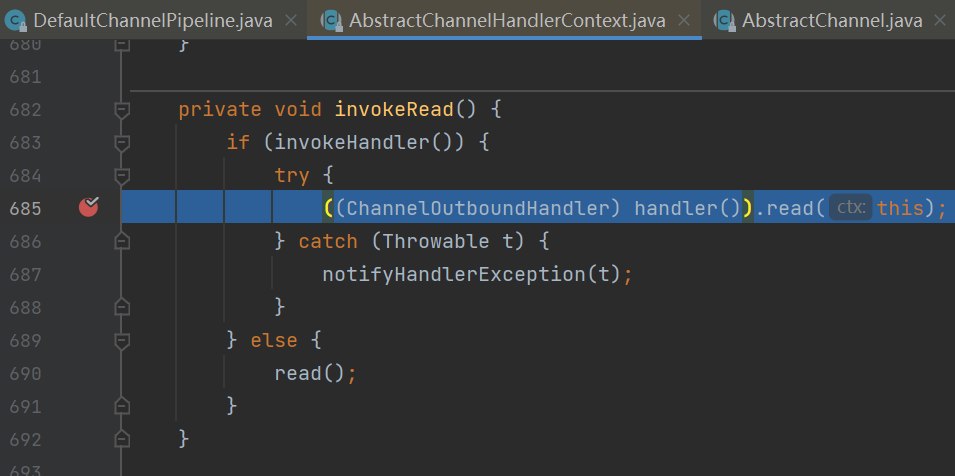
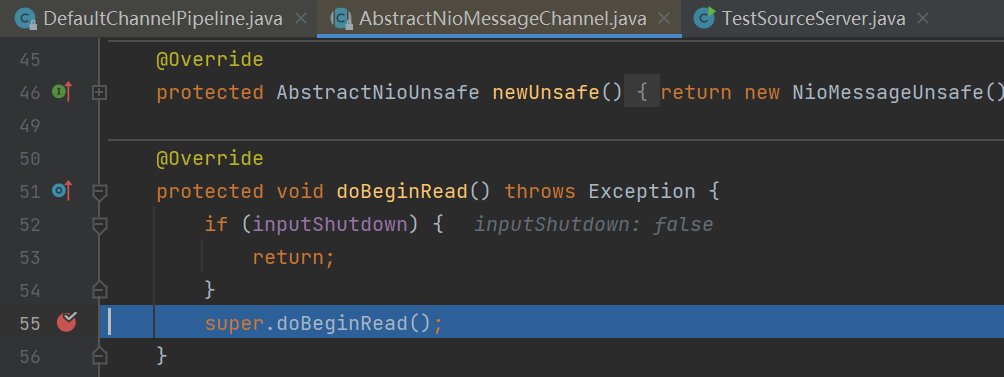
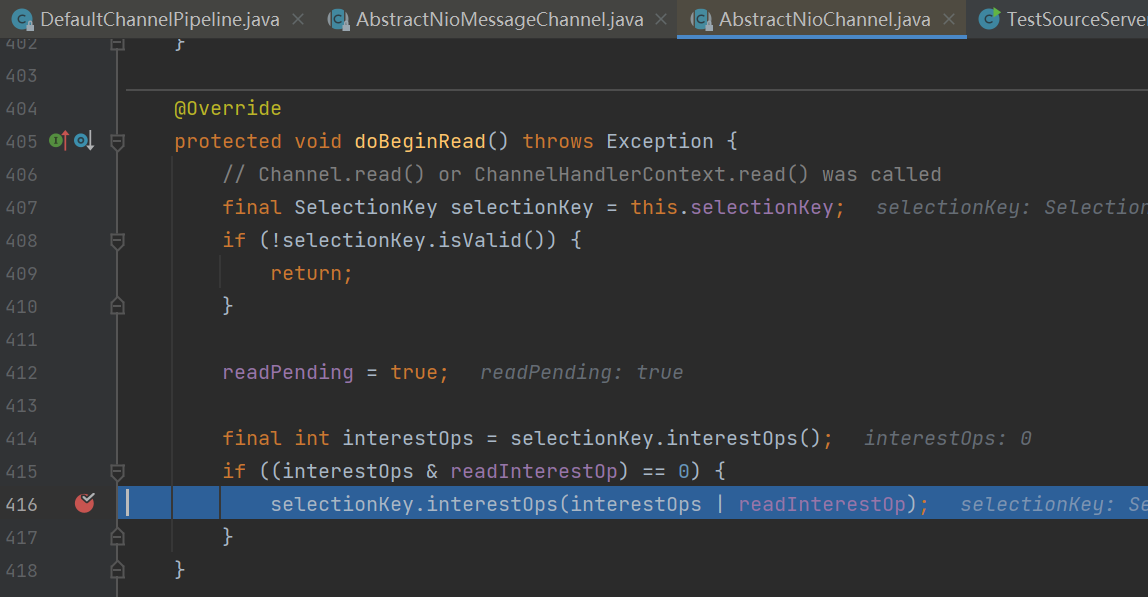
}沿着调用链来到
io.netty.channel.nio.AbstractNioChannel#doBeginRead。![]()
![]()
![]()
![]()
![]()
![]()
![]()
![]()
![]()
1
2
3
4
5
6
7
8
9
10
11
12
13
14
15protected void doBeginRead() throws Exception {
// Channel.read() or ChannelHandlerContext.read() was called
final SelectionKey selectionKey = this.selectionKey;
if (!selectionKey.isValid()) {
return;
}
readPending = true;
final int interestOps = selectionKey.interestOps();
// readInterestOp 取值是 16,在 NioServerSocketChannel 创建时初始化好,代表关注 accept 事件
if ((interestOps & readInterestOp) == 0) {
selectionKey.interestOps(interestOps | readInterestOp);
}
}
经过分析服务器启动完毕,总结:
![1653793179338]()


2.2 NioEventLoop剖析
2.2.1 重要组成部分
NioEventLoop既会处理IO事件,也会处理普通任务和定时任务,其重要组成部分如下:
Selector。
![]()
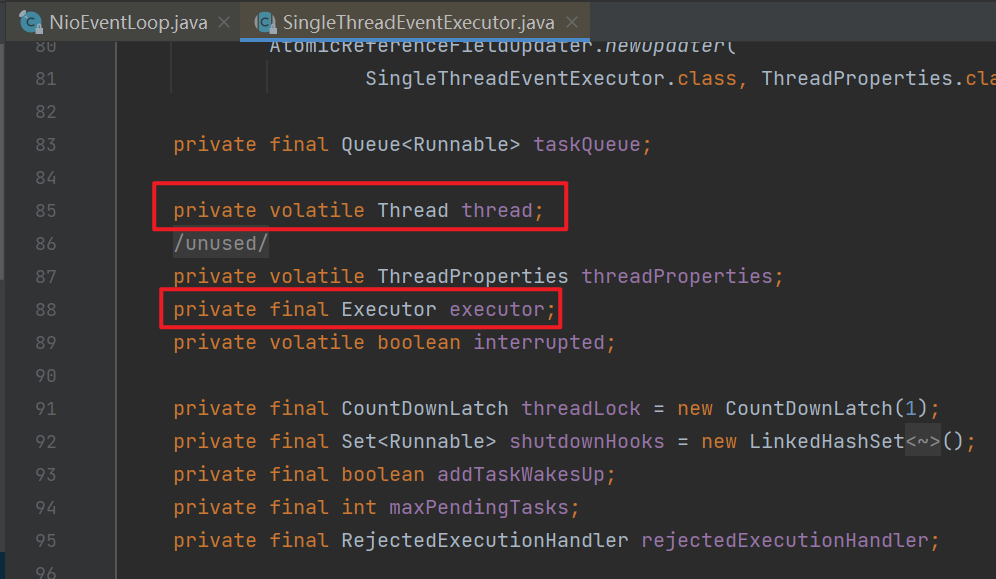
线程(在NioEventLoop的祖父类SingleThreadEventExecutor中)。
![]()
- 一个NioEventLoop只有一个Thread。
- 成员变量executor相当于一个单线程线程池,与成员变量thread用的是同一个线程。executor拥有更多功能,包括提交任务,添加定时任务等。
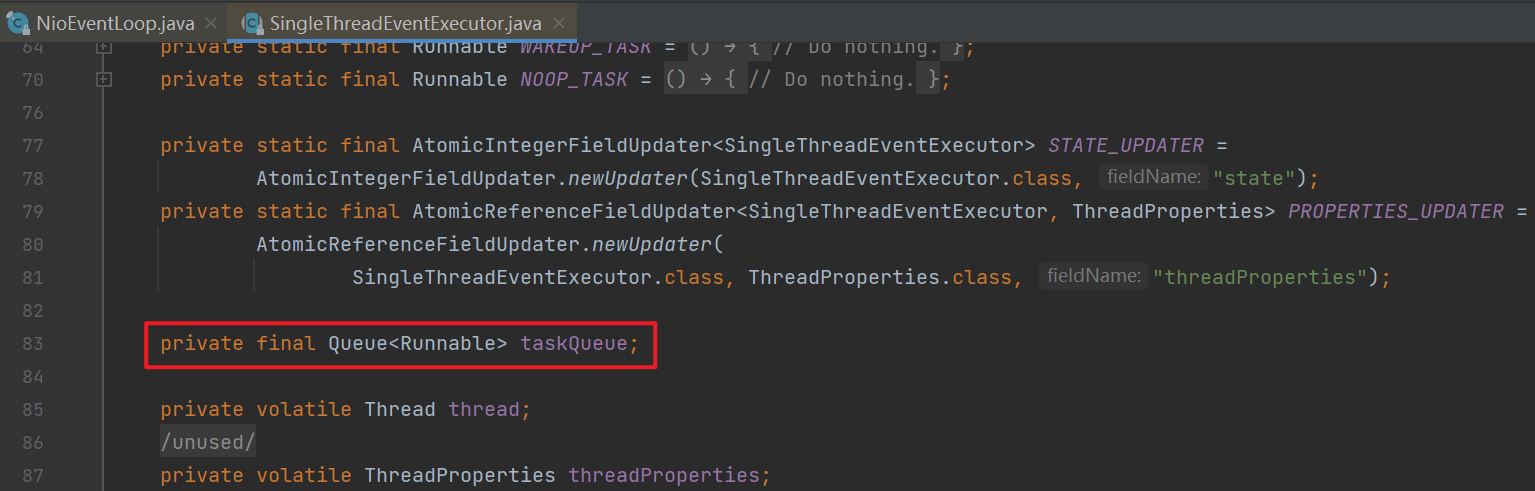
任务队列。
在NioEventLoop的祖父类SingleThreadEventExecutor中有一个成员变量taskQueue。由于NioEventLoop中只有一个线程,当向该NioEventLoop提交多个任务时,多出来的暂时无法处理的任务会被放到此任务队列中,后面等这个线程一个个从这个任务队列中取出任务并执行。
![]()
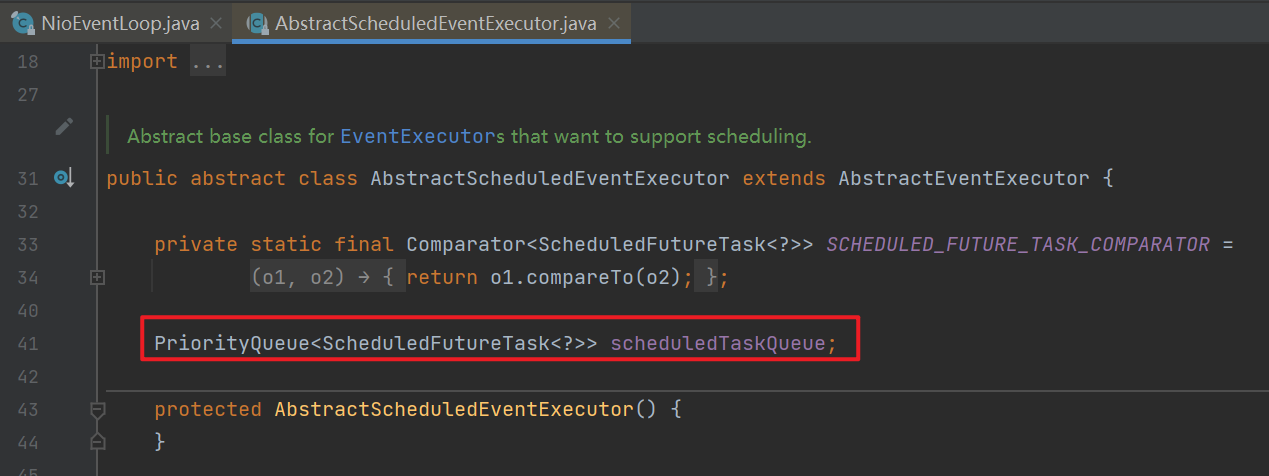
在NioEventLoop的曾祖父类AbstractScheduledEventExecutor中有一个成员变量scheduledTaskQueue,是一个专门用来处理定时任务的任务队列。
![]()
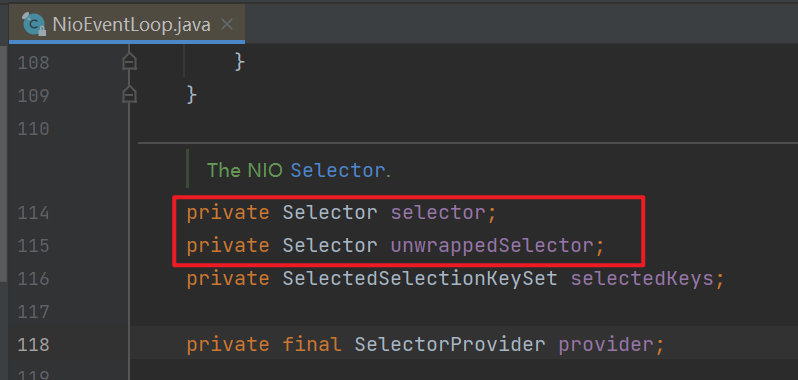
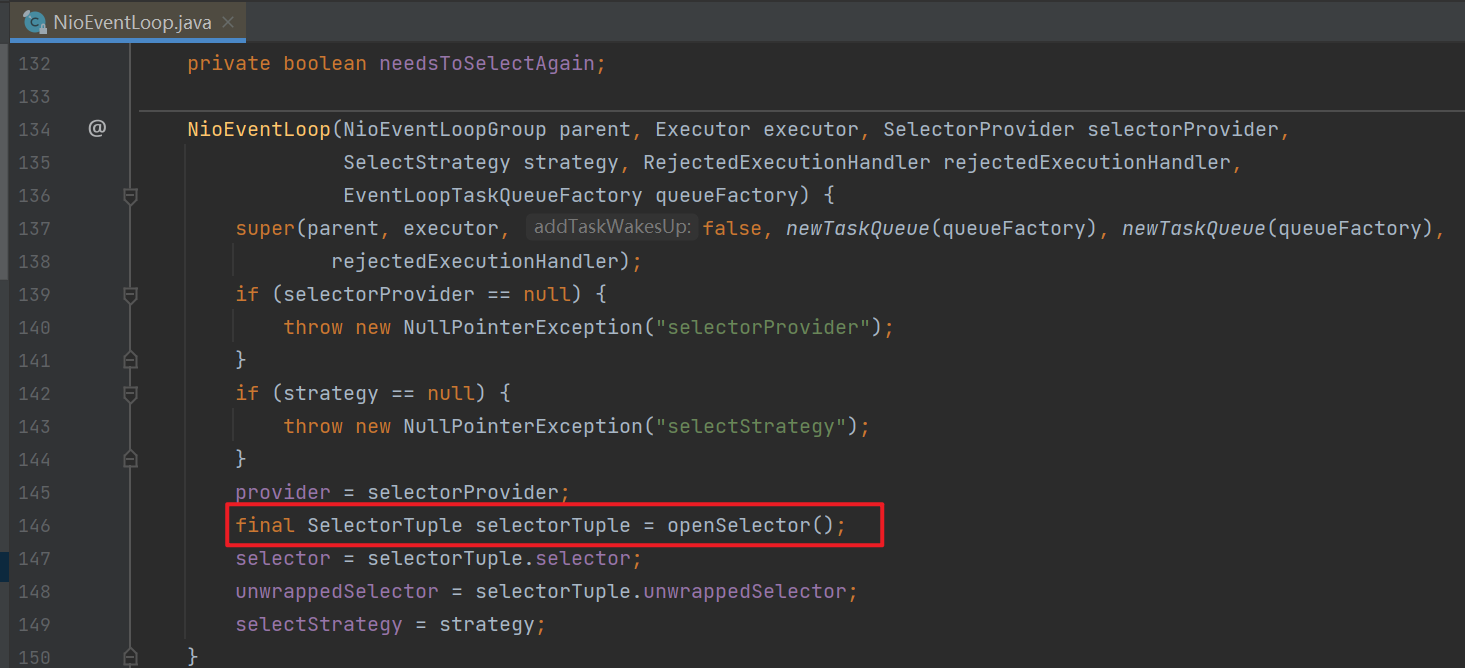
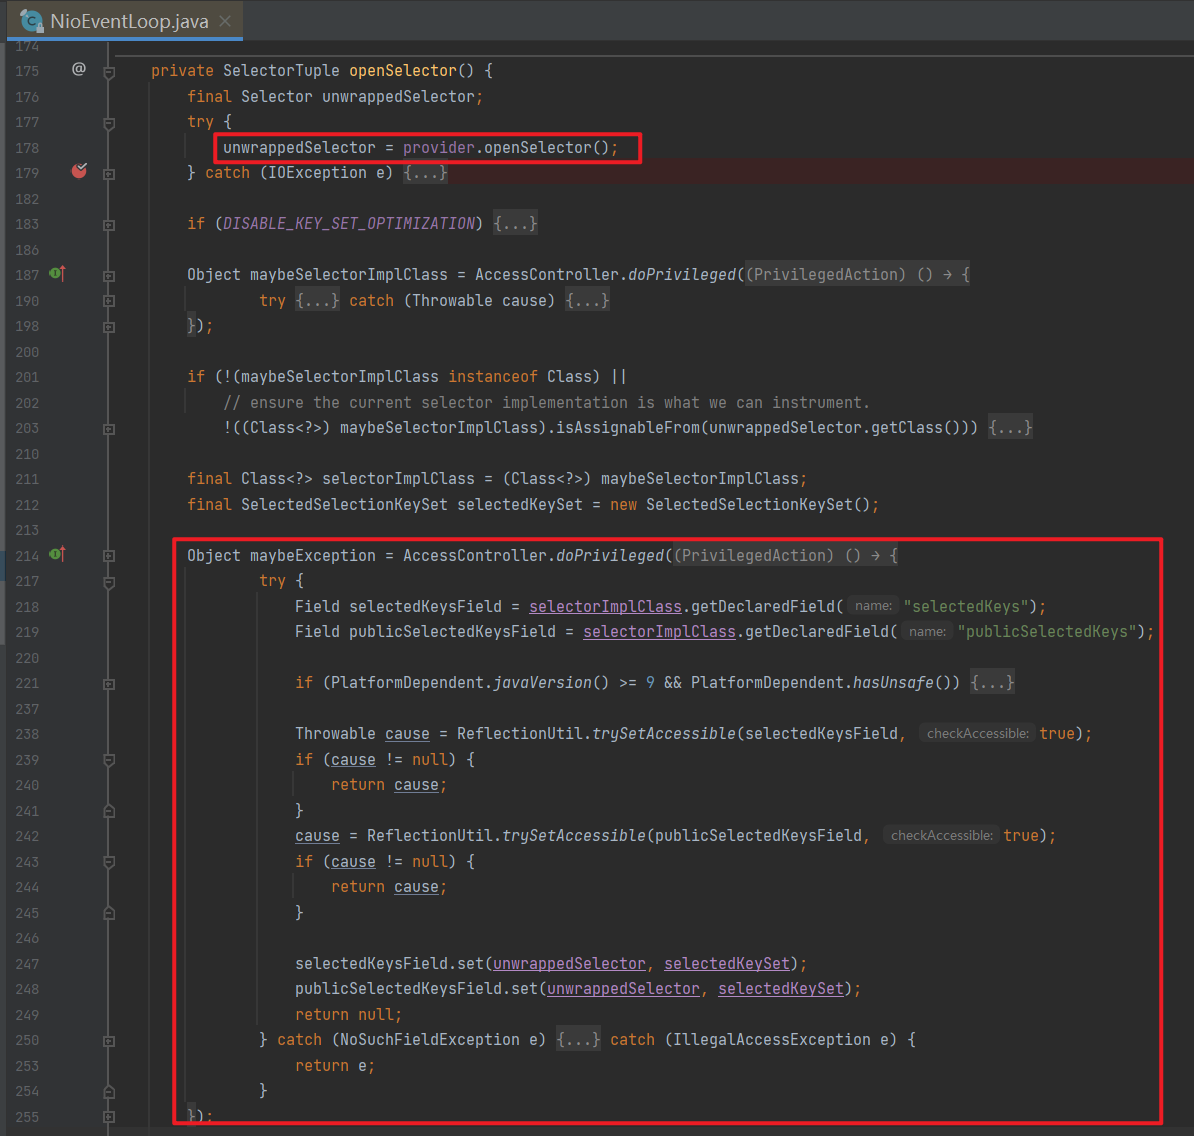
2.2.2 Selector的创建
Selector的创建是在NioEventLoop构造方法中执行的,这里创建了NIO底层的selector赋值给了NioEventLoop的成员变量unwrappedSelector。因为该selector中有一个selectionKeys集合,这个集合的实现默认使用Set,其遍历的性能并不高,于是netty将NIO的这个selectionKeys集合替换成使用数组来存储,从而提交遍历效率。
![]()
首先执行openSelector()方法给成员变量unwrappedSelector赋值。
![]()
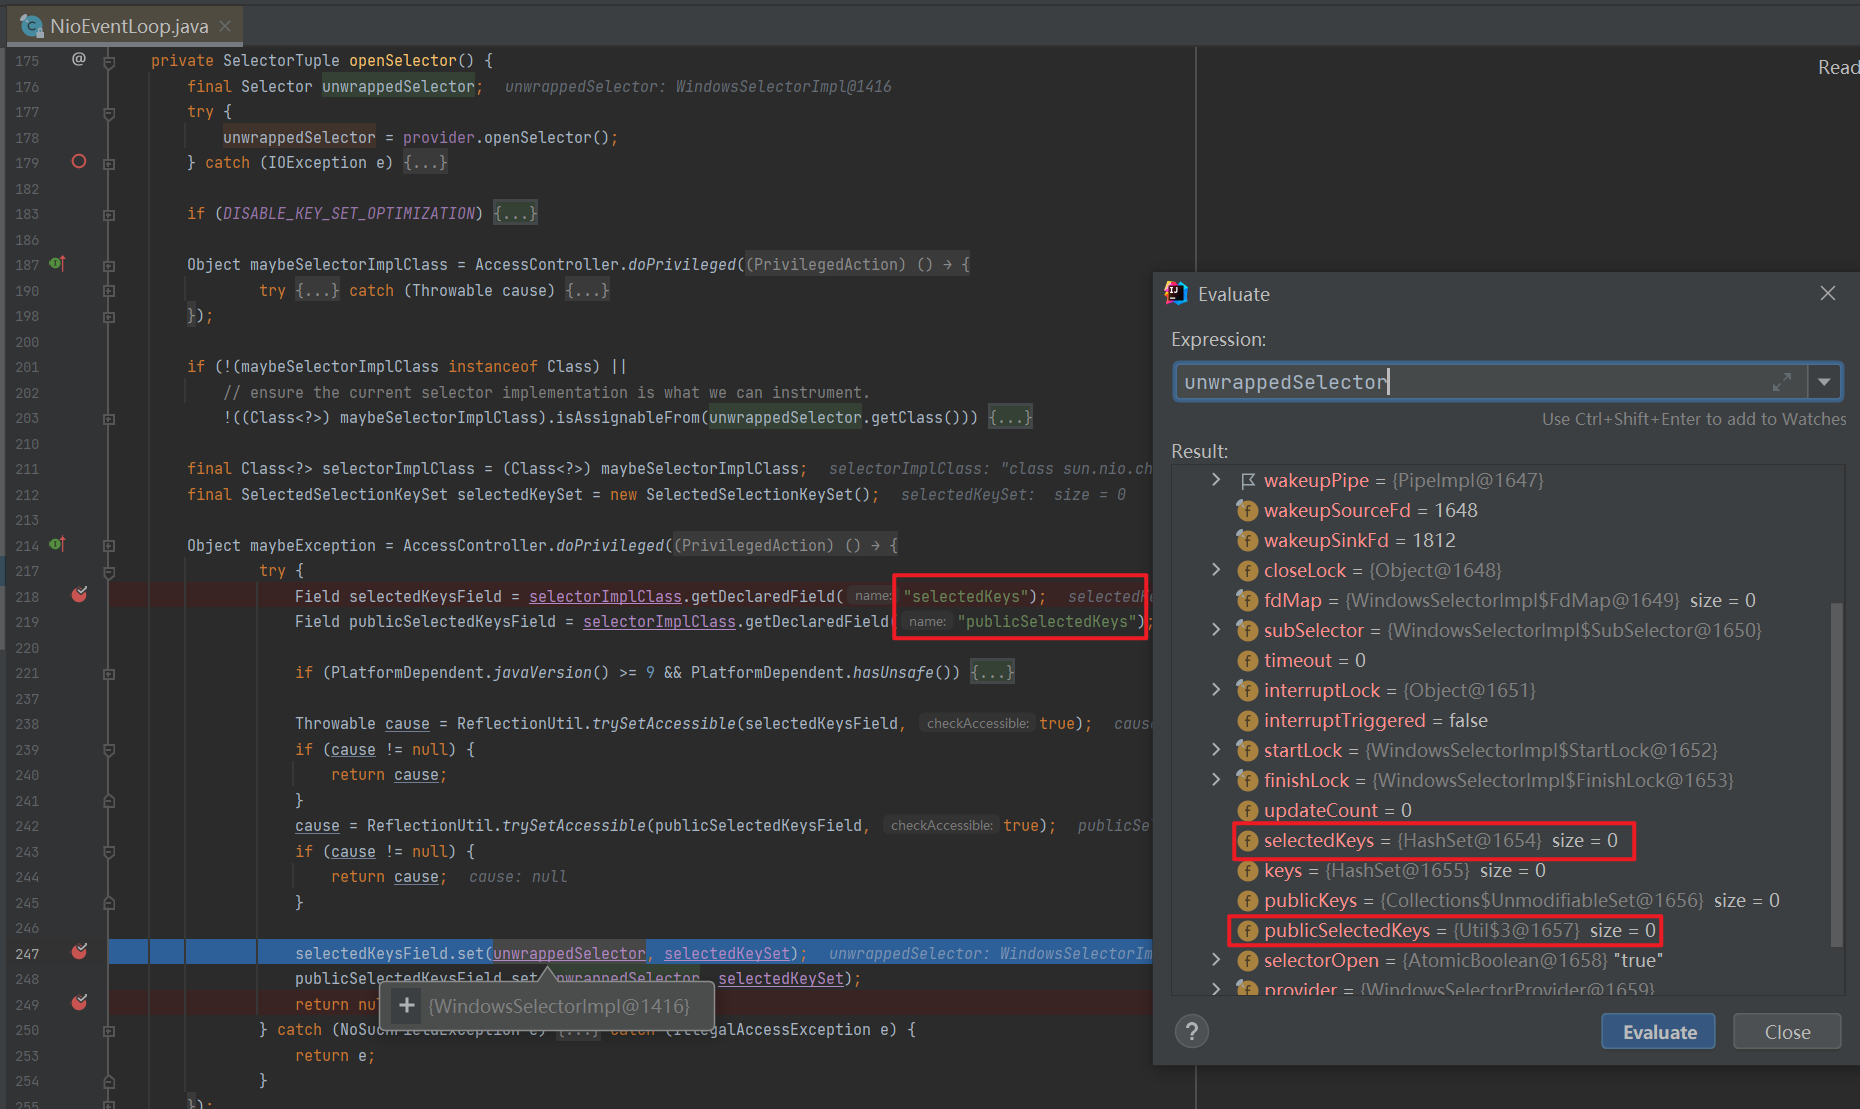
这里把成员变量unwrappedSelector中的selectedKeys以及publicSelectedKeys属性修改成了netty封装好的selectedKeys。
修改前:
![]()
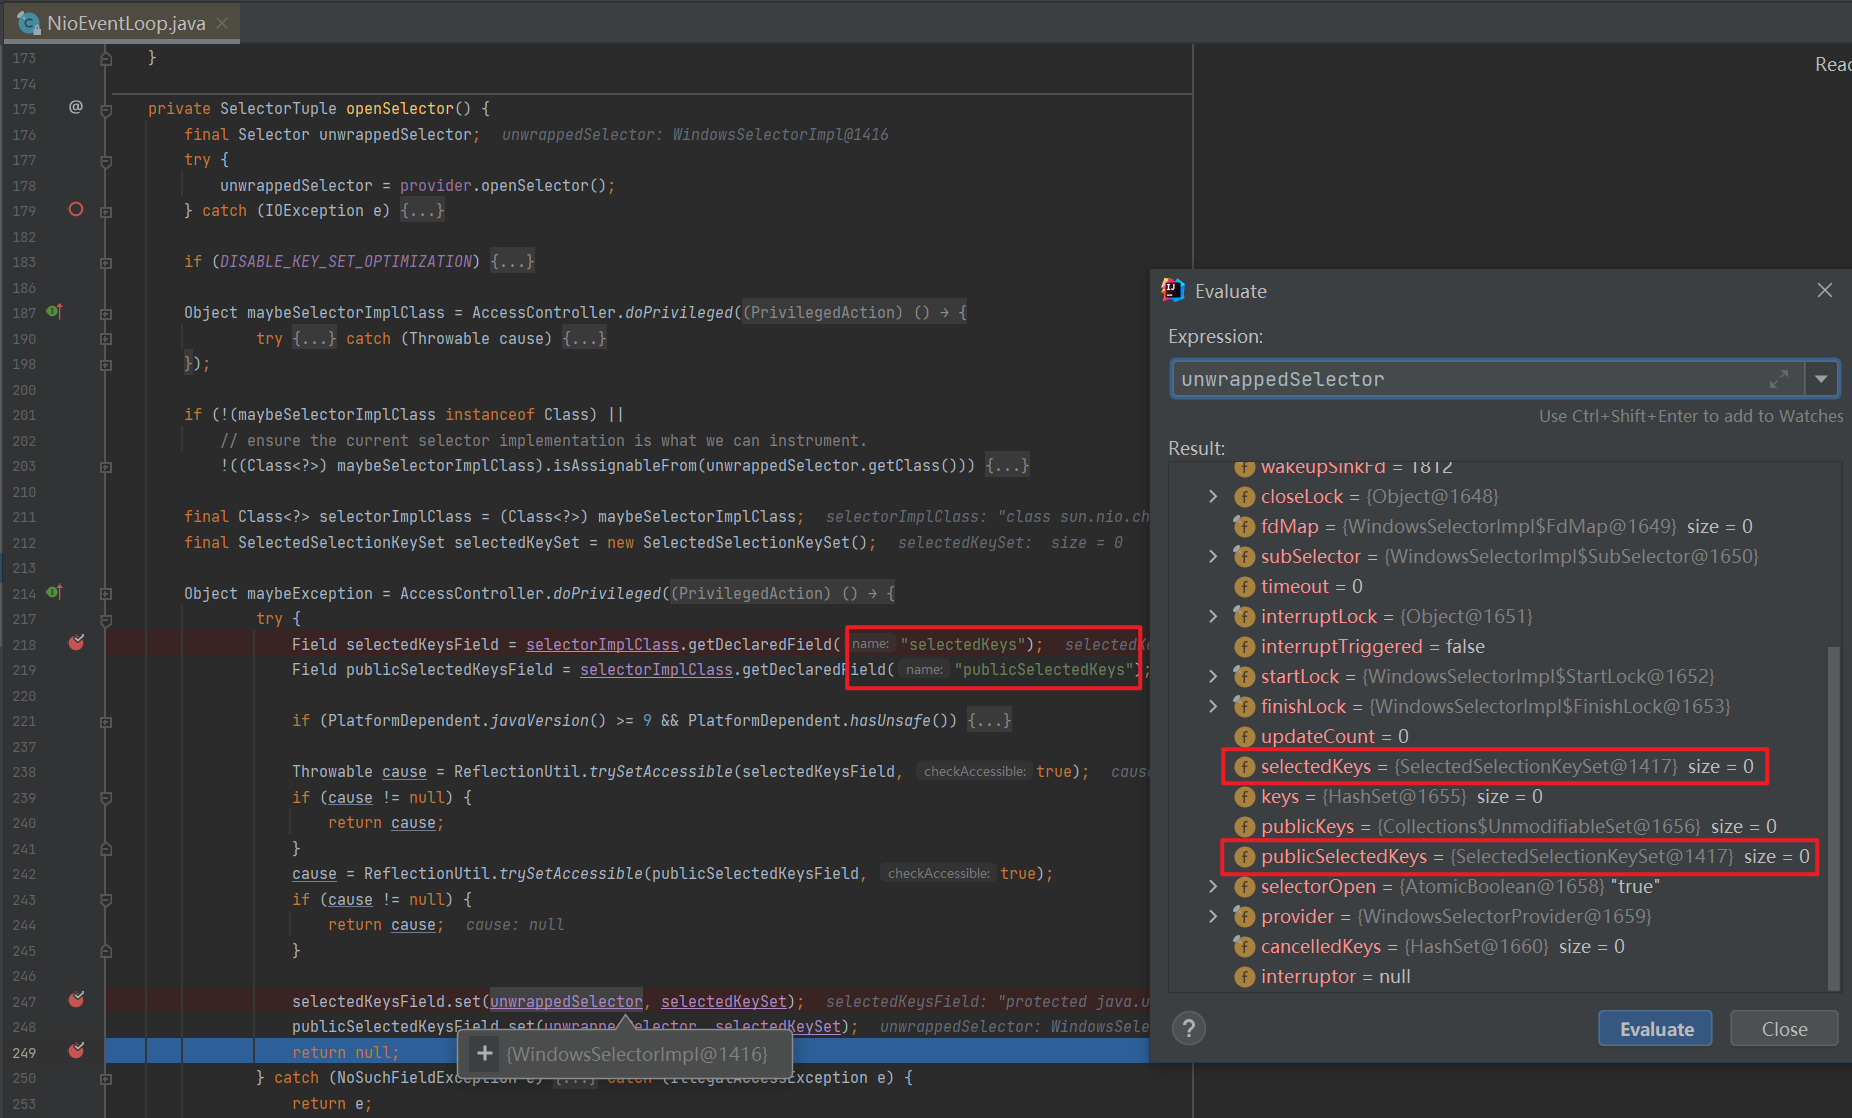
修改后:
![]()
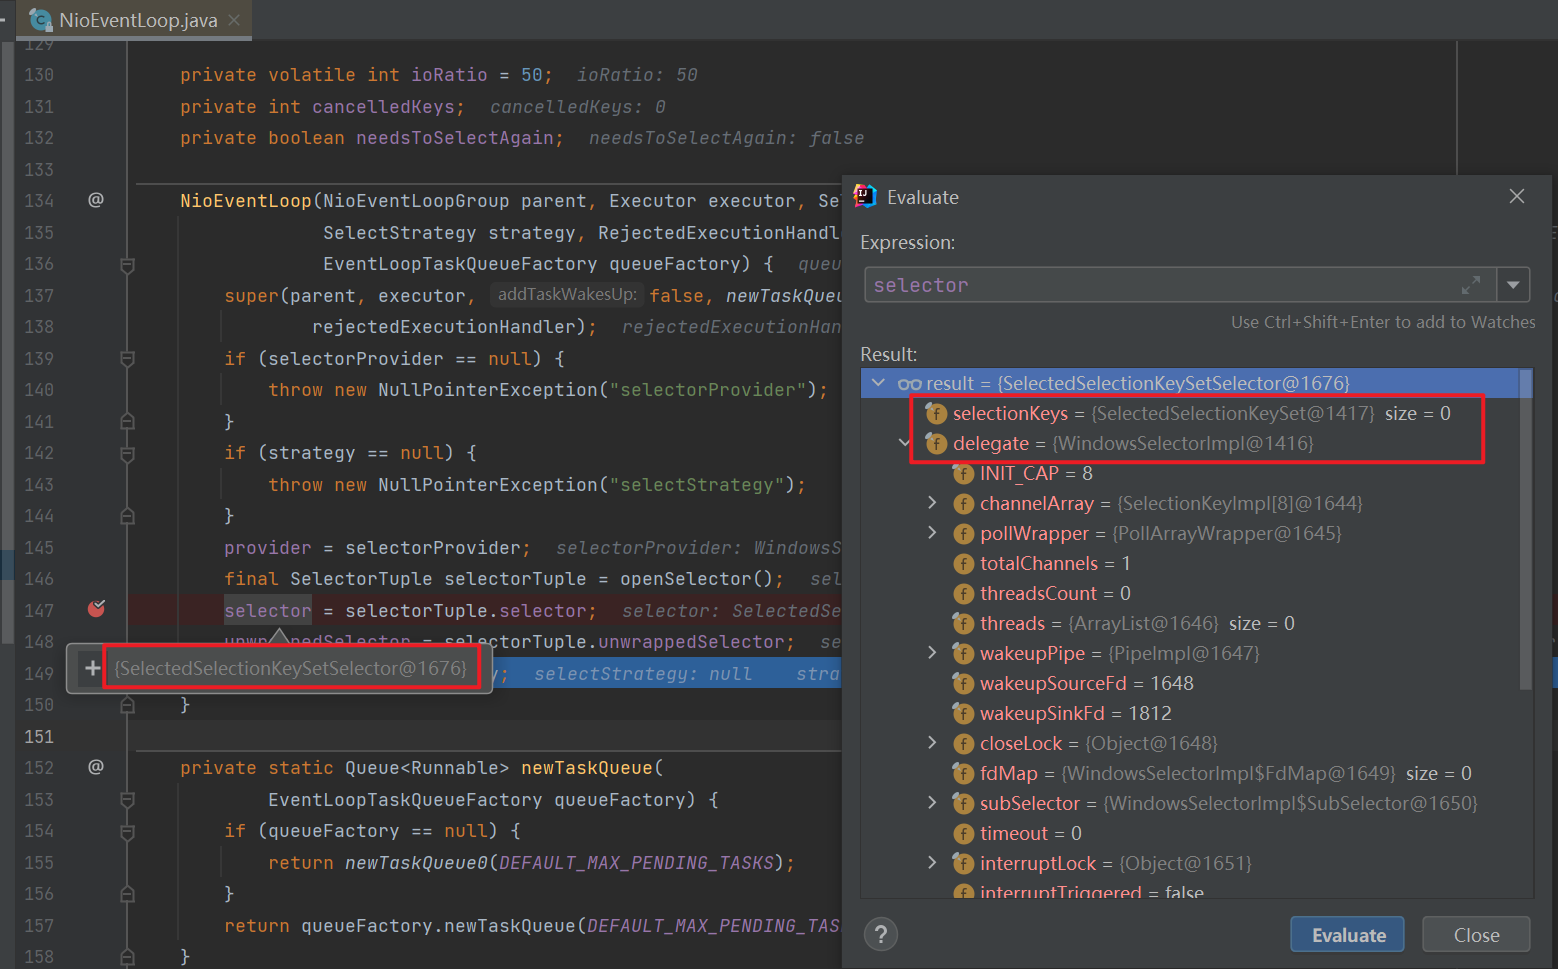
接着给成员变量selector赋值,可以看到其被赋值后的真实类型是SelectedSelectionKeySetSelector,有两个字段一个是Selector,即之前修改后的unwrappedSelector;另一个是netty修改后的selectionKeys集合即SelectedSelectionKeySet。
![]()
2.2.3 线程启动
编写测试代码:
1
2
3
4
5
6
7
8public class TestEventLoop {
public static void main(String[] args) {
EventLoop eventLoop = new NioEventLoopGroup().next();
eventLoop.execute(()->{
System.out.println("hello");
});
}
}在execute方法处打断点并运行程序,在第一次调用execute方法时会创建eventLoop中的线程。
![]()
1
2
3
4
5
6
7
8
9
10
11
12
13
14
15
16
17
18
19
20
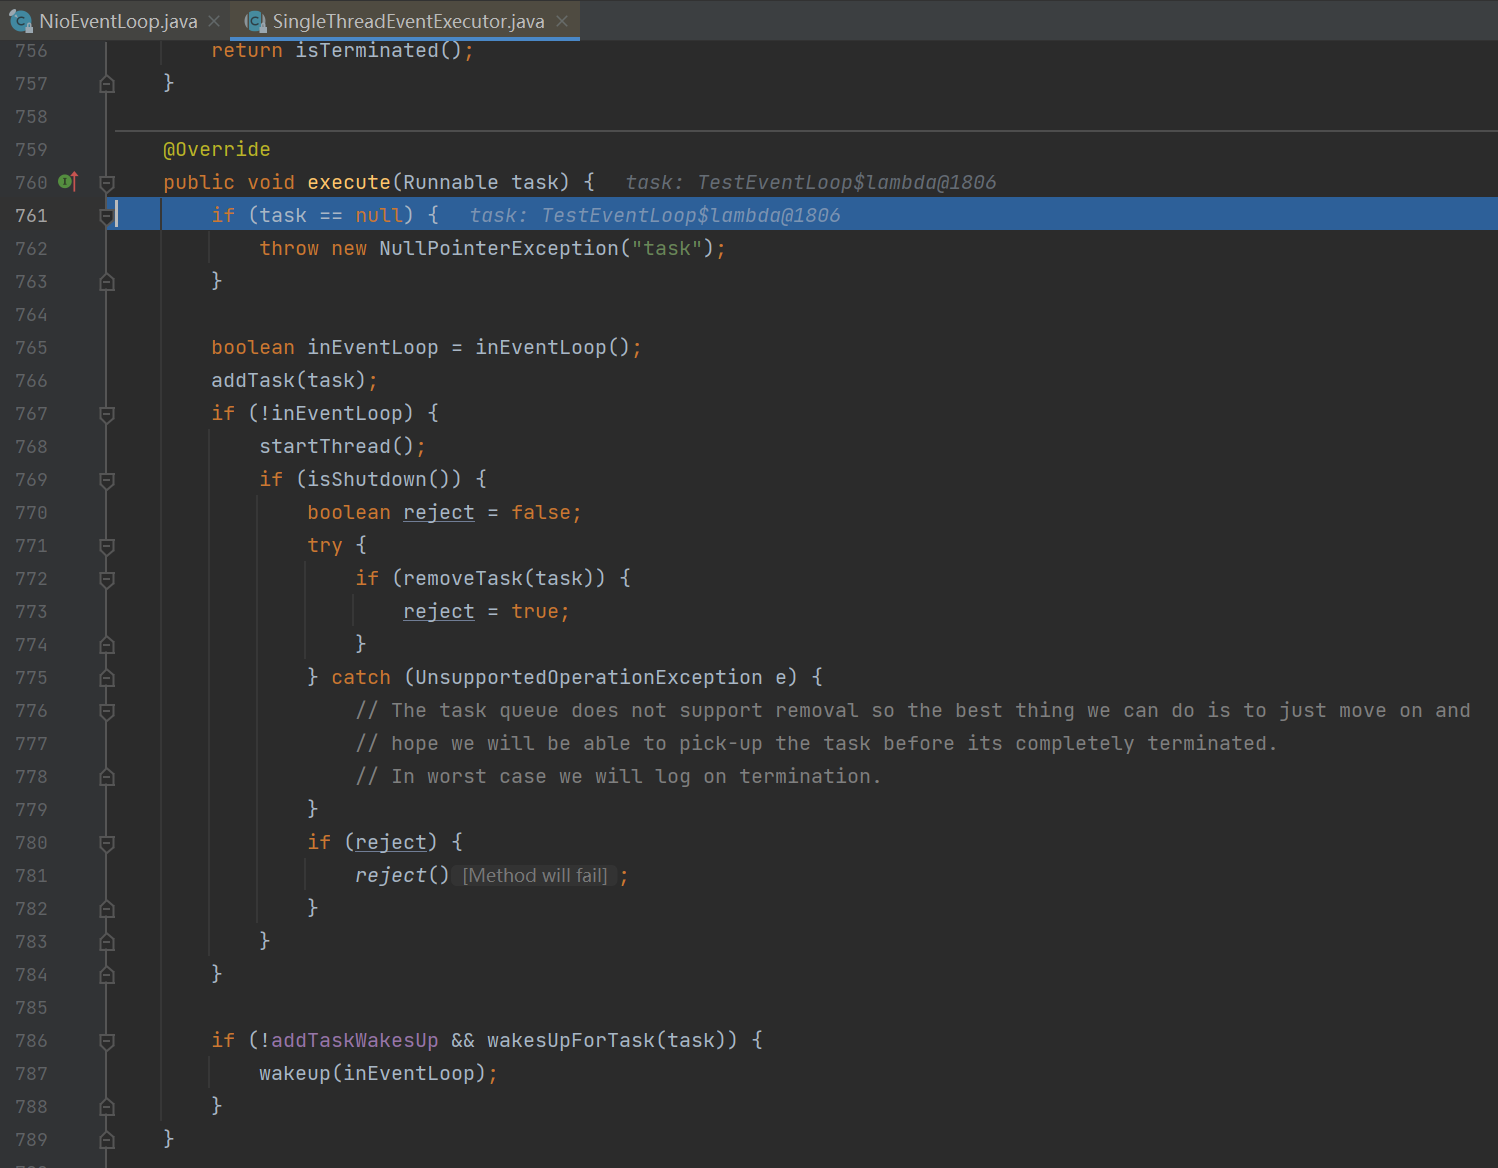
21public void execute(Runnable task) {
if (task == null) {
throw new NullPointerException("task");
}
boolean inEventLoop = inEventLoop();
// 添加任务,其中队列使用了 jctools 提供的 mpsc 无锁队列
addTask(task);
if (!inEventLoop) {
// inEventLoop 如果为 false 表示由其它线程来调用 execute,即首次调用,这时需要向 eventLoop 提交首个任务,启动死循环,会执行到下面的 doStartThread
startThread();
if (isShutdown()) {
// 如果已经 shutdown,做拒绝逻辑,代码略...
}
}
if (!addTaskWakesUp && wakesUpForTask(task)) {
// 如果线程由于 IO select 阻塞了,添加的任务的线程需要负责唤醒 NioEventLoop 线程
wakeup(inEventLoop);
}
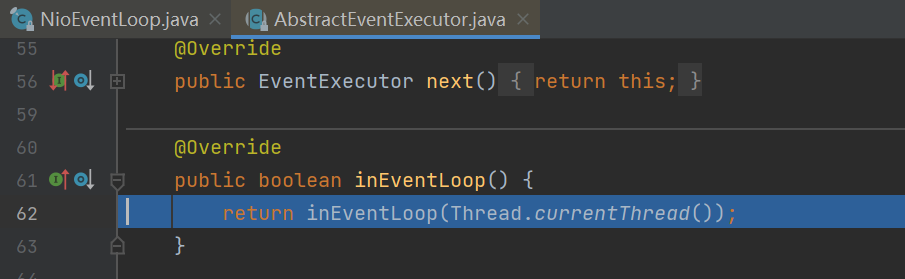
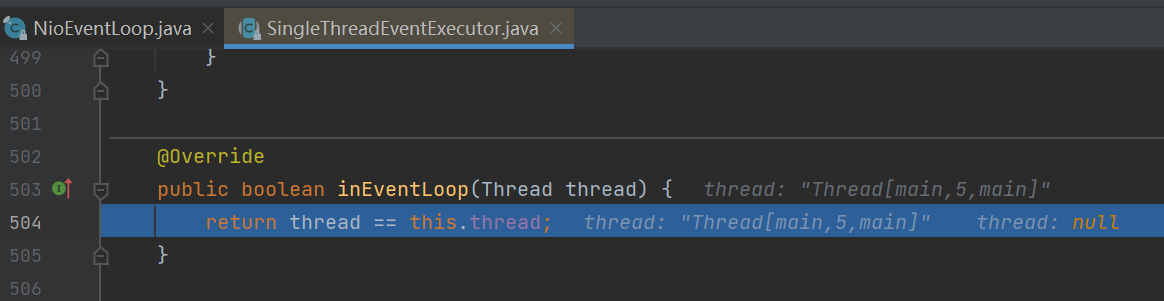
}首先调用inEventLoop()方法判断当前线程是否是eventLoop中的线程,由于此时eventLoop中的线程还没创建,且当前线程为main线程,所以返回false。
![]()
![]()
调用addTask方法将该任务添加进任务队列。
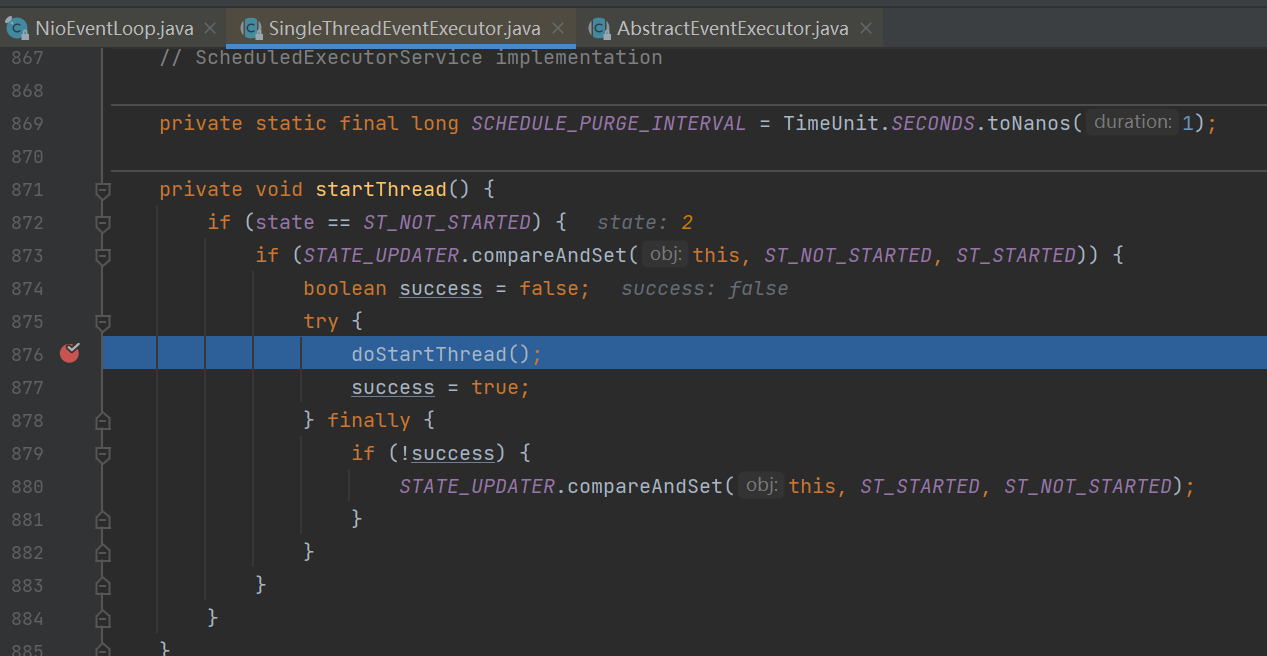
调用startThread->doStartThread方法创建并启动线程。
![]()
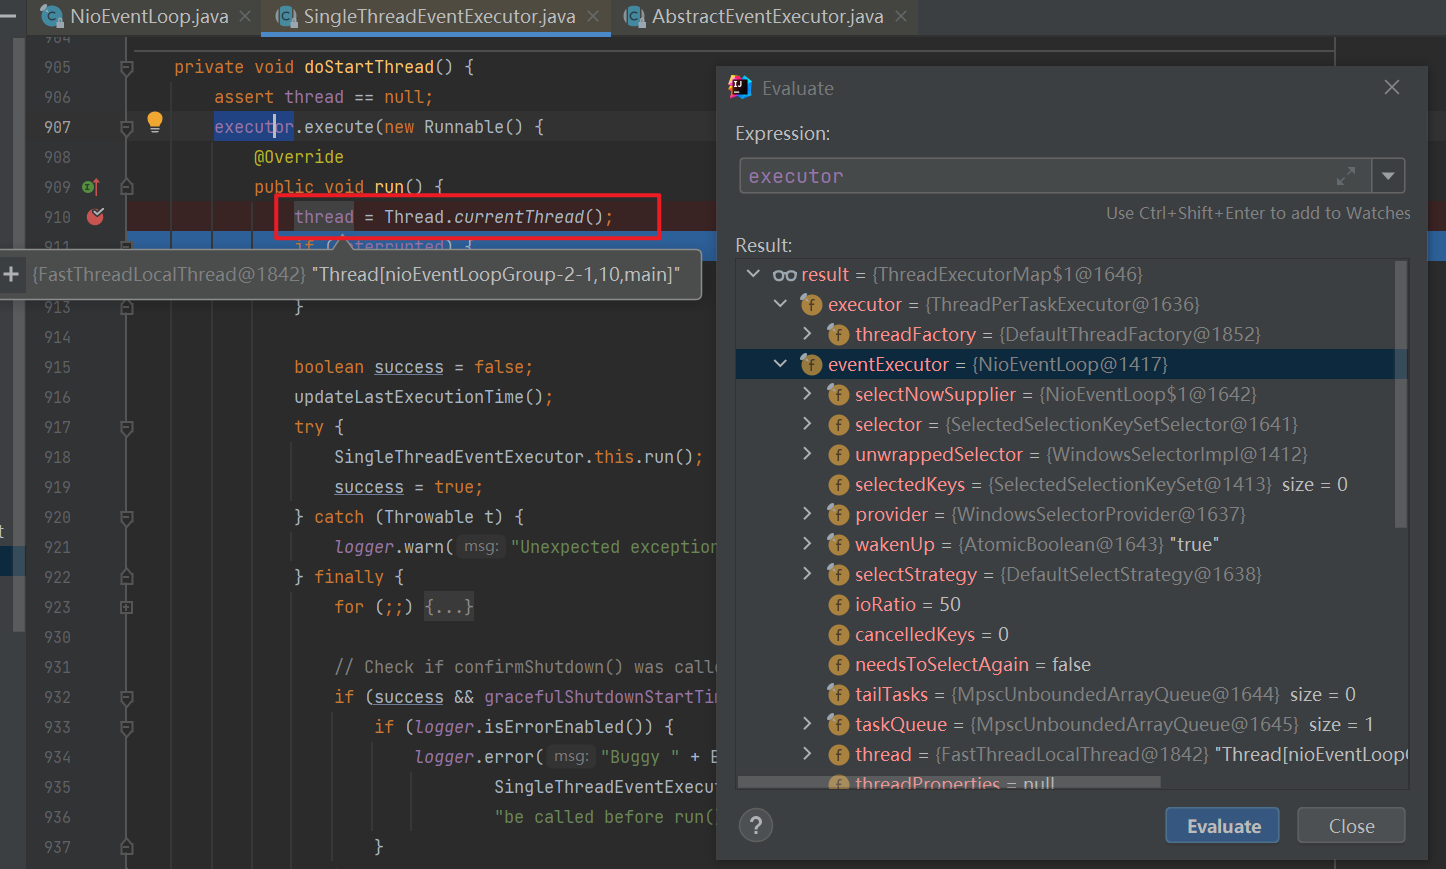
调用executor.execute方法往执行器中添加一个任务,会将执行该任务的线程(实际上executor中只有一个线程,所以executor中的线程即为eventLoop中的thread)通过调用thread = Thread.currentThread()赋值给eventLoop的成员变量thread。
![]()
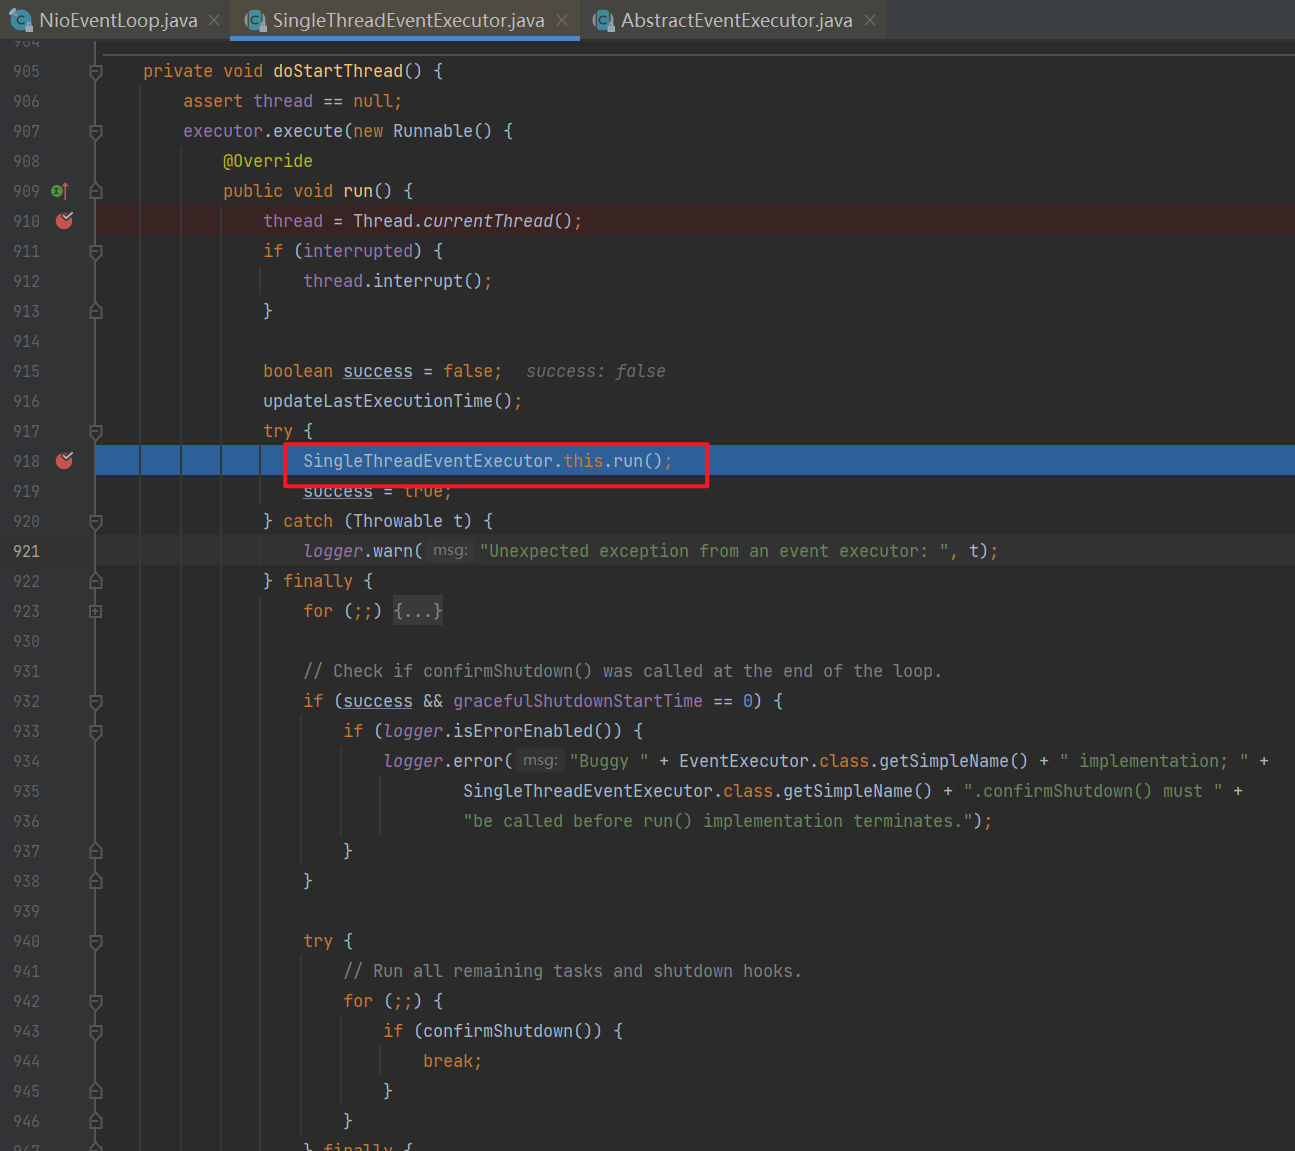
调用SingleThreadEventExecutor.this.run()方法,里面通过一个死循环不断查看任务队列里有没有新任务以及IO事件。
![]()
1
2
3
4
5
6
7
8
9
10
11
12
13
14
15
16
17
18
19
20
21
22
23
24
25private void doStartThread() {
assert thread == null;
executor.execute(new Runnable() {
public void run() {
// 将线程池的当前线程保存在成员变量中,以便后续使用
thread = Thread.currentThread();
if (interrupted) {
thread.interrupt();
}
boolean success = false;
updateLastExecutionTime();
try {
// 调用外部类 SingleThreadEventExecutor 的 run 方法,进入死循环,run 方法见下
SingleThreadEventExecutor.this.run();
success = true;
} catch (Throwable t) {
logger.warn("Unexpected exception from an event executor: ", t);
} finally {
// 清理工作,代码略...
}
}
});
}![]()
1
2
3
4
5
6
7
8
9
10
11
12
13
14
15
16
17
18
19
20
21
22
23
24
25
26
27
28
29
30
31
32
33
34
35
36
37
38
39
40
41
42
43
44
45
46
47
48
49
50
51
52
53
54
55
56
57
58
59
60
61
62
63
64
65
66
67
68
69
70
71
72
73protected void run() {
for (;;) {
try {
try {
// calculateStrategy 的逻辑如下:
// 有任务,会执行一次 selectNow,清除上一次的 wakeup 结果,无论有没有 IO 事件,都会跳过 switch
// 没有任务,会匹配 SelectStrategy.SELECT,看是否应当阻塞
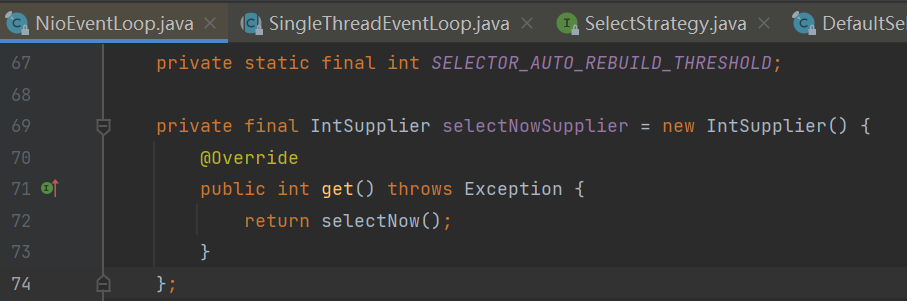
switch (selectStrategy.calculateStrategy(selectNowSupplier, hasTasks())) {
case SelectStrategy.CONTINUE:
continue;
case SelectStrategy.BUSY_WAIT:
case SelectStrategy.SELECT:
// 因为 IO 线程和提交任务线程都有可能执行 wakeup,而 wakeup 属于比较昂贵的操作,因此使用了一个原子布尔对象 wakenUp,它取值为 true 时,表示该由当前线程唤醒
// 进行 select 阻塞,并设置唤醒状态为 false
boolean oldWakenUp = wakenUp.getAndSet(false);
// 如果在这个位置,非 EventLoop 线程抢先将 wakenUp 置为 true,并 wakeup
// 下面的 select 方法不会阻塞
// 等 runAllTasks 处理完成后,到再循环进来这个阶段新增的任务会不会及时执行呢?
// 因为 oldWakenUp 为 true,因此下面的 select 方法就会阻塞,直到超时
// 才能执行,让 select 方法无谓阻塞
select(oldWakenUp);
if (wakenUp.get()) {
selector.wakeup();
}
default:
}
} catch (IOException e) {
rebuildSelector0();
handleLoopException(e);
continue;
}
cancelledKeys = 0;
needsToSelectAgain = false;
// ioRatio 默认是 50
final int ioRatio = this.ioRatio;
if (ioRatio == 100) {
try {
processSelectedKeys();
} finally {
// ioRatio 为 100 时,总是运行完所有非 IO 任务
runAllTasks();
}
} else {
final long ioStartTime = System.nanoTime();
try {
processSelectedKeys();
} finally {
// 记录 io 事件处理耗时
final long ioTime = System.nanoTime() - ioStartTime;
// 运行非 IO 任务,一旦超时会退出 runAllTasks
runAllTasks(ioTime * (100 - ioRatio) / ioRatio);
}
}
} catch (Throwable t) {
handleLoopException(t);
}
try {
if (isShuttingDown()) {
closeAll();
if (confirmShutdown()) {
return;
}
}
} catch (Throwable t) {
handleLoopException(t);
}
}
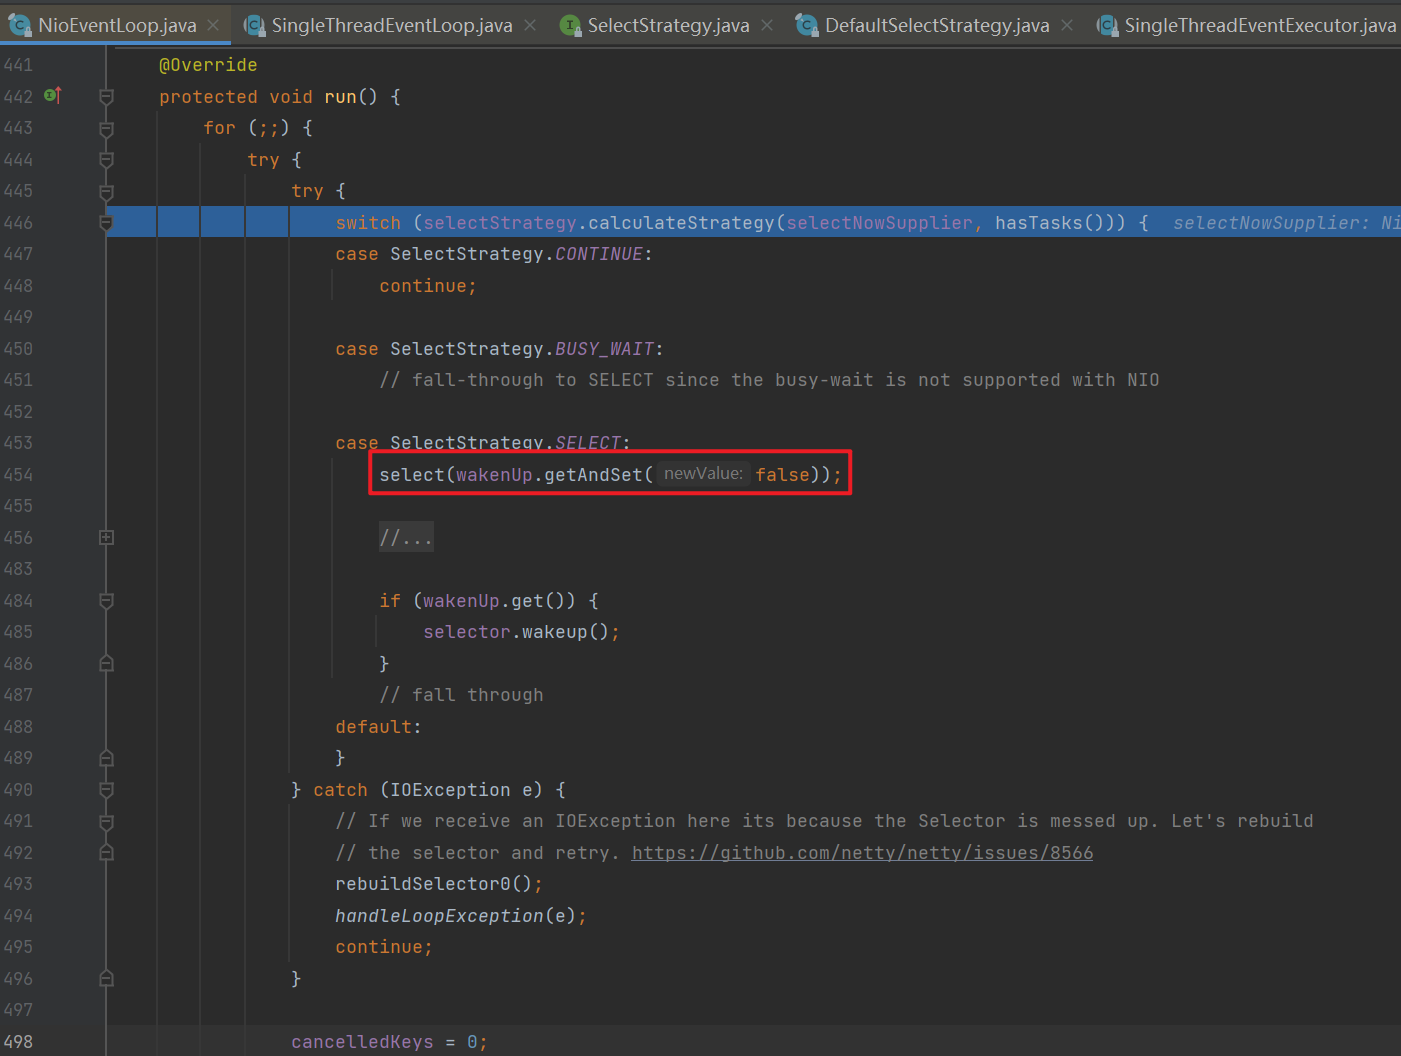
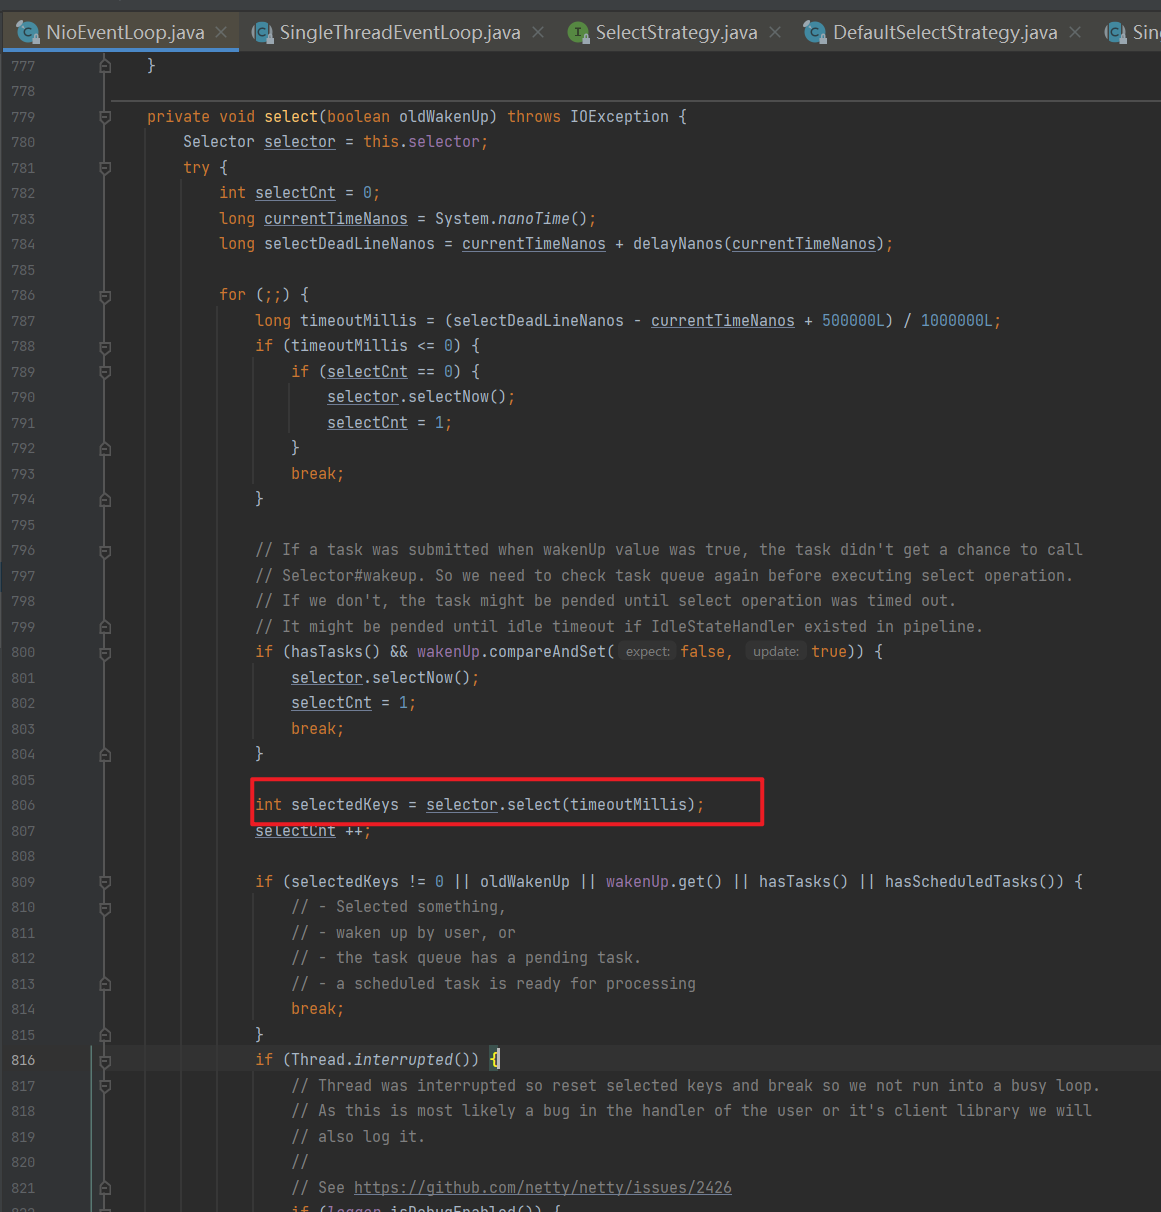
}当没有任务时会调用select(wakenUp.getAndSet(false))方法。在此方法中会调用selector.select(timeoutMillis)当没有事件发生时阻塞住从而使该线程不至于一直空转。
![]()
1
2
3
4
5
6
7
8
9
10
11
12
13
14
15
16
17
18
19
20
21
22
23
24
25
26
27
28
29
30
31
32
33
34
35
36
37
38
39
40
41
42
43
44
45
46
47
48
49
50
51
52
53
54
55
56
57
58
59
60
61
62
63
64
65
66
67
68
69
70
71private void select(boolean oldWakenUp) throws IOException {
Selector selector = this.selector;
try {
int selectCnt = 0;
long currentTimeNanos = System.nanoTime();
// 计算等待时间
// * 没有 scheduledTask,超时时间为 1s
// * 有 scheduledTask,超时时间为 `下一个定时任务执行时间 - 当前时间`
long selectDeadLineNanos = currentTimeNanos + delayNanos(currentTimeNanos);
for (;;) {
long timeoutMillis = (selectDeadLineNanos - currentTimeNanos + 500000L) / 1000000L;
// 如果超时,退出循环
if (timeoutMillis <= 0) {
if (selectCnt == 0) {
selector.selectNow();
selectCnt = 1;
}
break;
}
// 如果期间又有 task 退出循环,如果没这个判断,那么任务就会等到下次 select 超时时才能被执行
// wakenUp.compareAndSet(false, true) 是让非 NioEventLoop 不必再执行 wakeup
if (hasTasks() && wakenUp.compareAndSet(false, true)) {
selector.selectNow();
selectCnt = 1;
break;
}
// select 有限时阻塞
// 注意 nio 有 bug,当 bug 出现时,select 方法即使在规定的时间内没有事件发生,也不会阻塞住,导致不断空轮询,cpu 占用 100%
int selectedKeys = selector.select(timeoutMillis);
// 计数加 1
selectCnt ++;
// 醒来后,如果有 IO 事件、或是由非 EventLoop 线程唤醒,或者有任务,退出循环
if (selectedKeys != 0 || oldWakenUp || wakenUp.get() || hasTasks() || hasScheduledTasks()) {
break;
}
if (Thread.interrupted()) {
// 线程被打断,退出循环
// 记录日志
selectCnt = 1;
break;
}
long time = System.nanoTime();
if (time - TimeUnit.MILLISECONDS.toNanos(timeoutMillis) >= currentTimeNanos) {
// 如果超时,计数重置为 1,下次循环就会 break
selectCnt = 1;
}
// 计数超过阈值,由 io.netty.selectorAutoRebuildThreshold 指定,默认 512
// 这是为了解决 nio 空轮询 bug
else if (SELECTOR_AUTO_REBUILD_THRESHOLD > 0 &&
selectCnt >= SELECTOR_AUTO_REBUILD_THRESHOLD) {
// 重建 selector
selector = selectRebuildSelector(selectCnt);
selectCnt = 1;
break;
}
currentTimeNanos = time;
}
if (selectCnt > MIN_PREMATURE_SELECTOR_RETURNS) {
// 记录日志
}
} catch (CancelledKeyException e) {
// 记录日志
}
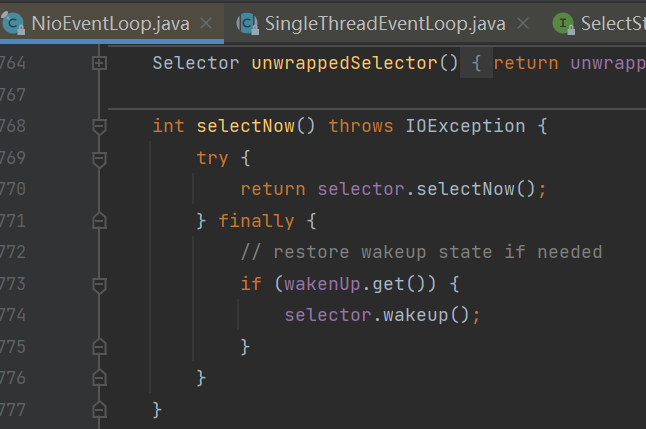
}当有任务时会调用selector.selectNow()方法顺便得到selector上的IO事件,从而在接下来能够调用processSelectedKeys()方法处理IO事件以及调用runAllTasks()方法执行普通任务。为了避免由于普通任务执行时间过长从而影响处理IO事件,netty采用了ioRatio变量控制处理IO事件所占用的时间比例,默认是50%,当设置为100时,总是运行完所有非IO任务再进入下一个循环处理IO事件。
processSelectedKeys()。
1
2
3
4
5
6
7
8
9private void processSelectedKeys() {
if (selectedKeys != null) {
// 通过反射将 Selector 实现类中的就绪事件集合替换为 SelectedSelectionKeySet
// SelectedSelectionKeySet 底层为数组实现,可以提高遍历性能(原本为 HashSet)
processSelectedKeysOptimized();
} else {
processSelectedKeysPlain(selector.selectedKeys());
}
}1
2
3
4
5
6
7
8
9
10
11
12
13
14
15
16
17
18
19
20
21
22
23
24
25
26
27private void processSelectedKeysOptimized() {
for (int i = 0; i < selectedKeys.size; ++i) {
final SelectionKey k = selectedKeys.keys[i];
// null out entry in the array to allow to have it GC'ed once the Channel close
// See https://github.com/netty/netty/issues/2363
selectedKeys.keys[i] = null;
// 获取到SelectionKey的附件即NioServerSocketChannel
final Object a = k.attachment();
if (a instanceof AbstractNioChannel) {
processSelectedKey(k, (AbstractNioChannel) a);
} else {
NioTask<SelectableChannel> task = (NioTask<SelectableChannel>) a;
processSelectedKey(k, task);
}
if (needsToSelectAgain) {
// null out entries in the array to allow to have it GC'ed once the Channel close
// See https://github.com/netty/netty/issues/2363
selectedKeys.reset(i + 1);
selectAgain();
i = -1;
}
}
}1
2
3
4
5
6
7
8
9
10
11
12
13
14
15
16
17
18
19
20
21
22
23
24
25
26
27
28
29
30
31
32
33
34
35// io.netty.channel.nio.NioEventLoop#processSelectedKey
private void processSelectedKey(SelectionKey k, AbstractNioChannel ch) {
final AbstractNioChannel.NioUnsafe unsafe = ch.unsafe();
// 当 key 取消或关闭时会导致这个 key 无效
if (!k.isValid()) {
// 无效时处理...
return;
}
try {
int readyOps = k.readyOps();
// 连接事件
if ((readyOps & SelectionKey.OP_CONNECT) != 0) {
int ops = k.interestOps();
ops &= ~SelectionKey.OP_CONNECT;
k.interestOps(ops);
unsafe.finishConnect();
}
// 可写事件
if ((readyOps & SelectionKey.OP_WRITE) != 0) {
ch.unsafe().forceFlush();
}
// 可读或可接入事件
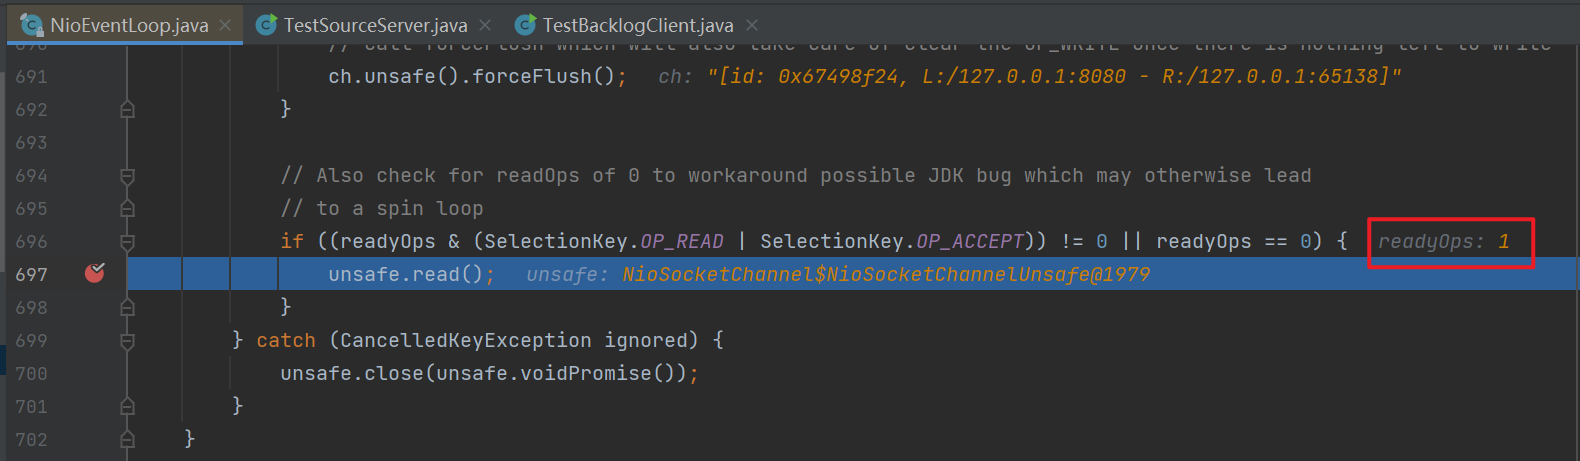
if ((readyOps & (SelectionKey.OP_READ | SelectionKey.OP_ACCEPT)) != 0 || readyOps == 0) {
// 如果是可接入 io.netty.channel.nio.AbstractNioMessageChannel.NioMessageUnsafe#read
// 如果是可读 io.netty.channel.nio.AbstractNioByteChannel.NioByteUnsafe#read
unsafe.read();
}
} catch (CancelledKeyException ignored) {
unsafe.close(unsafe.voidPromise());
}
}
注意:有无任务的判断在selectStrategy.calculateStrategy(selectNowSupplier, hasTasks())中。
1
2
3
4
5
6
7
8final class DefaultSelectStrategy implements SelectStrategy {
…………
public int calculateStrategy(IntSupplier selectSupplier, boolean hasTasks) throws Exception {
// 当有任务时会顺便得到selector上的io事件
return hasTasks ? selectSupplier.get() : SelectStrategy.SELECT;
}
}其中selectSupplier.get()即调用selector.selectNow()查看事件,如果没有事件会返回0。
![]()
![]()
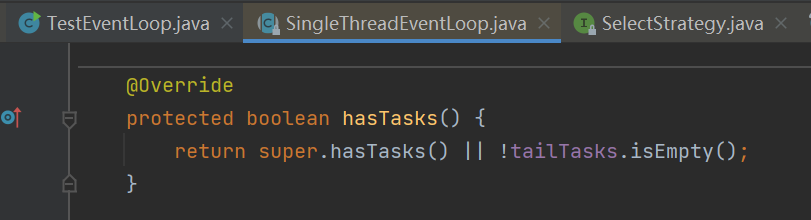
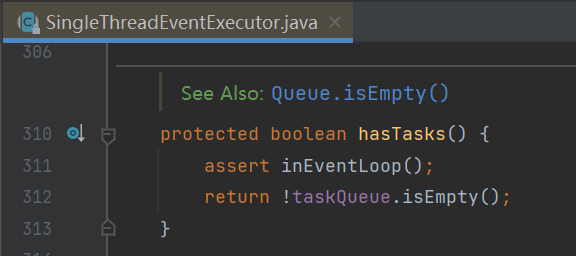
hasTasks()方法即判断taskQueue以及tailTasks两个队列中有无任务,只要有一个有任务则返回true。
![]()
![]()
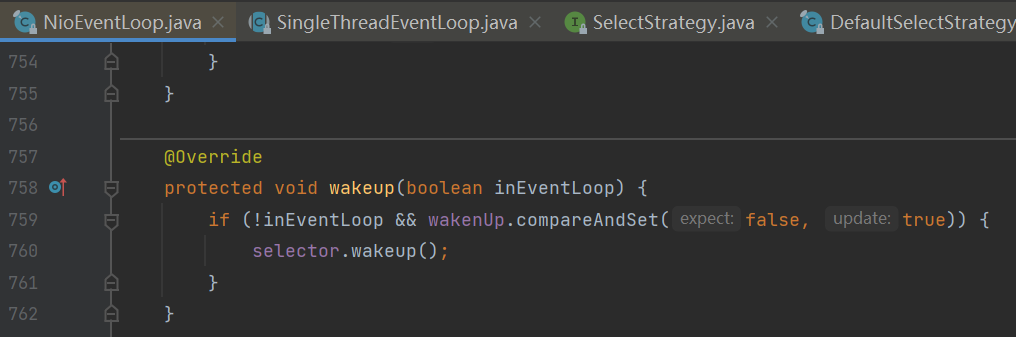
当exentLoop中的线程启动之后,当下次再次调用时就不会重复执行startThread方法了,而是调用wakeup(inEventLoop)方法判断如果NIO线程因为执行select阻塞了,则添加的任务的线程需要负责唤醒NioEventLoop线程,从而使该线程能够及时处理新添加的任务。
![]()
1
2
3
4
5
6
7
8
protected void wakeup(boolean inEventLoop) {
// 为了避免selector.wakeup()被频繁调用,使用CAS保证在多线程下只有一个线程能够设置wakenUp=true,从而进行selector.wakeup()操作。
if (!inEventLoop && wakenUp.compareAndSet(false, true)) {
// 添加新任务的线程与NIO线程不是同一个线程时才会执行,即当其它线程提交任务时才会执行。因为NIO线程在select时有指定过期时间timeoutMillis,时间到时会解除阻塞继续循环。
selector.wakeup();
}
}
总结:
![1653833249931]()
2.3 accept剖析
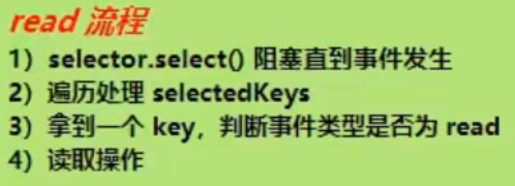
先回顾下NIO的流程:
- ①selector.select()阻塞直到事件发生。
- ②遍历处理selectedKeys。
- ③拿到一个key,判断事件类型是否为accept。
- ④创建SocketChannel,设置非阻塞。
- ⑤将SocketChannel注册至selector关注selectionKey的read事件。
1
2
3
4
5
6
7
8
9
10
11
12
13
14
15
16
17
18
19
20//1 阻塞直到事件发生
selector.select();
Iterator<SelectionKey> iter = selector.selectedKeys().iterator();
while (iter.hasNext()) {
//2 拿到一个事件
SelectionKey key = iter.next();
//3 如果是 accept 事件
if (key.isAcceptable()) {
//4 执行 accept
SocketChannel channel = serverSocketChannel.accept();
channel.configureBlocking(false);
//5 关注 read 事件
channel.register(selector, SelectionKey.OP_READ);
}
// ...
}上面已经分析到了netty的实现中第③步流程,现在从第④步开始分析,即到了
io.netty.channel.nio.NioEventLoop#processSelectedKey方法中调用的io.netty.channel.nio.AbstractNioMessageChannel.NioMessageUnsafe#read方法。以debug模式启动服务器端,再启动客户端,此时停在read方法处。![]()
![]()
1
2
3
4
5
6
7
8
9
10
11
12
13
14
15
16
17
18
19
20
21
22
23
24
25
26
27
28
29
30
31
32
33
34
35
36
37
38
39
40
41
42
43
44
45
46
47
48
49
50
51
52
53
54
55
56
57
58public void read() {
assert eventLoop().inEventLoop();
final ChannelConfig config = config();
final ChannelPipeline pipeline = pipeline();
final RecvByteBufAllocator.Handle allocHandle = unsafe().recvBufAllocHandle();
allocHandle.reset(config);
boolean closed = false;
Throwable exception = null;
try {
try {
do {
// doReadMessages 中执行了 accept 并创建 NioSocketChannel 作为消息放入 readBuf
// readBuf 是一个 ArrayList 用来缓存消息
int localRead = doReadMessages(readBuf);
if (localRead == 0) {
break;
}
if (localRead < 0) {
closed = true;
break;
}
// localRead 为 1,就一条消息,即接收一个客户端连接
allocHandle.incMessagesRead(localRead);
} while (allocHandle.continueReading());
} catch (Throwable t) {
exception = t;
}
int size = readBuf.size();
for (int i = 0; i < size; i ++) {
readPending = false;
// 触发 read 事件,让 pipeline 上的 handler 处理,这时是处理
// io.netty.bootstrap.ServerBootstrap.ServerBootstrapAcceptor#channelRead
pipeline.fireChannelRead(readBuf.get(i));
}
readBuf.clear();
allocHandle.readComplete();
pipeline.fireChannelReadComplete();
if (exception != null) {
closed = closeOnReadError(exception);
pipeline.fireExceptionCaught(exception);
}
if (closed) {
inputShutdown = true;
if (isOpen()) {
close(voidPromise());
}
}
} finally {
if (!readPending && !config.isAutoRead()) {
removeReadOp();
}
}
}执行doReadMessages(readBuf)方法创建SocketChannel,设置非阻塞。在NioSocketChannel的构造函数中传进SocketChannel,最后将NioSocketChannel放进readBuf集合中,接下来会将其当作消息进行处理。
![]()
![]()
调用pipeline.fireChannelRead(readBuf.get(i))将刚才创建的连接放到NioServerSocketChannel的流水线上处理(调用所有handler的ChannelRead方法),流水线上的handler链为head->accept->tail,这里重点讲accept handler,即来到
io.netty.bootstrap.ServerBootstrap.ServerBootstrapAcceptor#channelRead。![]()
1
2
3
4
5
6
7
8
9
10
11
12
13
14
15
16
17
18
19
20
21
22
23
24
25
26
27
28public void channelRead(ChannelHandlerContext ctx, Object msg) {
// 这时的 msg 是 NioSocketChannel
final Channel child = (Channel) msg;
// NioSocketChannel 添加 childHandler 即初始化器
child.pipeline().addLast(childHandler);
// 设置选项
setChannelOptions(child, childOptions, logger);
for (Entry<AttributeKey<?>, Object> e: childAttrs) {
child.attr((AttributeKey<Object>) e.getKey()).set(e.getValue());
}
try {
// 注册 NioSocketChannel 到 nio worker 线程,接下来的处理也移交至 nio worker 线程
childGroup.register(child).addListener(new ChannelFutureListener() {
public void operationComplete(ChannelFuture future) throws Exception {
if (!future.isSuccess()) {
forceClose(child, future.cause());
}
}
});
} catch (Throwable t) {
forceClose(child, t);
}
}调用childGroup.register(child)注册NioSocketChannel到nio worker线程,接下来的处理也移交至nio worker线程。沿着调用链一直往下找到熟悉的
io.netty.channel.AbstractChannel.AbstractUnsafe#register方法。1
2
3
4
5
6
7
8
9
10
11
12
13
14
15
16
17
18
19
20
21
22
23
24public final void register(EventLoop eventLoop, final ChannelPromise promise) {
// 一些检查,略...
AbstractChannel.this.eventLoop = eventLoop;
// 判断当前线程是否是EventLoop线程,由于当前线程是nioEventLoopGroup-2-1(即ServerSocketChannel线程)线程,所以这里为false,进入else块。
if (eventLoop.inEventLoop) {
register0(promise);
} else {
try {
// 这行代码完成的事实是 nio boss -> nio worker 线程的切换
eventLoop.execute(new Runnable() {
public void run() {
register0(promise);
}
});
} catch (Throwable t) {
// 日志记录...
closeForcibly();
closeFuture.setClosed();
safeSetFailure(promise, t);
}
}
}来到了熟悉的
io.netty.channel.AbstractChannel.AbstractUnsafe#register0。![]()
1
2
3
4
5
6
7
8
9
10
11
12
13
14
15
16
17
18
19
20
21
22
23
24
25
26
27
28
29
30
31private void register0(ChannelPromise promise) {
try {
if (!promise.setUncancellable() || !ensureOpen(promise)) {
return;
}
boolean firstRegistration = neverRegistered;
doRegister();
neverRegistered = false;
registered = true;
// 执行初始化器,执行前 pipeline 中只有 head -> 初始化器 -> tail
pipeline.invokeHandlerAddedIfNeeded();
// 执行后就是 head -> logging handler -> my handler -> tail
safeSetSuccess(promise);
pipeline.fireChannelRegistered();
if (isActive()) {
if (firstRegistration) {
// 触发 pipeline 上 active 事件
pipeline.fireChannelActive();
} else if (config().isAutoRead()) {
beginRead();
}
}
} catch (Throwable t) {
closeForcibly();
closeFuture.setClosed();
safeSetFailure(promise, t);
}
}来到了熟悉的doRegister()方法,将SocketChannel注册到当前eventLoop的selector上,不关注任何事件,并且把当前NioSocketChannel作为附件绑定到selectionKey上。
![]()
调用pipeline.invokeHandlerAddedIfNeeded()执行NioSocketChannel上handler链的初始化方法即initChannel()。
![]()
调用pipeline.fireChannelActive()触发pipeline上handler的ChannelActive事件。此时NioSocketChannel的handler链为head->logging->tail,在head handler的ChannelActive方法中调用readIfIsAutoRead()方法完成read事件的关注。
![]()
沿着调用链找到
io.netty.channel.nio.AbstractNioChannel#doBeginRead。![]()
1
2
3
4
5
6
7
8
9
10
11
12
13
14
15protected void doBeginRead() throws Exception {
// Channel.read() or ChannelHandlerContext.read() was called
final SelectionKey selectionKey = this.selectionKey;
if (!selectionKey.isValid()) {
return;
}
readPending = true;
// 这时候 interestOps 是 0
final int interestOps = selectionKey.interestOps();
if ((interestOps & readInterestOp) == 0) {
// 关注 read 事件
selectionKey.interestOps(interestOps | readInterestOp);
}
}
总结:
![1653890315717]()
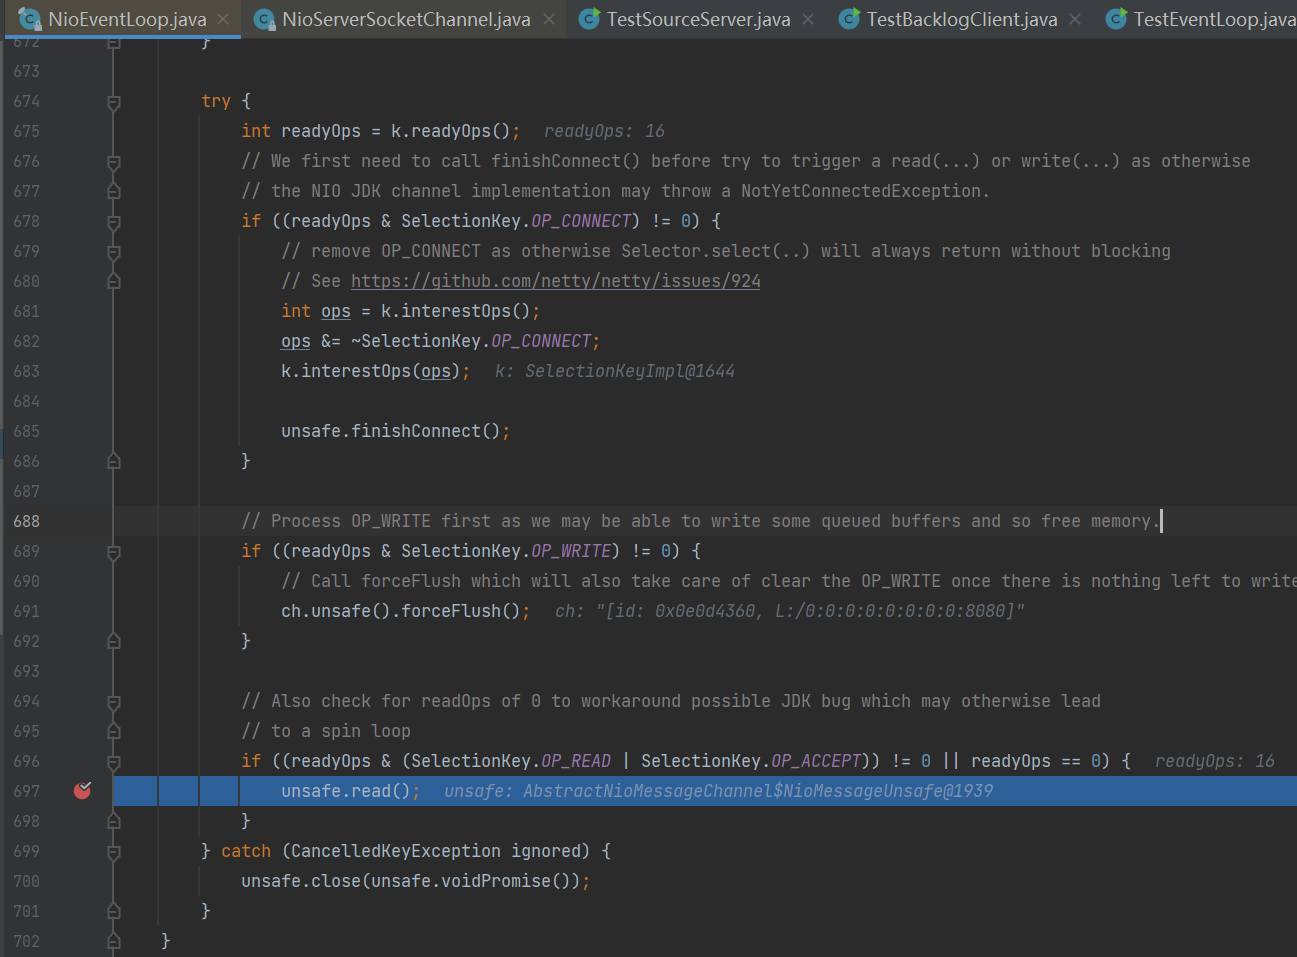
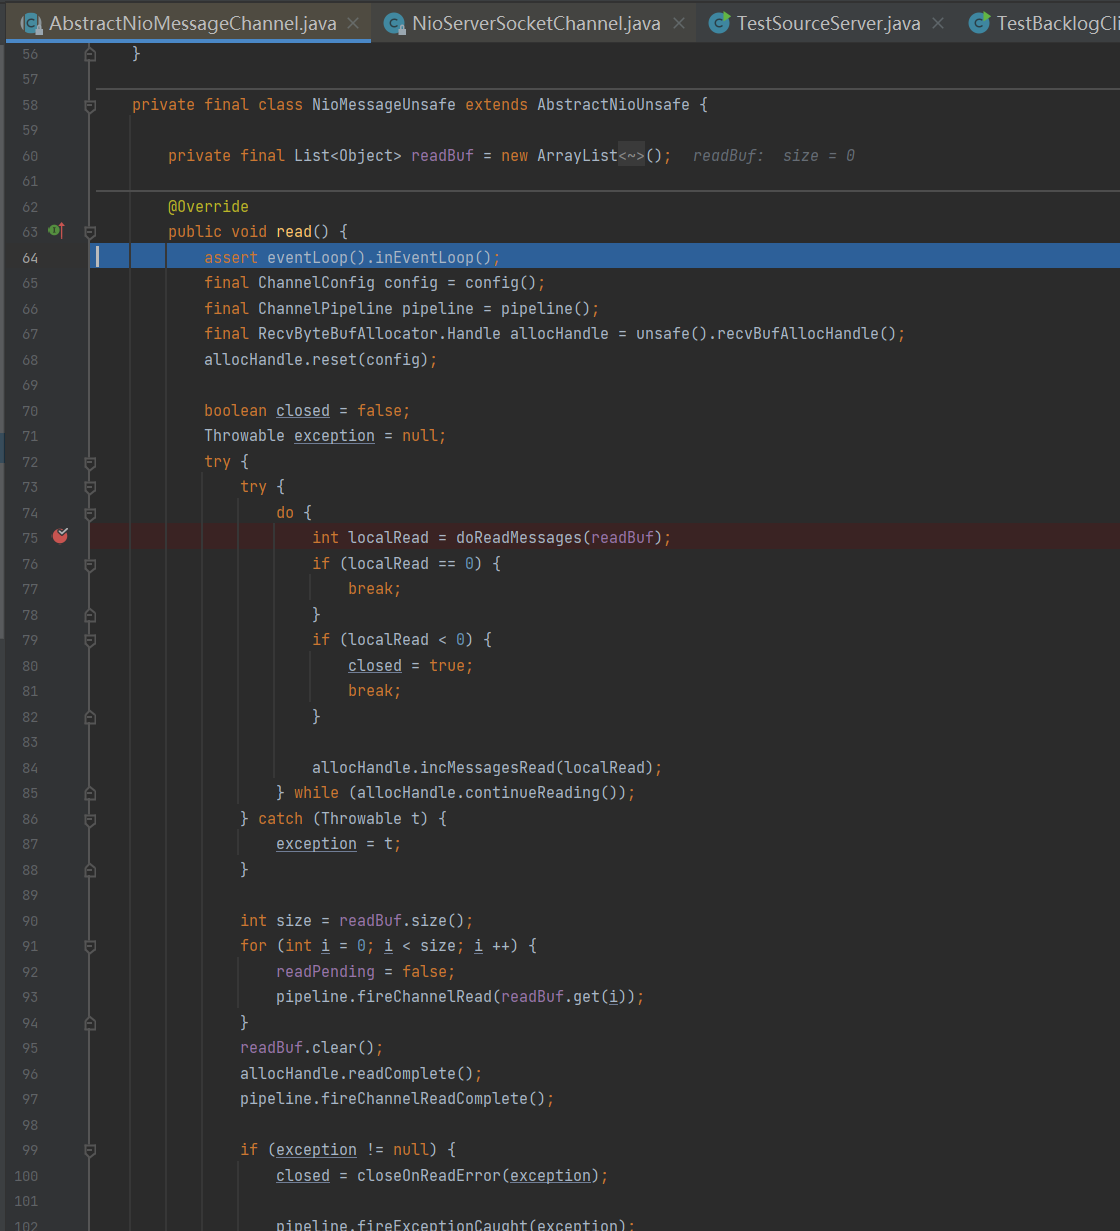
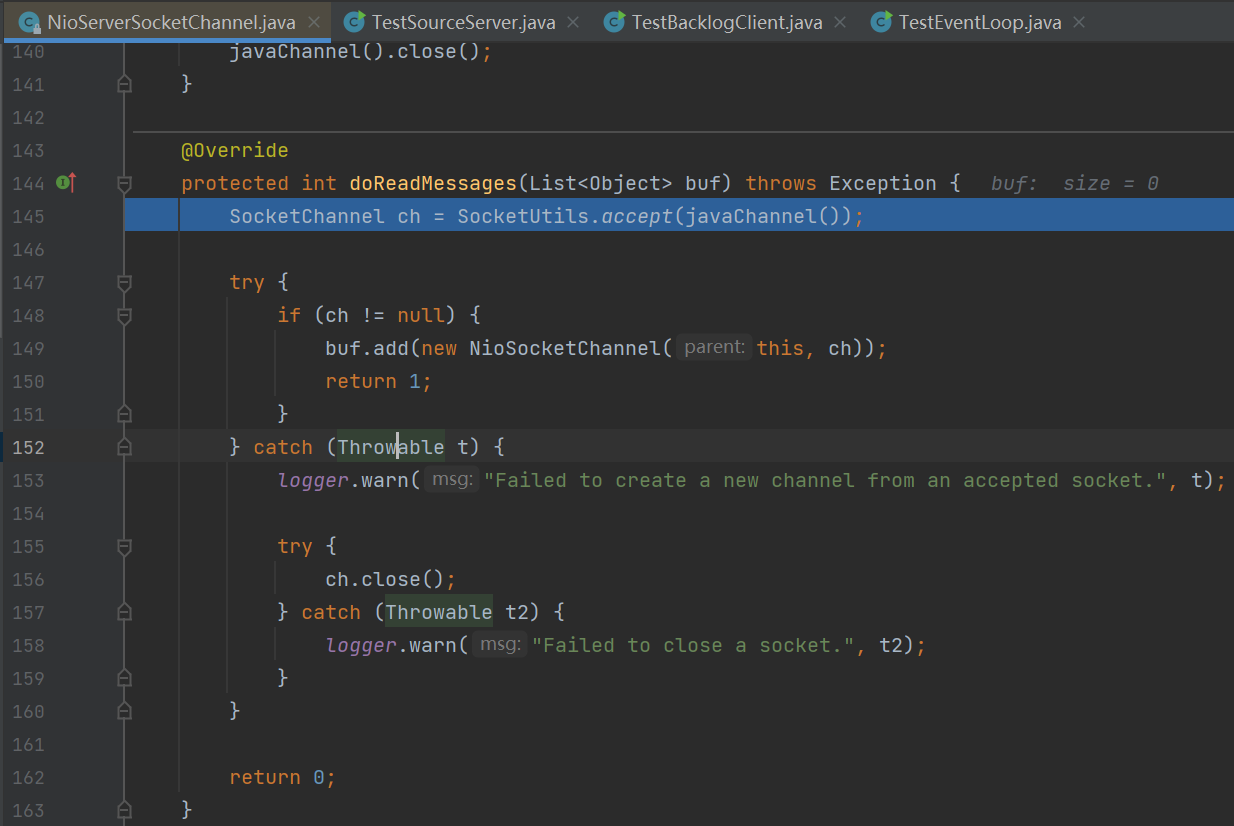
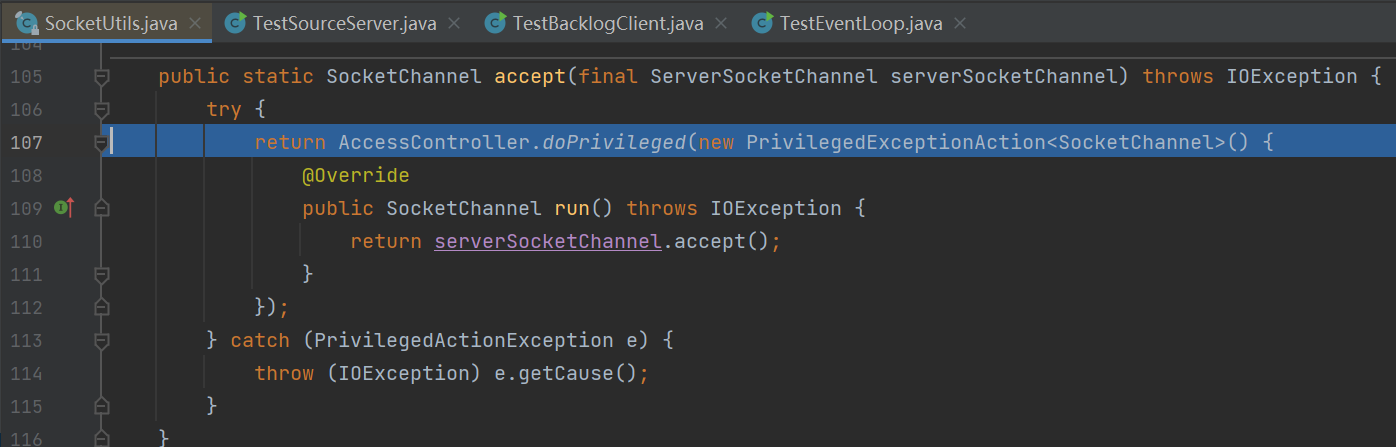
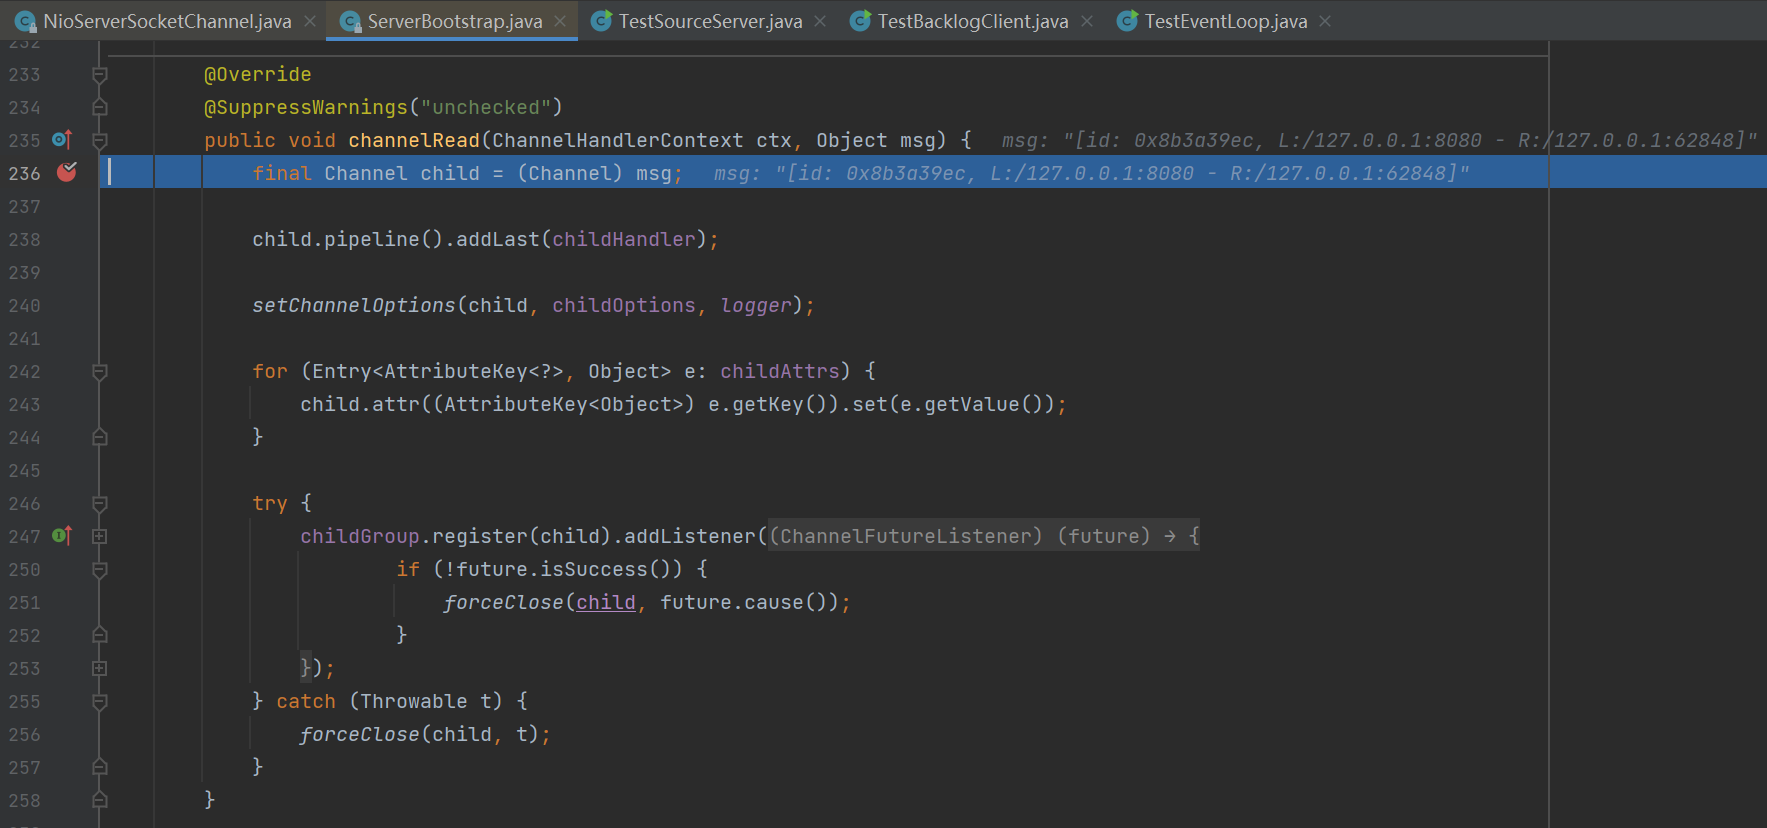
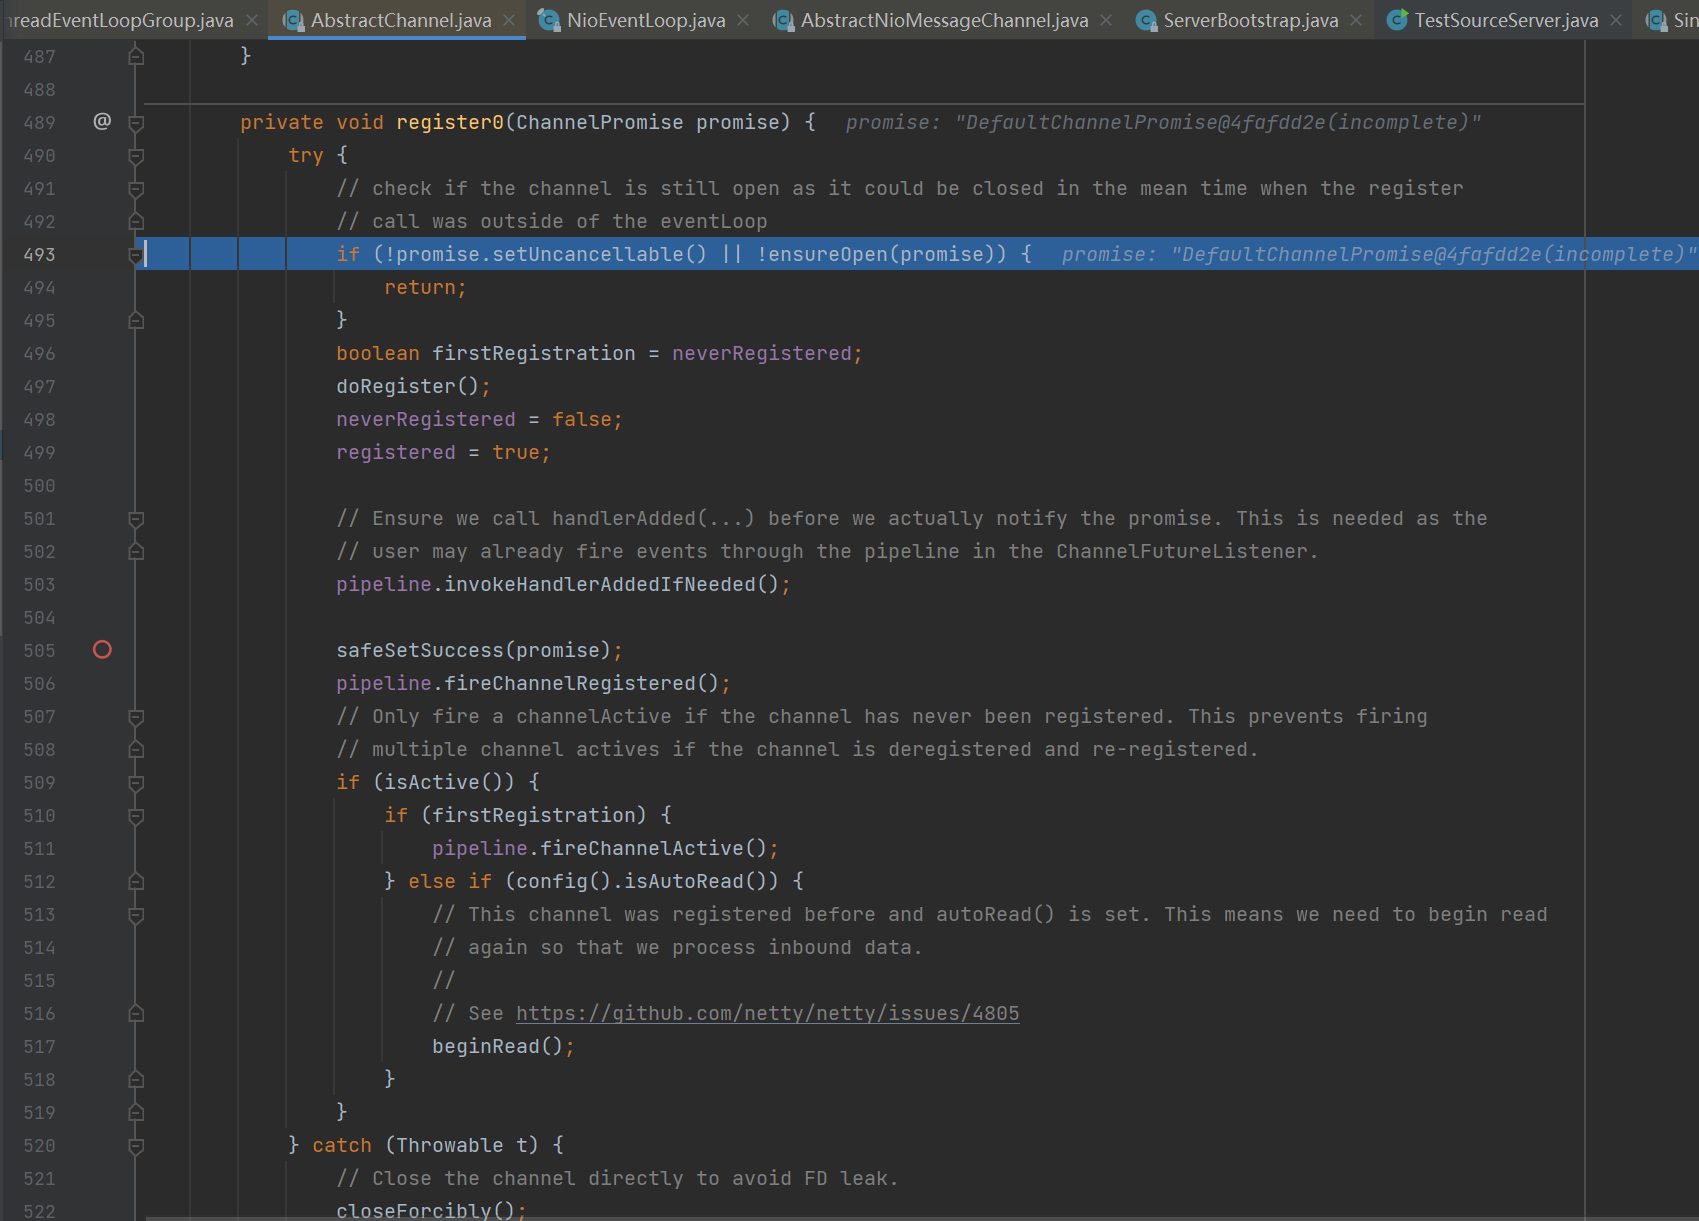


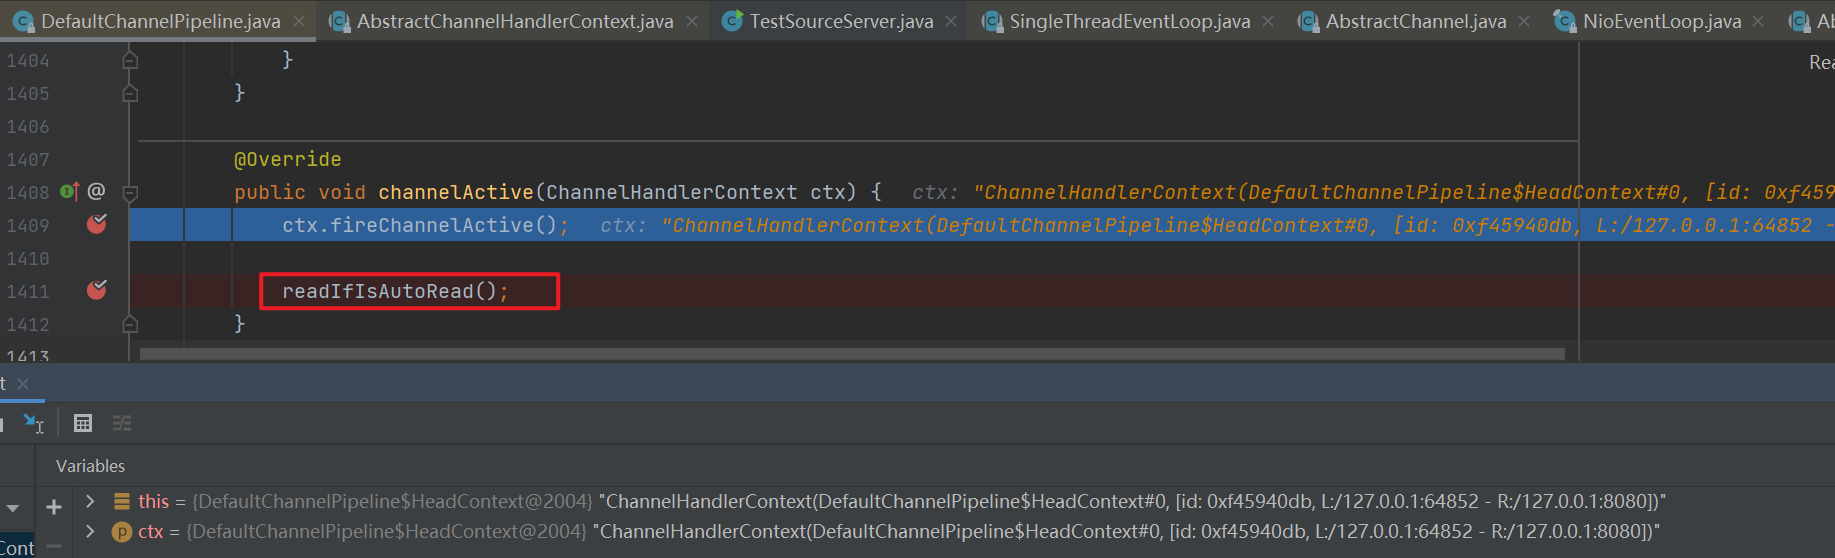
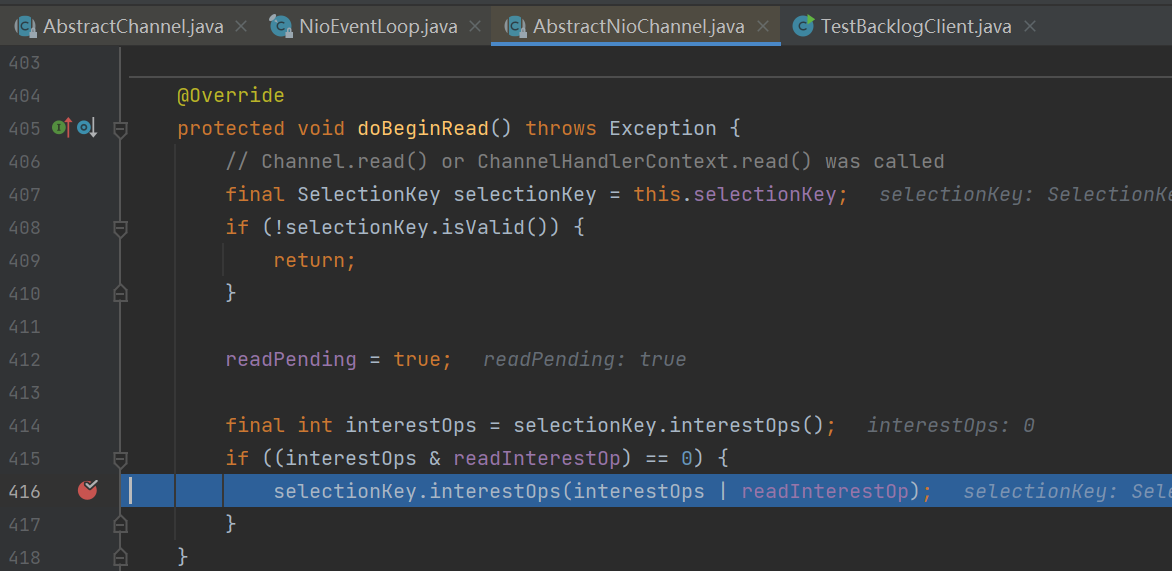
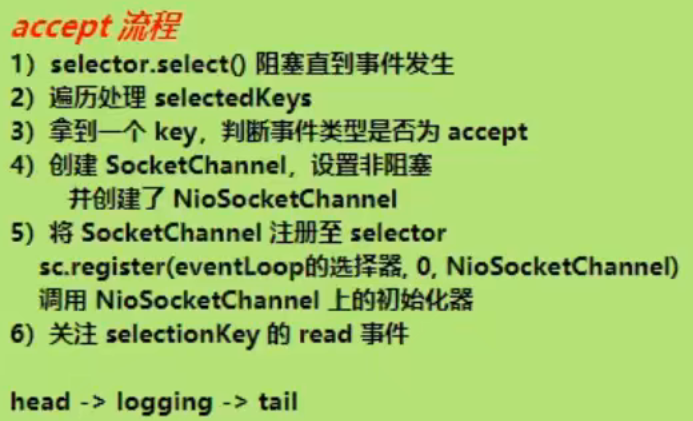
2.4 read剖析
在
io.netty.channel.nio.NioEventLoop#processSelectedKey的unsafe.read()处打上断点后以debug启动server。1
2
3
4
5
6
7
8
9
10
11
12
13public class TestSourceServer {
public static void main(String[] args) {
new ServerBootstrap()
.group(new NioEventLoopGroup())
.channel(NioServerSocketChannel.class)
.childHandler(new ChannelInitializer<NioSocketChannel>() {
protected void initChannel(NioSocketChannel ch) {
ch.pipeline().addLast(new LoggingHandler());
}
}).bind(8080);
}
}客户端在建立连接后发送消息到server。
1
2
3
4
5
6
7
8
9
10
11
12
13
14
15
16
17
18
19
20
21
22
23
24
25
26
27
28
29
30
public class TestBacklogClient {
public static void main(String[] args) {
NioEventLoopGroup worker = new NioEventLoopGroup();
try {
Bootstrap bootstrap = new Bootstrap();
bootstrap.channel(NioSocketChannel.class);
bootstrap.group(worker);
bootstrap.handler(new ChannelInitializer<SocketChannel>() {
protected void initChannel(SocketChannel ch) throws Exception {
ch.pipeline().addLast(new LoggingHandler());
ch.pipeline().addLast(new ChannelInboundHandlerAdapter(){
public void channelActive(ChannelHandlerContext ctx) throws Exception {
ctx.writeAndFlush(ctx.alloc().buffer().writeBytes("hello!".getBytes()));
}
});
}
});
ChannelFuture channelFuture = bootstrap.connect("127.0.0.1", 8080).sync();
channelFuture.channel().closeFuture().sync();
} catch (InterruptedException e) {
log.error("client error", e);
} finally {
worker.shutdownGracefully();
}
}
}第一次触发的是accept事件,直接放行。
![]()
第二次触发的是read事件,将执行
io.netty.channel.nio.AbstractNioByteChannel.NioByteUnsafe#read。注意发送的数据未必能够一次读完,因此会触发多次nio read事件,一次事件内会触发多次pipeline read,一次事件会触发一次pipeline read complete。![]()
![]()
1
2
3
4
5
6
7
8
9
10
11
12
13
14
15
16
17
18
19
20
21
22
23
24
25
26
27
28
29
30
31
32
33
34
35
36
37
38
39
40
41
42
43
44
45
46
47
48
49
50
51
52
53
54public final void read() {
final ChannelConfig config = config();
if (shouldBreakReadReady(config)) {
clearReadPending();
return;
}
final ChannelPipeline pipeline = pipeline();
// io.netty.allocator.type 决定 allocator 的实现
final ByteBufAllocator allocator = config.getAllocator();
// 用来分配 byteBuf,确定单次读取大小
final RecvByteBufAllocator.Handle allocHandle = recvBufAllocHandle();
allocHandle.reset(config);
ByteBuf byteBuf = null;
boolean close = false;
try {
do {
byteBuf = allocHandle.allocate(allocator);
// 读取
allocHandle.lastBytesRead(doReadBytes(byteBuf));
if (allocHandle.lastBytesRead() <= 0) {
byteBuf.release();
byteBuf = null;
close = allocHandle.lastBytesRead() < 0;
if (close) {
readPending = false;
}
break;
}
allocHandle.incMessagesRead(1);
readPending = false;
// 触发 read 事件,让 pipeline 上的 handler 处理,这时是处理 NioSocketChannel 上的 handler
pipeline.fireChannelRead(byteBuf);
byteBuf = null;
}
// 是否要继续循环
while (allocHandle.continueReading());
allocHandle.readComplete();
// 触发 read complete 事件
pipeline.fireChannelReadComplete();
if (close) {
closeOnRead(pipeline);
}
} catch (Throwable t) {
handleReadException(pipeline, byteBuf, t, close, allocHandle);
} finally {
if (!readPending && !config.isAutoRead()) {
removeReadOp();
}
}
}总结:
![1653890795370]()