在掌握了LangGraph的State状态定义模式后,我们就可以围绕LangGraph的State进入更高级的功能开发和探索阶段。
我们首先要探讨的是LangGraph中的代理架构,即在LangGraph框架下都能够通过哪些代理模型来构建应用。我们希望AI Agent程序带来的是更多的智能化,意味着我们希望仅仅输入一个需求,而无需关心处理过程的具体细节。随着应用变得越来越复杂,也自然而然要求基于大模型构建的系统能够具体更多的控制权限,从而才能解决更复杂的问题。
基于不同的需求场景,衍生出许多不同类型的代理架构,来赋予大模型不同级别的控制权,如下图所示:
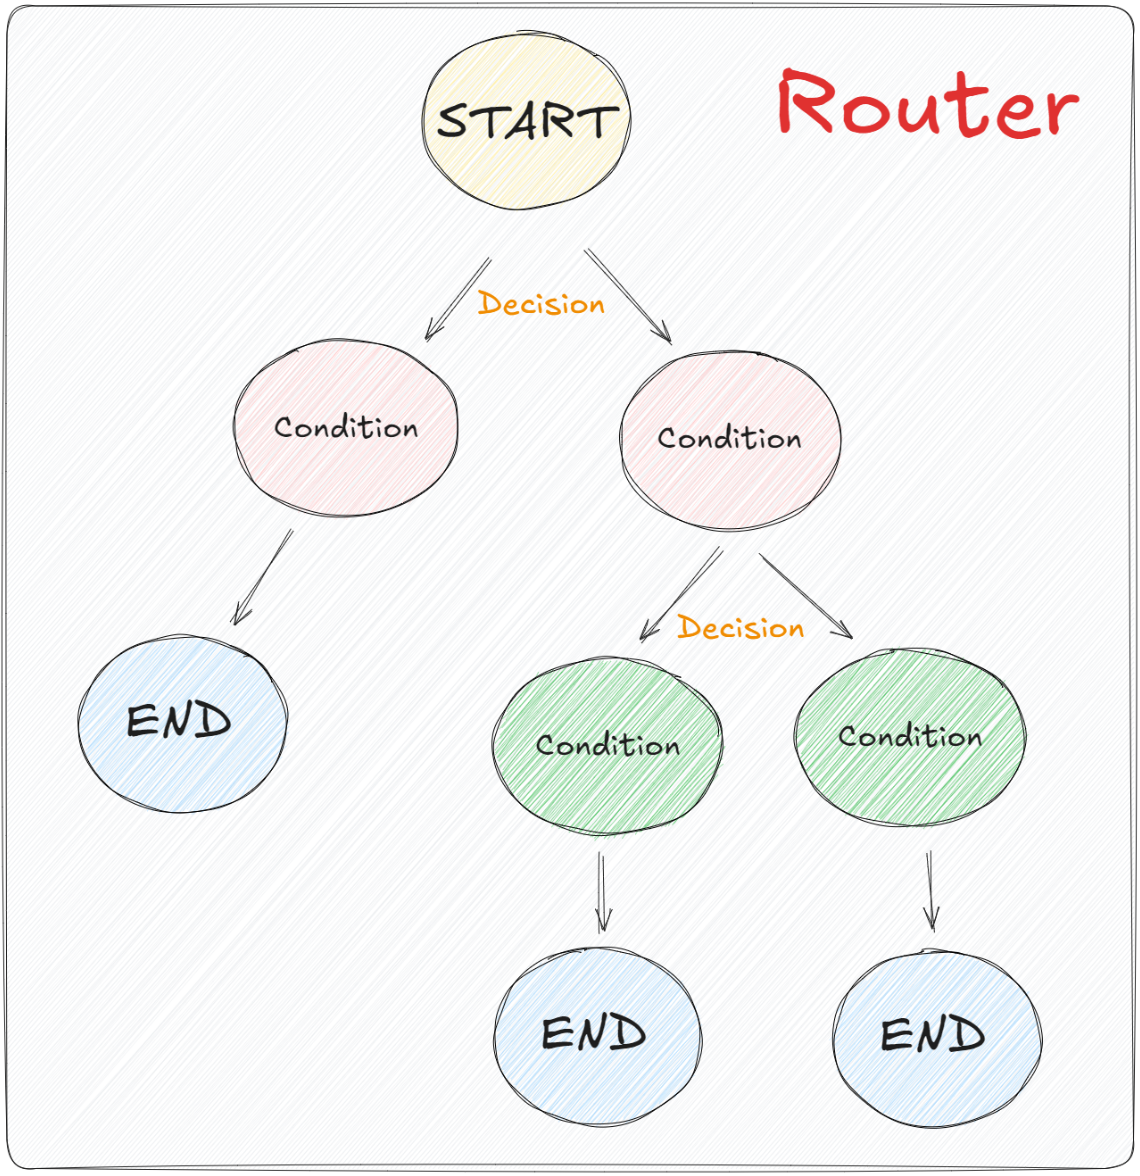
在代理架构模式下,大模型能通过多种方式进行操作控制。最基本的功能是在两个潜在路径之间做出选择。进而在每条路径上,如果存在多个可用工具,大模型能够自主决定调用哪一个。更复杂的情况下,它还能评估生成的答案是否满足问题的需求。如有必要进行额外工作,它将自行执行,直到得到一个充分满足条件的答案为止。LangGraph框架则是从这个角度出发,接入了路由代理,工具代理,自主循环代理以及多代理这四大类代理架构,以支持不同的场景需求。 因此,下面依次来介绍并实践以上四类不同的代理架构在LangGraph框架下的应用方法。首先来看较为基础的Router Agent,即路由代理。
1、LangGraph中的Router使用场景 在LangGraph中,我们可以利用“条件边”这一概念来指导或约束大模型在处理特定任务时的逻辑流程。这种机制允许大模型在达到某一环节并满足预设条件时,根据不同的条件输出或数据,选择性地执行不同的逻辑路径。如下图所示:
为了管理这样复杂的图结构,LangGraph使用的是一个类似于 if-else语句的结构组件,称为Router(路由)。这个组件允许大模型从一组预设的选项中选择合适的步骤来进行执行。这个设计思路并不难理解,同时由于LangGraph的底层封装,实现起来也非常简单,我们看下面的代码:
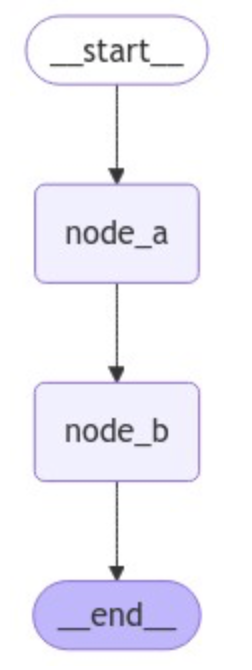
首先,对于简单的直接从节点A到节点B,我们一直使用的是add_edge方法,即:
1
2
3
4
5
6
7
8
9
10
11
12
13
14
15
16
17
18
19
20
from langgraph.graph import START, StateGraph, ENDfrom langgraph.graph import StateGraphdef node_a (state ): return {"x" : state["x" ] + 1 } def node_b (state ): return {"x" : state["x" ] - 2 } builder = StateGraph(dict ) builder.add_node("node_a" , node_a) builder.add_node("node_b" , node_b) builder.add_edge(START, "node_a" ) builder.add_edge("node_a" , "node_b" ) builder.add_edge("node_b" , END) graph = builder.compile ()
1
2
3
from IPython.display import Image, displaydisplay(Image(graph.get_graph(xray=True ).draw_mermaid_png()))
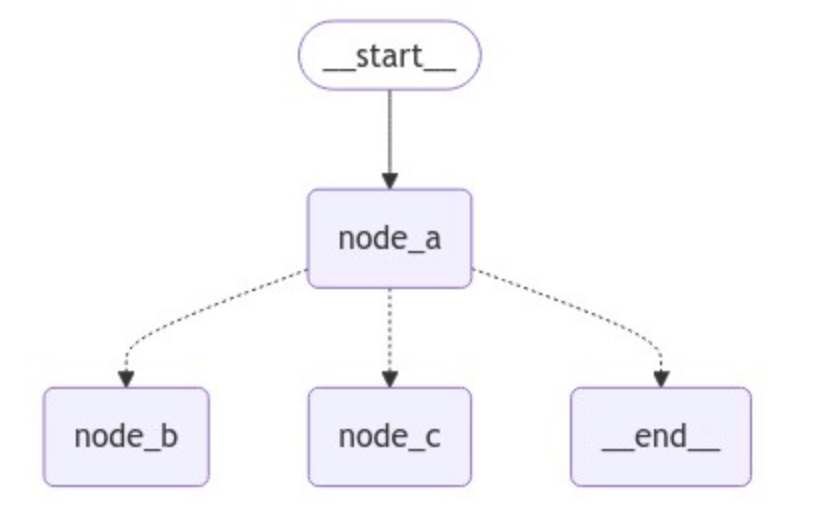
如果想选择性地路由到 1 个或多个边,则需要使用add_conditional_edges方法。该方法也在Graph的基类中进行了定义,如下所示:
1
2
3
4
5
6
7
8
9
10
11
12
13
14
15
16
17
18
19
20
class Graph : def __init__ (self ) -> None : self .nodes: dict [str , NodeSpec] = {} self .edges = set [tuple [str , str ]]() self .branches: defaultdict[str , dict [str , Branch]] = defaultdict(dict ) self .support_multiple_edges = False self .compiled = False def add_conditional_edges ( self, source: str , path: Union [ Callable [..., Union [Hashable, list [Hashable]]], Callable [..., Awaitable[Union [Hashable, list [Hashable]]]], Runnable[Any , Union [Hashable, list [Hashable]]], ], path_map: Optional [Union [dict [Hashable, str ], list [str ]]] = None , then: Optional [str ] = None , ) -> Self:
add_conditional_edges 源码:https://github.com/langchain-ai/langgraph/blob/main/libs/langgraph/langgraph/graph/state.py
根据源码的定义我们可以非常明确的分析出其调用过程。这里我们要关注path参数,它指的是一个函数调用对象,与普通的节点类似, 这个对象接受图的当前state并返回一个值,根据返回值的不同,来决定路由到哪个节点。比如想构建一个带有路由的图结构,这里我们定义一个 routing_function 作为路由函数,并添加一个新的节点node_c,代码如下所示:
1
2
3
4
5
6
7
8
9
10
11
12
13
14
15
16
17
18
19
20
21
22
23
24
25
26
27
28
29
30
31
32
33
34
from langgraph.graph import START, StateGraph, ENDfrom langgraph.graph import StateGraphfrom IPython.display import Image, displaydef node_a (state ): return {"x" : state["x" ] + 1 } def node_b (state ): return {"x" : state["x" ] - 2 } def node_c (state ): return {"x" : state["x" ] + 1 } def routing_function (): if state["x" ] == 10 : return "node_b" else : return "node_c" builder = StateGraph(dict ) builder.add_node("node_a" , node_a) builder.add_node("node_b" , node_b) builder.add_node("node_c" , node_c) builder.set_entry_point("node_a" ) builder.add_conditional_edges("node_a" , routing_function) graph = builder.compile () display(Image(graph.get_graph(xray=True ).draw_mermaid_png()))
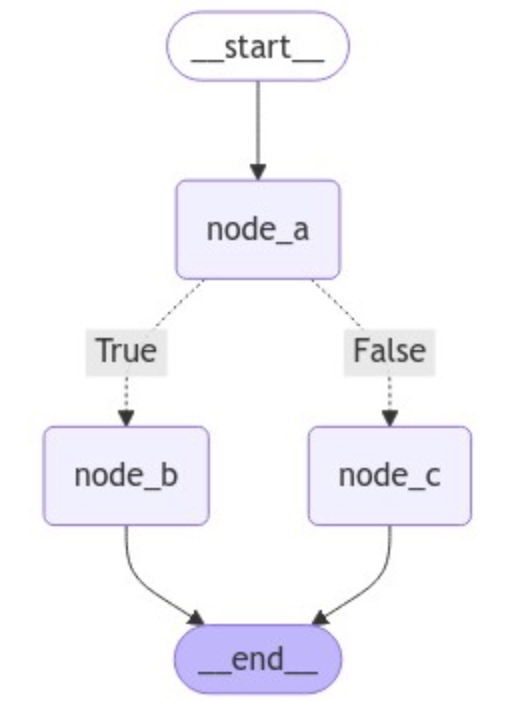
默认情况下,routing_function路由函数的返回值用作将状态发送到下一个的节点(或节点列表)的名称。除此之外,还可以使用path_map参数,通过一个字典的数据结构将routing_function的输出映射到下一个节点的名称。这里改动如下:
1
2
3
4
5
6
7
8
9
10
11
12
13
14
15
16
17
18
19
20
21
22
23
24
25
26
27
28
29
30
31
32
33
34
35
36
37
38
39
40
41
from typing_extensions import TypedDictfrom langgraph.graph import START, StateGraph, ENDfrom langgraph.graph import StateGraphdef node_a (state ): return {"x" : state["x" ] + 1 } def node_b (state ): return {"x" : state["x" ] - 2 } def node_c (state ): return {"x" : state["x" ] + 1 } def routing_function (state ): if state["x" ] == 10 : return True else : return False class GraphState (TypedDict ): x: int builder = StateGraph(GraphState) builder.add_node("node_a" , node_a) builder.add_node("node_b" , node_b) builder.add_node("node_c" , node_c) builder.set_entry_point("node_a" ) builder.add_conditional_edges("node_a" , routing_function, {True : "node_b" , False : "node_c" }) builder.add_edge("node_b" , END) builder.add_edge("node_c" , END) graph = builder.compile () from IPython.display import Image, displaydisplay(Image(graph.get_graph(xray=True ).draw_mermaid_png()))
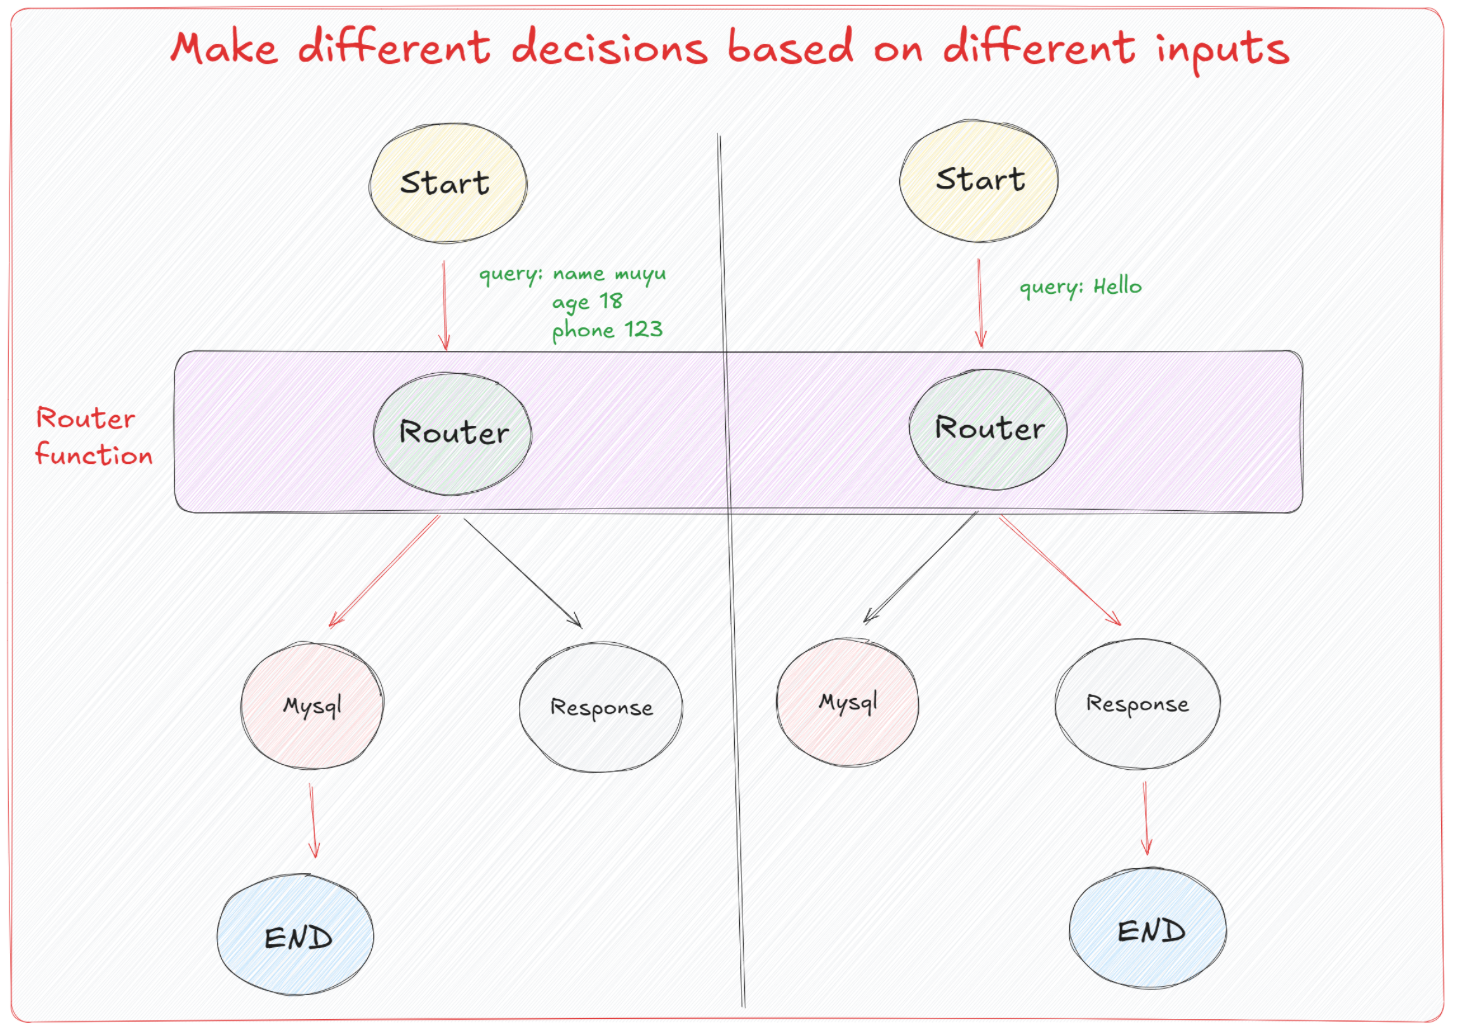
通过上述实践,大家也能体会到在LangGraph中去构建条件边并非难事,我们考虑这样一个现实意义的场景:一般来说,Agent是可以接收各种形式的输入,并通过预设的路由逻辑来确定执行的具体操作。如图所示,Agent的开始节点(Start)接收输入数据,这些输入可以是查询请求(例如“name: muyu, age: 18, phone: 123”或“Hello”)。根据输入的不同,流程通过Router函数进行决策,将不同的输入引导到正确的处理流程。
这里的核心是Router function ,它根据输入数据的结构和内容,动态地决定下一步应该执行的节点。例如,对于具体的查询请求,Router决定需要访问数据库(Mysql节点),而对于简单的问候(如”Hello”),则直接返回一个响应(Response节点)。每个决策路径最终都指向一个结束节点(End)。所以我们要明确的是,在构建实际的Agent时,Router fuction的定义才是最关键且最重要的。 我们需要在这个函数中,基于特定的一些格式或者标识来区分该执行哪一条分支的逻辑。而对于消息的传递,大模型往往是通过结构化输出,引导其在响应的过程中应遵循哪种模式来工作,就类似于工具调用过程。Router就很好的利用到了这个特性,通过结构化输出的特性来控制接下来的分支路径。
这里我们先来了解一下什么是结构化输出。在LangGraph中,实现结构化输出可以通过以下三种有效方式完成:
1
2
3
4
5
6
7
8
9
import getpassimport osif not os.environ.get("OPENAI_API_KEY" ): os.environ["OPENAI_API_KEY" ] = getpass.getpass("Enter your OpenAI API key: " ) from langchain_openai import ChatOpenAIllm = ChatOpenAI(model="gpt-4o-mini" )
1
2
3
4
5
6
7
8
9
10
11
from langchain_core.prompts import ChatPromptTemplateprompt = ChatPromptTemplate.from_messages( [ ( "system" , "Answer the user query. Wrap the output in `json`" , ), ("human" , "{query}" ), ] )
'```json\n{\n "name": "木羽",\n "age": 28,\n "email": "[email protected] ",\n "phone": "1234567052"\n}\n```'
直接通过提示工程让大模型生成特定格式的输出虽然是可行的,但这种方法在复杂的Agent构建流程中非常并不稳定。一个进阶的优化方法是:引入后处理步骤,通过输出解析器来格式化大模型生成的响应。 这种做法可以提高输出的准确性和一致性,这种形式的实现方法如下所示:
1
2
3
4
5
6
7
8
9
10
11
12
13
14
15
16
17
18
19
20
21
22
23
24
25
26
from langchain_core.messages import AIMessageimport jsonimport refrom typing import List def extract_json (message: AIMessage ) -> List [dict ]: """Extracts JSON content from a string where JSON is embedded between \`\`\`json and \`\`\` tags. Parameters: text (str): The text containing the JSON content. Returns: list: A list of extracted JSON strings. """ text = message.content pattern = r"\`\`\`json(.*?)\`\`\`" matches = re.findall(pattern, text, re.DOTALL) try : return [json.loads(match .strip()) for match in matches] except Exception: raise ValueError(f"Failed to parse: {message} " )
1
2
3
4
5
6
7
8
9
10
11
from langchain_core.prompts import ChatPromptTemplateprompt = ChatPromptTemplate.from_messages( [ ( "system" , "Answer the user query. Wrap the output in `json`" , ), ("human" , "{query}" ), ] )
1 chain = prompt | llm | extract_json
[{'name': '木羽', 'age': 18, 'email': '[email protected] ', 'phone': '1234567052'}]
从结果可以明显看出,通过定制化的输出解析器得到的结果会更加的符合预期,而接下来我们要说的是,在LangGraph中我们更常用的,且效果更好的是,直接使用其内置的工具方法:.with_structured_output()。
这个方法通过接受一个定义了所需输出属性的名称、类型和描述的模式作为输入,进而生成一个类似模型的 Runnable。不同于常规模型输出字符串或消息,这个 Runnable 输出一个与输入模式相匹配的对象。可以通过几种方式指定这种架构,包括 TypedDict 类、JSON Schema 或 Pydantic 类。如果采用 TypedDict 或 JSON Schema,Runnable 将输出一个字典;若使用 Pydantic 类,则输出一个 Pydantic 对象。我们可以依次的来实践一下。
我们首先尝试和实践使用Pydantic类做格式化输出,应用的场景是:从文本中提取格式化的数据。
1.1 使用Pydantic做结构化输出 使用Pydantic去限定输出格式,可以确保所有通过此模型处理的数据都会符合指定的结构和数据类型,从而减少数据处理中的错误并增加代码的健壊性。此外,Pydantic的验证系统还会自动确保所有字段都符合预定义的格式,如果输入数据不符合预期,则会抛出错误。比如下面是一个用Pydantic定义用户信息模型的示例:
1
2
3
4
5
6
7
8
9
10
from typing import Optional from pydantic import BaseModel, Fieldclass UserInfo (BaseModel ): """Extracted user information, such as name, age, email, and phone number, if relevant.""" name: str = Field(description="The name of the user" ) age: Optional [int ] = Field(description="The age of the user" ) email: str = Field(description="The email address of the user" ) phone: Optional [str ] = Field(description="The phone number of the user" )
在这个UserInfo模型中:
name(必需): 存储用户的名字。
age(可选): 存储用户的年龄,这是一个可选字段。
email(必需): 存储用户的电子邮件地址。
phone(可选): 存储用户的电话号码,这也是一个可选字段。
对于.with_structured_output()方法,如果我们希望模型返回一个 Pydantic 对象,只需要传入所需的 Pydantic 类即可,即UserInfo,代码如下所示:
1
2
3
4
5
6
7
8
9
import getpassimport osif not os.environ.get("OPENAI_API_KEY" ): os.environ["OPENAI_API_KEY" ] = getpass.getpass("Enter your OpenAI API key: " ) from langchain_openai import ChatOpenAIllm = ChatOpenAI(model="gpt-4o-mini" )
1 structured_llm = llm.with_structured_output(UserInfo)
RunnableBinding(bound=ChatOpenAI(client=<openai.resources.chat.completions.Completions object at 0x00000200F7EB5350>, async_client=<openai.resources.chat.completions.AsyncCompletions object at 0x00000200F7EE9250>, root_client=<openai.OpenAI object at 0x00000200F7CC6CD0>, root_async_client=<openai.AsyncOpenAI object at 0x00000200F7DF7850>, model_name='gpt-4o-mini', model_kwargs={}, openai_api_key=SecretStr('**********')), kwargs={'tools': [{'type': 'function', 'function': {'name': 'UserInfo', 'description': 'Extracted user information, such as name, age, email, and phone number, if relevant.', 'parameters': {'properties': {'name': {'description': 'The name of the user', 'type': 'string'}, 'age': {'anyOf': [{'type': 'integer'}, {'type': 'null'}], 'description': 'The age of the user'}, 'email': {'description': 'The email address of the user', 'type': 'string'}, 'phone': {'anyOf': [{'type': 'string'}, {'type': 'null'}], 'description': 'The phone number of the user'}}, 'required': ['name', 'age', 'email', 'phone'], 'type': 'object'}}}], 'parallel_tool_calls': False, 'tool_choice': {'type': 'function', 'function': {'name': 'UserInfo'}}}, config={}, config_factories=[])
| PydanticToolsParser(first_tool_only=True, tools=[<class '__main__.UserInfo'>])
1 2 3 4 extracted_user_info = structured_llm.invoke("我叫木羽,今年28岁,邮箱地址是[email protected] ,电话是1234567052" ) extracted_user_info
UserInfo(name='木羽', age=28, email='[email protected] ', phone='1234567052')
1 2 3 4 extracted_user_info = structured_llm.invoke("我是哈哈,3岁,邮箱为[email protected] ,电话是1234233052" ) extracted_user_info
UserInfo(name='哈哈', age=3, email='[email protected] ', phone='1234233052')
它返回的是一个UserInfo的Pytantic对象,每个字段中则填充了在原始非结构化文本中提取出来的结构化信息。经过这样的格式化输出呢,对于Router function中,我们就可以通过类似这样的伪代码去继续路由分支的选择,比如:
1 2 3 4 5 if isinstance (extracted_user_info, UserInfo): print ("执行节点A的逻辑" ) else : print ("执行节点B的逻辑" )
执行节点A的逻辑
1
2
3
4
5
6
extracted_user_info = "你好" if isinstance (extracted_user_info, UserInfo): print ("执行节点A的逻辑" ) else : print ("执行节点B的逻辑" )
执行节点B的逻辑
这就是结构化输出对于LangGraph中路由函数逻辑判断的意义所在。除此之外,还有TypedDict 和 JSON Schema能够做到相同的效果,下面我们依次对这两种模式进行尝试。
1.2 使用TypedDict做结构化输出 如果不想使用 Pydantic去明确地验证输出参数,则可以使用 TypedDict 类定义结构化输出的模式。这就可以使用我们上节课详细介绍的特殊Annotated语法,添加对指定字段的默认值和描述。
1
2
3
4
5
6
7
8
9
10
11
from typing import Optional from typing_extensions import Annotated, TypedDictclass UserInfo (TypedDict ): """Extracted user information from text""" name: Annotated[str , ..., "The user's name" ] age: Annotated[Optional [int ], None , "The user's age" ] email: Annotated[str , ..., "The user's email address" ] phone: Annotated[Optional [str ], None , "The user's phone number" ]
1
2
3
4
5
6
structured_llm = llm.with_structured_output(UserInfo) extracted_user_info = structured_llm.invoke("我叫木羽,今年28岁,邮箱地址是[email protected] ,电话是1234567052" ) extracted_user_info
{'name': '木羽', 'age': 28, 'email': '[email protected] ', 'phone': '1234567052'}
使用 TypedDict 创建的“对象”实际上是一个字典。它没有Pydantic模型那样的方法和属性,因此功能相对简单。TypedDict 主要用于静态类型检查,但它不会在运行时进行类型检查,但搭配着LangGraph中已实现的基本验证机制,也是一种不错的方法。
1.3 Json Schema 对于Json Schema格式大家应该最为熟悉,不需要导入或类,可以直接通过字典的形式清楚地准确记录每个参数,但代价是代码会更加冗长。如下所示user_info 的 JSON Schema,用于描述用户信息的结构,包括姓名、年龄、邮箱地址和电话号码。
1 2 3 4 5 6 7 8 9 10 11 12 13 14 15 16 17 18 19 20 21 22 23 24 25 26 27 28 29 30 31 32 33 34 json_schema = { "title" : "user_info" , "description" : "Extracted user information" , "type" : "object" , "properties" : { "name" : { "type" : "string" , "description" : "The user's name" , }, "age" : { "type" : "integer" , "description" : "The user's age" , "default" : None , }, "email" : { "type" : "string" , "description" : "The user's email address" , }, "phone" : { "type" : "string" , "description" : "The user's phone number" , "default" : None , }, }, "required" : ["name" , "email" ], } structured_llm = llm.with_structured_output(json_schema) extracted_user_info = structured_llm.invoke("我叫木羽,今年28岁,邮箱地址是[email protected] ,电话是1234567052" )
{'name': '木羽', 'age': 28, 'email': '[email protected] ', 'phone': '1234567052'}
1.4 结合结构化输出构建路由图 三种不同的结构化输出方法,我们更常使用的是用Pydantic来处理路由决策。在这种策略下,我们可以通过定义一个包含Union类型属性的父模型来灵活地从多种模式中选择适当的路由分支。例如,如果我们想根据输出决定是查询数据库还是直接回答问题,可以创建一个统一的模型来封装可能的输出类型。代码如下所示:
1
2
3
4
5
6
7
8
9
10
11
12
13
14
15
16
17
18
19
20
21
from typing import Union , Optional from pydantic import BaseModel, Fieldclass UserInfo (BaseModel ): """Extracted user information, such as name, age, email, and phone number, if relevant.""" name: str = Field(description="The name of the user" ) age: Optional [int ] = Field(description="The age of the user" ) email: str = Field(description="The email address of the user" ) phone: Optional [str ] = Field(description="The phone number of the user" ) class ConversationalResponse (BaseModel ): """Respond to the user's query in a conversational manner. Be kind and helpful.""" response: str = Field(description="A conversational response to the user's query" ) class FinalResponse (BaseModel ): final_output: Union [UserInfo, ConversationalResponse]
这个扩展后的代码将用于提取和存储用户的基本信息,包括姓名、年龄、电子邮件地址和电话号码的UserInfo模型与用于生成面向用户的交流响应的ConversationalResponse模型统一的放在了FinalResponse模型中,使用Union类型来支持灵活的输出选项。final_output属性可以是UserInfo类型,也可以是ConversationalResponse类型,这使得系统可以根据不同的业务逻辑和用户输入决定输出的具体形式。例如,在用户请求个人数据时可以返回UserInfo,而在普通查询时则提供ConversationalResponse。
1 structured_llm = llm.with_structured_output(FinalResponse)
1 2 3 4 extracted_user_info = structured_llm.invoke("你好" ) extracted_user_info
FinalResponse(final_output=ConversationalResponse(response='你好!有什么我可以帮助你的吗?'))
1 extracted_user_info.final_output.response
'你好!有什么我可以帮助你的吗?'
1 2 3 4 extracted_user_info = structured_llm.invoke("我叫木羽,今年28岁,邮箱地址是[email protected] ,电话是1234567052" ) extracted_user_info
FinalResponse(final_output=UserInfo(name='木羽', age=28, email='[email protected] ', phone='1234567052'))
1 extracted_user_info.final_output
UserInfo(name='木羽', age=28, email='[email protected] ', phone='1234567052')
掌握到这种程度,我们就可以利用这些判别条件作为Router Function来构建决策分支。通过使用Pydantic模型来提取结构化数据,能够在大语言模型(LLM)调用过程中将非结构化文本转换为结构化数据格式。这种转换使得我们构建的流程图能够根据用户的不同输入,智能判断是应当生成常规响应还是执行数据库操作。代码如下所示:
首先,还是定义Pydantic模型以及用于生成格式化输出的大模型实例。
1
2
3
4
5
6
7
8
9
10
11
12
13
14
15
16
17
18
19
20
21
22
23
24
25
26
27
28
29
30
31
32
33
import getpassimport osfrom typing import Union , Optional from pydantic import BaseModel, Fieldfrom langchain_openai import ChatOpenAIclass UserInfo (BaseModel ): """Extracted user information, such as name, age, email, and phone number, if relevant.""" name: str = Field(description="The name of the user" ) age: Optional [int ] = Field(description="The age of the user" ) email: str = Field(description="The email address of the user" ) phone: Optional [str ] = Field(description="The phone number of the user" ) class ConversationalResponse (BaseModel ): """Respond to the user's query in a conversational manner. Be kind and helpful.""" response: str = Field(description="A conversational response to the user's query" ) class FinalResponse (BaseModel ): final_output: Union [UserInfo, ConversationalResponse] if not os.environ.get("OPENAI_API_KEY" ): os.environ["OPENAI_API_KEY" ] = getpass.getpass("Enter your OpenAI API key: " ) llm = ChatOpenAI(model="gpt-4o-mini" )
接下来,考虑到设计的场景中用户需要执行数据库操作,我们首先需要实现一个连接数据库的函数。在这个示例中,我们选择使用MySQL数据库。基于UserInfo模型的定义,构建一个相应的表结构,以便支持后续的数据插入和更新操作。
1
2
3
4
5
6
7
8
9
10
11
12
13
14
15
16
17
18
19
20
21
22
23
24
25
26
27
28
29
30
31
32
from sqlalchemy import create_engine, Table, Column, Integer, String, MetaDatafrom sqlalchemy.orm import declarative_base, sessionmaker from sqlalchemy.orm import sessionmakerBase = declarative_base() class User (Base ): __tablename__ = 'users' id = Column(Integer, primary_key=True ) name = Column(String(50 )) age = Column(Integer) email = Column(String(100 )) phone = Column(String(15 )) DATABASE_URI = 'mysql+pymysql://root:[email protected] /langgraph_agent?charset=utf8mb4' engine = create_engine(DATABASE_URI, echo=True ) Base.metadata.create_all(engine) Session = sessionmaker(bind=engine) session = Session()
2024-10-25 14:15:58,999 INFO sqlalchemy.engine.Engine SELECT DATABASE()
2024-10-25 14:15:58,999 INFO sqlalchemy.engine.Engine [raw sql] {}
2024-10-25 14:15:59,004 INFO sqlalchemy.engine.Engine SELECT @@sql_mode
2024-10-25 14:15:59,005 INFO sqlalchemy.engine.Engine [raw sql] {}
2024-10-25 14:15:59,008 INFO sqlalchemy.engine.Engine SELECT @@lower_case_table_names
2024-10-25 14:15:59,009 INFO sqlalchemy.engine.Engine [raw sql] {}
2024-10-25 14:15:59,015 INFO sqlalchemy.engine.Engine BEGIN (implicit)
2024-10-25 14:15:59,016 INFO sqlalchemy.engine.Engine DESCRIBE `langgraph_agent`.`users`
2024-10-25 14:15:59,016 INFO sqlalchemy.engine.Engine [raw sql] {}
2024-10-25 14:15:59,025 INFO sqlalchemy.engine.Engine COMMIT
如果Mysql服务正常且连接信息填写正确,将会在langgraph_agent数据库中创建出一个User表,如下所示:(下图软件为Navicate,大家可自行下载,下载链接 👉 https://www.navicat.com/en/download/navicat-premium)
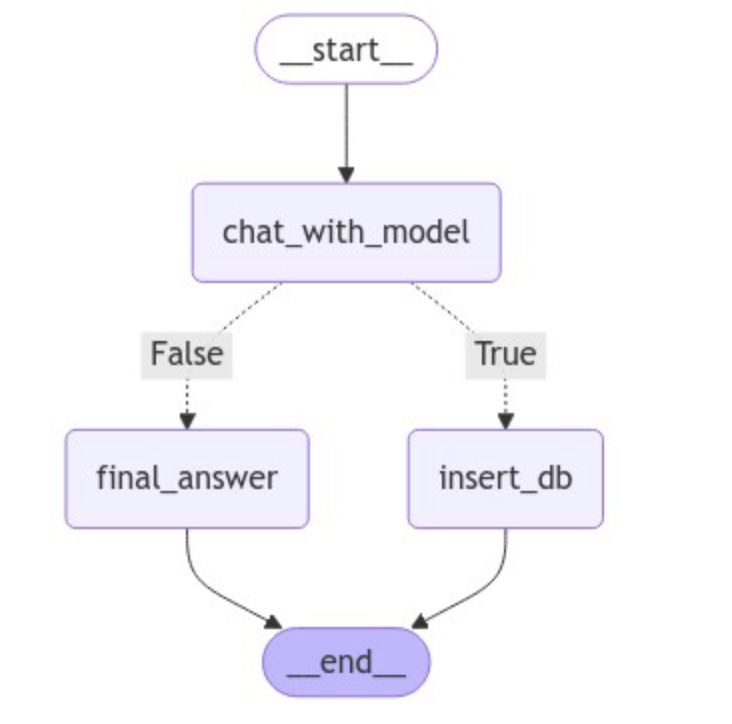
接下来我们定义节点函数,其中chat_with_model作为路由节点将用户输入的文本转化成格式化输出,搭配Router Function构建分支。
1
2
3
4
5
6
7
8
def chat_with_model (state ): """generate structured output""" print (state) print ("-----------------" ) messages = state['messages' ] structured_llm = llm.with_structured_output(FinalResponse) response = structured_llm.invoke(messages) return {"messages" : [response]}
然后分别定义两个分支节点,其中final_answer用于直接生成响应,而insert_db用于执行数据库插入操作。
1
2
3
4
5
6
7
8
9
10
11
12
13
14
15
16
17
18
19
20
21
22
23
24
25
26
def final_answer (state ): """generate natural language responses""" print (state) print ("-----------------" ) messages = state['messages' ][-1 ] response = messages.final_output.response return {"messages" : [response]} def insert_db (state ): """Insert user information into the database""" session = Session() try : result = state['messages' ][-1 ] output = result.final_output user = User(name=output.name, age=output.age, email=output.email, phone=output.phone) session.add(user) session.commit() return {"messages" : [f"数据已成功存储至Mysql数据库。" ]} except Exception as e: session.rollback() return {"messages" : [f"数据存储失败,错误原因:{e} " ]} finally : session.close()
定义好了所有节点函数后,开始构建图。
1
2
3
4
from langgraph.graph import StateGraph, ENDfrom typing import TypedDict, Annotatedimport operatorfrom langchain_core.messages import AnyMessage, SystemMessage, HumanMessage, ToolMessage
1
2
class AgentState (TypedDict ): messages: Annotated[list [AnyMessage], operator.add]
定义generate_branch函数作为Router Function,根据经过chat_with_model节点后产生的不同Pydantic对象,选择连接不同的节点,即final_answer或insert_db。
1
2
3
4
5
6
7
8
def generate_branch (state: AgentState ): result = state['messages' ][-1 ] output = result.final_output if isinstance (output, UserInfo): return True elif isinstance (output, ConversationalResponse): return False
构建图并使用条件边来生成Router。代码如下:
1
2
3
4
5
6
7
8
9
10
11
12
13
14
15
16
17
18
19
20
21
22
23
graph = StateGraph(AgentState) graph.add_node("chat_with_model" , chat_with_model) graph.add_node("final_answer" , final_answer) graph.add_node("insert_db" , insert_db) graph.set_entry_point("chat_with_model" ) graph.add_conditional_edges( "chat_with_model" , generate_branch, {True : "insert_db" , False : "final_answer" } ) graph.set_finish_point("final_answer" ) graph.set_finish_point("insert_db" ) graph = graph.compile ()
可视化图的完整结构,代码如下所示:
1
2
3
from IPython.display import Image, displaydisplay(Image(graph.get_graph(xray=True ).draw_mermaid_png()))
接下来进行测试,首先测试执行插入数据库的条件分支。
1 2 3 4 5 query="我叫木羽,今年28岁,邮箱地址是[email protected] ,电话是1323521313" input_message = {"messages" : [HumanMessage(content=query)]} result = graph.invoke(input_message) result
{'messages': [HumanMessage(content='我叫木羽,今年28岁,邮箱地址是[email protected] ,电话是1323521313', additional_kwargs={}, response_metadata={})]}
-----------------
2024-10-25 14:17:26,495 INFO sqlalchemy.engine.Engine BEGIN (implicit)
2024-10-25 14:17:26,496 INFO sqlalchemy.engine.Engine INSERT INTO users (name, age, email, phone) VALUES (%(name)s, %(age)s, %(email)s, %(phone)s)
2024-10-25 14:17:26,497 INFO sqlalchemy.engine.Engine [generated in 0.00047s] {'name': '木羽', 'age': 28, 'email': '[email protected] ', 'phone': '1323521313'}
2024-10-25 14:17:26,501 INFO sqlalchemy.engine.Engine COMMIT
{'messages': [HumanMessage(content='我叫木羽,今年28岁,邮箱地址是[email protected] ,电话是1323521313', additional_kwargs={}, response_metadata={}),
FinalResponse(final_output=UserInfo(name='木羽', age=28, email='[email protected] ', phone='1323521313')),
'数据已成功存储至Mysql数据库。']}
'数据已成功存储至Mysql数据库。'
而如果正常的问答,则会经过final_answer直接生成响应。
1 2 3 4 5 query="你好,请你介绍一下你自己" input_message = {"messages" : [HumanMessage(content=query)]} result = graph.invoke(input_message) result["messages" ][-1 ]
{'messages': [HumanMessage(content='你好,请你介绍一下你自己', additional_kwargs={}, response_metadata={})]}
-----------------
{'messages': [HumanMessage(content='你好,请你介绍一下你自己', additional_kwargs={}, response_metadata={}), FinalResponse(final_output=ConversationalResponse(response='你好!我是一个人工智能助手,旨在提供信息和帮助解答问题。我可以帮助你获取各种知识,提供建议,或者就你感兴趣的话题进行对话。如果你有什么具体的问题或者想了解的内容,请告诉我!'))]}
-----------------

'你好!我是一个人工智能助手,旨在提供信息和帮助解答问题。我可以帮助你获取各种知识,提供建议,或者就你感兴趣的话题进行对话。如果你有什么具体的问题或者想了解的内容,请告诉我!'
'你好!我是一个人工智能助手,旨在提供信息和帮助解答问题。我可以帮助你获取各种知识,提供建议,或者就你感兴趣的话题进行对话。如果你有什么具体的问题或者想了解的内容,请告诉我!'
1 2 3 4 5 query="请问什么是机器学习" input_message = {"messages" : [HumanMessage(content=query)]} result = graph.invoke(input_message) result["messages" ][-1 ]
{'messages': [HumanMessage(content='请问什么是机器学习', additional_kwargs={}, response_metadata={})]}
-----------------
{'messages': [HumanMessage(content='请问什么是机器学习', additional_kwargs={}, response_metadata={}), FinalResponse(final_output=ConversationalResponse(response='机器学习是一种人工智能的分支,它使计算机能够通过经验自动改进其性能,而无需明确编程。简单来说,机器学习是通过算法分析数据、识别模式并做出决策或预测的一种方法。它通常涉及以下几个步骤:\n\n1. **数据收集**:获取大量的数据,这些数据可以是结构化的(如表格数据)或非结构化的(如图像、文本等)。\n2. **数据预处理**:清理和准备数据,以确保其适合用于训练模型。这个步骤可能包括去除噪声、填补缺失值、标准化等。\n3. **选择模型**:根据问题的性质选择适当的机器学习模型(如回归、分类、聚类等)。\n4. **训练模型**:使用训练数据来调整模型的参数,使其能够识别数据中的模式。\n5. **评估模型**:使用测试数据评估模型的性能,检查其在新数据上的预测能力。\n6. **优化和调整**:根据评估结果对模型进行优化和调整,以提高其准确性和效率。\n\n机器学习在各个领域都有广泛应用,包括图像识别、自然语言处理、推荐系统、医疗诊断等。'))]}
-----------------

'机器学习是一种人工智能的分支,它使计算机能够通过经验自动改进其性能,而无需明确编程。简单来说,机器学习是通过算法分析数据、识别模式并做出决策或预测的一种方法。它通常涉及以下几个步骤:\n\n1. **数据收集**:获取大量的数据,这些数据可以是结构化的(如表格数据)或非结构化的(如图像、文本等)。\n2. **数据预处理**:清理和准备数据,以确保其适合用于训练模型。这个步骤可能包括去除噪声、填补缺失值、标准化等。\n3. **选择模型**:根据问题的性质选择适当的机器学习模型(如回归、分类、聚类等)。\n4. **训练模型**:使用训练数据来调整模型的参数,使其能够识别数据中的模式。\n5. **评估模型**:使用测试数据评估模型的性能,检查其在新数据上的预测能力。\n6. **优化和调整**:根据评估结果对模型进行优化和调整,以提高其准确性和效率。\n\n机器学习在各个领域都有广泛应用,包括图像识别、自然语言处理、推荐系统、医疗诊断等。'
1 2 3 4 5 query="我叫哈哈哈,今年108岁,邮箱地址是[email protected] " input_message = {"messages" : [HumanMessage(content=query)]} result = graph.invoke(input_message) result
{'messages': [HumanMessage(content='我叫哈哈哈,今年108岁,邮箱地址是[email protected] ', additional_kwargs={}, response_metadata={})]}
-----------------
2024-10-25 14:18:01,824 INFO sqlalchemy.engine.Engine BEGIN (implicit)
2024-10-25 14:18:01,824 INFO sqlalchemy.engine.Engine INSERT INTO users (name, age, email, phone) VALUES (%(name)s, %(age)s, %(email)s, %(phone)s)
2024-10-25 14:18:01,825 INFO sqlalchemy.engine.Engine [cached since 35.33s ago] {'name': '哈哈哈', 'age': 108, 'email': '[email protected] ', 'phone': None}
2024-10-25 14:18:01,828 INFO sqlalchemy.engine.Engine COMMIT
{'messages': [HumanMessage(content='我叫哈哈哈,今年108岁,邮箱地址是[email protected] ', additional_kwargs={}, response_metadata={}),
FinalResponse(final_output=UserInfo(name='哈哈哈', age=108, email='[email protected] ', phone=None)),
'数据已成功存储至Mysql数据库。']}
此时可以通过Navicate工具验证,数据已成功插入到本地的Mysql数据库中。
如上示例就是LangGraph中Router的常用使用形式,通过预定义的分支结构,可以根据用户的输入请求灵活适配不同的场景,在这个过程中,结构化输出对于路由至关重要,因为它们确保系统可以可靠地解释大模型的决定并采取行动。这种Router Agent(路由代理)的优势就是可以精准的控制程序链路中的每一个细节,但同时也表现出来了这是一种相对有限的控制级别的代理架构,因为大模型通常只能控制单个决策。 想象一下上面的场景中,如果我们希望定义的insert_db不仅仅只是包含插入数据库,而是有一堆各式各样的工具,比如网络搜索,RAG等等,应该如何进一步的扩展呢? 难道要做对每一个工具在insert_db节点下再通过Router Function做分支判断吗?虽然可行,但总归并不是高效的做法。
由此,我们接下来进一步给大家介绍Tool Calling Agent(工具调用代理)来高效的解决这一问题。
2、工具调用代理 Tool Calling Agent(工具调用代理)是LangGraph支持的第二种AI Agent代理架构。这个代理架构是在Router Agent的基础上,大模型可以自主选择并使用多种工具来完成某个条件分支中的任务。 工具调用大家应该非常熟悉了,当我们希望代理与外部系统交互时,工具就非常有用。外部系统(例如API)通常需要特定的输入模式,而不是自然语言。例如,当我们绑定 API 作为工具时,我们赋予大模型对所需输入模式的感知,大模型就能根据用户的自然语言输入选择调用工具,并将返回符合该工具架构的输出。
我们在之前的课程中已经多次介绍并实践过大模型调用Function calling的完整过程了,所以这里就不再重复的说明和演示。我们直接关注LangGraph中对工具调用的集成和使用方法。
在LangGraph框架中,可以直接使用预构建ToolNode进行工具调用,其内部实现原理和我们之前介绍的手动实现的Function Calling流程思路基本一致,即:
LangGraph ToolNode 源码:http://github.com/langchain-ai/langgraph/blob/main/libs/prebuilt/langgraph/prebuilt/tool_node.py
1
2
3
4
5
6
7
8
tools_by_name = {tool.name: tool for tool in tools} def tool_node (state: dict ): result = [] for tool_call in state["messages" ][-1 ].tool_calls: tool = tools_by_name[tool_call["name" ]] observation = tool.invoke(tool_call["args" ]) result.append(ToolMessage(content=observation, tool_call_id=tool_call["id" ])) return {"messages" : result}
经过ToolNode工具后,其返回的是一个LangChain Runnable对象,会将图形状态(带有消息列表)作为输入并输出状态更新以及工具调用的结果 ,通过这种设计去适配LangGraph中其他的功能组件。比如我们后续要介绍的LangGraph预构建的更高级AI Agent架构 - ReAct,两者搭配起来可以开箱即用,同时通过ToolNode构建的工具对象也能与任何StateGraph一起使用,只要其状态中具有带有适当Reducer的messages键。由此,对于ToolNode的使用,有三个必要的点需要满足,即:
状态必须包含消息列表。 最后一条消息必须是AIMessage。 AIMessage必须填充tool_calls。
我们尝试进行一下实践。首先,既然是工具调用代理,我们就准备一下需要用的外部工具/函数。这里我们使用Serper API去构建实时联网检索的功能。
1
2
3
4
5
6
7
8
9
10
11
12
13
14
15
16
17
18
19
20
21
22
23
24
25
26
import requestsimport jsondef fetch_real_time_info (query ): """Get real-time Internet information""" url = "https://google.serper.dev/search" payload = json.dumps({ "q" : query, "num" : 1 , }) headers = { 'X-API-KEY' : 'xxx' , 'Content-Type' : 'application/json' } response = requests.post(url, headers=headers, data=payload) data = json.loads(response.text) if 'organic' in data: return json.dumps(data['organic' ], ensure_ascii=False ) else : return json.dumps({"error" : "No organic results found" }, ensure_ascii=False )
定义好实时联网检索函数后,我们可以先进行一下连通性测试:
1 2 3 4 query = "Cloud3.5的最新新闻" result = fetch_real_time_info(query) print (result)
[{"title": "Anthropic公司推出的Cloud 3.5 Sonet模型:GPT-40更胜一筹?", "link": "https://heichat.net/zh-CN/blogs/L3z40ClfMls/Anthropic%E5%85%AC%E5%8F%B8%E6%8E%A8%E5%87%BA%E7%9A%84Cloud-3.5-Sonet%E6%A8%A1%E5%9E%8B%EF%BC%9AGPT-40%E6%9B%B4%E8%83%9C%E4%B8%80%E7%AD%B9%EF%BC%9F/", "snippet": "Anthropic公司最近发布了Cloud 3.5 Sonet模型,性能超越GPT-40,尤其在视觉识别方面达到最新水准。这款免费模型带来了新的体验,为人工智能界带来了清新 ...", "date": "Jun 22, 2024", "position": 1}]
如果功能正常,该函数将根据用户的输入,返回实时的网页检索信息,这包括标题、链接、摘要等等有效的信息。而如果想要将普通的函数变成ToolNode可以应用的外部函数,只需要在函数定义时添加@tool装饰器。
1
2
3
4
5
6
7
8
9
10
11
12
13
14
15
16
17
18
19
20
21
from langchain_core.tools import tool@tool def fetch_real_time_info (query ): """Get real-time Internet information""" url = "https://google.serper.dev/search" payload = json.dumps({ "q" : query, "num" : 1 , }) headers = { 'X-API-KEY' : 'xxx' , 'Content-Type' : 'application/json' } response = requests.post(url, headers=headers, data=payload) data = json.loads(response.text) if 'organic' in data: return json.dumps(data['organic' ], ensure_ascii=False ) else : return json.dumps({"error" : "No organic results found" }, ensure_ascii=False )
1
2
3
4
5
print (f''' name: {fetch_real_time_info.name} description: {fetch_real_time_info.description} arguments: {fetch_real_time_info.args} ''' )
name: fetch_real_time_info
description: Get real-time Internet information
arguments: {'query': {'title': 'Query'}}
ToolNode使用消息列表对图状态进行操作。所以它要求消息列表中的最后一条消息是带有tool_calls参数的AIMessage ,比如我们可以手动调用工具节点:
1
2
3
4
5
6
7
8
9
10
11
12
from langchain_core.messages import AIMessagetool_call = { "name" : "fetch_real_time_info" , "args" : {"query" : "Cloud3.5的最新新闻" }, "id" : "tool_call_id" , "type" : "tool_call" , } result = fetch_real_time_info.invoke(tool_call) print (result)
{'messages': [ToolMessage(content='[{"title": "Anthropic公司推出的Cloud 3.5 Sonet模型:GPT-40更胜一筹?", "link": "https://heichat.net/zh-CN/blogs/L3z40ClfMls/Anthropic%E5%85%AC%E5%8F%B8%E6%8E%A8%E5%87%BA%E7%9A%84Cloud-3.5-Sonet%E6%A8%A1%E5%9E%8B%EF%BC%9AGPT-40%E6%9B%B4%E8%83%9C%E4%B8%80%E7%AD%B9%EF%BC%9F/", "snippet": "Anthropic公司最近发布了Cloud 3.5 Sonet模型,性能超越GPT-40,尤其在视觉识别方面达到最新水准。这款免费模型带来了新的体验,为人工智能界带来了清新 ...", "date": "Jun 22, 2024", "position": 1}]', name='fetch_real_time_info', tool_call_id='tool_call_id')]}
同时,如果将多个工具调用同时传递给AIMessage的tool_calls参数:
1
2
3
4
5
6
7
8
9
@tool def get_weather (location ): """Call to get the current weather.""" if location.lower() in ["beijing" ]: return "北京的温度是16度,天气晴朗。" elif location.lower() in ["shanghai" ]: return "上海的温度是20度,部分多云。" else : return "不好意思,并未查询到具体的天气信息。"
1
2
3
4
5
6
7
8
9
10
11
12
13
14
15
16
17
18
19
20
21
22
23
24
25
26
27
28
29
30
31
32
33
34
35
from langchain_core.messages import ToolMessage, AIMessagetools = [fetch_real_time_info, get_weather] tools_by_name = {tool.name: tool for tool in tools} def my_tool_node (state: dict ): """手动实现的 tool_node""" result = [] for tool_call in state["messages" ][-1 ].tool_calls: tool = tools_by_name[tool_call["name" ]] observation = tool.invoke(tool_call["args" ]) result.append(ToolMessage(content=observation, tool_call_id=tool_call["id" ])) return {"messages" : result} message_with_multiple_tool_calls = AIMessage( content="" , tool_calls=[ { "name" : "fetch_real_time_info" , "args" : {"query" : "Cloud3.5的最新新闻" }, "id" : "tool_call_id" , "type" : "tool_call" , }, { "name" : "get_weather" , "args" : {"location" : "beijing" }, "id" : "tool_call_id_2" , "type" : "tool_call" , }, ], ) result = my_tool_node({"messages" : [message_with_multiple_tool_calls]}) print (result)
{'messages': [ToolMessage(content='[{"title": "Claude 5 最新消息汇总:2026 年Anthropic 下一代AI 模型6 大 ...", "link": "https://help.apiyi.com/claude-5-latest-news-2026-features-release.html", "snippet": "本文将为您全面汇总Claude 5 的最新情报,包括泄露的Sonnet 5 \\"Fennec\\" 代号、预计发布时间、性能基准测试数据,以及相比Claude 4.5 Opus 的改进方向。", "date": "3 days ago", "position": 1}]', tool_call_id='tool_call_id'), ToolMessage(content='北京的温度是16度,天气晴朗。', tool_call_id='tool_call_id_2')]}
而Tool Calling Agent的本质原理是:让大模型根据用户的输入,自动的去判断应该使用哪个函数,并实际的执行,最后结合工具的响应结果 + 用户的原始问题作为完整的Prompt生成最终的问题。即如下图所示:
通过ToolNode(tools)可以根据参数来执行函数,并返回结果。而其前一步,根据自然语言生成执行具体某个函数必要参数的过程,则由大模型决定,所以一个完整的基于大模型的工具调用过程应该是,在实例化大模型的时候,就告诉大模型你都有哪些工具可以使用。这个过程可以通过bind_tools函数来实现。代码如下:
1
2
3
4
5
6
7
8
9
10
import getpassimport osfrom langchain_openai import ChatOpenAIfrom langchain_core.prompts import ChatPromptTemplateif not os.environ.get("OPENAI_API_KEY" ): os.environ["OPENAI_API_KEY" ] = getpass.getpass("Enter your OpenAI API key: " ) tools = [fetch_real_time_info, get_weather] llm = ChatOpenAI(model="gpt-4o" )
1 model_with_tools = llm.bind_tools(tools)
RunnableBinding(bound=ChatOpenAI(client=<openai.resources.chat.completions.Completions object at 0x00000200FA136350>, async_client=<openai.resources.chat.completions.AsyncCompletions object at 0x00000200FA131450>, root_client=<openai.OpenAI object at 0x00000200FA0FA510>, root_async_client=<openai.AsyncOpenAI object at 0x00000200FA0FB590>, model_name='gpt-4o', model_kwargs={}, openai_api_key=SecretStr('**********')), kwargs={'tools': [{'type': 'function', 'function': {'name': 'fetch_real_time_info', 'description': 'Get real-time Internet information', 'parameters': {'properties': {'query': {}}, 'required': ['query'], 'type': 'object'}}}, {'type': 'function', 'function': {'name': 'get_weather', 'description': 'Call to get the current weather.', 'parameters': {'properties': {'location': {}}, 'required': ['location'], 'type': 'object'}}}]}, config={}, config_factories=[])
{'tools': [{'type': 'function',
   'function': {'name': 'fetch_real_time_info',
    'description': 'Get real-time Internet information',
    'parameters': {'properties': {'query': {}},
     'required': ['query'],
     'type': 'object'}}},
  {'type': 'function',
   'function': {'name': 'get_weather',
    'description': 'Call to get the current weather.',
    'parameters': {'properties': {'location': {}},
     'required': ['location'],
     'type': 'object'}}}]}
1 model_with_tools.invoke("Cloud3.5的最新新闻" ).tool_calls
[{'name': 'fetch_real_time_info',
  'args': {'query': 'Cloud3.5最新新闻'},
  'id': 'call_xIVN2dTDdo0pSMg9A8ZCL4XF',
  'type': 'tool_call'}]
1 model_with_tools.invoke("北京现在多少度呀?" ).tool_calls
[{'name': 'get_weather',
  'args': {'location': '北京'},
  'id': 'call_GwQSyXpgNiwmW4fKeqVXWPb6',
  'type': 'tool_call'}]
由此可见,借助大模型可以正确的填充tool_calls信息 ,因此我们可以将其直接传递给ToolNode,从而完成完整的Tool Calling Agent链路。代码如下(注意,tool_node.invoke在langgraph1.0执行会报错缺少有关上下文信息,这里仅作展示):
1 tool_node.invoke({"messages" : [model_with_tools.invoke("Cloud3.5的最新新闻" )]})
{'messages': [ToolMessage(content='[{"title": "Introducing Claude 3.5 Sonnet - Anthropic", "link": "https://www.anthropic.com/news/claude-3-5-sonnet", "snippet": "Claude 3.5 Sonnet raises the industry bar for intelligence, outperforming competitor models and Claude 3 Opus on a wide range of evaluations.", "date": "Jun 20, 2024", "position": 1}]', name='fetch_real_time_info', tool_call_id='call_xrc3hXM2VnlX2vwMyNiqDiUa')]}
1 tool_node.invoke({"messages" : [model_with_tools.invoke("北京现在多少度呀" )]})
{'messages': [ToolMessage(content='不好意思,并未查询到具体的天气信息。', name='get_weather', tool_call_id='call_ea009LrGFAmv3Kx4iySoZAxU')]}
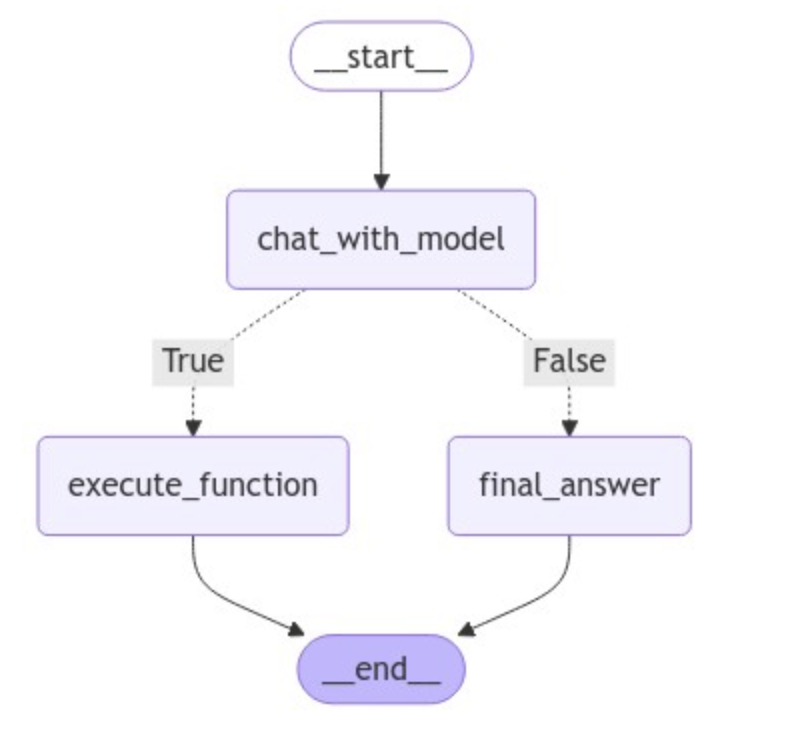
接下来,我们来构建完整的Tool Calling Agent。这里我们对Router Agent实现的图做进一步的升级,即用户输入问题后,如果不需要外部工具的信息,则直接生成回复,否则,则进入一个工具库中,选择最合适的工具执行,并返回最终的响应。因此,我们首先来定义工具库:
1
2
3
4
5
6
7
8
9
10
11
12
13
14
15
16
17
18
19
20
21
22
23
24
from pydantic import BaseModel, Fieldclass SearchQuery (BaseModel ): query: str = Field(description="Questions for networking queries" ) @tool(args_schema = SearchQuery ) def fetch_real_time_info (query ): """Get real-time Internet information""" url = "https://google.serper.dev/search" payload = json.dumps({ "q" : query, "num" : 1 , }) headers = { 'X-API-KEY' : 'xxx' , 'Content-Type' : 'application/json' } response = requests.post(url, headers=headers, data=payload) data = json.loads(response.text) if 'organic' in data: return json.dumps(data['organic' ], ensure_ascii=False ) else : return json.dumps({"error" : "No organic results found" }, ensure_ascii=False )
1
2
3
4
5
6
7
8
9
10
11
12
class WeatherLoc (BaseModel ): location: str = Field(description="The location name of the city" ) @tool(args_schema = WeatherLoc ) def get_weather (location ): """Call to get the current weather.""" if location.lower() in ["beijing" ]: return "北京的温度是16度,天气晴朗。" elif location.lower() in ["shanghai" ]: return "上海的温度是20度,部分多云。" else : return "不好意思,并未查询到具体的天气信息。"
1
2
3
4
5
6
7
8
9
10
11
12
13
14
15
16
17
18
19
20
21
22
23
24
class UserInfo (BaseModel ): """Extracted user information, such as name, age, email, and phone number, if relevant.""" name: str = Field(description="The name of the user" ) age: Optional [int ] = Field(description="The age of the user" ) email: str = Field(description="The email address of the user" ) phone: Optional [str ] = Field(description="The phone number of the user" ) @tool(args_schema = UserInfo ) def insert_db (name, age, email, phone ): """Insert user information into the database, The required parameters are name, age, email, phone""" session = Session() try : user = User(name=name, age=age, email=email, phone=phone) session.add(user) session.commit() return {"messages" : [f"数据已成功存储至Mysql数据库。" ]} except Exception as e: session.rollback() return {"messages" : [f"数据存储失败,错误原因:{e} " ]} finally : session.close()
三个工具定义完毕后,我们将其传递给ToolNode,并进行大模型的实例化。
1
2
tools = [insert_db, fetch_real_time_info, get_weather] tool_node = ToolNode(tools)
tools(tags=None, recurse=True, func_accepts_config=True, func_accepts={'writer': False, 'store': True}, tools_by_name={'insert_db': StructuredTool(name='insert_db', description='Insert user information into the database, The required parameters are name, age, email, phone', args_schema=<class '__main__.UserInfo'>, func=<function insert_db at 0x00000200FA19F060>), 'fetch_real_time_info': StructuredTool(name='fetch_real_time_info', description='Get real-time Internet information', args_schema=<class '__main__.SearchQuery'>, func=<function fetch_real_time_info at 0x00000200FA19F9C0>), 'get_weather': StructuredTool(name='get_weather', description='Call to get the current weather.', args_schema=<class '__main__.WeatherLoc'>, func=<function get_weather at 0x00000200FA19FBA0>)}, tool_to_state_args={'insert_db': {}, 'fetch_real_time_info': {}, 'get_weather': {}}, tool_to_store_arg={'insert_db': None, 'fetch_real_time_info': None, 'get_weather': None}, handle_tool_errors=True)
1
2
3
4
5
6
7
8
9
10
11
12
import getpassimport osfrom langchain_openai import ChatOpenAIfrom langchain_core.prompts import ChatPromptTemplateif not os.environ.get("OPENAI_API_KEY" ): os.environ["OPENAI_API_KEY" ] = getpass.getpass("Enter your OpenAI API key: " ) llm = ChatOpenAI(model="gpt-4o" ) model_with_tools = llm.bind_tools(tools)
这里仍然使用Pydantic来做结构化输出,帮助Router Function来选择路径分支。
1 2 3 4 5 6 7 8 9 class ConversationalResponse (BaseModel ): """Respond to the user's query in a conversational manner. Be kind and helpful.""" response: str = Field(description="A conversational response to the user's query" ) class FinalResponse (BaseModel ): final_output: Union [ConversationalResponse, SearchQuery, WeatherLoc, UserInfo]
依次定义三个节点函数:
1
2
3
4
5
6
7
8
def chat_with_model (state ): """generate structured output""" print (state) print ("-----------------" ) messages = state['messages' ] structured_llm = llm.with_structured_output(FinalResponse) response = structured_llm.invoke(messages) return {"messages" : [response]}
1
2
3
4
5
6
7
def final_answer (state ): """generate natural language responses""" print (state) print ("-----------------" ) messages = state['messages' ][-1 ] response = messages.final_output.response return {"messages" : [response]}
1
2
3
4
5
6
7
8
9
def execute_function (state ): """generate natural language responses""" print (state) print ("-----------------" ) messages = state['messages' ][-1 ].final_output response = tool_node.invoke({"messages" : [model_with_tools.invoke(str (messages))]}) print (f"response:{response} " ) response = response["messages" ][0 ].content return {"messages" : [response]}
定义图的状态模式。
1
2
class AgentState (TypedDict ): messages: Annotated[list [AnyMessage], operator.add]
定义generate_branch函数作为Router Function,根据经过chat_with_model节点后产生的不同Pydantic对象,选择连接不同的节点,即final_answer或insert_db。
1
2
3
4
5
6
7
8
def generate_branch (state: AgentState ): result = state['messages' ][-1 ] output = result.final_output if isinstance (output, ConversationalResponse): return False else : return True
构建图并使用条件边来生成Router。代码如下:
1
2
3
4
5
6
7
8
9
10
11
12
13
14
15
16
17
18
19
20
21
22
23
graph = StateGraph(AgentState) graph.add_node("chat_with_model" , chat_with_model) graph.add_node("final_answer" , final_answer) graph.add_node("execute_function" , execute_function) graph.set_entry_point("chat_with_model" ) graph.add_conditional_edges( "chat_with_model" , generate_branch, {True : "execute_function" , False : "final_answer" } ) graph.set_finish_point("final_answer" ) graph.set_finish_point("execute_function" ) graph = graph.compile ()
1
2
3
from IPython.display import Image, displaydisplay(Image(graph.get_graph(xray=True ).draw_mermaid_png()))
完成图的编译后,便可以开始进行功能测试,这里我们选择不同的输入场景,以测试是否可以正确的进入到指定的功能函数中完成需求。
1 2 3 4 5 query="你好,请你介绍一下你自己" input_message = {"messages" : [HumanMessage(content=query)]} result = graph.invoke(input_message) result
{'messages': [HumanMessage(content='你好,请你介绍一下你自己', additional_kwargs={}, response_metadata={})]}
-----------------
{'messages': [HumanMessage(content='你好,请你介绍一下你自己', additional_kwargs={}, response_metadata={}), FinalResponse(final_output=ConversationalResponse(response='你好!我是一个智能助手,旨在提供信息和帮助,回答你的问题,并协助完成各种任务。如果你有任何问题或需要帮助,请随时告诉我!'))]}
-----------------

{'messages': [HumanMessage(content='你好,请你介绍一下你自己', additional_kwargs={}, response_metadata={}),
  FinalResponse(final_output=ConversationalResponse(response='你好!我是一个智能助手,旨在提供信息和帮助,回答你的问题,并协助完成各种任务。如果你有任何问题或需要帮助,请随时告诉我!')),
  '你好!我是一个智能助手,旨在提供信息和帮助,回答你的问题,并协助完成各种任务。如果你有任何问题或需要帮助,请随时告诉我!']}
'你好!我是一个智能助手,旨在提供信息和帮助,回答你的问题,并协助完成各种任务。如果你有任何问题或需要帮助,请随时告诉我!'
1 2 3 4 5 query="帮我查一下Cloud3.5的最新新闻" input_message = {"messages" : [HumanMessage(content=query)]} result = graph.invoke(input_message) result
{'messages': [HumanMessage(content='帮我查一下Cloud3.5的最新新闻', additional_kwargs={}, response_metadata={})]}
-----------------
{'messages': [HumanMessage(content='帮我查一下Cloud3.5的最新新闻', additional_kwargs={}, response_metadata={}), FinalResponse(final_output=SearchQuery(query='Cloud3.5的最新新闻'))]}
-----------------
messages:query='Cloud3.5的最新新闻'
response:{'messages': [ToolMessage(content='[{"title": "Anthropic公司推出的Cloud 3.5 Sonet模型:GPT-40更胜一筹?", "link": "https://heichat.net/zh-CN/blogs/L3z40ClfMls/Anthropic%E5%85%AC%E5%8F%B8%E6%8E%A8%E5%87%BA%E7%9A%84Cloud-3.5-Sonet%E6%A8%A1%E5%9E%8B%EF%BC%9AGPT-40%E6%9B%B4%E8%83%9C%E4%B8%80%E7%AD%B9%EF%BC%9F/", "snippet": "Anthropic公司最近发布了Cloud 3.5 Sonet模型,性能超越GPT-40,尤其在视觉识别方面达到最新水准。这款免费模型带来了新的体验,为人工智能界带来了清新 ...", "date": "Jun 22, 2024", "position": 1}]', name='fetch_real_time_info', tool_call_id='call_q8fQvYG2IkqyTlcab2THU7CY')]}

{'messages': [HumanMessage(content='帮我查一下Cloud3.5的最新新闻', additional_kwargs={}, response_metadata={}),
  FinalResponse(final_output=SearchQuery(query='Cloud3.5的最新新闻')),
  '[{"title": "Anthropic公司推出的Cloud 3.5 Sonet模型:GPT-40更胜一筹?", "link": "https://heichat.net/zh-CN/blogs/L3z40ClfMls/Anthropic%E5%85%AC%E5%8F%B8%E6%8E%A8%E5%87%BA%E7%9A%84Cloud-3.5-Sonet%E6%A8%A1%E5%9E%8B%EF%BC%9AGPT-40%E6%9B%B4%E8%83%9C%E4%B8%80%E7%AD%B9%EF%BC%9F/", "snippet": "Anthropic公司最近发布了Cloud 3.5 Sonet模型,性能超越GPT-40,尤其在视觉识别方面达到最新水准。这款免费模型带来了新的体验,为人工智能界带来了清新 ...", "date": "Jun 22, 2024", "position": 1}]']}
'[{"title": "Anthropic公司推出的Cloud 3.5 Sonet模型:GPT-40更胜一筹?", "link": "https://heichat.net/zh-CN/blogs/L3z40ClfMls/Anthropic%E5%85%AC%E5%8F%B8%E6%8E%A8%E5%87%BA%E7%9A%84Cloud-3.5-Sonet%E6%A8%A1%E5%9E%8B%EF%BC%9AGPT-40%E6%9B%B4%E8%83%9C%E4%B8%80%E7%AD%B9%EF%BC%9F/", "snippet": "Anthropic公司最近发布了Cloud 3.5 Sonet模型,性能超越GPT-40,尤其在视觉识别方面达到最新水准。这款免费模型带来了新的体验,为人工智能界带来了清新 ...", "date": "Jun 22, 2024", "position": 1}]'
1 2 3 4 5 query="北京的天气怎么样?" input_message = {"messages" : [HumanMessage(content=query)]} result = graph.invoke(input_message) result
{'messages': [HumanMessage(content='北京的天气怎么样?', additional_kwargs={}, response_metadata={})]}
-----------------
{'messages': [HumanMessage(content='北京的天气怎么样?', additional_kwargs={}, response_metadata={}), FinalResponse(final_output=WeatherLoc(location='北京'))]}
-----------------
messages:location='北京'
response:{'messages': [ToolMessage(content='不好意思,并未查询到具体的天气信息。', name='get_weather', tool_call_id='call_iPGBLyWl8ZXVuPJYF5r7GRjC')]}

{'messages': [HumanMessage(content='北京的天气怎么样?', additional_kwargs={}, response_metadata={}),
  FinalResponse(final_output=WeatherLoc(location='北京')),
  '不好意思,并未查询到具体的天气信息。']}
'不好意思,并未查询到具体的天气信息。'
1 2 3 4 5 query="我是木羽,今年18,电话号是138292133,邮箱是[email protected] " input_message = {"messages" : [HumanMessage(content=query)]} result = graph.invoke(input_message) result
{'messages': [HumanMessage(content='我是木羽,今年18,电话号是138292133,邮箱是[email protected] ', additional_kwargs={}, response_metadata={})]}
-----------------
{'messages': [HumanMessage(content='我是木羽,今年18,电话号是138292133,邮箱是[email protected] ', additional_kwargs={}, response_metadata={}), FinalResponse(final_output=UserInfo(name='木羽', age=18, email='[email protected] ', phone='138292133'))]}
-----------------
messages:name='木羽' age=18 email='[email protected] ' phone='138292133'
2024-10-25 14:50:07,095 INFO sqlalchemy.engine.Engine BEGIN (implicit)
2024-10-25 14:50:07,119 INFO sqlalchemy.engine.Engine INSERT INTO users (name, age, email, phone) VALUES (%(name)s, %(age)s, %(email)s, %(phone)s)
2024-10-25 14:50:07,120 INFO sqlalchemy.engine.Engine [cached since 1961s ago] {'name': '木羽', 'age': 18, 'email': '[email protected] ', 'phone': '138292133'}
2024-10-25 14:50:07,124 INFO sqlalchemy.engine.Engine COMMIT
response:{'messages': [ToolMessage(content='{"messages": ["数据已成功存储至Mysql数据库。"]}', name='insert_db', tool_call_id='call_7mkG3MaGgmMTA1mQKFcrjqek')]}
{'messages': [HumanMessage(content='我是木羽,今年18,电话号是138292133,邮箱是[email protected] ', additional_kwargs={}, response_metadata={}),
FinalResponse(final_output=UserInfo(name='木羽', age=18, email='[email protected] ', phone='138292133')),
'{"messages": ["数据已成功存储至Mysql数据库。"]}']}
当然,工具调用的过程也可以手动进行实现,我们只需要进行适当的逻辑修改即可,如下示例所示:
1
2
3
4
5
6
7
8
9
10
11
12
13
14
15
16
17
18
19
20
21
22
23
24
25
26
27
28
29
30
31
32
33
34
35
36
37
38
39
40
41
42
43
44
45
46
47
48
49
50
51
52
53
54
55
56
57
58
59
60
61
62
63
class SearchQuery (BaseModel ): query: str = Field(description="Questions for networking queries" ) class WeatherLoc (BaseModel ): location: str = Field(description="The location name of the city" ) class UserInfo (BaseModel ): """Extracted user information, such as name, age, email, and phone number, if relevant.""" name: str = Field(description="The name of the user" ) age: Optional [int ] = Field(description="The age of the user" ) email: str = Field(description="The email address of the user" ) phone: Optional [str ] = Field(description="The phone number of the user" ) @tool(args_schema = SearchQuery ) def fetch_real_time_info (query ): """Get real-time Internet information""" url = "https://google.serper.dev/search" payload = json.dumps({ "q" : query, "num" : 1 , }) headers = { 'X-API-KEY' : 'xxx' , 'Content-Type' : 'application/json' } response = requests.post(url, headers=headers, data=payload) data = json.loads(response.text) if 'organic' in data: return json.dumps(data['organic' ], ensure_ascii=False ) else : return json.dumps({"error" : "No organic results found" }, ensure_ascii=False ) @tool(args_schema = WeatherLoc ) def get_weather (location ): """Call to get the current weather.""" if location.lower() in ["beijing" ]: return "北京的温度是16度,天气晴朗。" elif location.lower() in ["shanghai" ]: return "上海的温度是20度,部分多云。" else : return "不好意思,并未查询到具体的天气信息。" @tool(args_schema = UserInfo ) def insert_db (name, age, email, phone ): """Insert user information into the database, The required parameters are name, age, email, phone""" session = Session() try : user = User(name=name, age=age, email=email, phone=phone) session.add(user) session.commit() return {"messages" : [f"数据已成功存储至Mysql数据库。" ]} except Exception as e: session.rollback() return {"messages" : [f"数据存储失败,错误原因:{e} " ]} finally : session.close()
1
2
3
4
5
print (f''' name: {fetch_real_time_info.name} description: {fetch_real_time_info.description} arguments: {fetch_real_time_info.args} ''' )
name: fetch_real_time_info
description: Get real-time Internet information
arguments: {'query': {'description': 'Questions for networking queries', 'title': 'Query', 'type': 'string'}}
1
2
3
4
from langgraph.graph import StateGraph, ENDfrom typing import TypedDict, Annotatedimport operatorfrom langchain_core.messages import AnyMessage, SystemMessage, HumanMessage, ToolMessage
1
2
3
4
5
6
7
8
9
import getpassimport osif not os.environ.get("OPENAI_API_KEY" ): os.environ["OPENAI_API_KEY" ] = getpass.getpass("Enter your OpenAI API key: " ) from langchain_openai import ChatOpenAIllm = ChatOpenAI(model="gpt-4o-mini" )
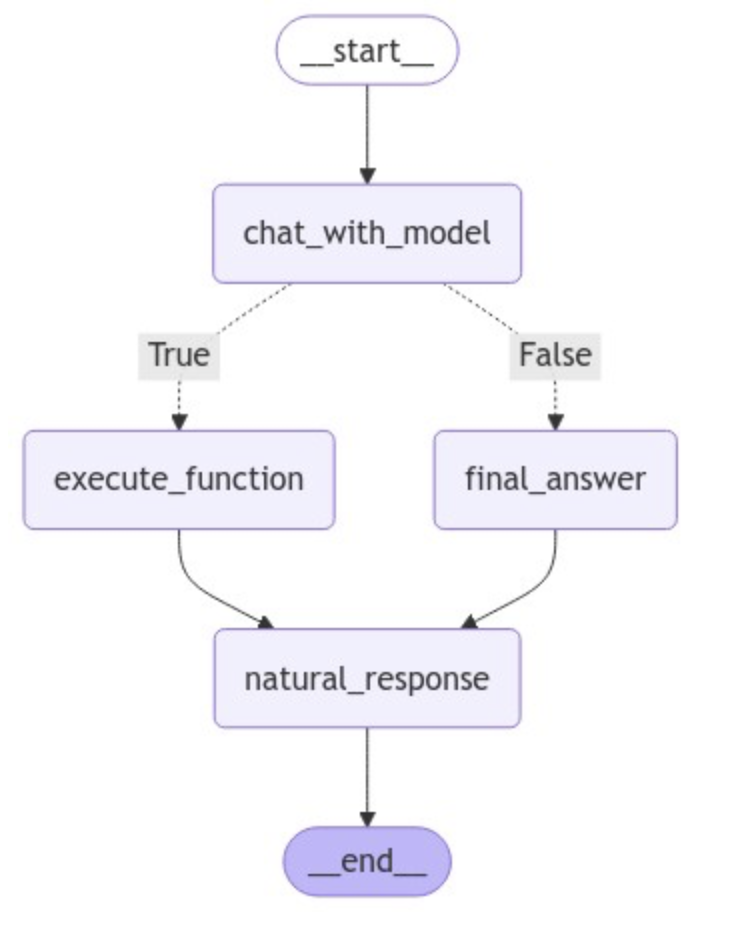
1
2
3
4
5
def chat_with_model (state ): """generate structured output""" messages = state['messages' ] response = llm.invoke(messages) return {"messages" : [response]}
1
2
3
4
5
6
7
8
9
10
11
12
def execute_function (state: AgentState ): tool_calls = state['messages' ][-1 ].tool_calls results = [] tools = [insert_db, fetch_real_time_info, get_weather] tools = {t.name: t for t in tools} for t in tool_calls: if not t['name' ] in tools: result = "bad tool name, retry" else : result = tools[t['name' ]].invoke(t['args' ]) results.append(ToolMessage(tool_call_id=t['id' ], name=t['name' ], content=str (result))) return {'messages' : results}
1
2
3
4
def final_answer (state ): """generate natural language responses""" messages = state['messages' ][-1 ] return {"messages" : [messages]}
1 2 3 4 SYSTEM_PROMPT = """ Please summarize the information obtained so far and generate a professional response. Note, please reply in Chinese. """
1
2
3
4
5
6
def natural_response (state ): """generate final language responses""" messages = state['messages' ][-1 ] messages = [SystemMessage(content=SYSTEM_PROMPT)] + [HumanMessage(content=messages.content)] response = llm.invoke(messages) return {"messages" : [response]}
1
2
3
def exists_function_calling (state: AgentState ): result = state['messages' ][-1 ] return len (result.tool_calls) > 0
1
2
class AgentState (TypedDict ): messages: Annotated[list [AnyMessage], operator.add]
1
2
3
4
5
6
7
8
9
10
11
12
13
14
15
16
17
18
19
20
21
22
23
24
25
26
from IPython.display import Image, displaygraph = StateGraph(AgentState) graph.add_node("chat_with_model" , chat_with_model) graph.add_node("execute_function" , execute_function) graph.add_node("final_answer" , final_answer) graph.add_node("natural_response" , natural_response) graph.set_entry_point("chat_with_model" ) graph.add_conditional_edges( "chat_with_model" , exists_function_calling, {True : "execute_function" , False : "final_answer" } ) graph.add_edge("execute_function" , "natural_response" ) graph.add_edge("final_answer" , "natural_response" ) graph.set_finish_point("natural_response" ) graph = graph.compile () display(Image(graph.get_graph(xray=True ).draw_mermaid_png()))
1
2
3
tools = [insert_db, fetch_real_time_info, get_weather] llm = llm.bind_tools(tools)
1
2
3
messages = [HumanMessage(content="你好,请你介绍一下你自己" )] result = graph.invoke({"messages" : messages}) result["messages" ][-1 ].content
'你好!很高兴见到你。作为一个人工智能助手,我能够帮助你解决问题、提供信息以及执行各种任务。如果你有任何具体问题或需要帮助的地方,请随时告诉我,我会尽力为你提供支持!'
1
2
3
messages = [HumanMessage(content="Cloud3.5的最新新闻" )] result = graph.invoke({"messages" : messages}) result["messages" ][-1 ].content
'根据最新的信息,Anthropic公司推出了Cloud 3.5 Sonet模型,标志着人工智能领域的又一重大进展。该模型被认为在性能和开放速度上对GPT-40构成了挑战,显示了未来人工智能产品的发展趋势。相关的详细信息可以通过以下链接访问:[Cloud 3.5 Sonet模型](https://heichat.net/zh-CN/blogs/L3z40ClfMls/Anthropic%E5%85%AC%E5%8F%B8%E6%8E%A8%E5%87%BA%E7%9A%84Cloud-3.5-Sonet%E6%A8%A1%E5%9E%8B%EF%BC%9AGPT-40%E6%9B%B4%E8%83%9C%E4%B8%80%E7%AD%B9%EF%BC%9F/)。\n\n如需进一步的信息或讨论,请随时告知。'
1
2
3
messages = [HumanMessage(content="我是木羽,28岁,电话是133232,有问题随时联系" )] result = graph.invoke({"messages" : messages}) result["messages" ][-1 ].content
2024-10-25 15:14:45,169 INFO sqlalchemy.engine.Engine BEGIN (implicit)
2024-10-25 15:14:45,171 INFO sqlalchemy.engine.Engine INSERT INTO users (name, age, email, phone) VALUES (%(name)s, %(age)s, %(email)s, %(phone)s)
2024-10-25 15:14:45,172 INFO sqlalchemy.engine.Engine [cached since 3439s ago] {'name': '木羽', 'age': 28, 'email': '', 'phone': '133232'}
2024-10-25 15:14:45,175 INFO sqlalchemy.engine.Engine COMMIT

'数据已成功存储至MySQL数据库。请问您还有其他需要帮助的地方吗?'
以上就是两个基于LangGraph实现的Tool Calling Agent代理架构,从整体上看,无论是对于图结构,还是工具的接入,可扩展性都非常高,使用这个代理架构需要注意的是Router Function的分支判断,除此之外,对于工具调用而言,因为调用工具的参数是由大模型根据用户输入的自然语言生成的,所以一定会存在尝试调用不存在的工具,或者无法返回与请求的架构匹配的参数等边缘情况,会直接导致整个图的运行中断。这一部分进阶优化的内容,我们在下一小节再进行详细的介绍和实践。